element14 Community
element14 Community
    Register Log In
  • Site
  • Search
  • Log In Register
  • About Us
  • Community Hub
    Community Hub
    • What's New on element14
    • Feedback and Support
    • Benefits of Membership
    • Personal Blogs
    • Members Area
    • Achievement Levels
  • Learn
    Learn
    • Ask an Expert
    • eBooks
    • element14 presents
    • Learning Center
    • Tech Spotlight
    • STEM Academy
    • Webinars, Training and Events
    • Learning Groups
  • Technologies
    Technologies
    • 3D Printing
    • FPGA
    • Industrial Automation
    • Internet of Things
    • Power & Energy
    • Sensors
    • Technology Groups
  • Challenges & Projects
    Challenges & Projects
    • Design Challenges
    • element14 presents Projects
    • Project14
    • Arduino Projects
    • Raspberry Pi Projects
    • Project Groups
  • Products
    Products
    • Arduino
    • Avnet Boards Community
    • Dev Tools
    • Manufacturers
    • Multicomp Pro
    • Product Groups
    • Raspberry Pi
    • RoadTests & Reviews
  • Store
    Store
    • Visit Your Store
    • Choose another store...
      • Europe
      •  Austria (German)
      •  Belgium (Dutch, French)
      •  Bulgaria (Bulgarian)
      •  Czech Republic (Czech)
      •  Denmark (Danish)
      •  Estonia (Estonian)
      •  Finland (Finnish)
      •  France (French)
      •  Germany (German)
      •  Hungary (Hungarian)
      •  Ireland
      •  Israel
      •  Italy (Italian)
      •  Latvia (Latvian)
      •  
      •  Lithuania (Lithuanian)
      •  Netherlands (Dutch)
      •  Norway (Norwegian)
      •  Poland (Polish)
      •  Portugal (Portuguese)
      •  Romania (Romanian)
      •  Russia (Russian)
      •  Slovakia (Slovak)
      •  Slovenia (Slovenian)
      •  Spain (Spanish)
      •  Sweden (Swedish)
      •  Switzerland(German, French)
      •  Turkey (Turkish)
      •  United Kingdom
      • Asia Pacific
      •  Australia
      •  China
      •  Hong Kong
      •  India
      •  Korea (Korean)
      •  Malaysia
      •  New Zealand
      •  Philippines
      •  Singapore
      •  Taiwan
      •  Thailand (Thai)
      • Americas
      •  Brazil (Portuguese)
      •  Canada
      •  Mexico (Spanish)
      •  United States
      Can't find the country/region you're looking for? Visit our export site or find a local distributor.
  • Translate
  • Profile
  • Settings
Test Instrumentation
  • Challenges & Projects
  • Project14
  • Test Instrumentation
  • More
  • Cancel
Test Instrumentation
Blog µBOSS .... Test Instrumentation ... micro:bit
  • Blog
  • Forum
  • Documents
  • Events
  • Polls
  • Files
  • Members
  • Mentions
  • Sub-Groups
  • Tags
  • More
  • Cancel
  • New
Join Test Instrumentation to participate - click to join for free!
  • Share
  • More
  • Cancel
Group Actions
  • Group RSS
  • More
  • Cancel
Engagement
  • Author Author: dougw
  • Date Created: 12 Oct 2018 12:05 AM Date Created
  • Views 5052 views
  • Likes 15 likes
  • Comments 33 comments
  • doug wong
  • micro:bit of sense system
  • bbc micro:bit
  • advanced micro:bit projects
  • microbit projects
  • microbit
  • µboss
  • advanced_microbit_projects
  • diytestinstruch
Related
Recommended

µBOSS .... Test Instrumentation ... micro:bit

dougw
dougw
12 Oct 2018
image

Test Instrumentation

Enter Your Electronics & Design Project for a chance to win a Grand Prize for Originality, a Tool Set, and a $100 Shopping Cart!

Back to The Project14 homepage image

Project14 Home
Monthly Themes
Monthly Theme Poll


This Project14 blog is about turning a BBC micro:bit into a test instrument. I call this a micro:bit of sense system or µBOSS.

The micro:bit already has a nice set of sensors but they aren't very easy to read on the built in LED display, so I thought I would display all the sensor readings on an LCD, turning it into a test instrument that has the following capabilities:

  • Thermometer
  • Volt Meter
  • Compass
  • Digital Level

Additional features include a lithium-polymer battery and a rectangular 3D printed case that allows flat surfaces to be measured for levelness.

The electronic design is based on a custom interconnect PCB that hosts a micro:bit connector, an LCD footprint, a power switch, a analog input connector and a charging connector.

The main parts look like this:

image

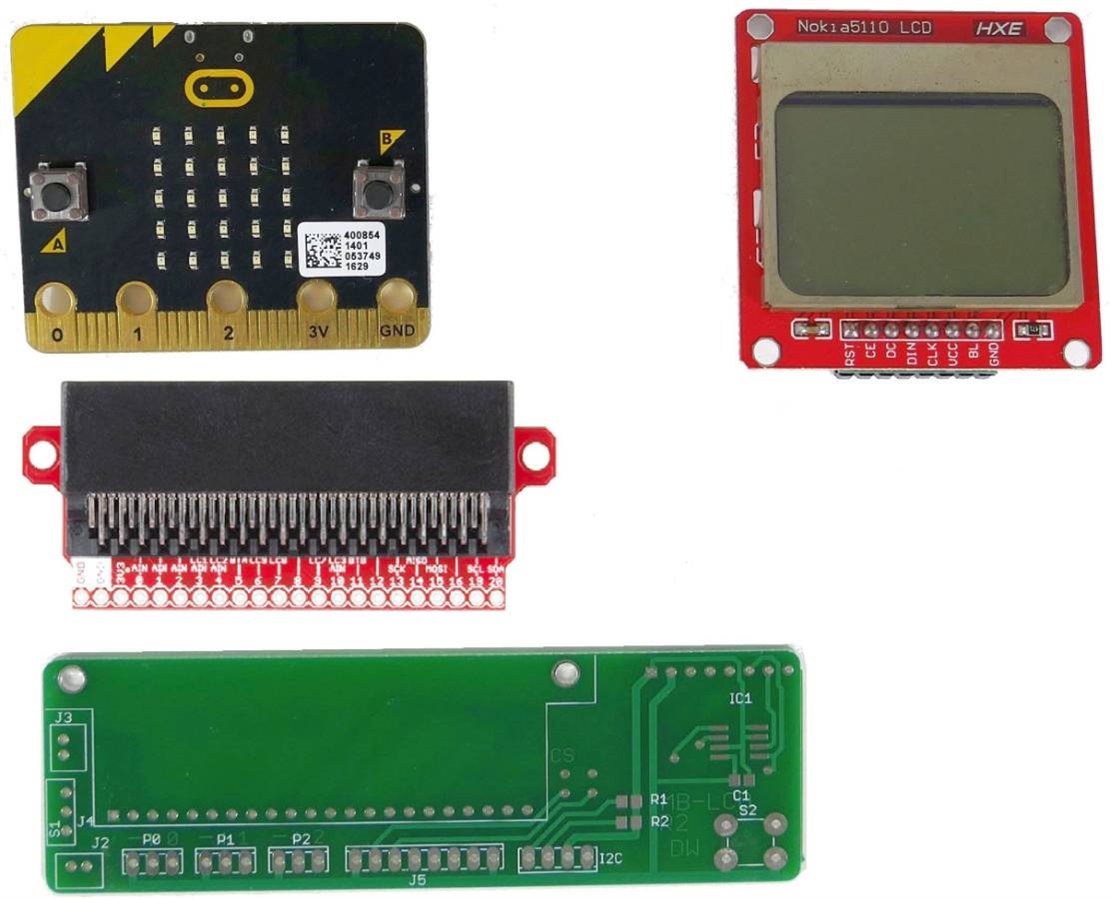
The micro:bit is programmed to display 6 sensed parameters on 6 lines of text.

Here is a video demonstrating the completed system:

You don't have permission to edit metadata of this video.
Edit media
x
image
Upload Preview
image


The LCD really allows the micro:bit built-in sensors to be fully displayed.

I have been perfecting the the connection and programming of an LCD with a micro:bit and this project is a good way to demonstrate the potential of an LCD to enhance a micro:bit.

There is a deceptive amount of work involved in getting everything connected properly, programmed properly and fit properly in a slim package, but that also makes it more satisfying when it all works.


This short video shows the charging module in action:

You don't have permission to edit metadata of this video.
Edit media
x
image
Upload Preview
image


beacon_dave made cool suggestion to use the LEDs as a bubble level - so here is single axis level with LEDs ....

You don't have permission to edit metadata of this video.
Edit media
x
image
Upload Preview
image


This is the schematic for those that would like to make one of these for themselves:


image


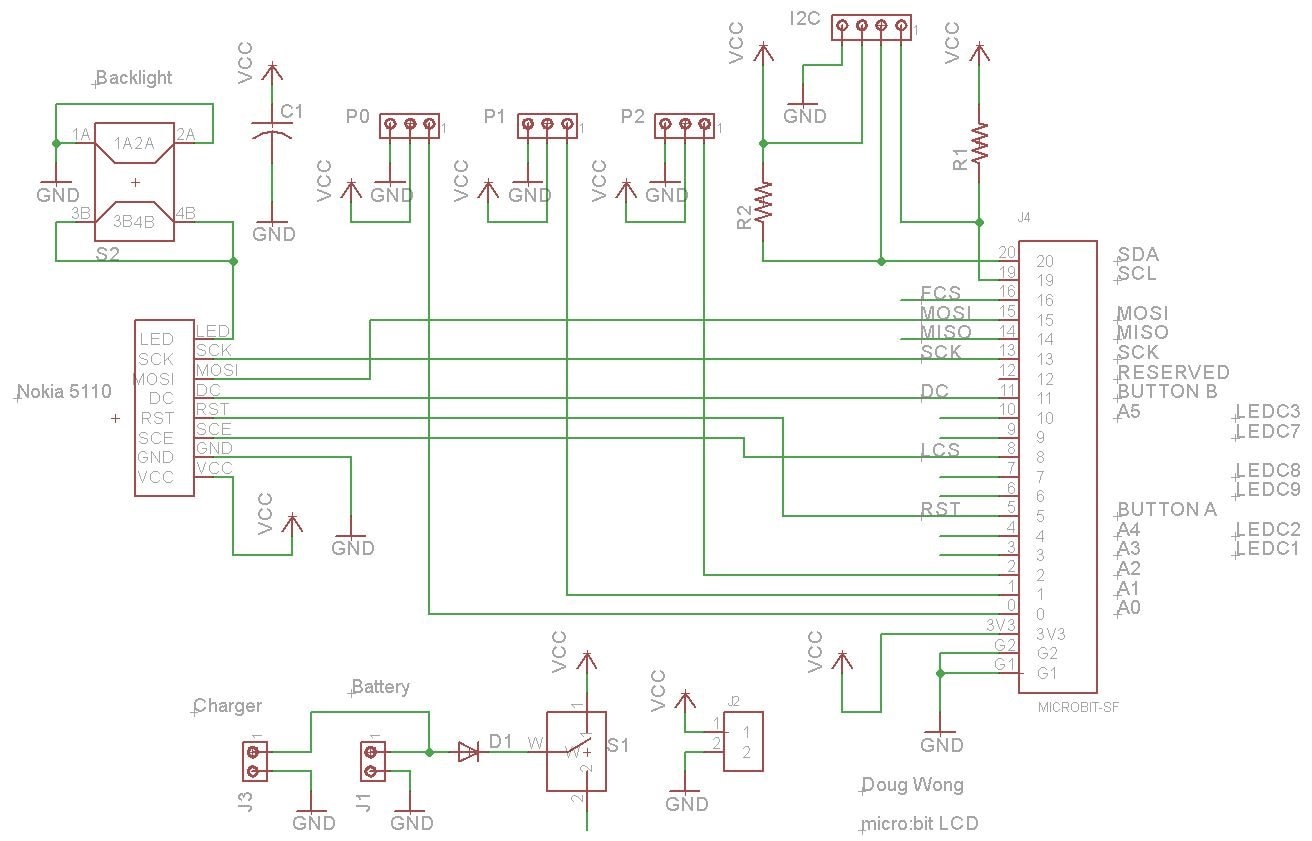
Note there are 2 different pinouts for Nokia 5110 LCDs - I have an adapter card that allows either to be used, but the pinout should be checked if you are going to try this.

Here is the code to display all the sensors on the LCD:


from microbit import *
# Program to display BBC micro:bit sensor data on a Nokia 5110 LCD
# by Doug Wong
# 2018


spi.init(baudrate=1000000, bits=8, mode=0, sclk=pin13, mosi=pin15, miso=pin14) # setup for SPI communication with LCD
#lcdinit = [33, 184, 4, 20, 32, 12]  # HEX 21 B8 04 14 20 0C


pin8.write_digital(1)   # disable LCD
pin1.write_digital(0)  # reset LCD
pin1.write_digital(1)  # release reset pin
pin8.write_digital(0)   # enable LCD
pin2.write_digital(0)  # select command mode
spi.write(b'\x21\xb8\x04\x14\x20\x0c')  #LCD init
pin2.write_digital(1)  # select data mode


display.scroll ("BOSS")  #splash screen


def lcd(kb):            # funtion to convert ascii characters to 56 pixel LCD representations and display
                        # each character is made up of 7 bytes where each byte is 8 vertical pixels
    if kb >= " ":
            if kb < "[":
                if kb < "!":
                    spi.write(b'\x00\x00\x00\x00\x00\x00\x00')  #space
    if kb > " ":
        if kb < "[":
            if kb < "#":
                spi.write(b'\x00\x00\x00\xbe\x00\x00\x00')  #!
            elif kb < "$":
                spi.write(b'\x00\x48\xfe\x48\xfe\x48\x00')  ##
            elif kb < "%":
                spi.write(b'\x00\x048\x54\xfe\x54\x24\x00')  #$
            elif kb < "&":
                spi.write(b'\x00\x46\x26\x10\xc8\xc4\x00')  #%
            elif kb < "'":
                spi.write(b'\x00\x6c\x92\xaa\x44\xc0\x00')  #&
            elif kb < ")":
                spi.write(b'\x00\x00\x38\x44\x82\x00\x00')  #(
            elif kb < "*":
                spi.write(b'\x00\x00\x82\x44\x38\x00\x00')  #)
            elif kb < "+":
                spi.write(b'\x00\x28\x10\x2c\x10\x28\x00')  #*
            elif kb < "-":
                spi.write(b'\x00\x00\xa0\x60\x00\x00\x00')  #,
            elif kb < ".":
                spi.write(b'\x00\x10\x10\x10\x10\x00\x00')  #-
            elif kb < "/":
                spi.write(b'\x00\x00\x60\x60\x00\x00\x00')  #.
            elif kb < "1":
                spi.write(b'\x00\x78\xa2\x92\x8a\x74\x00')  #0
            elif kb < "2":
                spi.write(b'\x00\x00\x84\xfe\x80\x00\x00')  #1
            elif kb < "3":
                spi.write(b'\x00\x44\xc2\xa0\x92\x8c\x00')  #2
            elif kb < "4":
                spi.write(b'\x00\x44\x82\x92\x92\x6e\x00')  #3
            elif kb < "5":
                spi.write(b'\x00\x30\x28\x24\xfe\x20\x00')  #4
            elif kb < "6":
                spi.write(b'\x00\x4e\x8a\x8a\x8a\x70\x00')  #5
            elif kb < "7":
                spi.write(b'\x00\x78\x94\x92\x92\x40\x00')  #6
            elif kb < "8":
                spi.write(b'\x00\x02\xc2\x12\x0a\x06\x00')  #7
            elif kb < "9":
                spi.write(b'\x00\x6c\x92\x92\x92\x6c\x00')  #8
            elif kb < ":":
                spi.write(b'\x00\x0c\x92\x92\x52\x3c\x00')  #9
            elif kb < ";":
                spi.write(b'\x00\x00\x6c\x6c\x00\x00\x00')  #:
            elif kb < "@":
                spi.write(b'\x00\x04\x02\xa2\x12\x0c\x00')  #?
            elif kb < "A":
                spi.write(b'\x00\x44\xa2\xc2\x82\x7c\x00')  #@
            elif kb < "B":
                spi.write(b'\x00\xfc\x12\x12\x12\xfc\x00')  #A
            elif kb < "C":
                spi.write(b'\x00\xfe\x92\x92\x92\x6c\x00')  #B
            elif kb < "D":
                spi.write(b'\x00\x7c\x82\x82\x82\x44\x00')  #C
            elif kb < "E":
                spi.write(b'\x00\xfe\x82\x82\x82\x7c\x00')  #D
            elif kb < "F":
                spi.write(b'\x00\xfe\x92\x92\x92\x82\x00')  #E
            elif kb < "G":
                spi.write(b'\x00\xfe\x12\x12\x12\x02\x00')  #F
            elif kb < "H":
                spi.write(b'\x00\x7c\x82\x82\xa2\x64\x00')  #G
            elif kb < "I":
                spi.write(b'\x00\xfe\x10\x10\x10\xfe\x00')  #H
            elif kb < "J":
                spi.write(b'\x00\x00\x82\xfe\x82\x00\x00')  #I
            elif kb < "K":
                spi.write(b'\x00\xe0\x82\x82\xfe\x02\x00')  #J
            elif kb < "L":
                spi.write(b'\x00\xfe\x10\x28\x44\x82\x00')  #K
            elif kb < "M":
                spi.write(b'\x00\xfe\x80\x80\x80\x80\x00')  #L
            elif kb < "N":
                spi.write(b'\x00\xfe\x02\x3c\x02\xfe\x00')  #M
            elif kb < "O":
                spi.write(b'\x00\xfe\x04\x38\x40\xfe\x00')  #N
            elif kb < "P":
                spi.write(b'\x00\x7c\x82\x82\x82\x7c\x00')  #O
            elif kb < "Q":
                spi.write(b'\x00\xfe\x22\x22\x22\x1c\x00')  #P
            elif kb < "R":
                spi.write(b'\x00\x7c\x82\xa2\x42\x7c\x00')  #Q
            elif kb < "S":
                spi.write(b'\x00\xfc\x22\x22\x52\x8c\x00')  #R
            elif kb < "T":
                spi.write(b'\x00\x4c\x92\x92\x92\x64\x00')  #S
            elif kb < "U":
                spi.write(b'\x00\x02\x02\xfe\x02\x02\x00')  #T
            elif kb < "V":
                spi.write(b'\x00\x7e\x80\x80\x80\x7e\x00')  #U
            elif kb < "W":
                spi.write(b'\x00\x3e\x40\x80\x40\x3e\x00')  #V
            elif kb < "X":
                spi.write(b'\x00\x7e\x80\x70\x80\x7e\x00')  #W
            elif kb < "Y":
                spi.write(b'\x00\xc6\x28\x10\x28\xc6\x00')  #X
            elif kb < "Z":
                spi.write(b'\x00\x06\x08\xf0\x08\x06\x00')  #Y
            elif kb < "[":
                spi.write(b'\x00\xc2\xa2\x92\x8a\x86\x00')  #Z
            elif kb < "_":
                spi.write(b'\x00\x10\x08\x04\x08\x10\x00')  #^
            else:
                spi.write(b'\x00\x00\x00\x00\x00\x00\x00')  #.


def dl():                                                   # funtion to display a line
    for i in range(0, 12):                                  # loop through 1 line of characters
        c = l[i]                                            # get next character in the line
        lcd(c)                                              # display the character
    
while True:
    
    l = "TEMP : " + str(temperature() - 4) + "           "          # compose temperature line
    dl()                                                            # display line of text
    l = "VOLT : " + str(pin0.read_analog() * .0031) + "           " # compose voltage line
    dl()                                                            # display line of text
    l = "HEAD : " + str(compass.heading()) + "            "         # compose compass heading line
    dl()                                                            # display line of text
    l = "X ACC: " + str(accelerometer.get_x()) + "           "      # compose X acceleration line
    dl()                                                            # display line of text
    l = "Y ACC: " + str(accelerometer.get_y()) + "           "      # compose Y acceleration line
    dl()                                                            # display line of text
    l = "Z ACC: " + str(accelerometer.get_z()) + "           "      # compose Z acceleration line
    dl()                                                            # display line of text


    sleep(350)                                                  # wait 350 ms before displaying another set of readings


Relevant Links:

Test Instrumentation

Project14 | Test Instrumentation: Tool Kit Prizes: micro:bits for Testing Tool: bits!


This project won some loot from element14 which is shown here:

  • Sign in to reply

Top Comments

  • shabaz
    shabaz over 6 years ago +6
    Hi Doug, Very cool : ) Impressive work integrating it all. It's easy to forget there are so many sensors on micro:bit, it's great to see them all brought out onto a status display!!
  • beacon_dave
    beacon_dave over 6 years ago in reply to shabaz +6
    I always rotate the spirit level through 180degrees before using it. If you get two different readings then the bubble vial isn't true to the edge. Ironically the last time I found one that was very badly…
  • jw0752
    jw0752 over 6 years ago in reply to beacon_dave +6
    Hi Dave, This is a simple and effective technique that I had to learn the hard way. I was a technician with a mission trip to Nicaragua where I had the job of mounting a dental x-ray machine to a concrete…
Parents
  • balearicdynamics
    balearicdynamics over 6 years ago

    I loved this project! First because of the use of the SPI protocol while I already have difficulties (it will be great if you share the software. I tried to manage SPI on micro:bit on both microPython and Javascript with no success. I am sure that something is wrong in the code but I can't figure out what it is.


    What I appreciated a lot is the use of the LCD screen and the LED grid of the micro:bit in conjunction. About leveling I have recently done some thoughts. What is the use of a level measurement in an instrument that can't be precise in terms of absolute? This thought is not related to your project, it's a general consideration. To put the hand on the problem I bought a Chinese digital level I will show you in the image below.


    image

    Despite how much tool is precise, the metallic part is surely trustable respect the physical level indicators (the traditional ones) while the Chinese plastic insertion with the display and the electronic circuit it is very improbable that it is inserted perfectly aligned respect the other parts. We can expect this kind of precision on more and more expensive devices, not with this 5 Euro tool.

    Ok, so why a digital inclinometer? I played a while and I discovered the trick. There is the reset button!

    So, I put over a plane (or not a plane, just a surface). Then I RESET and the digital value goes to zero. At this point - for example - I can position another part in a very precise way exactly in the position I want. This makes extremely useful and easier to place two objects at a specific degree despite their real orientation. Maybe the worth to use one of the two micro:bit buttons to include a similar behavior?


    Enrico

    • Cancel
    • Vote Up +4 Vote Down
    • Sign in to reply
    • More
    • Cancel
  • mcb1
    mcb1 over 6 years ago in reply to balearicdynamics

    For those other reading ...


    I decided to buy one that I saw on Project Binky. (https://www.youtube.com/watch?v=7hCPODjJO7s )

    (Warning there are 19 episodes of this fantastic feat of engineering, and you should not start watching unless you have 19 hours spare)

    https://www.amazon.com/gp/product/B0016Z1084/ref=od_aui_detailpages00?ie=UTF8&psc=1

    Basically you press the calibrate and set it one way, press the button, then rotate it 180 degs, press the button then place it on a vertical surface press the button and rotate 180 degs.

    https://www.trick-tools.com/common/documentation/dwl-200-manual.pdf


    It should then be calibrated against any sort of manufacturing irregularity and be accurate to 0.1 deg..


    Mark

    • Cancel
    • Vote Up +4 Vote Down
    • Sign in to reply
    • More
    • Cancel
  • dougw
    dougw over 6 years ago in reply to mcb1

    And after 19 episodes it still isn't complete...

    • Cancel
    • Vote Up +1 Vote Down
    • Sign in to reply
    • More
    • Cancel
Comment
  • dougw
    dougw over 6 years ago in reply to mcb1

    And after 19 episodes it still isn't complete...

    • Cancel
    • Vote Up +1 Vote Down
    • Sign in to reply
    • More
    • Cancel
Children
  • three-phase
    three-phase over 6 years ago in reply to dougw

    Nope, still some way off as well, but I have thoroughly enjoyed watching over the years and will continue to do so.


    Kind regards.

    • Cancel
    • Vote Up +1 Vote Down
    • Sign in to reply
    • More
    • Cancel
  • dougw
    dougw over 6 years ago in reply to three-phase

    After the massive amount of metalwork you would hope they will do a complete overhaul of the powerplant as well.

    • Cancel
    • Vote Up 0 Vote Down
    • Sign in to reply
    • More
    • Cancel
  • mcb1
    mcb1 over 6 years ago in reply to dougw

    re Project Binky. ...


    you would hope they will do a complete overhaul of the powerplant as well.

    That will come no doubt.


    It has been a time consumming exercise but it is weekends only ... so understandable.


    If you guys like what they've done have a look at v8 Stealth Bettle.

    https://v8stealthbeetle.com/

    https://www.facebook.com/v8stealthbeetle/


    https://www.youtube.com/watch?v=tAfCKmg2w0A


    Mark

    • Cancel
    • Vote Up +1 Vote Down
    • Sign in to reply
    • More
    • Cancel
element14 Community

element14 is the first online community specifically for engineers. Connect with your peers and get expert answers to your questions.

  • Members
  • Learn
  • Technologies
  • Challenges & Projects
  • Products
  • Store
  • About Us
  • Feedback & Support
  • FAQs
  • Terms of Use
  • Privacy Policy
  • Legal and Copyright Notices
  • Sitemap
  • Cookies

An Avnet Company © 2025 Premier Farnell Limited. All Rights Reserved.

Premier Farnell Ltd, registered in England and Wales (no 00876412), registered office: Farnell House, Forge Lane, Leeds LS12 2NE.

ICP 备案号 10220084.

Follow element14

  • X
  • Facebook
  • linkedin
  • YouTube