

Table of contents

Abstract
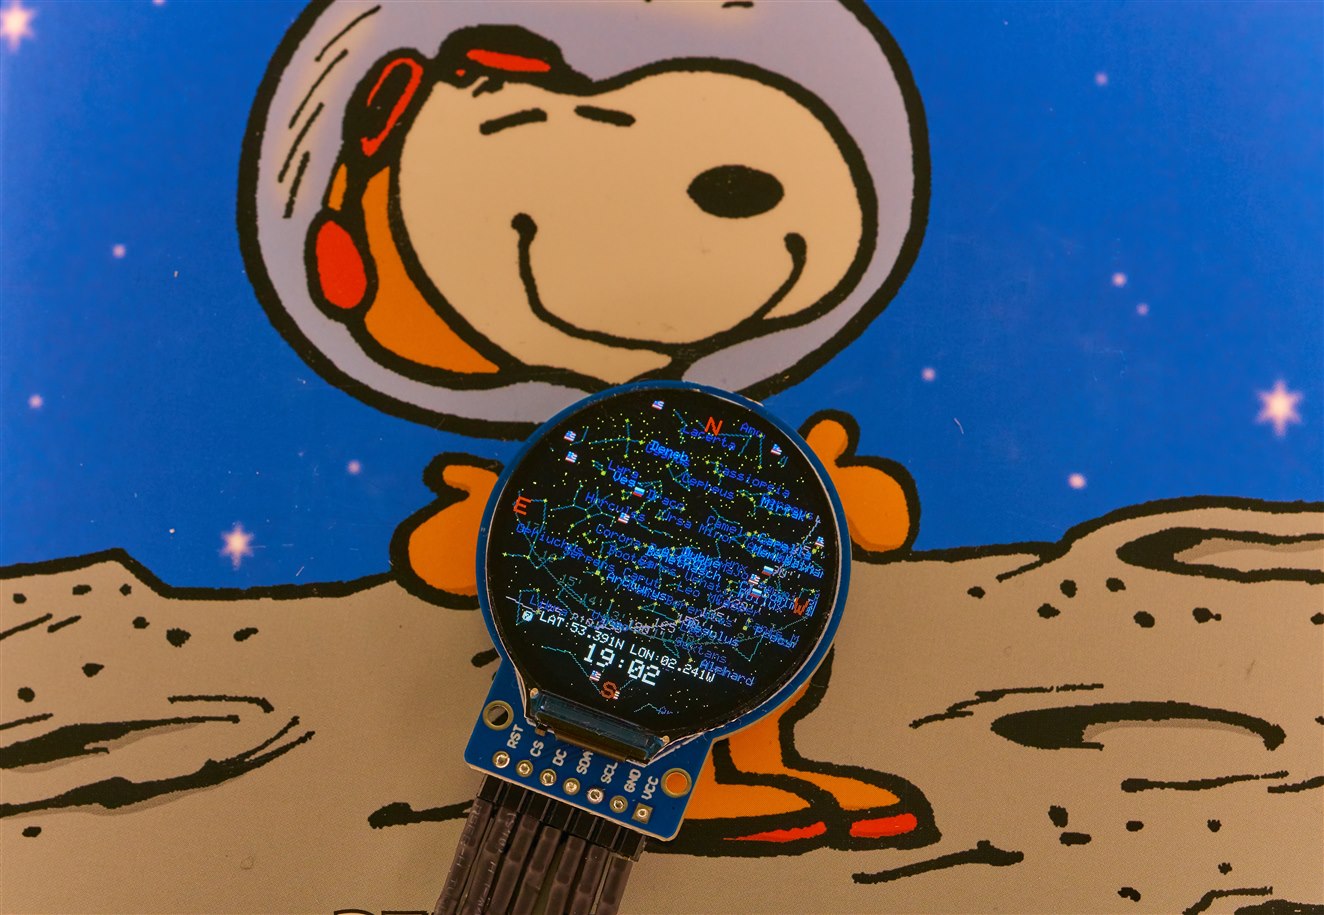
This project implements a real-time star-chart / planetarium within an Arduino. The results are displayed on a circular TFT screen.
Project
Introduction
This month’s Project14 challenge sounded super interesting. There’s so much that can be done related to space or time.
For this Project14 challenge, I wondered, can a modern Arduino chart the stars? It was decided to try to implement a fully standalone chart/planetarium within an Arduino. I think it could be a useful tool to regularly see in real-time the stars, moon, and possibly other planet positions, just to learn a bit about where we are in space and how things are moving and spinning!
For a short (3-minute) overview including a demonstration, please see the video:
The project can be split into four separate elements, and all are described separately because each element is standalone.
(1) The first element is to create an Arduino library (I called it Starmap for want of a name), which can provide the star positions
(2) The second is to get a TFT display running (which for cosmetic reasons is circular of course!)
(3) The third element is to figure out where to store the (relatively) large amount of star data
(4) The fourth part is to use a GPS module so that the user doesn’t need to set their latitude/longitude and time.

This project ended up being a testbed for learning a variety of things. I used this opportunity to discover a bit about putting new functionality into Arduino libraries, what GPS is all about, and about navigation pre-GPS!, how star positions are kind-of similarly represented to longitude and latitude but on a celestial sphere, plus how to add a circular display and Flash memory to an Arduino.
The end result allows the user to see a map of the stars for any given location (longitude and latitude) and time. This project uses completely local storage, i.e. there’s no WiFi connection to obtain data from a server. The project is standalone, so it can be used outdoors at night.
While the current end result is usable, it’s for those with super-human eyesight with the tiny watch display that was used. The project will benefit from scaling up (large circular displays are expensive, but technically a rectangular display could be used instead).
Incremental Development
The project can be implemented incrementally because all the elements are independent of each other. If you just install the Starmap library, it will successfully run, but just not have a display to view. If you then add the TFT screen, then you’ll see basic connecting-line patterns of stars (known as asterisms) visible on the display, but no stars themselves, because the star database is not present. If you then add some programmed Flash memory, stars will appear. And finally, adding a GPS module means that you won’t need to manually set anything. With slight coding changes, you can, for instance, use a completely different display or a different GPS module.

What Can You Do With It?
This project might be useful for a number of different things. One could build a desk clock, or possibly a wristwatch, with planet and star positions, and moon phase. The Starmap library code is display-agnostic, so it could be adapted to work with much larger screens if desired.
Another interesting project would be to use the Starmap library to control a telescope. This is beyond the current scope of this blog post, but it would involve modifying the code to obtain the positions before they are mapped onto a two-dimensional plane (for displaying on a TFT screen), and then driving the telescope mechanism.
What’s Required?
Technically, nothing is required; it’s possible to try out the Starmap library on Linux (it will dump to a PNG graphic file). Then, an Arduino can be used when you’re ready. I used an Arduino Uno R4 (an R4 Minima to be precise), and a circular display called 1.28” TFT 240x240 GC9A01. Note that you need an Arduino with a lot of memory, and with 3.3V logic levels to be compatible with the TFT screen. It doesn’t need to be an Arduino Uno R4, if you have a different Arduino lying around, provided it has sufficient memory (at least 128kbytes of Flash memory, and at least 32kbytes of RAM). You will still need an external Flash memory chip, but the 128kbytes of Arduino built-in memory will at least allow the Starmap library to operate minus the star database.
I used an Arduino Uno R4 board and it is designed for 5V logic levels. That will require either level translation, or, easier, you can make a small modification to the board to convert it to 3.3V logic levels: Modifying the Arduino Uno R4: Making it 3.3V-Friendly
How to Determine Astronomical Object Positions
After a brief search, I found some Arduino libraries that perform some of the required calculations, but nothing regarding an entire star map, or planet positions. This wasn’t unexpected; most star charting software expects to run on a PC, or mobile or web app. A new Arduino library was needed!
Unsurprisingly, astronomical algorithms have not changed much over the years, and almost every piece of commercial star software running on PCs ends up using the same references; a book by Jean Meeus called Astronomical Algorithms, and a downloadable database of star positions called the Yale Bright Star Catalog. Combine both of those, and that’s an entire virtual planetarium. There’s ancient source code in the public domain that uses these, although a lot of that freely-available content dates back to early Windows 3.1 or Windows 95 days! I decided to try to convert that old star-chart code to run on the Arduino!
The way things work, is that the star database contains the positions of thousands of stars as if they were stuck onto a huge immovable sphere surrounding the Earth. What the code does, is take the input (time and co-ordinates of where you are), and uses that to work out the orientation of the Earth within that outer sphere, to see what portion of the outer sphere should be visible to you, and and then projects that onto a flat circular view capable of being plotted to a screen. For the planets, there are separate per-planet motion algorithms, and they are also projected onto the flat circular view.
It took quite a while fiddling with it; old C code looks different to todays C code if you want to build it with any recent compilers. For the Arduino, the code actually needs to be in the form of a C++ class, if it is to be part of a library. All the Windows-specific code needed to be stripped out of course, which meant thinking about how to make the library output-agnostic, so that the Arduino user can mix and match the Starmap library with their desired TFT screen (assuming that is in the project; there could be projects that do not require such a display). The (not-so) secret method was to use C++ virtual functions as a sort of callback. They provide a way for users to extend the library functionality inside their .ino file, without needing to modify the library (note: for a better technique, check out Jan Cumps blog post regarding callbacks in C++!). The user functionality can take care of the TFT screen, and the Starmap library will automatically call the user code when TFT operations are required. In a similar vein, the star catalog can reside anywhere if the Starmap library again uses virtual functions for data access, so that was implemented too, because, unlike a PC, with the Arduino I didn’t have the luxury of a built-in large file system.
The porting exercise was unfortunately quite extensive, there was a lot of code to get through. I had to plough through it bit-by-bit and just hope it would work out. I tested on Linux, since it would be easier than repeatedly uploading to an Arduino. Instead of a TFT, I used a RAM buffer, and then used a library called libpng to save as a graphics file. Then, I visually compared the graphics output with online night-sky display websites. It was a relief when things looked the same.
I’d worked through the large amount of code almost every night for a couple of weeks, without knowing for sure if it would ever work; it would have be a nightmare to try to troubleshoot the algorithms since I’m no mathematician nor astronomer. More through luck than anything else, I didn’t end up with anything too awkward to troubleshoot.
I needed to create some graphics; I took a very basic approach. The images were sketched in PowerPoint, and then manually converted into values stored in ‘const’ arrays. It would be good to improve this area of the code one day.
![]()
For anyone creating an Arduino library, I’d strongly recommend putting some thought into how to debug it on the PC, because it will save a massive amount of time compared to repeatedly uploading to the Arduino. Based on what I learned, some tips/tricks are documented here: Arduino Library Creation and Testing Workflow
When I was fairly convinced it was working, I zipped up the code, so that it can be added as a library within the Arduino IDE.
Adding the Starmap Library
Download the starmap_library-1.0.0.zip file from the starmap Github Releases page, onto your PC.
Within the Arduino 2.x IDE, click on Sketch->Include Library->Add .ZIP Library.
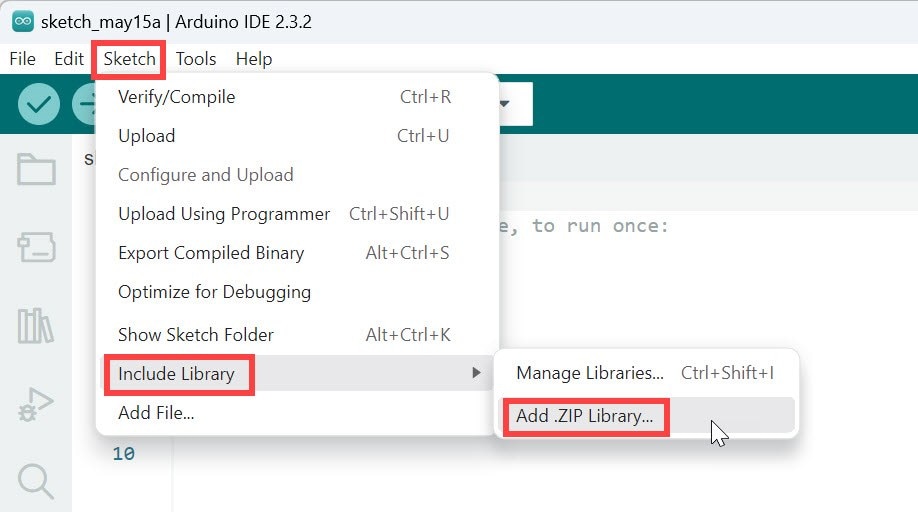
Select the downloaded zip library file, and then you should see at the bottom-right a little pop-up indicating that the library is being processed. After a few seconds, there will be a message indicating that the library is installed.
You can now view some example code by selecting File->Examples->Starmap Library->StarmapTest
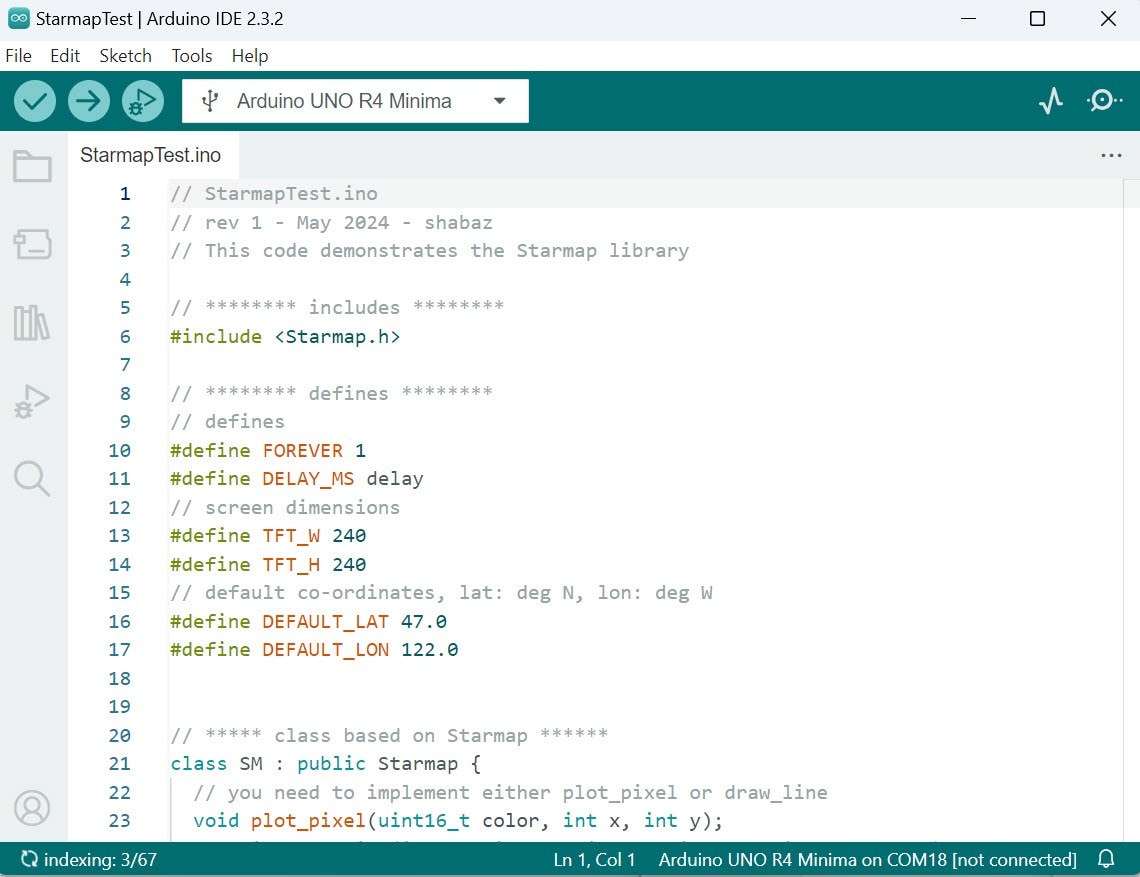
The example code can be built in the usual Arduino manner by pressing the check-mark icon!
The example code can be successfully run at this stage, but it won’t do much, because there’s no TFT display code so far. When run, the code will perform all the astronomical calculations, it just won’t plot anything since there’s no display code.
Adding an Adafruit TFT Display Library
This project happens to use a small circular display, but it’s totally feasible to use any normal rectangular display, with a minimal amount of code changes. It might even be beneficial to use a rectangular display, since the corners of the screen could perhaps be used to indicate status information. I used a circular display partially out of curiosity, I’d never used one before.
If you’re planning to use the same display, then select the Library icon on the left bar, type GC9A and when the Adafruit GC9A01A library is found, click on Install. You’ll likely see a popup requesting if you wish to install dependencies. Click on Install All. Wait a minute or two, for everything to install.

Note that if you’re using an Uno R4, then there is a bug in the Adafruit library which will cause a compilation error. To fix that, go to the folder where the library is installed (on my PC, it was a path called c:\Users\shabaz\Documents\Arduino\libraries\Adafruit_GC9A01A\ so yours may be similar, but with a different username). Edit the file there called Adafruit_GC9A01A.cpp and search for the line containing the text:
#include "wiring_private.h"
Comment out that line (by prefixing it with two slashes):
//#include "wiring_private.h"
Save the file, and now the code will work for the Uno R4.
Circuit Diagram
Note that, in the circuit diagram below, everything to the left of the line can be assembled on a separate board; see the GPS/GNSS blog post Fun With Arduino, Global Navigation Satellite Systems (GNSS) and Teseo III

Assembling the Display Circuit
There’s not a lot to assemble; just 7 wires. The circular TFT screen uses an SPI interface. Some AliExpress boards have pins labelled SCL and SDA as if it were I2C, but actually it’s still an SPI interface, just badly labelled.
The table below shows the connections that need to be made between the TFT screen and the Uno R4.
| Description | AliExpress TFT | Waveshare TFT | Uno R4 |
| Reset | RST | RST | D8 |
| Chip Select | CS | CS | D10 |
| Data/Command | DC | DC | D7 |
| SPI MOSI (COPI) | SDA | DIN | D11 |
| SPI SCK | SCL | CLK | D13 |
| GND | GND | GND | GND |
| 3.3V | VCC | VCC | 3.3V |
| Backlight | N/A | BL | D9 |
Testing the TFT Screen
Once you’ve installed the Adafruit GC9A01A library, and connected up the screen as described above, (and remember, the Uno R4 needed to be modified for 3.3V operation) you can check it if you like, by going to File->Examples->Adafruit GC9A01A->graphicstest
In the example code that appears, change the value TFT_DC from 9 to 7, then add these two lines:
#define TFT_RST 8#define TFT_BL 9
Change the line:
Adafruit_GC9A01A tft(TFT_CS, TFT_DC);
to:
Adafruit_GC9A01A tft(TFT_CS, TFT_DC,TFT_RST);
When you run the example, you should see various graphic demonstrations appear on the display!
With just a few lines of Arduino code, you could now actually use the TFT with the Starmap library, but as mentioned earlier, you’ll only have a partial display, because the star database is missing. You’ll see ‘asterism’ lines at least, which is enough to see that the star projection algorithms are functioning.
Star Data Storage
A big question is, where to store the star data? As a compromise, some of the data is within the Arduino library, allowing users to immediately make use of it; that’s why asterisms work in the previous section.
It would be difficult to store the entire data on the Arduino (it would completely fill up the 256 kbytes of Flash on the Arduino Uno R4). As a result, it was decided to put the entire data onto an external Flash memory chip. Here’s the memory map:
0x0 0000 text identifier “starmap v01” followed by unallocated memory0x0 2000 constellation data0x0 3400 constellation lines data0x0 5400 constellation bounds data0x0 6c00 unallocated 8kbytes of memory0x0 8c00 star database0x2 4400 approximate end of star database, followed by unallocated memory
There is about 8kbytes of spare space for future use, at the start of the address space (after the text identifier), and there is another 8kbytes from address 0x06c00. There is also plenty of free space at the end of the star database, in case additional stars ever need to be added!
A minimum of 4 Mbits of Flash memory is recommended; I used an 8 Mbit chip (i.e. 1 Mbyte) in case I want to do more with it later (e.g. store pictures and icons).
The file that needs to be burned onto the Flash chip is called starmap_rom_v01.bin. I used an external programmer for now (called XGecu T48 - excellent product), but it would be very easy to write code to make the Arduino itself into a programmer. I didn’t do that for now, because I’m sure such code must already exist (or a Pi could be used; there’s plenty of options, and it wasn’t core to this project). If you have a simple favourite solution, please let me know!
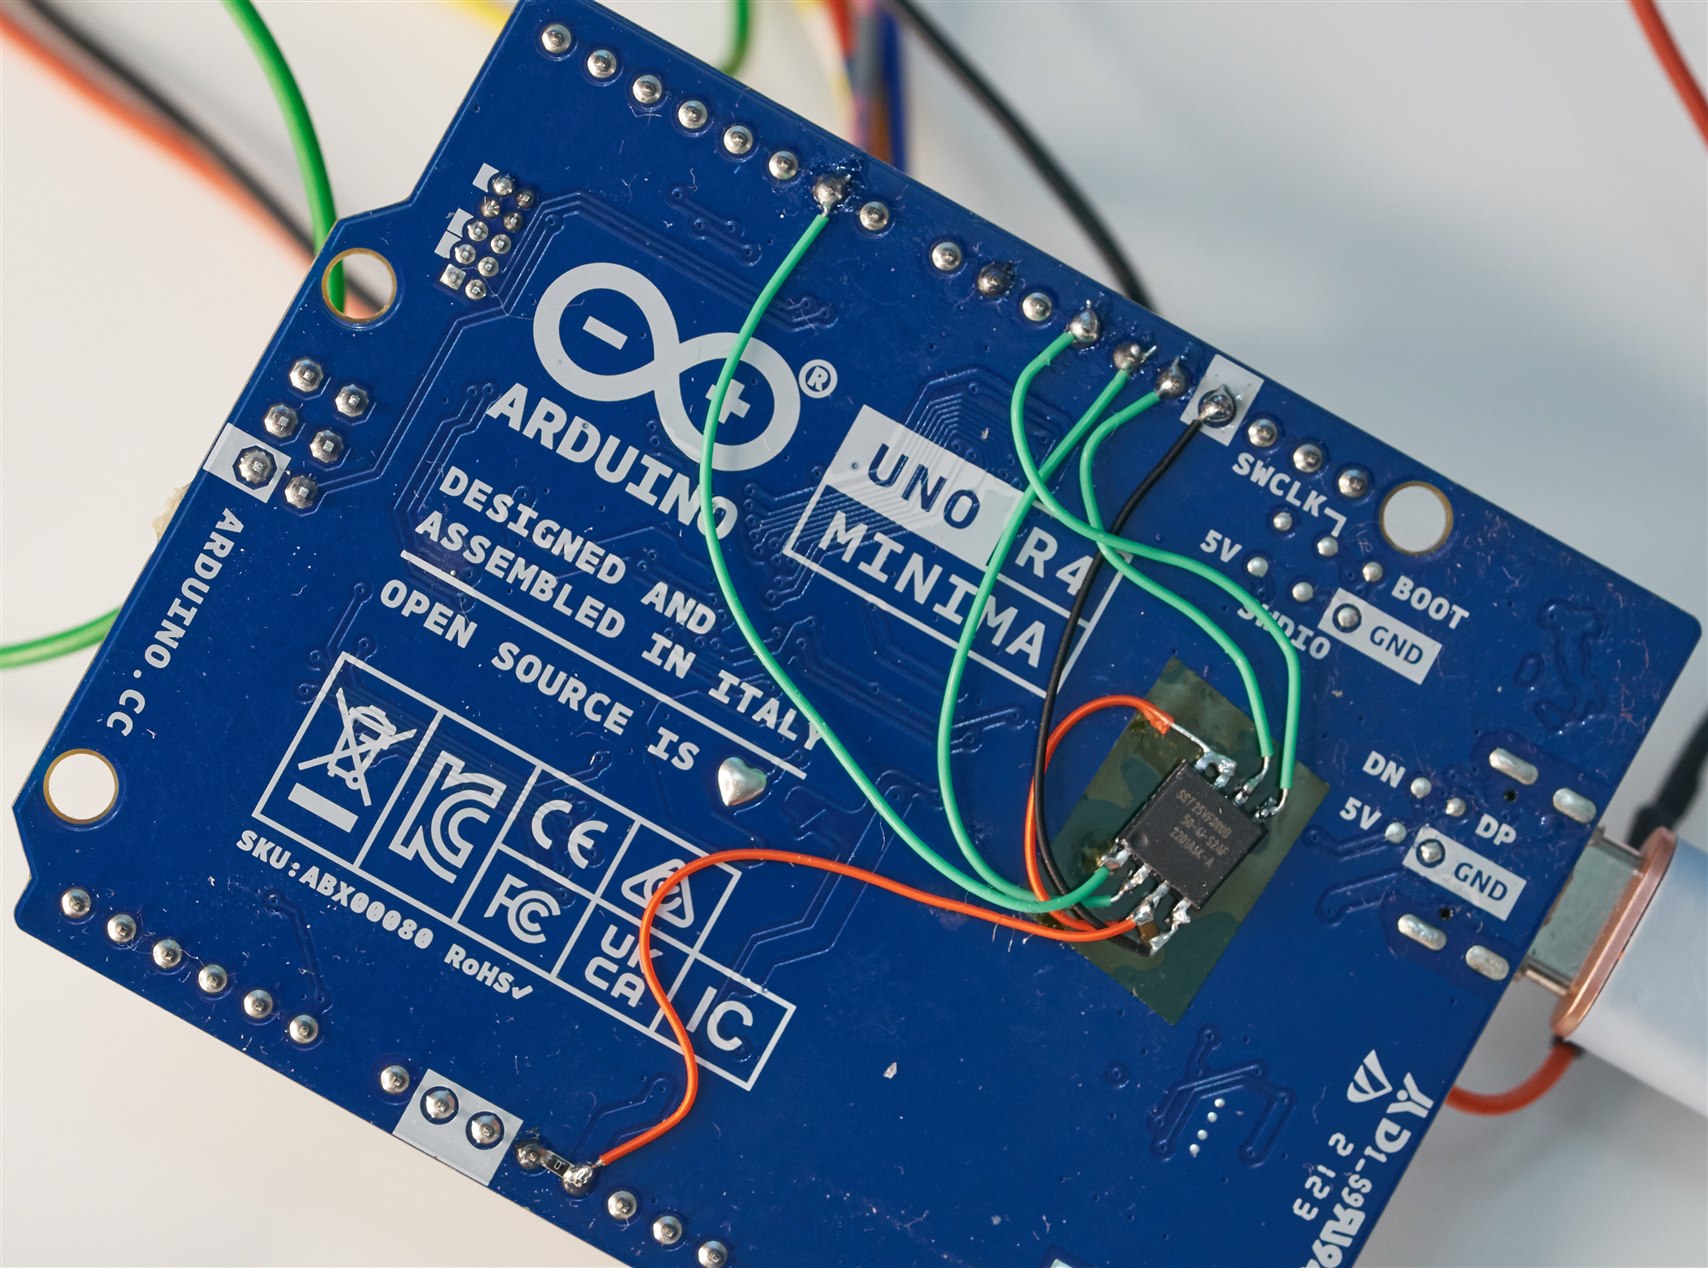
The photo here shows how the memory chip was soldered for the prototype.
Adding Global Navigation Satellite System (GNSS) Capability
This is easy; there’s a separate blog post for this: Fun With Arduino, Global Navigation Satellite Systems (GNSS) and Teseo III
If you’d like to use the same ST Teseo device that I did, you could upload the PCB files at that link to any PCB manufacturer website.
The GNSS board is used to obtain satellite data, and the location (longitude/latitude) and the date and time. For the prototype, the user’s timezone is hard-coded in the source code .ino file.
Working with the Source Code
Although the starmap library zip file is provided, you may wish to improve the library, or run tests on Linux. If you're only interested in running the code, you can skip this section.
Here's how to use the source code.
The github repository needs to be installed on any Linux machine (it could be a Raspberry Pi). I created a folder called development, and then placed the repo content there:
mkdir -p ~/development
cd ~/development
git clone https://github.com/shabaz123/starmap.git
Go into the starmap folder (i.e. from the development folder, type cd starmap), then type the following:
cd examples/StarmapLinuxTest/src
mkdir -p build
cd build
cmake ..
make
You should see the following:
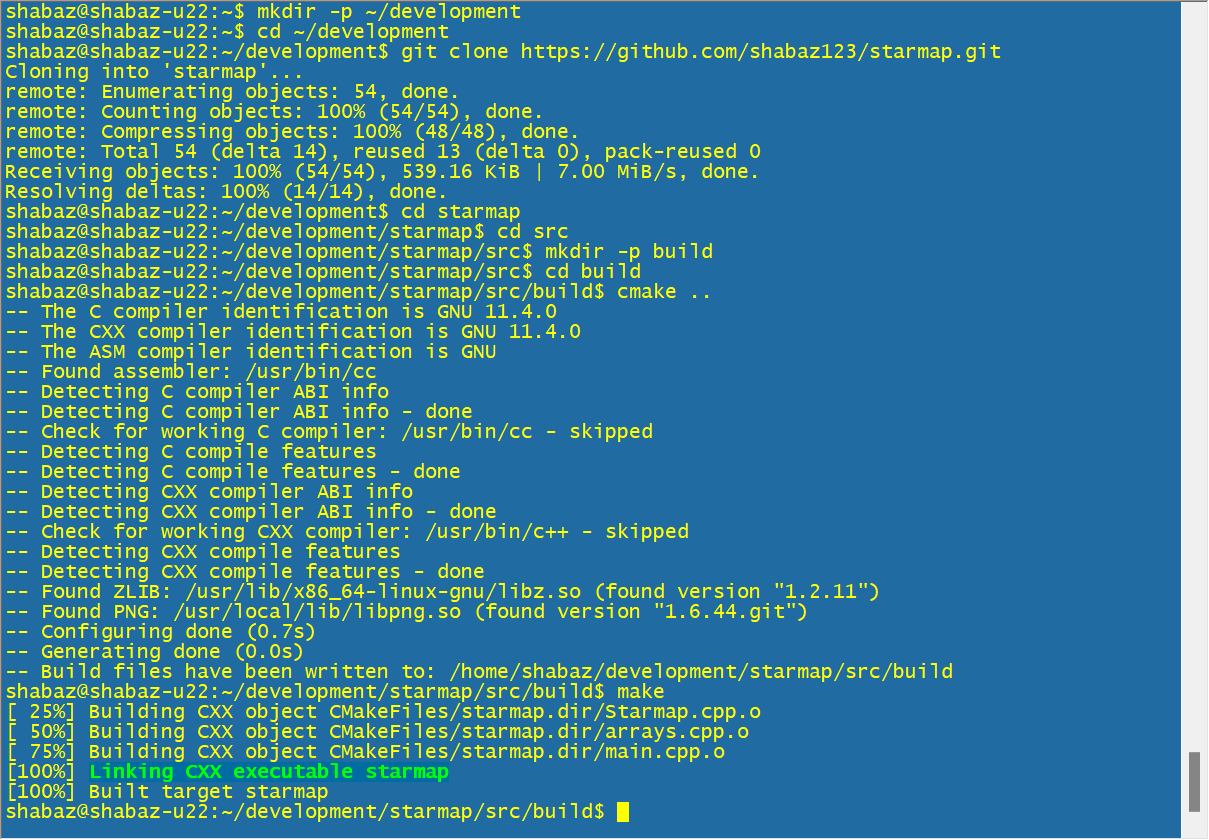
A program called starmap will have been built, which you can run on Linux:

The output will be a file called out.png which should be sufficient to test out the starmap algorithms or to make enhancements to the starmap library code.
After any modifications to the library code, you can build the Arduino library zip file as follows, from the starmap folder:
chmod 755 make_libraries.py
./make_libraries.py

The Arduino library called starmap_library-1.0.0.zip will have been created in the folder one-up from starmap folder, all ready for use in Arduino projects. Note that a second zip file, called starmap_lib.zip will also have been created. That's useful for Pi Pico projects using the Pico C/C++ SDK, and is unrelated to Arduino projects.
Trying It Out
After everything is wired up, and the Starmap library is installed, and the Teseo satellite navigation library is installed, open up the StarmapProject.ino file (you can access it from the Arduino development environment using File->Examples->Starmap Library->StarmapProject) in the Arduino development environment and click on the usual Verify and Upload buttons to install it to the Arduino.
Position the antenna close to a window (it doesn’t need to be extremely close; it worked from several meters away from a window, indoors), and power up the project using a 5V USB supply. If you’re using a PC for the USB connection, then debug text will appear on the USB serial window.
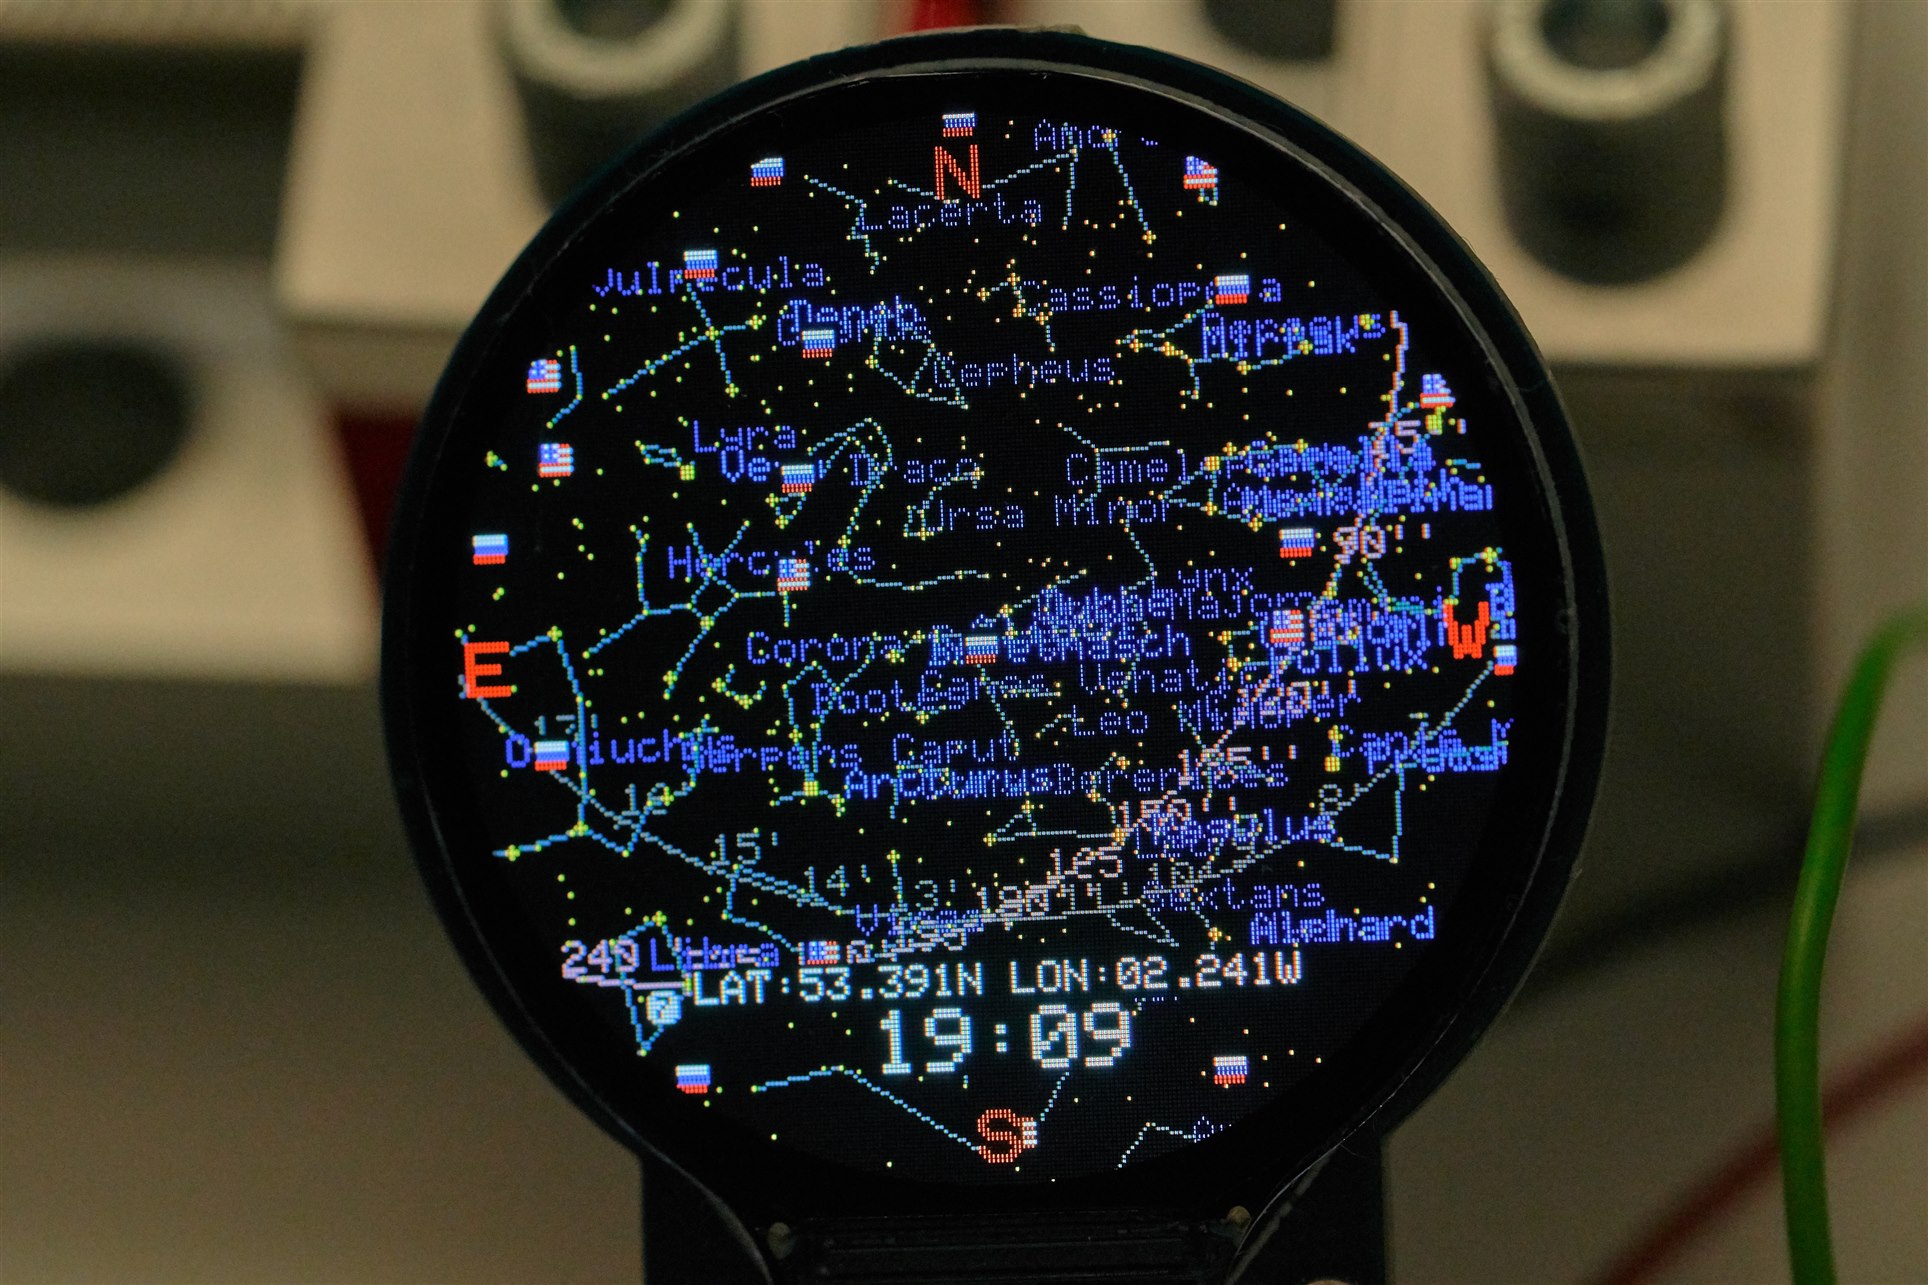
Within a few seconds, a star chart should appear. It will dynamically update. It's hard to take a nice photo of the TFT screen; the display is bright and looks better in real life.
Summary
A star chart library was created, using an adaptation of public domain software originally intended for Windows 95. The library can be used standalone with an Arduino (I used an Arduino Uno R4, but a Pi Pico running Arduino software should work too, although I have not tested that). The project benefits from an external Flash memory chip to store star data, and a TFT screen to display the results! If a GPS module is available, then location and time information is automatically used.
This project is easy to work with because everything is modular. Users can immediately test the code on Linux and then gradually build out a desired solution on Arduino. The code could use some TLC; it’s still very prototype-grade, but it seems stable enough, provided valid inputs are provided.
As a next step, it would be nice to move to a larger circular screen (but those are quite expensive!) and perhaps build a desktop start-chart-capable clock! It would require a custom PCB that would allow the Arduino to plug on top, or, alternatively, the Renesas chip used on the Uno R4 could be used to build a completely custom board.
I would love to hear your ideas or if you implement anything using the Starmap library.
Thanks for reading.
References
Teseo Satellite Navigation Github site
Fun With Arduino, Global Navigation Satellite Systems (GNSS) and Teseo III
Pre-GPS: Hyperbolic Radio Navigation Systems and the Decca Navigator
Windows 95 Home Planet software site
Modifying the Arduino Uno R4: Making it 3.3V-Friendly

