element14 Community
element14 Community
    Register Log In
  • Site
  • Search
  • Log In Register
  • About Us
  • Community Hub
    Community Hub
    • What's New on element14
    • Feedback and Support
    • Benefits of Membership
    • Personal Blogs
    • Members Area
    • Achievement Levels
  • Learn
    Learn
    • Ask an Expert
    • eBooks
    • element14 presents
    • Learning Center
    • Tech Spotlight
    • STEM Academy
    • Webinars, Training and Events
    • Learning Groups
  • Technologies
    Technologies
    • 3D Printing
    • FPGA
    • Industrial Automation
    • Internet of Things
    • Power & Energy
    • Sensors
    • Technology Groups
  • Challenges & Projects
    Challenges & Projects
    • Design Challenges
    • element14 presents Projects
    • Project14
    • Arduino Projects
    • Raspberry Pi Projects
    • Project Groups
  • Products
    Products
    • Arduino
    • Avnet Boards Community
    • Dev Tools
    • Manufacturers
    • Multicomp Pro
    • Product Groups
    • Raspberry Pi
    • RoadTests & Reviews
  • Store
    Store
    • Visit Your Store
    • Choose another store...
      • Europe
      •  Austria (German)
      •  Belgium (Dutch, French)
      •  Bulgaria (Bulgarian)
      •  Czech Republic (Czech)
      •  Denmark (Danish)
      •  Estonia (Estonian)
      •  Finland (Finnish)
      •  France (French)
      •  Germany (German)
      •  Hungary (Hungarian)
      •  Ireland
      •  Israel
      •  Italy (Italian)
      •  Latvia (Latvian)
      •  
      •  Lithuania (Lithuanian)
      •  Netherlands (Dutch)
      •  Norway (Norwegian)
      •  Poland (Polish)
      •  Portugal (Portuguese)
      •  Romania (Romanian)
      •  Russia (Russian)
      •  Slovakia (Slovak)
      •  Slovenia (Slovenian)
      •  Spain (Spanish)
      •  Sweden (Swedish)
      •  Switzerland(German, French)
      •  Turkey (Turkish)
      •  United Kingdom
      • Asia Pacific
      •  Australia
      •  China
      •  Hong Kong
      •  India
      •  Korea (Korean)
      •  Malaysia
      •  New Zealand
      •  Philippines
      •  Singapore
      •  Taiwan
      •  Thailand (Thai)
      • Americas
      •  Brazil (Portuguese)
      •  Canada
      •  Mexico (Spanish)
      •  United States
      Can't find the country/region you're looking for? Visit our export site or find a local distributor.
  • Translate
  • Profile
  • Settings
microbit
  • Learn
  • Learning Center
  • STEM Academy
  • microbit
  • More
  • Cancel
microbit
micro:bit Blog 10 micro:bit Projects in 10 Days: Day Ten - Two-player telegraph game
  • Blog
  • Forum
  • Documents
  • Events
  • Polls
  • Files
  • Members
  • Mentions
  • Sub-Groups
  • Tags
  • More
  • Cancel
  • New
Join microbit to participate - click to join for free!
  • Share
  • More
  • Cancel
Group Actions
  • Group RSS
  • More
  • Cancel
Engagement
  • Author Author: jlucas
  • Date Created: 3 Jun 2016 11:47 AM Date Created
  • Views 4352 views
  • Likes 20 likes
  • Comments 10 comments
  • micro:bit
  • bbc micro:bit
  • microbit
  • beginner micro:bit projects
  • bbc microbit
  • ten bbc micro:bit projects
  • beginner_microbit_projects
  • bbc_micro:bit
  • 10projects10days
Related
Recommended

10 micro:bit Projects in 10 Days: Day Ten - Two-player telegraph game

jlucas
jlucas
3 Jun 2016

About this project


We end our 'ten projects' series with a very simple exercise that demonstrates how to make two BBC micro:bit devices communicate with each other.


What you'll need


2 x BBC micro:bit devices

1 x Micro USB

1 x Computer or tablet

2 x AAA Batteries & Battery Holder

4 x Crocodile Clips


Project walkthrough


  • Go to the BBC micro:bit website, click 'create code' and begin a new Microsoft Block Editor project.


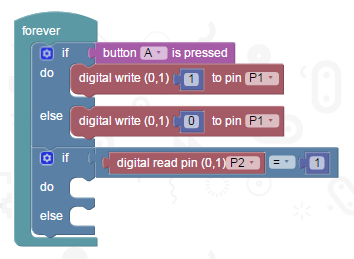
  • Select two 'if/do' tiles from the Logic commands menu, add an 'else' option to both by clicking the blue cog icon, and connect them in a 'forever' loop.


image

  • The first 'if/do/else' tile will be used to send a message from your BBC micro:bit to the device it's connected to.


  • Drag in a 'button [A] is pressed' tile from the Input commands menu and attach it next to 'if'.


  • For 'do', got to the Pins menu and attach a 'digital write (0,1) [1] to pin [P0]' tile. Set the pin to [P1] in the right dialog box.


  • Add a second 'digital write...' tile next to 'else', also changing the pin to [P1] and setting the value in the left dialog box to [0], like so...


image


  • When you press button A now, your device will send a current through pin P1. Otherwise, there will be no current through this pin. When your device is connected to your partner's BBC micro:bit via the crocodile clips, this is how they will communicate.


  • Next you need to tell your device what to do when it receives a message from your partner's BBC micro:bit, in the form of the aforementioned current. For the purposes of this project, we're just going to create a simple telegraph - meaning that when your BBC micro:bit receives the message from the connected device, it will flash up a light on the LED.


  • In the second 'if/do/else' block, attach a '[0] = [0]' tile from the variables menu.


  • In the left dialog box, attach a 'digital read pin (0,1) [P0]' tile and set the dropdown to P2.


  • Change the value in the right dialog box to 1.


image


  • Your device now knows that when it receives an active current through pin P2 - via the second BBC micro:bit - it needs to perform an action.


  • From the LED commands menu, attach a tile that reads 'plot x [0] y [0]', attach next to 'do' and change value in both of the dialog boxes to [2].


  • Next to 'else' attach a tile that reads 'unplot x [0] y [0]' and also set the values in both dialog boxes to [2]


image


  • Now, when your device receives a current through pin P2, it will flash the LED at co-ordinates X2, Y2.


  • Make sure this code is compiled and downloaded to both BBC micro:bits.


  • To connect the two BBC micro:bits, take your first pair of crocodile clips and attach each end to the GND pin on both devices.


  • Attach your second pair of crocodile clips to the 3V pin on each device.


image


  • Take your third pair of crocodile clips and attach one end to Pin 1 on your first BBC micro:bit. Connect the other end to Pin 2 on the second device.


  • Do the reverse with your fourth and final pair of crocodile clips. attaching one end to Pin 2 on the first device, and the other to Pin 1 on the second.


  • Your devices are now ready to communicate! Make sure your code is downloaded to both devices, and hit button A to start communicating!


image


Once your students have completed this project, what can they do to make communication between the two devices more interesting? Can they figure out how to trigger sound effects, or to build two-player arcade style games similar to the falling sprite challenge from day five? Let us know what ideas they come up with in the comments section below.

  • Sign in to reply

Top Comments

  • jlucas
    jlucas over 9 years ago in reply to jgmarcelino +7
    Hi Jose We're going to feature some Bluetooth projects in due course, but for the purposes of this introductory blog series we wanted to focus on the more tactile elements of the device and demonstrate…
  • jgmarcelino
    jgmarcelino over 9 years ago +3
    So here we have two boards natively built around Bluetooth and you're proposing we use cables to communicate between them...
  • balearicdynamics
    balearicdynamics over 9 years ago +2
    Adopted for the next BBC micro:bit review article As it is a sort of miracle that I have one, some modifications should be added to this project ... Enrico
Parents
  • will06
    will06 over 3 years ago

    I'd have loved one of these devices when I was younger, but I have one now. Better late than never.Thinking

    • Cancel
    • Vote Up 0 Vote Down
    • Sign in to reply
    • More
    • Cancel
Comment
  • will06
    will06 over 3 years ago

    I'd have loved one of these devices when I was younger, but I have one now. Better late than never.Thinking

    • Cancel
    • Vote Up 0 Vote Down
    • Sign in to reply
    • More
    • Cancel
Children
No Data
element14 Community

element14 is the first online community specifically for engineers. Connect with your peers and get expert answers to your questions.

  • Members
  • Learn
  • Technologies
  • Challenges & Projects
  • Products
  • Store
  • About Us
  • Feedback & Support
  • FAQs
  • Terms of Use
  • Privacy Policy
  • Legal and Copyright Notices
  • Sitemap
  • Cookies

An Avnet Company © 2025 Premier Farnell Limited. All Rights Reserved.

Premier Farnell Ltd, registered in England and Wales (no 00876412), registered office: Farnell House, Forge Lane, Leeds LS12 2NE.

ICP 备案号 10220084.

Follow element14

  • X
  • Facebook
  • linkedin
  • YouTube