element14 Community
element14 Community
    Register Log In
  • Site
  • Search
  • Log In Register
  • Community Hub
    Community Hub
    • What's New on element14
    • Feedback and Support
    • Benefits of Membership
    • Personal Blogs
    • Members Area
    • Achievement Levels
  • Learn
    Learn
    • Ask an Expert
    • eBooks
    • element14 presents
    • Learning Center
    • Tech Spotlight
    • STEM Academy
    • Webinars, Training and Events
    • Learning Groups
  • Technologies
    Technologies
    • 3D Printing
    • FPGA
    • Industrial Automation
    • Internet of Things
    • Power & Energy
    • Sensors
    • Technology Groups
  • Challenges & Projects
    Challenges & Projects
    • Design Challenges
    • element14 presents Projects
    • Project14
    • Arduino Projects
    • Raspberry Pi Projects
    • Project Groups
  • Products
    Products
    • Arduino
    • Avnet & Tria Boards Community
    • Dev Tools
    • Manufacturers
    • Multicomp Pro
    • Product Groups
    • Raspberry Pi
    • RoadTests & Reviews
  • About Us
  • Store
    Store
    • Visit Your Store
    • Choose another store...
      • Europe
      •  Austria (German)
      •  Belgium (Dutch, French)
      •  Bulgaria (Bulgarian)
      •  Czech Republic (Czech)
      •  Denmark (Danish)
      •  Estonia (Estonian)
      •  Finland (Finnish)
      •  France (French)
      •  Germany (German)
      •  Hungary (Hungarian)
      •  Ireland
      •  Israel
      •  Italy (Italian)
      •  Latvia (Latvian)
      •  
      •  Lithuania (Lithuanian)
      •  Netherlands (Dutch)
      •  Norway (Norwegian)
      •  Poland (Polish)
      •  Portugal (Portuguese)
      •  Romania (Romanian)
      •  Russia (Russian)
      •  Slovakia (Slovak)
      •  Slovenia (Slovenian)
      •  Spain (Spanish)
      •  Sweden (Swedish)
      •  Switzerland(German, French)
      •  Turkey (Turkish)
      •  United Kingdom
      • Asia Pacific
      •  Australia
      •  China
      •  Hong Kong
      •  India
      • Japan
      •  Korea (Korean)
      •  Malaysia
      •  New Zealand
      •  Philippines
      •  Singapore
      •  Taiwan
      •  Thailand (Thai)
      • Vietnam
      • Americas
      •  Brazil (Portuguese)
      •  Canada
      •  Mexico (Spanish)
      •  United States
      Can't find the country/region you're looking for? Visit our export site or find a local distributor.
  • Translate
  • Profile
  • Settings
STEM Projects
  • Learn
  • Learning Center
  • STEM Academy
  • STEM Projects
  • More
  • Cancel
STEM Projects
Blog The Raspberry Pi "Turtle Bot" Breaths Life Into Lesson 2
  • Blog
  • Forum
  • Documents
  • Events
  • Polls
  • Files
  • Members
  • Mentions
  • Sub-Groups
  • Tags
  • More
  • Cancel
  • New
Join STEM Projects to participate - click to join for free!
  • Share
  • More
  • Cancel
Group Actions
  • Group RSS
  • More
  • Cancel
Engagement
  • Author Author: kitfud
  • Date Created: 7 Jan 2015 12:25 AM Date Created
  • Views 1762 views
  • Likes 3 likes
  • Comments 17 comments
  • raspberry pi educators design challenge
  • raspberry_pi_educator
  • pi educators sub space
  • raspberrypi_education
Related
Recommended

The Raspberry Pi "Turtle Bot" Breaths Life Into Lesson 2

kitfud
kitfud
7 Jan 2015

The school year has started again after a solid two week break.

image


And it was a solid two weeks of me thinking about how I was going to approach my Tuesday grind because it is every Tuesday I teach a variety of classes based on the subject of programming. These days, I'm running a very special class where I have been using the Python Programming Language with the Raspberry Pi "Turtle Bot." For an explanation of how to make the Turtle Bot and the thought that went into it please refer to my last blog post.....


here is the video from last week....image

You don't have permission to edit metadata of this video.
Edit media
x
image
Upload Preview
image


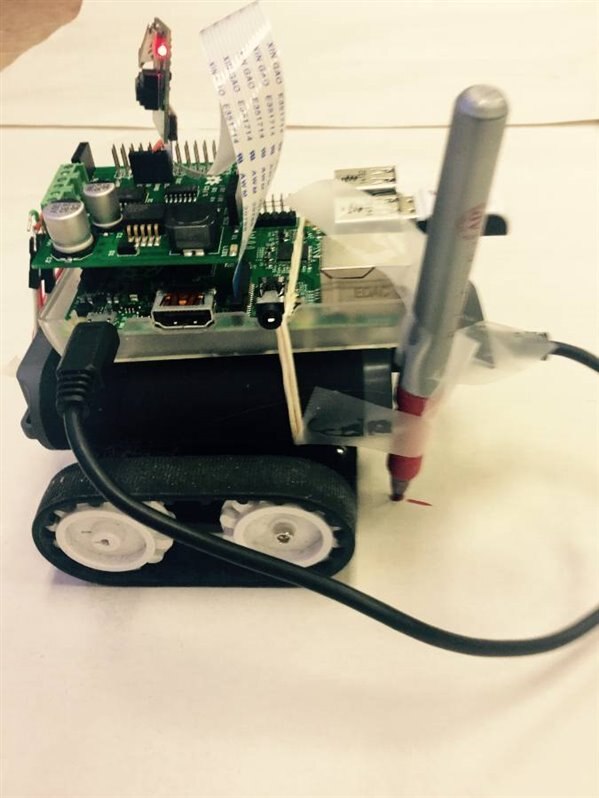
Anyway, last night I was preparing my material and was anticipating the moment when I would break out the Turtle Bot and let it roll around my classroom floor during a lesson with my one student, William. Last lesson we programmed shapes using the "turtle" library in Python but my objective during this lesson was to bring the graphics onscreen to life by using a robot as a physical manifestation on the python turtle as the one and only "Turtle Bot."


Below is the link to the lesson plan I wrote for this lesson:

https://drive.google.com/file/d/0B8Kb7tLLB0yzRHR6dU93MnNTY00/view?usp=sharing


This was a lesson designed for a full 40 minute class however, because today just had to be a snow day image, with school's opening being delayed for two hours and thus all class periods shorted I ended up only 30 minutes to run my lesson image. What I realized is that things moved a bit slower than expected however, this was certainly for the better and without a doubt it was a valuable learning experience both for my student and I. In the end, I was only able to get through two of my goals from the lesson plan; 1. being to revise drawing shapes using the Python turtle library and then 2. Translating this into the "Turtle Bot's" movement when a pen is taped to the back of it image. In this way, the robot could really draw some gems (but really they were only squares)!


The Python code I wrote below is what I based this lesson off of :


import turtle
t = turtle.Pen()

def square():
    for x in range (4):
        t.forward(100)
        t.left(90)
    turtle.done()

while True:
    square()


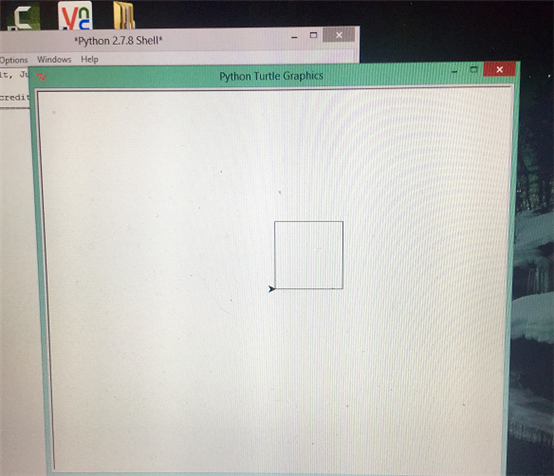
This produces the following image when run in the Python IDE ("IDLE"):

image


After reviewing the basic Python library turtle commands with t = turtle.Pen() such as t.forward, t.left, t.right in the shell I let William attempt to write a script for drawing a square. But I did not show him the script that I had wrote earlier as I wanted him to come up with a script on his own and also, he is not familiar enough with the Python syntax to declare a "range" yet. My objective during all of this was to talk about creating a function; in our case square(). This was necessary because when using the Raspberry Pi robot I built it relies on functions from the RRB2 Motor Shield library such as forward(), backward(), left() and right(). To put these types of commands in context and to better explain them I felt it was thus necessary to relate the creation of a functions to drawing a square in Python.


This is what we ended up with without much guidance:

image

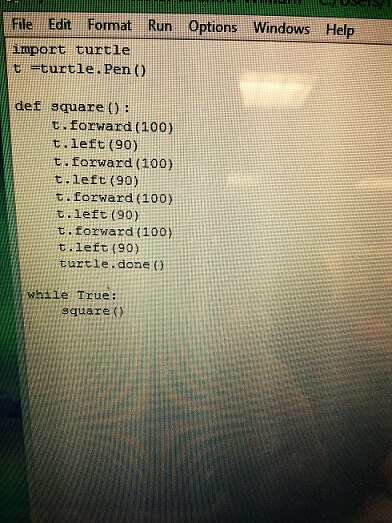
This code produced a square according to the function: square(). Just as planned! Oh, and of note, all this experimentation was being done on the Raspberry Pi since it has Python pre-installed on it; and just as I planned, it was being mirrored to my laptop desktop using VNC viewer:


image

The photo above shows William putting in dat work on the Python shell!

image


Now the next step after creating the square was to experiment with the movement commands for the RRB2 Motor Shield; paying particular attention to the use of functions. To reinforce this and for comparison to the script we just wrote I gave out this handout taken from the RRB2 github resource page:


https://drive.google.com/file/d/0B8Kb7tLLB0yzVlJ4ZDBLVzZJcmM/view?usp=sharing


It was fun driving the robot around in the shell, and also realizing that we were working with seconds whenever we plugged a command into a RRB2 function. For example: rr.forward(5) would cause the robot to drive forward for 5 seconds. Here is a photo of the robot in action:

image

Yes, that's the mighty turtle bot driving off into the distance! Into that mess of wires next to a desk.


What we realized is that if we were going to create a function for the "Turtle Bot" to draw a square and it was moving by seconds we had to figure out how many seconds it would take for the robot to turn 90 degrees in one direction. This was a fun process to figure out because I would continually replace the robot on the floor according to a tile while William experimented with different variables in the Python shell in order to find the exact amount of time it would take to rotate the beast 90 degrees. Time was quickly running out by this point and it was time! But excitement and engagement with the activity was at an all time high. With very little guidance this is the script that William wrote to get the turtle bot to draw a square on paper when a pen is attached to it:

image

Impressive stuff in a very short period of time and also considering that this is only his second time working with Python programming; the first time was two weeks ago before the winter break!


The end result from running this script wasn't perfect as the video will show but it did generate a lot of enthusiasm in a shot amount of time. When we get the code right and it draws squares correctly on the paper we will bundle it up into a function square() which can then be elicited by a Tkinter button. In this way, we are really working towards creating a control interface using Python to create geometric shapes in real life.


You don't have permission to edit metadata of this video.
Edit media
x
image
Upload Preview
image


image


Overall, I am looking forward to how this all evolves by next week and the feedback I got from William was that the experience was very positive and productive. So much so that we almost ran into the gym period time during our attempts to get the thing to draw a proper square! What I realized from this is that robots and movement is a great way to engage one's mind in coding. Maybe next week we will use the camera on the Raspberry Pi to take pictures of all of our progress.

  • Sign in to reply

Top Comments

  • masonc
    masonc over 10 years ago +2
    I love this visual. hands on way to show programming!
  • Robert Peter Oakes
    Robert Peter Oakes over 10 years ago +2
    One of the issues you appear to have is with turning, this may be due to the use of a tracked device rather than wheels, they tend to slide differently depending on the surface where a wheel is more lightly…
  • kitfud
    kitfud over 10 years ago in reply to masonc +1
    Thanks for the encouragement! Like my reply to you in my other post; connecting programming commands to something students can touch and feel has been very effective method. Both for motivation and also…
Parents
  • cleoqc
    cleoqc over 10 years ago

    Nice job! You're inspiring me for our end of class project!

    • Cancel
    • Vote Up 0 Vote Down
    • Sign in to reply
    • More
    • Cancel
  • kitfud
    kitfud over 10 years ago in reply to cleoqc

    That's great, Nicole! Teaching programming with mini drawing robots has had a profound effect on my students' enthusiasm for programming. Just the look on their faces alone when they turn an inanimate single board computer into a moving device via code is priceless. Moreover, how they show up to class early and jazzed up to continue their work justifies using project based learning (via robotics) as a way to launch introductory programming lessons. Just so you know, the most difficult part of my project was setting up the VNC viewer for remote viewing of the Raspberry Pi. However, in my blog I have a link to an Adafruit.com article which shows you how to do this. Let me know how it goes with your class in the future.

    • Cancel
    • Vote Up 0 Vote Down
    • Sign in to reply
    • More
    • Cancel
  • cleoqc
    cleoqc over 10 years ago in reply to kitfud

    Thanks Kit. We're already running with VNC, that's been a fantastic tool for a portable classroom.  I teach in a homeschool co-op, so there's no permanent setup and the kids have to bring their laptop and raspberry pi each week.  Without VNC, it would have meant a screen, a mouse and a keyboard, and that's not easy to carry!

    This Friday is our third lesson. The first one was spent on the Pi architecture, and setting up their laptops. The second one was playing with the interpreter (doing math, playing with strings, importing the math module for more math)...
    I have two Pi-enabled robots but no access to wifi. Short of having a long cable to control the robot, I'm not too sure how I could use them in class. Also, my kids have already done Lego Mindstorms projects.

    My current plan for end-of-year project is to control a couple of LEDs and create a "candle" with the PWM pin.

    I'll also demo Kano's Spycam : Kano World

    • Cancel
    • Vote Up +1 Vote Down
    • Sign in to reply
    • More
    • Cancel
  • kitfud
    kitfud over 10 years ago in reply to cleoqc

    The Kano World post looks fun. I'm showing students how to use PIR sensors with Arduinos in another of my classes and this is a fun way to incorporate the camera. PWM is a fun lesson and will be interesting for your students to consider from a perception standpoint; light intensity decreasing and increasing "flip book" style!


    If you are using VNC viewer already then you must have WiFi access from the Pi to your computer. The difference between using Mindstorms as opposed to creating a Raspberry Pi robot is obviously the programming language. If your students are working in Python, which it looks like you are (focusing on maths and strings?) then you can easily transition into introducing them to the "turtle" library for drawing; and then how these terms can be used to structure the movement of a robot, and then eventually the graphics needed to create a remote control interface with buttons (Tkinter library).


    For my project, to create a Pi-enabled robot I needed a motor controller so I went and bought one called a RaspiRobotBoard V2; I'm not balling out with cash but I decided it was an investment to save time. This controller would allow you to access the GPIO pins off of the PI so it can actually sit on top of a robot and be driven around remotely via a wifi dongle and nifty Python code taken from the motor controller's library. What I've found with LEGO Mindstorms is that while it is a great tool for teaching engineering it doesn't give students a "true" sense of what programming looks like. Though some will argue that it is a valid drag and drop programming language with flow structures blah blah blah; I've had more success relating programming to Scratch which is also drag and drop but is more explicit in mimicking the flow structures you'd find in something like Python or Arduino C++. That's just my opinion though, but then again I probably just want to you to make a "turtle bot" to share feelings with the one I made.... image

    • Cancel
    • Vote Up 0 Vote Down
    • Sign in to reply
    • More
    • Cancel
  • cleoqc
    cleoqc over 10 years ago in reply to kitfud

    Quick answers (as dinner is cooking)..


    VNC, we use with ethernet cables. That allows 10 laptops and 10 Pis in the same room, without me going crazy with IP addresses (anyway we don't have wifi). Maybe you didn't know that ethernet cables do a great job here. (well except when it comes to robots moving around...)


    I most likely have older kids, 12 to 16 years old. Most of them have done Mindstorms with me for three years (partial years, 8 or 10 weeks per year).  So they should have a basic understanding of control flow by now.  This week's plan is all about Turtle, introducing loops, the notion of indented blocks, and an intro to classes.  Next week, we will be creating our own functions and classes but I'm not certain yet what I will be working with.  End of year project will be with the GPIO library.


    My robots are GoPiGo, and BrickPi.  I'm waiting for TiddlyBot but I'm not counting on it for this year. I also have an Arduino based one: Sparki.  I've heard of the RaspiRobotBoard, but have never played with it. As you, I'm low on cash flow for this class. The 10 Pis were donated, but that's as far as it goes...


    Ok, dinner time, time to call the kids.

    • Cancel
    • Vote Up 0 Vote Down
    • Sign in to reply
    • More
    • Cancel
  • mcb1
    mcb1 over 10 years ago in reply to cleoqc

    cleoqc

    kitfud

    You might be interested in some of the offerings Terry King has.

    Full kit inc Arduino for USD$45  http://yourduino.com/sunshop2/index.php?l=product_detail&p=400

    2WD base USD$14  2 Wheel Drive Robot Chassis - 1 Deck

    5WD base USD $18 4 Wheel Drive Simple Robot Base


    I've dealt with Terry over the years and had great service and products... inc all the supporting documentation and code.


    Mark

    • Cancel
    • Vote Up +1 Vote Down
    • Sign in to reply
    • More
    • Cancel
Comment
  • mcb1
    mcb1 over 10 years ago in reply to cleoqc

    cleoqc

    kitfud

    You might be interested in some of the offerings Terry King has.

    Full kit inc Arduino for USD$45  http://yourduino.com/sunshop2/index.php?l=product_detail&p=400

    2WD base USD$14  2 Wheel Drive Robot Chassis - 1 Deck

    5WD base USD $18 4 Wheel Drive Simple Robot Base


    I've dealt with Terry over the years and had great service and products... inc all the supporting documentation and code.


    Mark

    • Cancel
    • Vote Up +1 Vote Down
    • Sign in to reply
    • More
    • Cancel
Children
  • cleoqc
    cleoqc over 10 years ago in reply to mcb1

    Cool!  his two wheels base is the base for GoPiGo.  http://www.dexterindustries.com/GoPiGo/


    I'm not investing any more $$ into this though. I've invested enough in what is basically a volunteer job...

    • Cancel
    • Vote Up +1 Vote Down
    • Sign in to reply
    • More
    • Cancel
  • mcb1
    mcb1 over 10 years ago in reply to cleoqc

    cleoqc

    Great that we've identified some parts.


    I've invested enough in what is basically a volunteer job

    And I can understand that.

    You now have some information to help the next person who wants to get involved.


    I take it you've added your name to this.

    http://www.element14.com/community/roadTests/1417


    Mark

    • Cancel
    • Vote Up 0 Vote Down
    • Sign in to reply
    • More
    • Cancel
  • kitfud
    kitfud over 10 years ago in reply to mcb1

    Thank you so much for sharing this, Mark. This summer I am running a robotics camp and I have been looking for the best option for a cheap robotics base. You've made things easier for this purpose.

    • Cancel
    • Vote Up 0 Vote Down
    • Sign in to reply
    • More
    • Cancel
  • mcb1
    mcb1 over 10 years ago in reply to kitfud

    Glad I could help.

    Fell free to talk with Terry as he is very interested in supporting education.


    Mark

    • Cancel
    • Vote Up 0 Vote Down
    • Sign in to reply
    • More
    • Cancel
element14 Community

element14 is the first online community specifically for engineers. Connect with your peers and get expert answers to your questions.

  • Members
  • Learn
  • Technologies
  • Challenges & Projects
  • Products
  • Store
  • About Us
  • Feedback & Support
  • FAQs
  • Terms of Use
  • Privacy Policy
  • Legal and Copyright Notices
  • Sitemap
  • Cookies

An Avnet Company © 2025 Premier Farnell Limited. All Rights Reserved.

Premier Farnell Ltd, registered in England and Wales (no 00876412), registered office: Farnell House, Forge Lane, Leeds LS12 2NE.

ICP 备案号 10220084.

Follow element14

  • X
  • Facebook
  • linkedin
  • YouTube