element14 Community
element14 Community
    Register Log In
  • Site
  • Search
  • Log In Register
  • Members
    Members
    • Benefits of Membership
    • Achievement Levels
    • Members Area
    • Personal Blogs
    • Feedback and Support
    • What's New on element14
  • Learn
    Learn
    • Learning Center
    • eBooks
    • STEM Academy
    • Webinars, Training and Events
    • Learning Groups
  • Technologies
    Technologies
    • 3D Printing
    • FPGA
    • Industrial Automation
    • Internet of Things
    • Power & Energy
    • Sensors
    • Technology Groups
  • Challenges & Projects
    Challenges & Projects
    • Design Challenges
    • element14 presents
    • Project14
    • Arduino Projects
    • Raspberry Pi Projects
    • Project Groups
  • Products
    Products
    • Arduino
    • Dev Tools
    • Manufacturers
    • Raspberry Pi
    • RoadTests & Reviews
    • Avnet Boards Community
    • Product Groups
  • Store
    Store
    • Visit Your Store
    • Choose Another Store
      • Europe
      •  Austria (German)
      •  Belgium (Dutch, French)
      •  Bulgaria (Bulgarian)
      •  Czech Republic (Czech)
      •  Denmark (Danish)
      •  Estonia (Estonian)
      •  Finland (Finnish)
      •  France (French)
      •  Germany (German)
      •  Hungary (Hungarian)
      •  Ireland
      •  Israel
      •  Italy (Italian)
      •  Latvia (Latvian)
      •  
      •  Lithuania (Lithuanian)
      •  Netherlands (Dutch)
      •  Norway (Norwegian)
      •  Poland (Polish)
      •  Portugal (Portuguese)
      •  Romania (Romanian)
      •  Russia (Russian)
      •  Slovakia (Slovak)
      •  Slovenia (Slovenian)
      •  Spain (Spanish)
      •  Sweden (Swedish)
      •  Switzerland(German, French)
      •  Turkey (Turkish)
      •  United Kingdom
      • Asia Pacific
      •  Australia
      •  China
      •  Hong Kong
      •  India
      •  Korea (Korean)
      •  Malaysia
      •  New Zealand
      •  Philippines
      •  Singapore
      •  Taiwan
      •  Thailand (Thai)
      • Americas
      •  Brazil (Portuguese)
      •  Canada
      •  Mexico (Spanish)
      •  United States
      Can't find the country/region you're looking for? Visit our export site or find a local distributor.
  • Translate
  • Profile
Members
Members
Blog M5StickC Modules
  • Blog
  • Forum
  • Documents
  • Events
  • Leaderboard
  • Members
  • Mentions
  • Sub-Groups
  • Tags
  • More
  • Cancel
  • New
Members requires membership for participation - click to join
Blog Post Actions
  • Subscribe by email
  • More
  • Cancel
  • Share
  • Subscribe by email
  • More
  • Cancel
Group Actions
  • Group RSS
  • More
  • Cancel
Engagement
  • Author Author: ralphjy
  • Date Created: 19 Dec 2020 11:56 PM Date Created
  • Views 1494 views
  • Likes 6 likes
  • Comments 9 comments
  • esp32
  • m5stack
  • m5stickc
Related
Recommended

M5StickC Modules

ralphjy
ralphjy
19 Dec 2020

I've previously posted about small SAMD21 modules that I've found useful for small standalone projects - SAMD21 Mini Modules .


I also frequently have the need for small modules that have WiFi or Bluetooth connectivity.  I've tended to use ESP8266 boards for this purpose because they are reasonably inexpensive and easy to use.  I became interested in the M5Stick modules made by M5Stack after I saw one used by kk99 in the Photonics competition back in March - Simple light flicker meter .


The unit that he used isn't offered anymore since it is EOL, but M5Stack has a couple of newer versions - the M5StckC and M5StickC Plus.  All the units use the ESP32 processor and include a small display and built-in LiPo battery.


I made a spreadsheet of the differences in the models.

image


The newer models use smaller higher resolution TFT displays rather than the OLED on the original version.  They also offer somewhat larger batteries and different sensors - like a PDM microphone and RTC.


I'm working on a project that needs multiple remote temperature sensors for HVAC tuning, so it seemed like these modules would be a good fit.  I think that they should also work well for TinyML applications.


The M5StickC units also can use a variety of "Hats" that plug into the top of the unit to provide additional sensor capability (this is in addition to the Grove port at the bottom of the unit).  M5Stack offers an Environment Hat with Temperature, Humidity, and Pressure sensors - https://docs.m5stack.com/#/en/hat/hat_envII that I thought would be just what I needed for my project (uses SHT30, BMP280 and BMM150 sensors).


I started out with the M5StickC - the kit that I got included a Speaker Hat, ENV II Hat, and some mounting accessories (including a wrist strap) https://m5stack.com/collections/m5-core/products/m5stickc-development-kit-with-hat?variant=17348918935642  .

image


Here's a real short video showing the M5StickC running on battery and using the LCD display and Speaker Hat.

You don't have permission to edit metadata of this video.
Edit media
x
image
Upload Preview
image


I next set up to run with the ENV II Hat as it would in my application.  There are actually 2 temperature sensors in the hat, so I decide to log them both (the SHT30 is supposedly more accurate than the BMP280).  I am publishing MQTT data to Adafruit IO.


M5Stick_AdafruitIO_MQTT.ino

/**
 * M5Stick_AdafruitIO_MQTT.ino
 *
 *  Created on: 12.18.2020
 *
 */

#include <Arduino.h>
#include <WiFi.h>
#include <WiFiMulti.h>
#include <WiFiClient.h>

#include <M5StickC.h>
#include "SHT3X.h"
#include <Wire.h>
#include "Adafruit_Sensor.h"
#include <Adafruit_BMP280.h>

#include "Adafruit_MQTT.h"
#include "Adafruit_MQTT_Client.h"

#define AIO_SERVER      "io.adafruit.com"
#define AIO_SERVERPORT  1883                   // use 8883 for SSL
#define AIO_USERNAME    "aaaaa"
#define AIO_KEY         "bbbbbccccc"

#define USE_SERIAL Serial

WiFiClient client;
WiFiMulti wifiMulti;
SHT3X sht3x;
Adafruit_BMP280 bme;

float temp1 = 0.0;
float temp2 = 0.0;

// Setup the MQTT client class by passing in the WiFi client and MQTT server and login details.
Adafruit_MQTT_Client mqtt(&client, AIO_SERVER, AIO_SERVERPORT, AIO_USERNAME, AIO_KEY);
// Setup a feed called 'temperature' for publishing
// Notice MQTT paths for AIO follow the form: <username>/feeds/<feedname>
Adafruit_MQTT_Publish tempSHT = Adafruit_MQTT_Publish(&mqtt, AIO_USERNAME "/feeds/tempSHT");
Adafruit_MQTT_Publish tempBMP = Adafruit_MQTT_Publish(&mqtt, AIO_USERNAME "/feeds/tempBMP");

void MQTT_connect();

void setup() {
    M5.begin();
    Wire.begin(0,26);
    M5.Lcd.setRotation(3);
    M5.Lcd.fillScreen(BLACK);
    M5.Lcd.setCursor(5, 5, 2);
    M5.Lcd.println("TEMPERATURE TEST");
    pinMode(M5_BUTTON_HOME, INPUT);

    if (!bme.begin(0x76)){  
        Serial.println("Could not find a valid BMP280 sensor, check wiring!");
        while (1);
    }    
  
    USE_SERIAL.begin(115200);

    USE_SERIAL.println();
    USE_SERIAL.println();
    USE_SERIAL.println();

    for(uint8_t t = 4; t > 0; t--) {
        USE_SERIAL.printf("[SETUP] WAIT %d...\n", t);
        USE_SERIAL.flush();
        delay(1000);
    }

    wifiMulti.addAP("xxxxx", "yyyyyzzzzz");

    // wait for WiFi connection
    if((wifiMulti.run() == WL_CONNECTED)) {
      MQTT_connect();
    }

}

void loop() {
    // Ensure the connection to the MQTT server is alive (this will make the first
    // connection and automatically reconnect when disconnected).  See the MQTT_connect
    // function definition further below.
    MQTT_connect();

    if(sht3x.get()==0){
      temp1 = sht3x.fTemp;      // fTemp for Fahrenheit or cTemp for Celsius
    }  

    M5.Lcd.setCursor(5, 30, 2);
    M5.Lcd.printf("TempSHT: %2.1f F", temp1);

    temp2 = bme.readTemperature()*1.8 + 32;
    M5.Lcd.setCursor(5, 50, 2);
    M5.Lcd.printf("TempBMP: %2.1f F", temp2);
    delay(100);   
        
    if (!tempSHT.publish(temp1)) { //publish sensor data
        Serial.println(F("Failed"));
      } else {
        Serial.println(F("tempSHT sent!"));
      }
    
    if (!tempBMP.publish(temp2)) {
      Serial.println(F("Failed"));
    } else {
      Serial.println(F("tempBMP sent!"));
    }

    delay(5000);
}

void MQTT_connect()
{
  int8_t ret;

  // Stop if already connected.
  if (mqtt.connected()) {
    return;
  }

  Serial.print("Connecting to MQTT… ");

  uint8_t retries = 3;

  while ((ret = mqtt.connect()) != 0) { // connect will return 0 for connected
    Serial.println(mqtt.connectErrorString(ret));
    Serial.println("Retrying MQTT connection in 5 seconds…");
    mqtt.disconnect();

    delay(5000); // wait 5 seconds

    retries--;
    if (retries == 0) {
      // basically die and wait for WDT to reset me
      while (1);
    }
  }

  Serial.println("MQTT Connected!");
}


I was surprised by the temperature data because both sensors were reading about 10 degrees F too high.

image


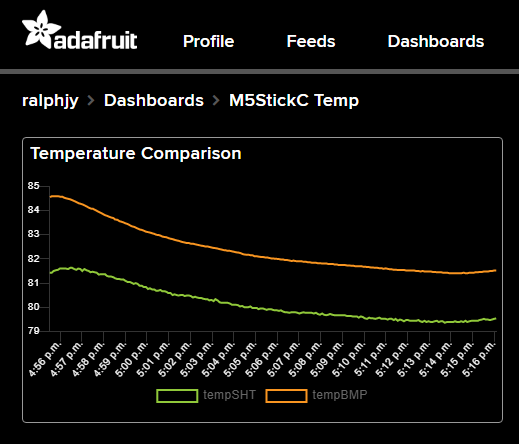
I was also somewhat surprised by the long settle time (~20 minutes) and the difference between the 2 sensors (>2 degrees F).


I somewhat suspected that PCB in the hat was getting heat from the M5StickC module, so I tried adding 8 inches of wire between the module and the hat.

image


And here are the measurements:

imageimage


So, around an 8 degree F delta between the two cases and the difference between sensors is <0.5 degrees F in the extended case.   The extended data is much closer to what I would have expected.


Apparently, I won't be able to run with the hat directly attached.  Quite disappointing.


Otherwise, I'm happy with the convenience of the M5StickC.  I know that the battery is too small to run for an extended period, but it should be sufficient for my application - if not I'll add an external power pack.


I'll probably use M5StickC Plus modules and individual SHT30 sensors.  I'll need to experiment with how much distance I need between the module and the sensor.

  • Sign in to reply

Top Comments

  • ralphjy
    ralphjy over 2 years ago in reply to DAB +3
    If you are familiar with the ESP32 and are building a "common" application, it's pretty easy. M5 supports 3 development flows - UIFlow, Arduino IDE, and AWS FreeRTOS. I tend to use the Arduino IDE and…
  • ralphjy
    ralphjy over 2 years ago in reply to neilk +2
    Hi Neil, One neat thing is that a PMIC is used for all the power management including the battery charging - the PMU AXP192. That means that you can also monitor the various voltages in the part. I haven…
  • ralphjy
    ralphjy over 2 years ago in reply to neilk +2
    Here's a couple of pics of power measurements on USB and BAT power. Sorry for the poor focus...
  • neilk
    neilk over 2 years ago in reply to ralphjy

    I wondered if the device is in deepsleep for most of the time, as mine are, whether even very low levels of solar power might be enough to keep the battery charged?? Some simple calculations would help, but my brain hurts at the moment!!


    Neil

    • Cancel
    • Vote Up +1 Vote Down
    • Sign in to reply
    • More
    • Cancel
  • ralphjy
    ralphjy over 2 years ago in reply to neilk

    Yes, somewhat disappointing that the battery couldn't be somewhat higher capacity - probably couldn't find something with the right form factor.  I like that they did bring out VBAT to the top connector so that you can use an external battery instead.  I've been thinking that I could add attach a small drone battery (800-1200mAH) to the back.  They have slots in the case to attach a mounting clip.  For right now, I have a few 2000mAh USB power banks that are the same width and twice the height that I'm going to use.  I just need to print some clips.  I'll post some pics when I get that done.


    Solar is great when you have sunlight image.  Not so great for Oregon winters.

    • Cancel
    • Vote Up +1 Vote Down
    • Sign in to reply
    • More
    • Cancel
  • neilk
    neilk over 2 years ago in reply to ralphjy

    Hi Ralph


    Thanks very much for all the extra information. It's prompted me to look deeper into ESP32 in general and the M5Stick range in general. I can see some benefits for my projects in having the compact form factor, the RTC and the built in display, but only in situations where I can supply external power easily; the on-board lipo is disappointingly small. May be the answer is to provide solar.....


    Prices over here in UK seem reasonable, especially when considering everything that's included. Up to now, I hadn't seen any benefit in upgrading from ESP8266 to ESP32. I will have to invest in a unit and have good play!


    Neil

    • Cancel
    • Vote Up +2 Vote Down
    • Sign in to reply
    • More
    • Cancel
  • ralphjy
    ralphjy over 2 years ago in reply to DAB

    If you are familiar with the ESP32 and are building a "common" application, it's pretty easy.  M5 supports 3 development flows - UIFlow, Arduino IDE, and AWS FreeRTOS.  I tend to use the Arduino IDE and there are lots of examples for the M5StickC.  The M5StickC Plus is newer and currently only has the FactoryTest program included.  You can use M5StickC programs with the Plus but because of the different display, you need to swap out the device library and adjust the display settings if the program uses the display.


    The biggest issue if you are doing something not covered in an example program is figuring out how the hardware is configured - e.g. there are 3 different I2C busses in the StickC, one for internal devices, one for the Grove port, and one for the Hat connector - so you need to configure the port you want to use, the Grove port is the default.  For these types of issues the M5 forum is pretty responsive.  The second issue is finding the appropriate library if you're adding external components.


    There is also another M5Stick variant - the M5StickV which is based on the Kendryte K210 RISC processor.  I don't have this one, but from experience programming the K210 - it can be very difficult because of the lack of documentation.  That said, this variant includes a camera and can be used to implement an AI machine vision camera.

    • Cancel
    • Vote Up +3 Vote Down
    • Sign in to reply
    • More
    • Cancel
  • DAB
    DAB over 2 years ago

    Nice post.


    How easy is it to build an application using this device?


    DAB

    • Cancel
    • Vote Up +1 Vote Down
    • Sign in to reply
    • More
    • Cancel
>
element14 Community

element14 is the first online community specifically for engineers. Connect with your peers and get expert answers to your questions.

  • Members
  • Learn
  • Technologies
  • Challenges & Projects
  • Products
  • Store
  • About Us
  • Feedback & Support
  • FAQs
  • Terms of Use
  • Privacy Policy
  • Legal and Copyright Notices
  • Sitemap
  • Cookies

An Avnet Company © 2023 Premier Farnell Limited. All Rights Reserved.

Premier Farnell Ltd, registered in England and Wales (no 00876412), registered office: Farnell House, Forge Lane, Leeds LS12 2NE.

ICP 备案号 10220084.

Follow element14

  • Facebook
  • Twitter
  • linkedin
  • YouTube