element14 Community
element14 Community
    Register Log In
  • Site
  • Search
  • Log In Register
  • Community Hub
    Community Hub
    • What's New on element14
    • Feedback and Support
    • Benefits of Membership
    • Personal Blogs
    • Members Area
    • Achievement Levels
  • Learn
    Learn
    • Ask an Expert
    • eBooks
    • element14 presents
    • Learning Center
    • Tech Spotlight
    • STEM Academy
    • Webinars, Training and Events
    • Learning Groups
  • Technologies
    Technologies
    • 3D Printing
    • FPGA
    • Industrial Automation
    • Internet of Things
    • Power & Energy
    • Sensors
    • Technology Groups
  • Challenges & Projects
    Challenges & Projects
    • Design Challenges
    • element14 presents Projects
    • Project14
    • Arduino Projects
    • Raspberry Pi Projects
    • Project Groups
  • Products
    Products
    • Arduino
    • Avnet Boards Community
    • Dev Tools
    • Manufacturers
    • Multicomp Pro
    • Product Groups
    • Raspberry Pi
    • RoadTests & Reviews
  • About Us
  • Store
    Store
    • Visit Your Store
    • Choose another store...
      • Europe
      •  Austria (German)
      •  Belgium (Dutch, French)
      •  Bulgaria (Bulgarian)
      •  Czech Republic (Czech)
      •  Denmark (Danish)
      •  Estonia (Estonian)
      •  Finland (Finnish)
      •  France (French)
      •  Germany (German)
      •  Hungary (Hungarian)
      •  Ireland
      •  Israel
      •  Italy (Italian)
      •  Latvia (Latvian)
      •  
      •  Lithuania (Lithuanian)
      •  Netherlands (Dutch)
      •  Norway (Norwegian)
      •  Poland (Polish)
      •  Portugal (Portuguese)
      •  Romania (Romanian)
      •  Russia (Russian)
      •  Slovakia (Slovak)
      •  Slovenia (Slovenian)
      •  Spain (Spanish)
      •  Sweden (Swedish)
      •  Switzerland(German, French)
      •  Turkey (Turkish)
      •  United Kingdom
      • Asia Pacific
      •  Australia
      •  China
      •  Hong Kong
      •  India
      •  Korea (Korean)
      •  Malaysia
      •  New Zealand
      •  Philippines
      •  Singapore
      •  Taiwan
      •  Thailand (Thai)
      • Americas
      •  Brazil (Portuguese)
      •  Canada
      •  Mexico (Spanish)
      •  United States
      Can't find the country/region you're looking for? Visit our export site or find a local distributor.
  • Translate
  • Profile
  • Settings
Community Hub
Community Hub
Member's Forum Trailer Lights Logic
  • Blog
  • Forum
  • Documents
  • Quiz
  • Events
  • Leaderboard
  • Polls
  • Files
  • Members
  • Mentions
  • Sub-Groups
  • Tags
  • More
  • Cancel
  • New
Join Community Hub to participate - click to join for free!
Actions
  • Share
  • More
  • Cancel
Forum Thread Details
  • Replies 16 replies
  • Subscribers 550 subscribers
  • Views 1188 views
  • Users 0 members are here
  • logic
  • signal
  • light
  • brake
  • towing
  • trailer
Related

Trailer Lights Logic

ntewinkel
ntewinkel over 8 years ago

Hi all,


Remember this discussion (https://www.element14.com/community/message/201594/l/re-using-12v-at-base-of-transistor) a while back?


That's when I started a project involving a little travel trailer and trying to use a basic 4-wire wiring connection to properly light up separate brake and signal lights.


To sum up: the 4 wire connection from the car consists of: Ground, Marker lights (for night use), Left, and Right.

What that really means is that the brake and signal lights are combined in the 2 wires for left and right. Usually trailers just have a red light on the left and a red light on the right, and they do their thing.


But I bought fancy LED lights that separate out the brakes and the signal lights. Which left me trying to figure out if it was possible to do some logic to properly handle the brake and signal lights to their full potential... without rewiring the harness on the car!


I think I've found a way to do this using logic chips. And from what I can tell, the 4000 series chips will handle up to 18 volts, which is plenty to handle whatever the tow vehicle will throw my way.


I played around with it on this website I found (Simulator.io), and it seems to work like I want it to.

http://simulator.io/board/qQCIfvpreQ/3

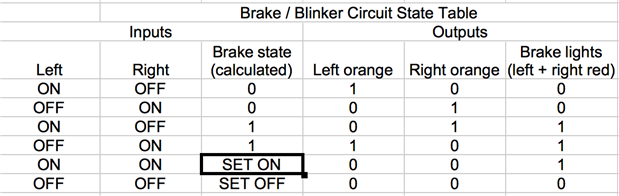
1. If either the left or right wire is on, that orange indicator will go on, giving properly blinking

2. if both wires are on, the red brake lights go on, giving proper brake light function

3. if the brakes go on, the brake lights will remain on as long as there is power to the system (ie, at least one of the left or right wires has power)

4. if the brakes are on and one of the left or right wire goes off, then that indicator light goes one - essentially, the one side that's blinking will end up blinking but in reverse to how the car is blinking.


image


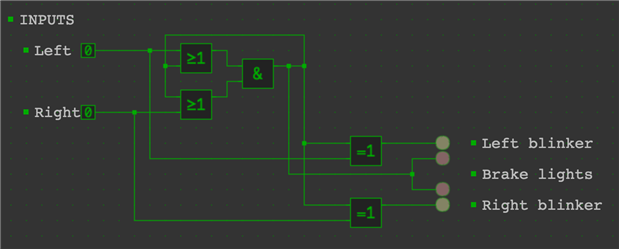
If you follow that URL above, you can play with the circuit - clicking on the "0" box beside the "Left" and "Right" inputs simulate the wire coming from the car.


I was going to test this using the 7400 series chips I have (using 5 volts and LEDs), but sadly I don't have any OR chips! (I'll have to fix that soon!). And making them from NAND chips looks to be very painful.


Here is my logic (edit: I had the wrong picture here earlier)

image

Special thanks goes to Michael Kellett michaelkellett for the idea of latching the brake lights ON and keeping it on until both wires are off.

And another special thanks goes to Douglas Wong dougw for the idea of putting together a logic truth table - that helped me get things straight in my mind, and gave me the idea to try using logic chips.


Anyway, what do you all think? Am I overlooking any potential problems?


ps, I think I also figured out a way to achieve this using just relays, but I figured solid state would be smaller and easier.


Thanks,

-Nico


edit: Note mostly to self: I have updated the trailer lights logic to now also reset when both blinker lights are off: https://simulator.io/board/qQCIfvpreQ/4

This allows the circuit to retain power and still function properly. The previous logic required power to be shut down in order to reset. The new logic allows battery or super-cap backup to keep it on.

  • Sign in to reply
  • Cancel

Top Replies

  • michaelkellett
    michaelkellett over 8 years ago +2
    Hello Nico, Generally when designing electronics for automotive use you should go for the following rough electrical spec: "12V" supply, 5 - 28V continuous, -12V continuous, system should work correctly…
  • michaelkellett
    michaelkellett over 8 years ago in reply to ntewinkel +1
    There are automotive rated voltage regulators you could use to get the 5V (don't use a 7805) but in your case I would go for 4000 or 74HC series logic (low current) and a simple series R shunt zener regulator…
  • michaelkellett
    michaelkellett over 8 years ago in reply to michaelkellett +1
    Hello Nico, Just found this useful paper from TI re. automotive power supplies. Lots of useful background as well as specifics for a high performance (and high cost) design. http://www.ti.com/general/docs…
Parents
  • mcb1
    mcb1 over 8 years ago

    I fear there might be an error in your truth table.

    Is this what it should be.??

    image

    On the 3rd and 4th rows you had the Left and Right Orange outputs swapped.


    Mark

    • Cancel
    • Vote Up +1 Vote Down
    • Sign in to reply
    • Cancel
  • ntewinkel
    ntewinkel over 8 years ago in reply to mcb1

    Right, that's the tricky part. When the brakes are on, and an indicator light is blinking, you need to reverse the state of the correct indicator.


    Imagine braking: both tail lights are on.


    Now turn right while the brakes are on (like at a stop light waiting to turn) - the left light stays ON while the right light turns off and on.

    • Cancel
    • Vote Up 0 Vote Down
    • Sign in to reply
    • Cancel
  • mcb1
    mcb1 over 8 years ago in reply to ntewinkel

    I thought that as well ...but

    Your truth table should be showing the state of the input, not what the lamp was doing. ...


    If the view is from the rear of the trailer, then I can see some merit in matching the red light of the car to the orange light ... which it does.

    BUT when the brake is On as well there is this red light that is ON plus this orange light flashing, so is having it match the towing vehicle a bonus or a distraction ???


    Imagine a long line of cars turning, the indicators are all flashing at different rates and some are on while others off.

    It isn't confusing.


    The other small part of this is that with the left indicator on and the brake, the left lamp toggles state, but the right one stays ON.

    If the left indicator is on by itself the left lamp toggles but the right stays off.

    ie the bit you need to detect is the toggling bit.


    Yes I still haven't sorted the internal logic and the housing mine came is seems to be expoxy .....

    Mark

    • Cancel
    • Vote Up +1 Vote Down
    • Sign in to reply
    • Cancel
  • ntewinkel
    ntewinkel over 8 years ago in reply to mcb1

    I think it toggling in reverse to what the car is doing is ok. Otherwise the logic just gets more complex than it needs to be.


    It'd be great to test out what the commercial module does, and how it handles all the states.


    Did you try out the circuit at: https://simulator.io/board/qQCIfvpreQ/3   ?

    (edit: click on the zeroes beside the words "left" and "right" to change the input states)


    It seems to work properly for all situations. Except that the hazard lights (4-way blinkers) flash the red brake lights on and off. But I don't think there's a way around it unless we keep a logic state related to previous state.


    ps, keep in mind that the circuit simulator misses the bit at then end - when both inputs are off, power to the circuit goes off and the whole thing resets (in the simulator you'd need to press reset when both inputs are off)


    Thanks,

    -Nico

    • Cancel
    • Vote Up 0 Vote Down
    • Sign in to reply
    • Cancel
Reply
  • ntewinkel
    ntewinkel over 8 years ago in reply to mcb1

    I think it toggling in reverse to what the car is doing is ok. Otherwise the logic just gets more complex than it needs to be.


    It'd be great to test out what the commercial module does, and how it handles all the states.


    Did you try out the circuit at: https://simulator.io/board/qQCIfvpreQ/3   ?

    (edit: click on the zeroes beside the words "left" and "right" to change the input states)


    It seems to work properly for all situations. Except that the hazard lights (4-way blinkers) flash the red brake lights on and off. But I don't think there's a way around it unless we keep a logic state related to previous state.


    ps, keep in mind that the circuit simulator misses the bit at then end - when both inputs are off, power to the circuit goes off and the whole thing resets (in the simulator you'd need to press reset when both inputs are off)


    Thanks,

    -Nico

    • Cancel
    • Vote Up 0 Vote Down
    • Sign in to reply
    • Cancel
Children
  • mcb1
    mcb1 over 8 years ago in reply to ntewinkel

    Did you try out the circuit

    No for a few reasons.....


    I also fell into the trap of the latched brakes staying on for a full cycle of the indicator until the power drops out the latch.

    I initially thought that was wrong and wouldn't work until I realised it was only half a cycle and who cares.


    I suspect some of the bits can use an SCR since they latch and have good current capability.


    It'd be great to test out what the commercial module does, and how it handles all the states.

    I was thinking the same thing the other week about building a test rig.

    I got asked to build another unit that does the reverse (combines 4 wire plus tailights, to 3 wire) for LED's, and thought I should build a test rig ...


    Looks like I have a job this afternoon, but it may be next week as I'm heading away for the weekend..

    I'll use relays and a uP.    image


    mark


    PS I did this table


    INPUTSTAILIGHTSTRAILER
    LRBLRLRB
    00000000
    1/0001/001/000
    01/0001/001/00
    00111001
    1/0011/011/001
    01/0111/001/01
    • Cancel
    • Vote Up 0 Vote Down
    • Sign in to reply
    • Cancel
  • mcb1
    mcb1 over 8 years ago in reply to mcb1

    ntewinkel


    I wonder if this will do what you want.


    /*
    
          Trailer Lights
    
       Pin assignments
       Pin 0  Rx
       Pin 1  Tx
       Pin 2  
       Pin 3  Left Indicator      (HIGH)
       Pin 4  Right Indicator     (HIGH)
       Pin 5  Left Out
       Pin 6  Right Out
       Pin 7  Brake Out
       Pin 8
       Pin 9
       Pin 10 
       Pin 11
       Pin 13 Led
       
       Created 17 Mar 2017
       by Mark Beckett
    
       Version
       0.1  Initial Code  started 17 Mar 2017
    
       Function
       This interfaces between an American 3 wire light system and converts to 4 wire for a trailer.
       The 3 wire system uses the same light for Brake and Indicator, while the 4 wire seperates the Brake and Indicators.
    
       Requires regulator and solid state switching.
       Inputs need a resistor and zener to drop to 5v.
       
       ---------------------------------------------------
       To Do :
        
      
       */
    
      #define TailLEFT 3                // LEFT Tail light input
      #define TailRIGHT 4               // RIGHT Tail light input
      #define OutLEFT 5                // LEFT Indicator Output 
      #define OutRIGHT 6               // RIGHT Indicator Output
      #define OutBRAKE 7               // BRAKE light Output
    
      boolean  TailLEFTstate = 0;
      boolean  TailRIGHTstate = 0;
      boolean  BRAKEstate = 0; 
        
    
    void setup() {
      // put your setup code here, to run once:


      pinMode (TailLEFT, INPUT);
      pinMode (TailRIGHT, INPUT);
      pinMode (OutLEFT, OUTPUT);
      pinMode (OutRIGHT, OUTPUT);
      pinMode (OutBRAKE, OUTPUT);
    }
    
    void loop() 
    {
    
        TailLEFTstate = digitalRead(TailLEFT);
        TailRIGHTstate = digitalRead(TailRIGHT);
        
        if(TailLEFTstate == 1 && TailRIGHTstate == 1)
        {
          BRAKEstate = 1; 
        }
        
        if(TailLEFTstate == 0 && TailRIGHTstate == 0)
        {
          BRAKEstate = 0;
        }
        
        digitalWrite(OutBRAKE, BRAKEstate);
        digitalWrite(OutLEFT, TailLEFTstate);
        digitalWrite(OutRIGHT, TailRIGHTstate);
      
     }


    I'm picking that a diode from Left and Right Brake/Ind is enough for power.

    Use a 7808 to give 8v into an Arduino ( Digispark with start delay removed ... maybe ).


    You'll need to use a resistor and 4.8v zener across each input to drop it down.

    Perhaps a MosFET between the Left/Right vehicle tailight to drive each Indicator.

    With another MosFET using the diode common to power the brake lights.


    Mark


    edit ... minor cut and paste in pinmode.

    • Cancel
    • Vote Up +1 Vote Down
    • Sign in to reply
    • Cancel
  • ntewinkel
    ntewinkel over 8 years ago in reply to mcb1

    That looks perfect, thanks!

    I had thought about using a Digispark minus start delay - I remember looking that up.


    I like that the microcontroller gives a LOT of flexibility in maintaining states and doing additional logic that would be hard to do in hardware.

    But I do like that the 4000 series chips can handle the higher voltages directly.


    I might have to try both. Makes for good science image


    -Nico

    • Cancel
    • Vote Up +1 Vote Down
    • Sign in to reply
    • Cancel
element14 Community

element14 is the first online community specifically for engineers. Connect with your peers and get expert answers to your questions.

  • Members
  • Learn
  • Technologies
  • Challenges & Projects
  • Products
  • Store
  • About Us
  • Feedback & Support
  • FAQs
  • Terms of Use
  • Privacy Policy
  • Legal and Copyright Notices
  • Sitemap
  • Cookies

An Avnet Company © 2025 Premier Farnell Limited. All Rights Reserved.

Premier Farnell Ltd, registered in England and Wales (no 00876412), registered office: Farnell House, Forge Lane, Leeds LS12 2NE.

ICP 备案号 10220084.

Follow element14

  • X
  • Facebook
  • linkedin
  • YouTube