element14 Community
element14 Community
    Register Log In
  • Site
  • Search
  • Log In Register
  • Members
    Members
    • Benefits of Membership
    • Achievement Levels
    • Members Area
    • Personal Blogs
    • Feedback and Support
    • What's New on element14
  • Learn
    Learn
    • Learning Center
    • eBooks
    • STEM Academy
    • Webinars, Training and Events
    • Learning Groups
  • Technologies
    Technologies
    • 3D Printing
    • Experts & Guidance
    • FPGA
    • Industrial Automation
    • Internet of Things
    • Power & Energy
    • Sensors
    • Technology Groups
  • Challenges & Projects
    Challenges & Projects
    • Design Challenges
    • element14 presents
    • Project14
    • Arduino Projects
    • Raspberry Pi Projects
    • Project Groups
  • Products
    Products
    • Arduino
    • Dev Tools
    • Manufacturers
    • Raspberry Pi
    • RoadTests & Reviews
    • Avnet Boards Community
    • Product Groups
  • Store
    Store
    • Visit Your Store
    • 'Choose another store...'
      • Europe
      •  Austria (German)
      •  Belgium (Dutch, French)
      •  Bulgaria (Bulgarian)
      •  Czech Republic (Czech)
      •  Denmark (Danish)
      •  Estonia (Estonian)
      •  Finland (Finnish)
      •  France (French)
      •  Germany (German)
      •  Hungary (Hungarian)
      •  Ireland
      •  Israel
      •  Italy (Italian)
      •  Latvia (Latvian)
      •  
      •  Lithuania (Lithuanian)
      •  Netherlands (Dutch)
      •  Norway (Norwegian)
      •  Poland (Polish)
      •  Portugal (Portuguese)
      •  Romania (Romanian)
      •  Russia (Russian)
      •  Slovakia (Slovak)
      •  Slovenia (Slovenian)
      •  Spain (Spanish)
      •  Sweden (Swedish)
      •  Switzerland(German, French)
      •  Turkey (Turkish)
      •  United Kingdom
      • Asia Pacific
      •  Australia
      •  China
      •  Hong Kong
      •  India
      •  Korea (Korean)
      •  Malaysia
      •  New Zealand
      •  Philippines
      •  Singapore
      •  Taiwan
      •  Thailand (Thai)
      • Americas
      •  Brazil (Portuguese)
      •  Canada
      •  Mexico (Spanish)
      •  United States
      Can't find the country/region you're looking for? Visit our export site or find a local distributor.
  • Translate
  • Profile
Personal Blogs
  • Members
  • More
Personal Blogs
Legacy Personal Blogs 1870's Programmable Clock Project...
  • Blog
  • Documents
  • Mentions
  • Sub-Groups
  • Tags
  • More
  • Cancel
  • New
Blog Post Actions
  • Subscribe by email
  • More
  • Cancel
  • Share
  • Subscribe by email
  • More
  • Cancel
Group Actions
  • Group RSS
  • More
  • Cancel
Engagement
  • Author Author: jonivanart
  • Date Created: 11 Jan 2016 2:03 AM Date Created
  • Views 465 views
  • Likes 3 likes
  • Comments 7 comments
  • imbedded
  • robotics
  • collectable
  • horology
  • old
  • clocks
  • art
  • electronics
  • arduino
  • programmable
  • opensource
Related
Recommended

1870's Programmable Clock Project...

jonivanart
jonivanart
11 Jan 2016

First off, I have no idea how to do a blog so if this goes tot he wrong place then sorry in advance. LOL!

I am working on my 4th art project in a series called "TIME". Everything is in #steampunk style art. I have built a Violin, a lamp and a Guitar. (#JonIvanArt) The latest and No. 4 is a clock dated around 1870 or earlier. I'm calling it the "#ExplodedClock" because it will be as if the top right exploded and the steam generator grew out of it.

image

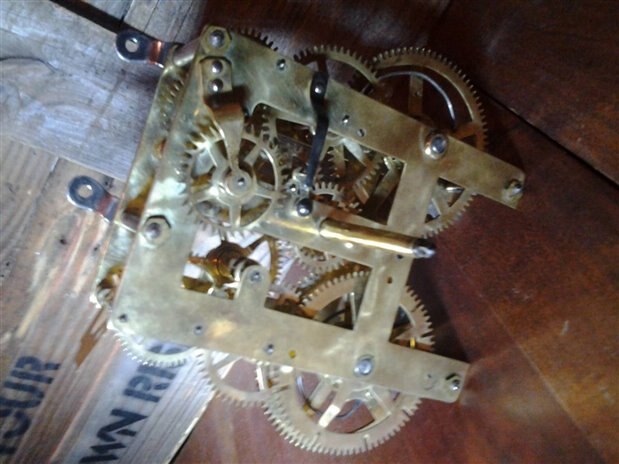
When I received the clock it was in the case that was damaged and the mechanics was in terrible shape. I had to tear it down and clean and polish the whole mechanism. It will be driven by 2 Arduino's. The first #Arduino has the tasks of moving the clock drive gear train with a stepper, the LCD display, and a solenoid that will engage every half second. I have a video that shows the operation of the solenoid posted here and on YouTube under my Jon Ivan channel. The second Arduino will operate the chimes which will be vibrating cell phone motors with Haptic drivers. It will also operate the chime side of the drive gears with a stepper. On top of this there will be a couple vaccum tubes lit with LED's from whichever source I can control it from, Arduino1 or 2.

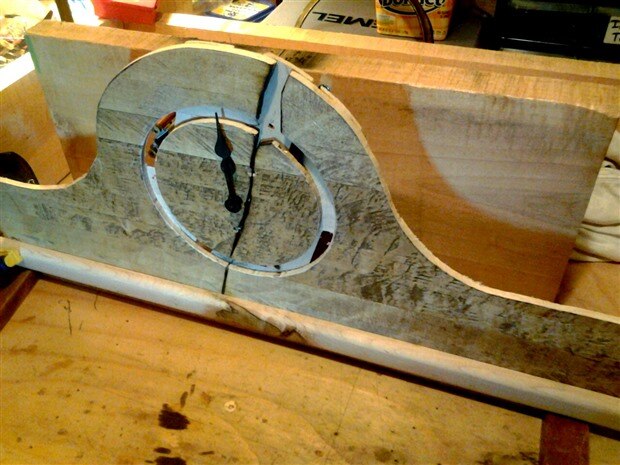
At the moment I have removed the clock for the wooden mount I built and am building the case. This is the front of the clock with it's crack built in but not the final color.

image

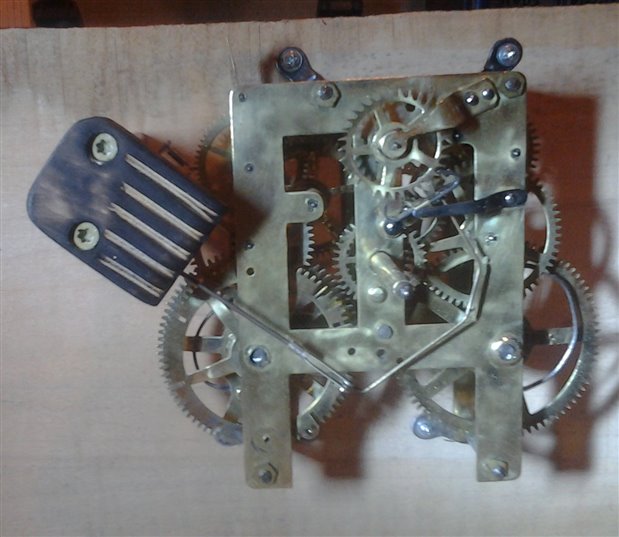
Here is a picture of it mounted and the #solenoid cover installed.

image

  • Sign in to reply

Top Comments

  • jw0752
    jw0752 over 7 years ago +1
    Hi Jon, It looks like you are off to a great start. I like to see the mixture of art and technology. I look forward to following your project. By the way your blog post turned out perfect. John
  • balearicdynamics
    balearicdynamics over 7 years ago +1
    Great idea ! Wait to see how the stuff proceed Enrico
  • jonivanart
    jonivanart over 7 years ago +1
    I'm guessing that I just add updates in the comment section so here goes! :-) I've got most of the mounting frame work cut to shape, the glass in it's frame and fitted to the clock face. In the picture…
  • jonivanart
    jonivanart over 7 years ago

    I know there is a lot of assembly and layout pictures for now but I hope to gain many followers before I get to the programming.

    Here is the Vacuum Tube assembly. The Tubes are barely noticable at this point because I will be cutting down the Light cage when putting it together. They will be lit up with 2 (Possibly RGB) LED's. The LED's will randomly glow different colors while fading in and out at random times.

    image

    • Cancel
    • Vote Up 0 Vote Down
    • Sign in to reply
    • More
    • Cancel
  • jonivanart
    jonivanart over 7 years ago

    I now have the second hand clock cleaned and assembled. It will operate like in a watch only I will be creating a feature that will make it extra cool in the project. I will try to make a random glitch generator in the program. This will make it stop and go backwards then stop and go forwards again at different speed as if it isn't working properly. Technically it won't be working properly! Ironic art! LOL!


    image

    I am also on Instagram @JonIvanArt if anyone wants to look at my other art builds including the worlds coolest guitar! ;-)

    • Cancel
    • Vote Up +1 Vote Down
    • Sign in to reply
    • More
    • Cancel
  • jonivanart
    jonivanart over 7 years ago

    During my building phases I constantly have to assemble and reassemble certain sections a lot for fitting purposes. At this point I use screws but if the part becomes permanent I use glue and usually dowels and sometimes screws and glue if needed. There is one guarantee tho, if it is permanent it is "PERMANENT"! LOL! In this picture the main chassis is temporary with screws. After figuring out the drive shaft assemblies I will have to disassemble it to drill the holes in a drill press to keep them lined up properly. Also I am fitting the tubing for one of the special features of the clock. The "Second" hand. This will be displaying 60 second rotations in the housing of a 2" clock piece at the end of the tubing. I will run the wires for the stepper through this tubing to the stepper driver or mount the driver with the stepper and just run the wires required for the driver board in the tubing to the Arduino.


    image

    • Cancel
    • Vote Up +1 Vote Down
    • Sign in to reply
    • More
    • Cancel
  • jw0752
    jw0752 over 7 years ago in reply to jonivanart

    I like to see art that is created out of technology. I have even tried a couple times but I am sure my talent, what little there is, lies on the technology side of the equation.

    John

    • Cancel
    • Vote Up +1 Vote Down
    • Sign in to reply
    • More
    • Cancel
  • jonivanart
    jonivanart over 7 years ago

    I'm guessing that I just add updates in the comment section so here goes! :-)

    I've got most of the mounting frame work cut to shape, the glass in it's frame and fitted to the clock face. In the picture it shows the water tank to the right in what I think will be the final position but not yet mounted.

    image


    The center of the face that is light colored will be removed later after the case is more stable without it. You will be able to see the clock movement from the front through the glass. I'm working on the trim pieces at the moment. Much more to go before the programming process but at least theres progress! ;-)

    • Cancel
    • Vote Up +1 Vote Down
    • Sign in to reply
    • More
    • Cancel
>
element14 Community

element14 is the first online community specifically for engineers. Connect with your peers and get expert answers to your questions.

  • Members
  • Learn
  • Technologies
  • Challenges & Projects
  • Products
  • Store
  • About Us
  • Feedback & Support
  • FAQs
  • Terms of Use
  • Privacy Policy
  • Legal and Copyright Notices
  • Sitemap
  • Cookies

An Avnet Company © 2023 Premier Farnell Limited. All Rights Reserved.

Premier Farnell Ltd, registered in England and Wales (no 00876412), registered office: Farnell House, Forge Lane, Leeds LS12 2NE.

ICP 备案号 10220084.

Follow element14

  • X
  • Facebook
  • linkedin
  • YouTube