element14 Community
element14 Community
    Register Log In
  • Site
  • Search
  • Log In Register
  • Members
    Members
    • Benefits of Membership
    • Achievement Levels
    • Members Area
    • Personal Blogs
    • Feedback and Support
    • What's New on element14
  • Learn
    Learn
    • Learning Center
    • eBooks
    • STEM Academy
    • Webinars, Training and Events
    • Learning Groups
  • Technologies
    Technologies
    • 3D Printing
    • Experts & Guidance
    • FPGA
    • Industrial Automation
    • Internet of Things
    • Power & Energy
    • Sensors
    • Technology Groups
  • Challenges & Projects
    Challenges & Projects
    • Design Challenges
    • element14 presents
    • Project14
    • Arduino Projects
    • Raspberry Pi Projects
    • Project Groups
  • Products
    Products
    • Arduino
    • Dev Tools
    • Manufacturers
    • Raspberry Pi
    • RoadTests & Reviews
    • Avnet Boards Community
    • Product Groups
  • Store
    Store
    • Visit Your Store
    • 'Choose another store...'
      • Europe
      •  Austria (German)
      •  Belgium (Dutch, French)
      •  Bulgaria (Bulgarian)
      •  Czech Republic (Czech)
      •  Denmark (Danish)
      •  Estonia (Estonian)
      •  Finland (Finnish)
      •  France (French)
      •  Germany (German)
      •  Hungary (Hungarian)
      •  Ireland
      •  Israel
      •  Italy (Italian)
      •  Latvia (Latvian)
      •  
      •  Lithuania (Lithuanian)
      •  Netherlands (Dutch)
      •  Norway (Norwegian)
      •  Poland (Polish)
      •  Portugal (Portuguese)
      •  Romania (Romanian)
      •  Russia (Russian)
      •  Slovakia (Slovak)
      •  Slovenia (Slovenian)
      •  Spain (Spanish)
      •  Sweden (Swedish)
      •  Switzerland(German, French)
      •  Turkey (Turkish)
      •  United Kingdom
      • Asia Pacific
      •  Australia
      •  China
      •  Hong Kong
      •  India
      •  Korea (Korean)
      •  Malaysia
      •  New Zealand
      •  Philippines
      •  Singapore
      •  Taiwan
      •  Thailand (Thai)
      • Americas
      •  Brazil (Portuguese)
      •  Canada
      •  Mexico (Spanish)
      •  United States
      Can't find the country/region you're looking for? Visit our export site or find a local distributor.
  • Translate
  • Profile
Personal Blogs
  • Members
  • More
Personal Blogs
Legacy Personal Blogs Make a Logic Analyzer from your Dev Kit Part 2: Papilio FPGA
  • Blog
  • Documents
  • Mentions
  • Sub-Groups
  • Tags
  • More
  • Cancel
  • New
Blog Post Actions
  • Subscribe by email
  • More
  • Cancel
  • Share
  • Subscribe by email
  • More
  • Cancel
Group Actions
  • Group RSS
  • More
  • Cancel
Engagement
  • Author Author: Jan Cumps
  • Date Created: 19 Mar 2015 8:18 PM Date Created
  • Views 2554 views
  • Likes 11 likes
  • Comments 5 comments
  • i2c
  • gadget_factory
  • sketch
  • papilio
  • spi
  • fpga
  • uart
  • logic_analyzer
  • protocol
  • logic_sniffer
  • feature_tutorial
Related
Recommended

Make a Logic Analyzer from your Dev Kit Part 2: Papilio FPGA

Jan Cumps
Jan Cumps
19 Mar 2015

The Papilio FPGA board is an excellent FPGA development board. It's got a Xilinx Spartan chip.

And you can use it as a quite capable logic analyzer.

That's no surprise. The developer of the Papilio, Jack Gasset from Gadget Factory, was also involved in the design of the Dangerous Prototypes Open Workbench Logic Sniffer.

Just compare the schematics, and you'll find more similarities than differences.

In essence, the Logic Sniffer is a Papilio with a Logic Analyzer design loaded, and with input buffering.

What we 'll do here is: load that same code (it's open source) to the Papilio,

That alone is enough to get a logic analyzer that can sample 32 channels at 200 MHz.

I'll also look at a level translator. That's a small 4-component circuit that allows to measure 5V digital signals.


image


Hardware


The bare minimum to start is one of the Papilio boards and a computer with USB port that can run Java.

With that alone you can start probing 3.3 V digital signals. So don't connect it directly to your Arduino UNO. The Arduino's signals are 5 V and the Xilinx Spartan doesn't like that.

I am using a Papilio Pro with a Xilinx Spartan 6LX FPGA. There's also a port available for the Papilio One with a Spartan 3E.


You don't have permission to edit metadata of this video.
Edit media
x
image
Upload Preview
image


If you want to probe 5V signals, you'll need a level translator. Gadget Factory has a few buffer wings (the Papilio lingo for shield).

The Gadget Factory wing designs are open source. I've made my own based on their design. More on that later.


Firmware


I believe that firmware is not the right name for that thing you load to an FPGA. The best other description I have found is bitstream. Whatever.

The sources are available on this thread on the Gadget Factory forum. They are no longer available. I attached my project as a ZIP to this post.

You'll need the Xilinx ISE Design Suite to create the binary file.


tip: I have loaded the logic analyzer bitfile to Flash, so that it's always available at power-on.

When I'm using the Papilio as FPGA development board, most of the times I load my designs to the FPGA directly and leave the LA design alone. After a power cycle or reset, it's an LA again.


Client software


I'm just going to point to my previous blog post here. It's exactly the same: Make a Logic Analyzer from your Dev Kit Part 1: Arduino UNO


Using the Papilio as Logic Analyzer


This video here walks through an i2c analysis:


You don't have permission to edit metadata of this video.
Edit media
x
image
Upload Preview
image


There are a few steps to do to be able to start samping:

Check your COM port:

When you plug in your analyzer, your computer will have two new COM ports. The port you need to select is the one with the highest number.


Connect your signals to the logic analyzer. For my i2c probing, I've connected ground to ground, SCL to A0 and SDA to A1

Then set up the sampling:

imageimageimage

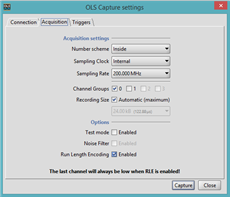
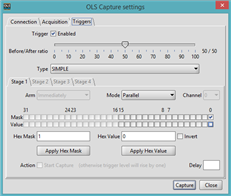
With the above settings, we'll sample at 200 MHz, triggering on a low of the i2c clock.

Here's the resulting sampling signal view:

image


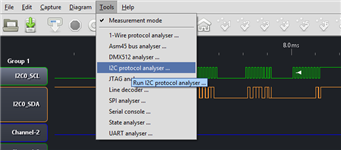
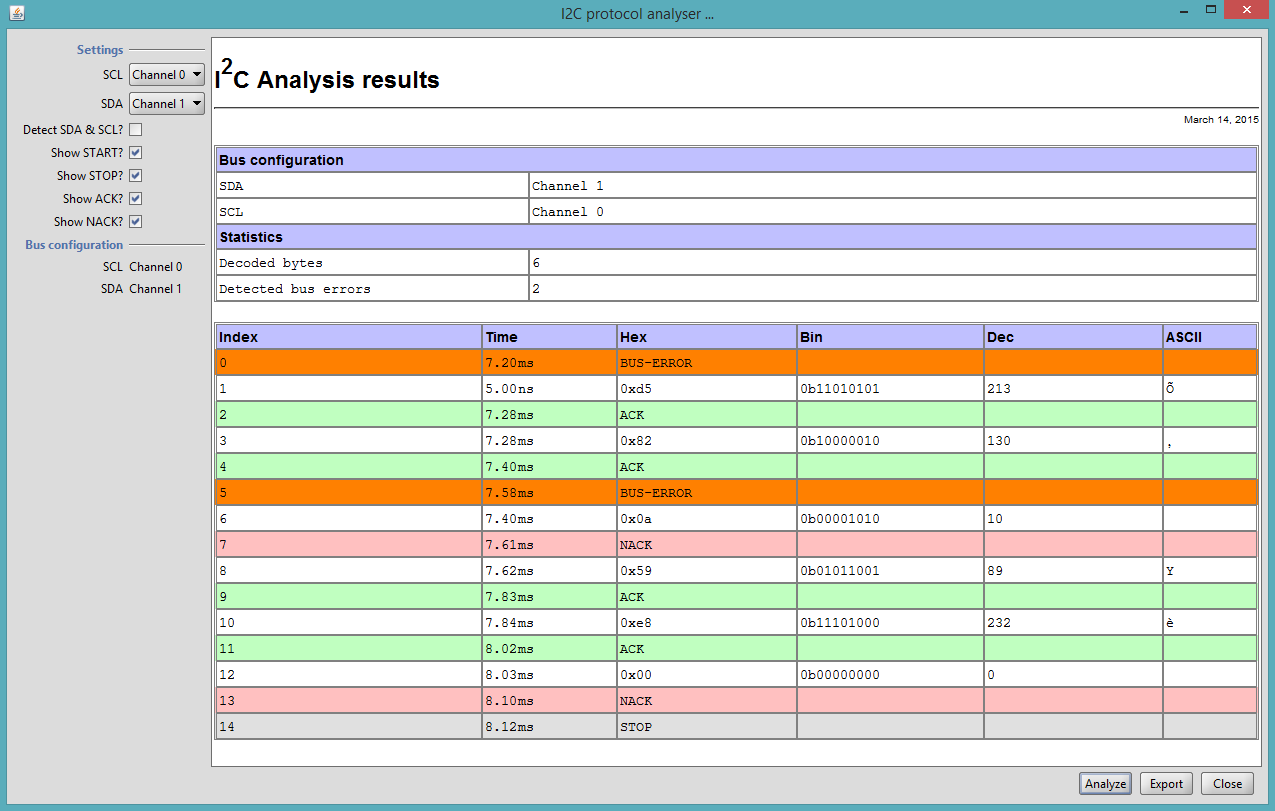
Once you're at this stage, you can use the i2c protocol analyzer to view the data and annotate your signal.

image

image

image


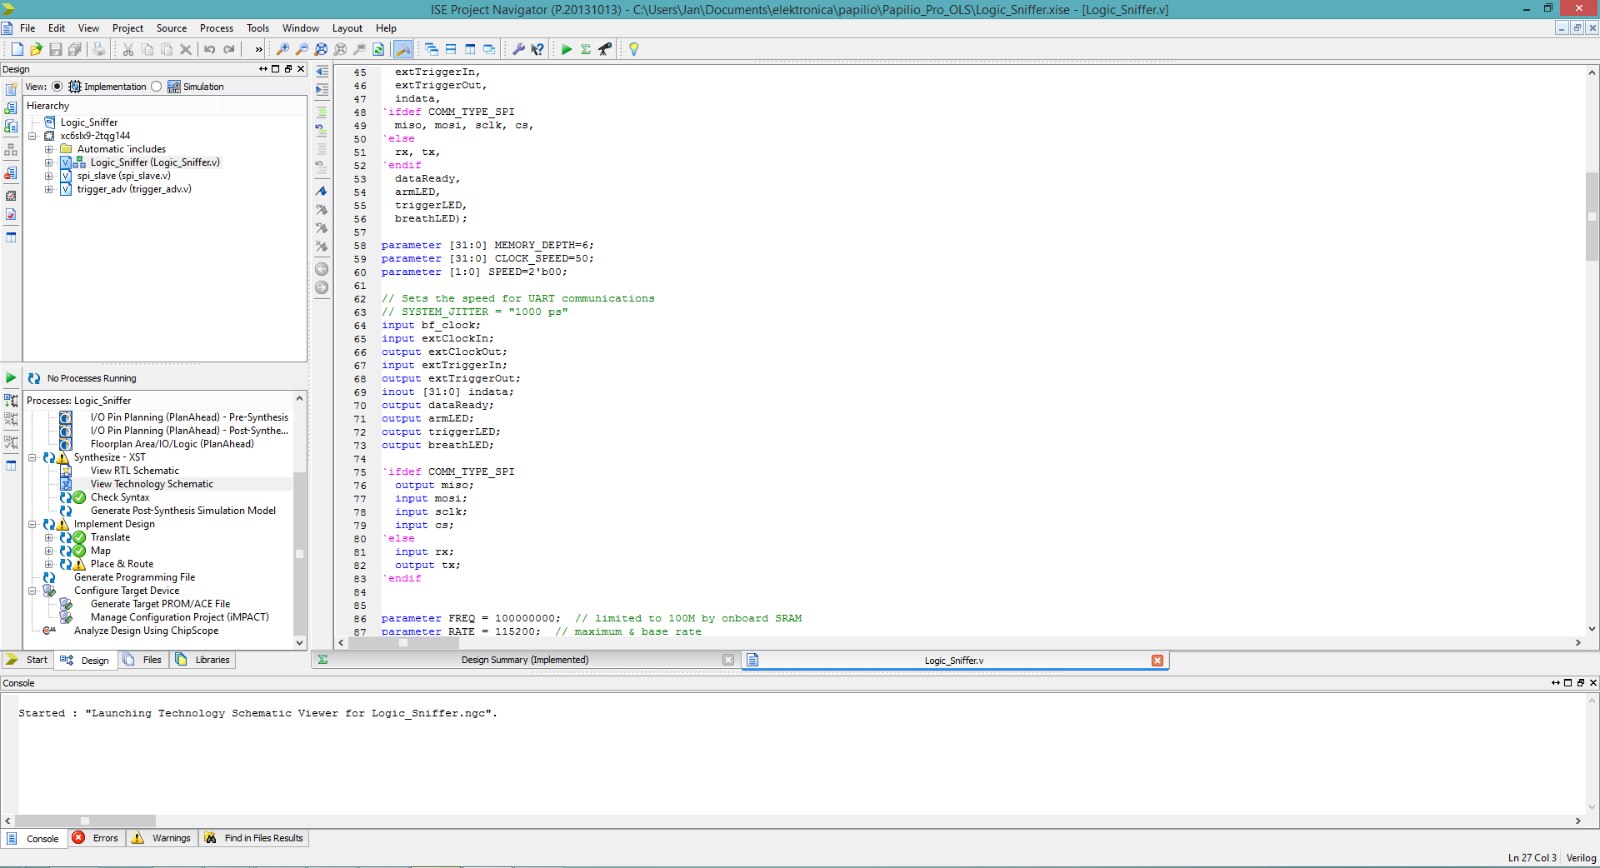
Just for kicks I'm also showing the Xilinx ISE. I haven't written any of the verilog (I'm only capable of writing some basic VHDL).


image


Related Blog
Make a Logic Analyzer from your Dev Kit Part 1: Arduino UNO
Make a Logic Analyzer from your Dev Kit Part 2: Papilio FPGA
Make a Logic Analyzer from your Dev Kit Part 3: Level Translator and Buffer
Attachments:
Papilio_Pro_OLS.zip
  • Sign in to reply

Top Comments

  • johnbeetem
    johnbeetem over 8 years ago +1
    This is a nice 'blog. Thank you for posting it. I really like the Papilio boards. This would be good material for element14's FPGA Group That group doesn't get a lot of traffic these days, which puzzles…
  • shabaz
    shabaz over 8 years ago +1
    Hi Jan, Great post!!! I've not tried to make the Papilio board into an OBLS since I have an OBLS board, but it is good to know there is little difference apart from the level translator that needs adding…
  • Jan Cumps
    Jan Cumps over 2 years ago

    The original sources for this project aren't available anymore on the internet.

    I attached my version to this post now. It's Magnus' project, but with input pulldowns disabled in the constraint file.

    • Cancel
    • Vote Up 0 Vote Down
    • Sign in to reply
    • More
    • Cancel
  • johnbeetem
    johnbeetem over 8 years ago in reply to Jan Cumps

    Jan Cumps wrote:


    I have been thinking about posting this one in the FPGA Group, and the previous blog in the Arduino group. But where to go with the Bus Pirate post?

    I would suggest http://www.element14.com/community/groups/open-source-hardware

    You don't need to be a member of the OSHW group to create content.

    • Cancel
    • Vote Up 0 Vote Down
    • Sign in to reply
    • More
    • Cancel
  • shabaz
    shabaz over 8 years ago

    Hi Jan,


    Great post!!! I've not tried to make the Papilio board into an OBLS since I have an OBLS board, but it is good to know there

    is little difference apart from the level translator that needs adding.

    It is extremely useful. I used it to decode a camera parallel bus - worked great!!

    • Cancel
    • Vote Up +1 Vote Down
    • Sign in to reply
    • More
    • Cancel
  • Jan Cumps
    Jan Cumps over 8 years ago in reply to johnbeetem

    I have been thinking about posting this one in the FPGA Group, and the previous blog in the Arduino group. But where to go with the Bus Pirate post?

    • Cancel
    • Vote Up 0 Vote Down
    • Sign in to reply
    • More
    • Cancel
  • johnbeetem
    johnbeetem over 8 years ago

    This is a nice 'blog.  Thank you for posting it.  I really like the Papilio boards.


    This would be good material for element14's FPGA Group  That group doesn't get a lot of traffic these days, which puzzles me: I don't know of a better site for general FPGA discussion and 'blogging.  It's probably a chicken-and-egg problem and we just need people to post a lot more content there.

    • Cancel
    • Vote Up +1 Vote Down
    • Sign in to reply
    • More
    • Cancel
element14 Community

element14 is the first online community specifically for engineers. Connect with your peers and get expert answers to your questions.

  • Members
  • Learn
  • Technologies
  • Challenges & Projects
  • Products
  • Store
  • About Us
  • Feedback & Support
  • FAQs
  • Terms of Use
  • Privacy Policy
  • Legal and Copyright Notices
  • Sitemap
  • Cookies

An Avnet Company © 2023 Premier Farnell Limited. All Rights Reserved.

Premier Farnell Ltd, registered in England and Wales (no 00876412), registered office: Farnell House, Forge Lane, Leeds LS12 2NE.

ICP 备案号 10220084.

Follow element14

  • X
  • Facebook
  • linkedin
  • YouTube