element14 Community
element14 Community
    Register Log In
  • Site
  • Search
  • Log In Register
  • Community Hub
    Community Hub
    • What's New on element14
    • Feedback and Support
    • Benefits of Membership
    • Personal Blogs
    • Members Area
    • Achievement Levels
  • Learn
    Learn
    • Ask an Expert
    • eBooks
    • element14 presents
    • Learning Center
    • Tech Spotlight
    • STEM Academy
    • Webinars, Training and Events
    • Learning Groups
  • Technologies
    Technologies
    • 3D Printing
    • FPGA
    • Industrial Automation
    • Internet of Things
    • Power & Energy
    • Sensors
    • Technology Groups
  • Challenges & Projects
    Challenges & Projects
    • Design Challenges
    • element14 presents Projects
    • Project14
    • Arduino Projects
    • Raspberry Pi Projects
    • Project Groups
  • Products
    Products
    • Arduino
    • Avnet Boards Community
    • Dev Tools
    • Manufacturers
    • Multicomp Pro
    • Product Groups
    • Raspberry Pi
    • RoadTests & Reviews
  • Store
    Store
    • Visit Your Store
    • Choose another store...
      • Europe
      •  Austria (German)
      •  Belgium (Dutch, French)
      •  Bulgaria (Bulgarian)
      •  Czech Republic (Czech)
      •  Denmark (Danish)
      •  Estonia (Estonian)
      •  Finland (Finnish)
      •  France (French)
      •  Germany (German)
      •  Hungary (Hungarian)
      •  Ireland
      •  Israel
      •  Italy (Italian)
      •  Latvia (Latvian)
      •  
      •  Lithuania (Lithuanian)
      •  Netherlands (Dutch)
      •  Norway (Norwegian)
      •  Poland (Polish)
      •  Portugal (Portuguese)
      •  Romania (Romanian)
      •  Russia (Russian)
      •  Slovakia (Slovak)
      •  Slovenia (Slovenian)
      •  Spain (Spanish)
      •  Sweden (Swedish)
      •  Switzerland(German, French)
      •  Turkey (Turkish)
      •  United Kingdom
      • Asia Pacific
      •  Australia
      •  China
      •  Hong Kong
      •  India
      •  Korea (Korean)
      •  Malaysia
      •  New Zealand
      •  Philippines
      •  Singapore
      •  Taiwan
      •  Thailand (Thai)
      • Americas
      •  Brazil (Portuguese)
      •  Canada
      •  Mexico (Spanish)
      •  United States
      Can't find the country/region you're looking for? Visit our export site or find a local distributor.
  • Translate
  • Profile
  • Settings
Personal Blogs
  • Community Hub
  • More
Personal Blogs
Legacy Personal Blogs Smart Home: Party Ball, Kind of
  • Blog
  • Documents
  • Mentions
  • Sub-Groups
  • Tags
  • More
  • Cancel
  • New
  • Share
  • More
  • Cancel
Group Actions
  • Group RSS
  • More
  • Cancel
Engagement
  • Author Author: djfraz
  • Date Created: 1 Jun 2018 7:44 PM Date Created
  • Views 1206 views
  • Likes 5 likes
  • Comments 7 comments
Related
Recommended

Smart Home: Party Ball, Kind of

djfraz
djfraz
1 Jun 2018

So the I have gotten the code to function as intended. So now for the hardware.


I started by depopulating the pcb that came with the original product. My original plan was to make an acrylic version with just the mounting holes, but realise if i flipped the pcb over, it would have the same effect.

imageimageimage

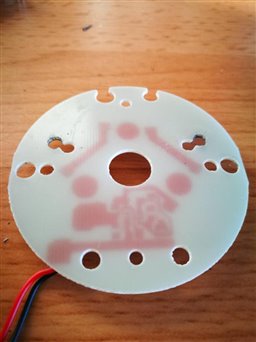
The only component which gave me any trouble was the inductor, the contacts were soldered under the ferrite core, and in the end i just snapped it off, as i was not worried about keeping the PCB traces.


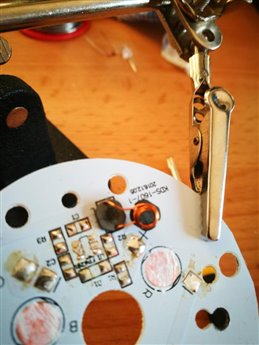
For the neopixels iI purchased some breadboard friendly ones from ebay (same price as most online retailers and no shipping cost) and simply hot glued them into place. The was to be able to replace them if needed.


And that is really all the hardware, the motor was connected through a transistor with diode protection. And it was ready for its first test.


image

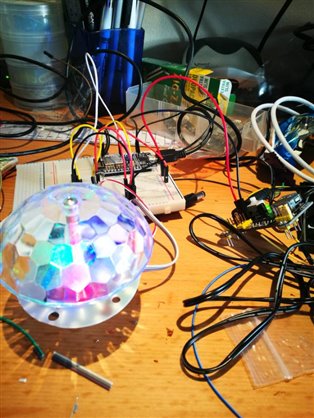
Everything appeared to be working, so I turned off the lights, closed al the blinds ready to see it in the dark, and;

image

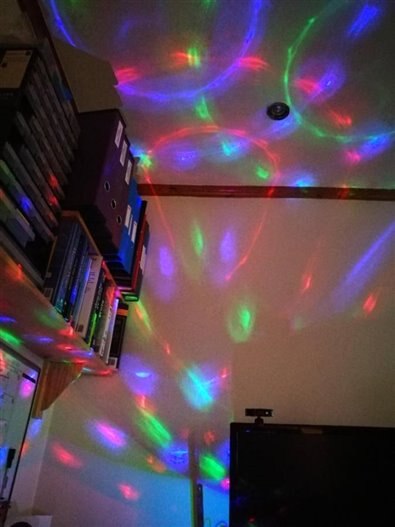
The picture has done it some justice here, but it is very dim in person. and for comparison, I purchased another of the original for comparison, and turned them on together. All the light is from the original. I have included a short video to greater illustrate the point, this one was with the lights on.

You don't have permission to edit metadata of this video.
Edit media
x
image
Upload Preview
image
image


It is fair to say that I am a bit disappointed at the moment. I though that the Neopixels would be bright enough, any of Adafruit videos show them being very bright.


I think the next step is going to be looking for higher powered RGB Addressable LEDs, somewhere in the region of 1W, as i think that is the value of the ones in the original. If anyone know where i could get my hand on them it would be much appreciated. I was considering buying normal 1W RGB LEDs and the Driver IC WS2811, but i think they are surface mounted and I am not wanting to go down the road of getting a custom PCB made for this.

  • Sign in to reply

Top Comments

  • 14rhb
    14rhb over 7 years ago +3
    Hi Duncan, I wouldn't say your design is a fail as titled in your video. It looks good, but from reading your article you are disappointed with the brightness - maybe this is just version 1 in development…
  • genebren
    genebren over 7 years ago +3
    Duncan, There is no such thing as a failure, if you keep trying (then it is just an experiment). You have made some great steps towards your goal, so keep moving forward. There are some good suggestions…
  • djfraz
    djfraz over 7 years ago in reply to 14rhb +3
    It has definitely been V1.0, it was not so much a fail of the design, more of my expectations. The process of designing and programming this has been rewarding in the knowledge i have gained, which i will…
  • djfraz
    djfraz over 7 years ago in reply to 14rhb

    It has definitely been V1.0, it was not so much a fail of the design, more of my expectations. The process of designing and programming this has been rewarding in the knowledge i have gained, which i will be using towards other projects. I will continue to work on the project, incorporating other features into the software to begin with and looking into ways of increasing the brightness of the leds.


    I had not though too much into the luminous flux density of the original leds or how they compare with the Neopixels. Looking at the original design, i would suspect that this is the case.

    • Cancel
    • Vote Up +3 Vote Down
    • Sign in to reply
    • More
    • Cancel
  • genebren
    genebren over 7 years ago

    Duncan,


    There is no such thing as a failure, if you keep trying (then it is just an experiment).  You have made some great steps towards your goal, so keep moving forward.  There are some good suggestions  here (thanks to fmilburn, jc2048  and 14rhb), so step back and plan what to try next.

    Good luck!

    Gene

    • Cancel
    • Vote Up +3 Vote Down
    • Sign in to reply
    • More
    • Cancel
  • 14rhb
    14rhb over 7 years ago

    Hi Duncan,


    I wouldn't say your design is a fail as titled in your video. It looks good, but from reading your article you are disappointed with the brightness - maybe this is just version 1 in development, lessons learnt and therefore definitely not a fail? image.


    The single LED on the original board do look like they are higher power than the Neopixels - I see you mentioned that in your teardown, assuming they were 1W....which is probably correct. The thing I notice is that they have a clear lens and probably focus that power into a narrower beam angle than your Neopixels. So you probably loose on luminous flux density due to both the lower power and lower beam forming.


    You may have already mentioned this and I've just missed those comments - my apologies if that is the case.


    Rod

    • Cancel
    • Vote Up +3 Vote Down
    • Sign in to reply
    • More
    • Cancel
  • djfraz
    djfraz over 7 years ago in reply to jc2048

    I was wanting to use addressable RGB Leds to be able to expand on the functionality of the original device. So, if I decide that I want all the lights to be purple, then all of them change to purple, instead of just seting the three Leds to their corresponding RGB value.


    It was also just to experiment. I may end up replacing the original LEDs and driving them together, as I plan to use and esp01 with only two gpio pins, and the motor control is a nice feature.


    I am still undecided how to proceed with this project, but it is for more of s learning experience than for the occasionally use the device will see.

    • Cancel
    • Vote Up +2 Vote Down
    • Sign in to reply
    • More
    • Cancel
  • jc2048
    jc2048 over 7 years ago in reply to fmilburn

    It looks (from Duncan's previous tear-down) like the case of that product is the heatsink. It would be much better with a metal-clad board, but it's nice that the heat is radiated off the exterior and not internally into the case.


    It's possible, looking at the board, that the person who originally designed it intended it to have an mcb and it's been subsequently cheapened (probably on the basis that something that runs for about an hour on three AA batteries probably won't be run for anything like 60,000 hours to test the LED lifetime).


    Once you get to 1W, there's a good case for a constant-current driver rather than resistors.

    • Cancel
    • Vote Up +2 Vote Down
    • Sign in to reply
    • More
    • Cancel
>
element14 Community

element14 is the first online community specifically for engineers. Connect with your peers and get expert answers to your questions.

  • Members
  • Learn
  • Technologies
  • Challenges & Projects
  • Products
  • Store
  • About Us
  • Feedback & Support
  • FAQs
  • Terms of Use
  • Privacy Policy
  • Legal and Copyright Notices
  • Sitemap
  • Cookies

An Avnet Company © 2025 Premier Farnell Limited. All Rights Reserved.

Premier Farnell Ltd, registered in England and Wales (no 00876412), registered office: Farnell House, Forge Lane, Leeds LS12 2NE.

ICP 备案号 10220084.

Follow element14

  • X
  • Facebook
  • linkedin
  • YouTube