


Last week I started a series of blogs on making the Tin Man from the 1939 movie The Wizard of Oz. The progress towards completion has been leisurely but this week's update features the first 3D print and code to add speech and smoothed movement to the eyes. I also showed the Tin Man to Bender who does not seem happy about a new robot in the house.

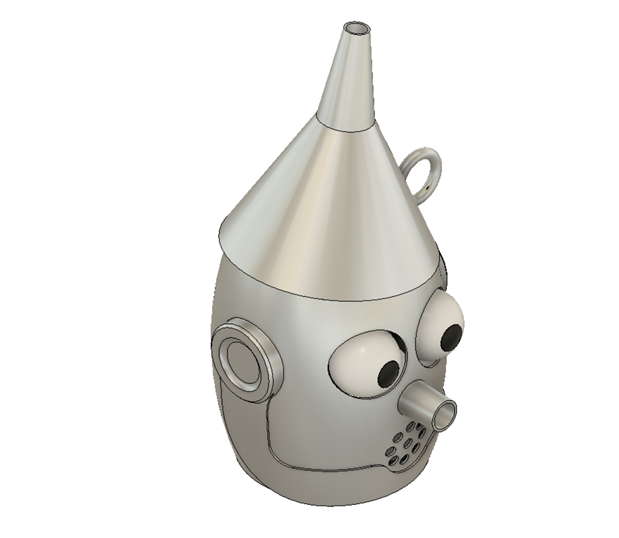
As a reminder, this is what he will ultimately look like. I hope.
Printing the Shell of the Head
The shell of the head was started last night around 8:00 PM and after a bit more than fifteen hours later it was complete.
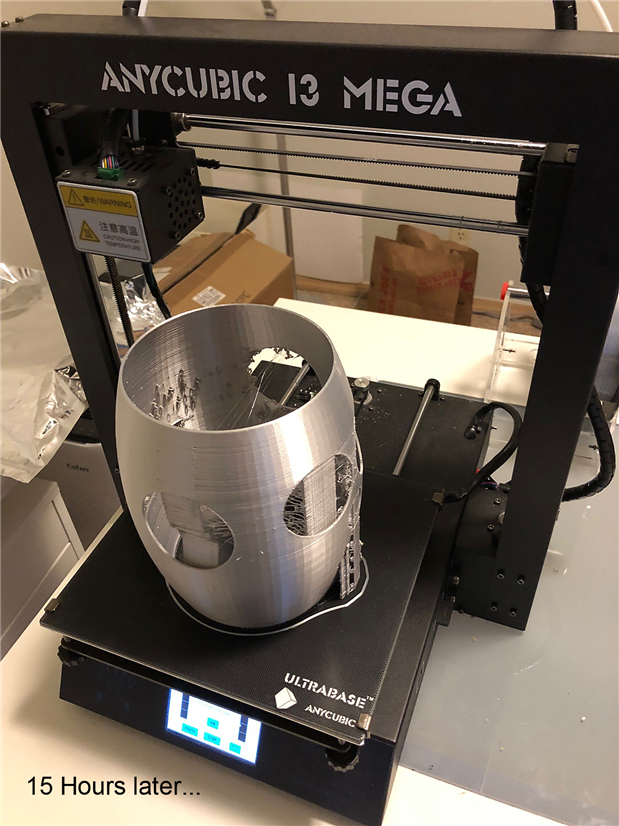
I learned a number of things from this print. It was as large as anything I've printed and the shell was only 1.6mm thick. Normally, I print thin shells at 2.0mm. I considered printing this without supports based on previous comments by Douglas Wong on the ability of PLA to bridge gaps. In the end, I elected to add supports thinking it would increase the probability of success and not wanting to lose the print. Adding supports increased the print time by 3 hours. Among the things learned:
- One support failed completely (left ear) and one became very distorted (right ear)
- The opening with the failed support bridged OK even without support
- The poor supports occurred along the Y-axis where the print table bangs back and forth
- There was a lot of stringing, especially where the supports failed
If I were to reprint this I would do it without supports. Here is the view from the front where the supports worked as designed and prior to removing supports and stringing. This would make a pretty scary Halloween mask.

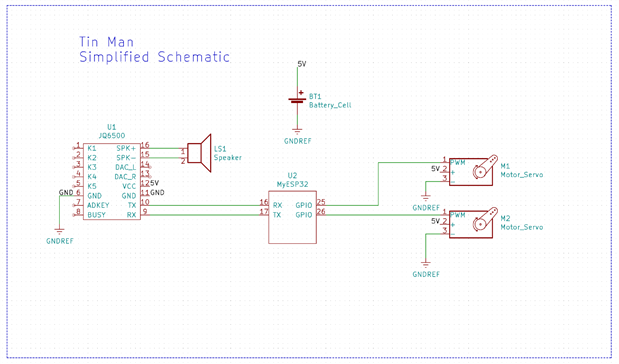
The Electronics
The simplified schematic is shown below.
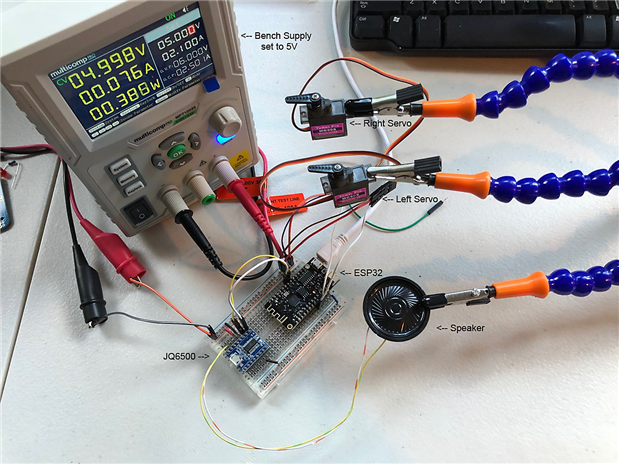
For now, a bench power supply is used to power the JQ6500 for sound and the two servos that control the eyes. In the final build, this will be replaced by a 18650 battery with a power management system. The actual test setup is shown in the image below.
The Firmware
I plan an upgrade to the animatronics over what was done with Bender by creating a sequencer. The sequencer will execute events like controlling the eyes and speech at pre-selected times. The speech events will be done using the Arduino library for the JQ6500 by James Sleeman located here. The algorithm described by James Bruton located here will be used to smooth out the movement of the servos events. Modifications were made to the libraries and algorithm to work with the ESP32 and suit the needs of this project.
The standard Arduino servo library moves the servo from the starting position to the finishing position as fast as the servo will turn. The algorithm by Bruton starts the servo out fast and then slows it as it approaches the final position in an attempt to make movement smoother and more natural. In the plot below I've plotted the output of one such event using the Arduino plotter.
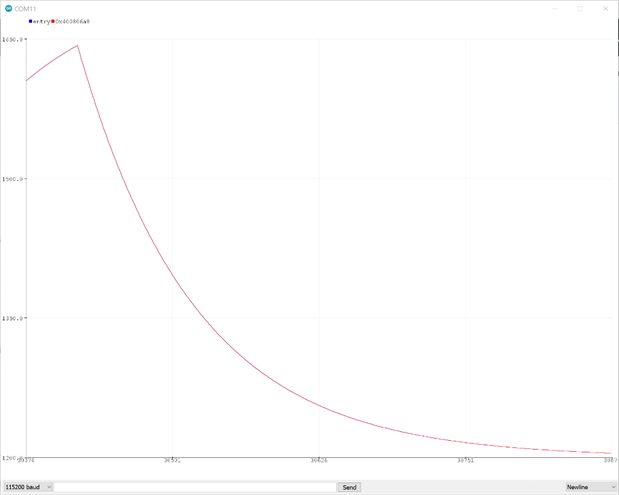
Note that if the movement hasn't finished (the sharp peak at the start of the plot) then a call for a new event will start immediately anyways in the algorithm as I have implemented it.
The Sequencer starts with a C-style struct that defines events.
struct events{
  int leftEyeMove;       // 0 to 1024
  int rightEyeMove;      // 0 to 1024
  int speachFile;        // -1, no file called
  int speachVolume;      // 0 to 30
  long eventLength;      // milliseconds
};
Somewhat unusual is the range that eye movement takes - basically it maps 0 to 1024 to the range of the servos. Speech files are aligned with the order that the files were placed on the JQ6500 with a value of -1 meaning no file is called for that event. The event length is the amount of time in milliseconds before the next event in the sequence occurs.
Assume that a laugh sequence is desired where the robot looks left for one second, returns to the center for one second, looks right for one second, and then laughs for 3 seconds with the laugh track being on file 3. The volume is set to 30 (loud). An array of events can be set up as shown below.
const int numLaughEvents = 6;
struct events laughSequence[numLaughEvents] = {
// Leye  Reye  File Vol Time
  {512,  512,  -1,  0,  1000},
  {0,    0,    -1,  0,  1000},
  {512,  512,  -1,  0,  1000},
  {1024, 1024, -1,  0,  1000},
  {512,  512,  -1,  0,  1000},
  {512,  512,   3,  30, 3000}
};
A short program to execute the sequence is included below that uses the algorithm of Bruton to smooth out the servos. It will be modified to execute multiple sequences in the final code.
/*
 * Sequences servo movement and speach from JQ6500
 * Contains ESP32 specific code, tested on generic ESP32
 *
 * Utilizes JQ6500 library from James Sleeman: http://sparks.gogo.co.nz/
 * Utilizes servo smoothing algorithm by James Bruton: https://github.com/XRobots/ServoSmoothing
 *
 * F Milburn,  Oct 2021
 */


// Libraries
#include <ESP32Servo.h>
#include <HardwareSerial.h>
#include <JQ6500_Serial.h>


// Event and Sequence Definition
struct events{
  int leftEyeMove;       // 0 to 1024
  int rightEyeMove;      // 0 to 1024
  int speachFile;        // -1, no file called
  int speachVolume;      // 0 to 30
  long eventLength;      // milliseconds
};
const int numLaughEvents = 6;
struct events laughSequence[numLaughEvents] = {
// Leye  Reye  File Vol Time
  {512,  512,  -1,  0,  1000},
  {0,    0,    -1,  0,  1000},
  {512,  512,  -1,  0,  1000},
  {1024, 1024, -1,  0,  1000},
  {512,  512,  -1,  0,  1000},
  {512,  512,   3,  30, 3000}
};


// JQ6500
// Create the mp3 module object. We're using the ESP32 Hardware Serial UART2, so:
// ESP32 Pin 16 (RX) is connected to TX of the JQ6500
// ESP32 Pin 17 (TX) is connected to RX of the JQ6500
HardwareSerial mySerial(2);
JQ6500_Serial mp3(mySerial);


// Servos
int leftEyeServoVal = laughSequence[0].leftEyeMove;
float leftEyeServoScaled = 1200;
float leftEyeServoSmoothed = 512;
float leftEyeServoSmoothedPrev = 512;


int rightEyeServoVal = laughSequence[0].rightEyeMove;
float rightEyeServoScaled = 1200;
float rightEyeServoSmoothed = 512;
float rightEyeServoSmoothedPrev = 512;


Servo leftEyeServo;
Servo rightEyeServo;


// Global variables
long newEventStart = laughSequence[0].eventLength;
unsigned long currentMillis;
long previousMillis = 0;    // set up timers
long interval =  5;         // update interval in milliseconds
int eventNum = 0;
long previousEventStart = 0;


void setup() {


  Serial.begin(115200);


  // Servos
  leftEyeServo.attach(25);
  rightEyeServo.attach(26);


  // Speech
  mySerial.begin(9600);
  mp3.reset();
  mp3.setVolume(10);                            // volume can be set 0 to 30
  mp3.setLoopMode(MP3_LOOP_NONE);               // play one file and stop
}


void loop() {


  currentMillis = millis();
  if (currentMillis - previousMillis >= interval) {  // start 5ms timed loop
      previousMillis = currentMillis;


      // Check to see if time for new event
      if ((currentMillis - previousEventStart) > newEventStart) {
        previousEventStart = currentMillis;
        leftEyeServoVal =  laughSequence[eventNum].leftEyeMove;
        rightEyeServoVal = laughSequence[eventNum].rightEyeMove;
        newEventStart =    laughSequence[eventNum].eventLength;
        if (laughSequence[eventNum].speachFile > -1){
          mp3.setVolume(laughSequence[eventNum].speachVolume);
          mp3.playFileByIndexNumber(laughSequence[eventNum].speachFile);
        }

        // set to next event
        if (eventNum < numLaughEvents-1){
          eventNum++;
        }
        else{
          eventNum = 0;
        }
      }

      // scale all inputs for the servo microseconds range
      leftEyeServoScaled =  (leftEyeServoVal - 512)  + 1200;
      rightEyeServoScaled = (rightEyeServoVal - 512) + 1200;

      // smooth inputs
      leftEyeServoSmoothed =  (leftEyeServoScaled * 0.01) +  (leftEyeServoSmoothedPrev * 0.99);
      rightEyeServoSmoothed = (rightEyeServoScaled * 0.01) + (rightEyeServoSmoothedPrev * 0.99);

      // save previous values
      leftEyeServoSmoothedPrev =  leftEyeServoSmoothed;
      rightEyeServoSmoothedPrev = rightEyeServoSmoothed;


      // write servos
      leftEyeServo.writeMicroseconds(leftEyeServoSmoothed);
      rightEyeServo.writeMicroseconds(rightEyeServoSmoothed);


  } // end of timed loop


} // end if main loop
The Obligatory Video
OK, maybe not obligatory, but here is a 20-second video to show that it works. You will have to imagine it is inside the head of the Tin Man and there are eyes attached to the servo. I'm working on improving the link mechanism to the eyes.
There are two weeks to finish this up. The difficult print is out of the way and the firmware shouldn't be bad if there is no feature creep. Thanks for reading and comments and suggestions are always welcome.
Links
The Tin Man - Getting Started
-

shabaz
-
Cancel
-
Vote Up
0
Vote Down
-
-
Sign in to reply
-
More
-
Cancel
Comment-

shabaz
-
Cancel
-
Vote Up
0
Vote Down
-
-
Sign in to reply
-
More
-
Cancel
Children