element14 Community
element14 Community
    Register Log In
  • Site
  • Search
  • Log In Register
  • Community Hub
    Community Hub
    • What's New on element14
    • Feedback and Support
    • Benefits of Membership
    • Personal Blogs
    • Members Area
    • Achievement Levels
  • Learn
    Learn
    • Ask an Expert
    • eBooks
    • element14 presents
    • Learning Center
    • Tech Spotlight
    • STEM Academy
    • Webinars, Training and Events
    • Learning Groups
  • Technologies
    Technologies
    • 3D Printing
    • FPGA
    • Industrial Automation
    • Internet of Things
    • Power & Energy
    • Sensors
    • Technology Groups
  • Challenges & Projects
    Challenges & Projects
    • Design Challenges
    • element14 presents Projects
    • Project14
    • Arduino Projects
    • Raspberry Pi Projects
    • Project Groups
  • Products
    Products
    • Arduino
    • Avnet Boards Community
    • Dev Tools
    • Manufacturers
    • Multicomp Pro
    • Product Groups
    • Raspberry Pi
    • RoadTests & Reviews
  • About Us
  • Store
    Store
    • Visit Your Store
    • Choose another store...
      • Europe
      •  Austria (German)
      •  Belgium (Dutch, French)
      •  Bulgaria (Bulgarian)
      •  Czech Republic (Czech)
      •  Denmark (Danish)
      •  Estonia (Estonian)
      •  Finland (Finnish)
      •  France (French)
      •  Germany (German)
      •  Hungary (Hungarian)
      •  Ireland
      •  Israel
      •  Italy (Italian)
      •  Latvia (Latvian)
      •  
      •  Lithuania (Lithuanian)
      •  Netherlands (Dutch)
      •  Norway (Norwegian)
      •  Poland (Polish)
      •  Portugal (Portuguese)
      •  Romania (Romanian)
      •  Russia (Russian)
      •  Slovakia (Slovak)
      •  Slovenia (Slovenian)
      •  Spain (Spanish)
      •  Sweden (Swedish)
      •  Switzerland(German, French)
      •  Turkey (Turkish)
      •  United Kingdom
      • Asia Pacific
      •  Australia
      •  China
      •  Hong Kong
      •  India
      •  Korea (Korean)
      •  Malaysia
      •  New Zealand
      •  Philippines
      •  Singapore
      •  Taiwan
      •  Thailand (Thai)
      • Americas
      •  Brazil (Portuguese)
      •  Canada
      •  Mexico (Spanish)
      •  United States
      Can't find the country/region you're looking for? Visit our export site or find a local distributor.
  • Translate
  • Profile
  • Settings
Arduino Tutorials
  • Products
  • Arduino
  • Arduino Tutorials
  • More
  • Cancel
Arduino Tutorials
Blog Getting to Know Arduino : Part 3 : Taking your Temperature
  • Blog
  • Forum
  • Documents
  • Events
  • Polls
  • Files
  • Members
  • Mentions
  • Sub-Groups
  • Tags
  • More
  • Cancel
  • New
Join Arduino Tutorials to participate - click to join for free!
  • Share
  • More
  • Cancel
Group Actions
  • Group RSS
  • More
  • Cancel
Engagement
  • Author Author: cstanton
  • Date Created: 31 Mar 2014 9:20 AM Date Created
  • Views 2026 views
  • Likes 9 likes
  • Comments 5 comments
  • min
  • 10
  • arduino uno
  • arduino-uno
  • ardunio
  • microcontrollers
  • 10minarduino
  • programming
  • atmega328
  • atmega328p
  • microcontroller
  • minute
  • 10minutearduino
  • uno
  • getting_to_know
  • getting to know
  • c++
  • arduino
  • feature tutorial
  • feature_tutorial
  • atmel
Related
Recommended

Getting to Know Arduino : Part 3 : Taking your Temperature

cstanton
cstanton
31 Mar 2014

You don't have permission to edit metadata of this video.
Edit media
x
image
Upload Preview
image


Previous Guides:

Getting to Know Arduino : Part 1 : Hello, World!

Getting to Know Arduino : Part 2 : Hello, Again!


So after getting a little familiar with flashing an LED in Getting to Know Arduino : Part 1 : Hello, World! and Getting to Know Arduino : Part 2 : Hello, Again! of my Getting to Know Arduino, I have decided to throw a bit of a curve ball with my Part 3. So assuming that you already have picked up a Breadboard and some wires with your Arduino Uno. I decided that some of you may have been like I was after getting to grips with it:


"Where's the cool stuff? All I'm doing is flashing a light".


So to be topically "Internet of Things", we're going to play with a temperature sensor. It can seem daunting to start with, but once you have it plugged in then it's easy enough to get instant feedback to be reading Celsius and Fahrenheit. Honest! And what's more fun than having empirical evidence to back up a complaint of the weather?


So to get to know your Arduino a little more you will need the following:


  • Arduino UnoArduino Uno
  • USB A to B CableUSB A to B Cable
  • BreadboardBreadboard
  • WiresWires
  • DS18B20DS18B20 Temperature Sensor
  • 4.7k Resistor4.7k Resistor


Along with the Arduino IDE installed onto your computer. When you have your parts, you will want to plug them into your breadboard and there is a specific way to plug them in to complete the circuit. Here is an example of a completed setup:


image


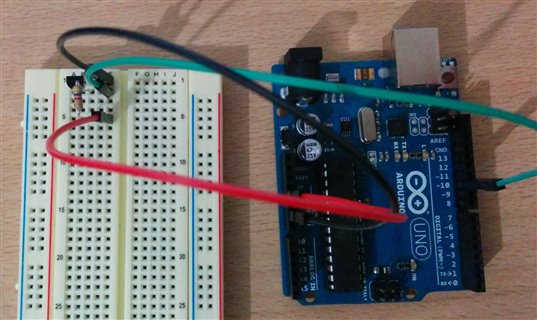
So at the moment, this looks like a mess of wiring in a dimly lit photograph (I guess that's partly what it is). However, there are some directions that can be taken to supplement this photograph. On a typical breadboard there is a grid referencing system. As you can partly see in the photograph it is labelled A to J along the columns across the top and numbered from 1 downwards for the rows. So simply we can wire it up thus:


  • Insert the DS18B20 to the breadboard. Push the outer pins into row 1 and the centre pin into row 2.
  • Insert the 4.7k resistor into row 2 and into row 5. Orientation does not matter.
  • Connect a wire:
    • From Pin 10 on the Arduino onto row 2.
    • From row 1 to GND on the Arduino, it does not matter which GND this is.
    • From row 5 to 5v on the Arduino

You should now have something that looks like the diagram! Only, possibly a lot neater.


Now once you have your temperature sensor, resistor and wires all connected to the Arduino, you can plug it into your computer via USB. However, we cannot go about using the Arduino IDE just yet, we need to get the example code to work from.


The temperature sensor communicates with the Arduino via a protocol called 'OneWire' and this is a protocol (a method of communicating) that was created by Dallas Semiconductor (now Maxim Integrated Products). The DS18B20 has a datasheet which goes into all sorts of detail about how it communicates on a very low level, what its voltage and current limits are, etc. This is common for electronic components and these datasheets, while laborious to read and learn are very useful for finding out what the equipment is capable of and how you can get it working.


So to communicate with the temperature sensor, we need to download the OneWire library, it can be downloaded from Paul Stoffregen's site, or I have attached it to this blog post. Once you have your OneWire.zip file, you will need to extract it to your Sketchbook folder. If you open up your Arduino IDE, click the File menu and select Preferences, your Sketchbook folder will be displayed under 'Sketchbook Location'. Extract the OneWire.zip file into this location using Windows or free software such as 7-Zip (merely copying the .zip file into the sketchbook folder will not suffice).


When the library is in place, restart the IDE and then you can open the File menu, go to Sketchbook, then OneWire and choose DS18x20_Temperature. This will load a sketch that you can then select the Sketch menu, and select Verify/Compile which will push it to your Arduino.


Once the sketch has compiled and it is on your Arduino, click the Tools menu, then select Serial Monitor. You should now see some values including the temperature detected by the sensor!


Since the code is running on the Arduino now, you can quite happily sit back and watch it collect the temperature. However what you could also now do, is alter what it prints to the Serial Monitor so that it could be picked up by, say, Python and presented as a graph. Below is code you can compile and send to your Arduino which will only show the temperature in Celsius without the additional information. Bare in mind that the temperature might need calibrating and it could be off by a few degrees, this is correctable in software.


#include <OneWire.h>

OneWire  ds(10);  // on pin 10 (a 4.7K resistor is necessary)

void setup(void) {
  Serial.begin(9600);
}

void loop(void) {
  byte i;
  byte present = 0;
  byte type_s;
  byte data[12];
  byte addr[8];
  float celsius, fahrenheit;

  if ( !ds.search(addr)) {
    ds.reset_search();
    delay(250);
    return;
  }

  if (OneWire::crc8(addr, 7) != addr[7]) {
      Serial.println("CRC is not valid!");
      return;
  }
  Serial.println();

  // the first ROM byte indicates which chip
  switch (addr[0]) {
    case 0x10:
      type_s = 1;
      break;
    case 0x28:
      type_s = 0;
      break;
    case 0x22:
      type_s = 0;
      break;
    default:
      return;
  }

  ds.reset();
  ds.select(addr);
  ds.write(0x44, 1);        // start conversion, with parasite power on at the end

  delay(1000);     // maybe 750ms is enough, maybe not

  present = ds.reset();
  ds.select(addr);
  ds.write(0xBE);         // Read Scratchpad

  for ( i = 0; i < 9; i++) {           // we need 9 bytes
    data[i] = ds.read();
  }

  int16_t raw = (data[1] << 8) | data[0];
  if (type_s) {
    raw = raw << 3; // 9 bit resolution default
    if (data[7] == 0x10) {
      raw = (raw & 0xFFF0) + 12 - data[6];
    }
  } else {
    byte cfg = (data[4] & 0x60);
    if (cfg == 0x00) raw = raw & ~7;  // 9 bit resolution, 93.75 ms
    else if (cfg == 0x20) raw = raw & ~3; // 10 bit res, 187.5 ms
    else if (cfg == 0x40) raw = raw & ~1; // 11 bit res, 375 ms
  }
  celsius = (float)raw / 16.0;
//  fahrenheit = celsius * 1.8 + 32.0;
}


If you want the Fahrenheit temperature, you can just un-comment (remove the //) on the line. Have a play about with the code, look up the functions as to what they do and see what you can make of it. If you have any troubles please leave a comment. There's also more information in the The specified item was not found. community group!

Attachments:
OneWire.zip
  • Sign in to reply

Top Comments

  • Robert Peter Oakes
    Robert Peter Oakes over 10 years ago in reply to Former Member +1
    Can you provide a diagram showing what the various parts are and how you want them to be connected (Dont worry about the technical details, just how the data will flow and in what form + where the XBee…
  • bodhi_94
    bodhi_94 over 9 years ago +1
    Nice work buddy.. Keep it up..
  • roshanjha
    roshanjha over 8 years ago

    Hi Everyone,


    I want to send the data of the sensor through Arduino to directly into the database postgresql, So i want to know how can i do this ,Is Arduino support the Postgresql, Plz  direct me ,how can i make this possible.ArduinoadminChristyZtech_contentzaras123harn

    • Cancel
    • Vote Up 0 Vote Down
    • Sign in to reply
    • More
    • Cancel
  • bodhi_94
    bodhi_94 over 9 years ago

    Nice work buddy.. Keep it up.. image

    • Cancel
    • Vote Up +1 Vote Down
    • Sign in to reply
    • More
    • Cancel
  • Robert Peter Oakes
    Robert Peter Oakes over 10 years ago in reply to Former Member

    Can you provide a diagram showing what the various parts are and how you want them to be connected (Dont worry about the technical details, just how the data will flow and in what form + where the XBee fits in etc), I am not sure if you want to be using an SD card or not. I am assuming you do


    Using the SD card libraries and a protocol stack (XBee libraries) on the same board may leave very little room on an arduino UNO for other parts of your program so I want to be sure of what the architecture is going to look like. Include where the temp sensor is etc


    Thanks

    • Cancel
    • Vote Up +1 Vote Down
    • Sign in to reply
    • More
    • Cancel
  • cstanton
    cstanton over 10 years ago in reply to Former Member

    Hi gkch,

    You can communicate with an SDCard using SPI (https://www.arduino.cc/en/Reference/SPI) and you can either connect directly to the SDCard with wires (eww) or buy an adapter board or make one yourself. There's an Arduino library for reading and writing to/from an SDCard (https://www.arduino.cc/en/Reference/SD).


    Hope that helps.

    • Cancel
    • Vote Up 0 Vote Down
    • Sign in to reply
    • More
    • Cancel
  • Former Member
    Former Member over 10 years ago

    i am using arduino uno ,it dont has sd card,i need receiving the file (from xbee)and read that file in serial monitor program for that any one help me


    apprisiating your help

    • Cancel
    • Vote Up 0 Vote Down
    • Sign in to reply
    • More
    • Cancel
element14 Community

element14 is the first online community specifically for engineers. Connect with your peers and get expert answers to your questions.

  • Members
  • Learn
  • Technologies
  • Challenges & Projects
  • Products
  • Store
  • About Us
  • Feedback & Support
  • FAQs
  • Terms of Use
  • Privacy Policy
  • Legal and Copyright Notices
  • Sitemap
  • Cookies

An Avnet Company © 2025 Premier Farnell Limited. All Rights Reserved.

Premier Farnell Ltd, registered in England and Wales (no 00876412), registered office: Farnell House, Forge Lane, Leeds LS12 2NE.

ICP 备案号 10220084.

Follow element14

  • X
  • Facebook
  • linkedin
  • YouTube