element14 Community
element14 Community
    Register Log In
  • Site
  • Search
  • Log In Register
  • About Us
  • Community Hub
    Community Hub
    • What's New on element14
    • Feedback and Support
    • Benefits of Membership
    • Personal Blogs
    • Members Area
    • Achievement Levels
  • Learn
    Learn
    • Ask an Expert
    • eBooks
    • element14 presents
    • Learning Center
    • Tech Spotlight
    • STEM Academy
    • Webinars, Training and Events
    • Learning Groups
  • Technologies
    Technologies
    • 3D Printing
    • FPGA
    • Industrial Automation
    • Internet of Things
    • Power & Energy
    • Sensors
    • Technology Groups
  • Challenges & Projects
    Challenges & Projects
    • Design Challenges
    • element14 presents Projects
    • Project14
    • Arduino Projects
    • Raspberry Pi Projects
    • Project Groups
  • Products
    Products
    • Arduino
    • Avnet Boards Community
    • Dev Tools
    • Manufacturers
    • Multicomp Pro
    • Product Groups
    • Raspberry Pi
    • RoadTests & Reviews
  • Store
    Store
    • Visit Your Store
    • Choose another store...
      • Europe
      •  Austria (German)
      •  Belgium (Dutch, French)
      •  Bulgaria (Bulgarian)
      •  Czech Republic (Czech)
      •  Denmark (Danish)
      •  Estonia (Estonian)
      •  Finland (Finnish)
      •  France (French)
      •  Germany (German)
      •  Hungary (Hungarian)
      •  Ireland
      •  Israel
      •  Italy (Italian)
      •  Latvia (Latvian)
      •  
      •  Lithuania (Lithuanian)
      •  Netherlands (Dutch)
      •  Norway (Norwegian)
      •  Poland (Polish)
      •  Portugal (Portuguese)
      •  Romania (Romanian)
      •  Russia (Russian)
      •  Slovakia (Slovak)
      •  Slovenia (Slovenian)
      •  Spain (Spanish)
      •  Sweden (Swedish)
      •  Switzerland(German, French)
      •  Turkey (Turkish)
      •  United Kingdom
      • Asia Pacific
      •  Australia
      •  China
      •  Hong Kong
      •  India
      •  Korea (Korean)
      •  Malaysia
      •  New Zealand
      •  Philippines
      •  Singapore
      •  Taiwan
      •  Thailand (Thai)
      • Americas
      •  Brazil (Portuguese)
      •  Canada
      •  Mexico (Spanish)
      •  United States
      Can't find the country/region you're looking for? Visit our export site or find a local distributor.
  • Translate
  • Profile
  • Settings
Arduino
  • Products
  • More
Arduino
Arduino Forum MQTT client program not showing any results with Arduino
  • Blog
  • Forum
  • Documents
  • Quiz
  • Events
  • Polls
  • Files
  • Members
  • Mentions
  • Sub-Groups
  • Tags
  • More
  • Cancel
  • New
Join Arduino to participate - click to join for free!
Actions
  • Share
  • More
  • Cancel
Forum Thread Details
  • Replies 49 replies
  • Subscribers 395 subscribers
  • Views 4122 views
  • Users 0 members are here
Related

MQTT client program not showing any results with Arduino

Former Member
Former Member over 10 years ago

I modified the MQTT example present under MQTT library pubsubclient for Arduino.

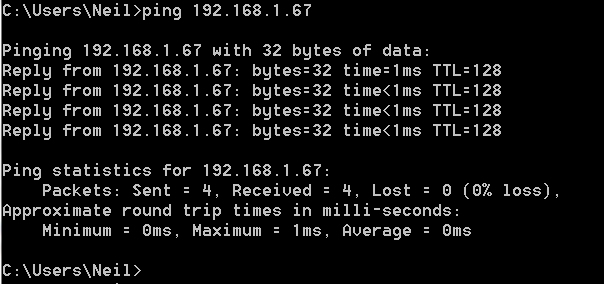
My MQTT server address is 192.168.1.6 with port 8081.

To this MQTT server,another MQTT client in my mobile is able to connect.

But this is not working with Arduino.There is no error shown during compilation or during uploading.

Infact,I am not able to see the connection result messages such as "Connected" or "Not connected" which i given in Serial.println() in setup function.

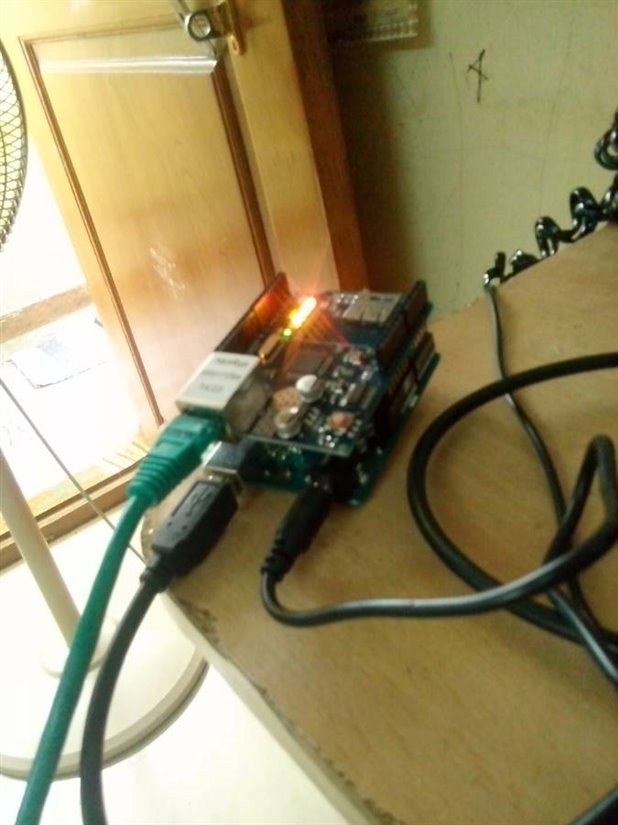
I am resetting Arduino before uploading the program.Please let me know why this is not showing any output....


#include <SPI.h>

#include <Ethernet.h>

#include <PubSubClient.h>

// Update these with values suitable for your network.

byte mac[]    = {  0xDE, 0xED, 0xBA, 0xFE, 0xFE, 0xED };

byte server[] = {192, 168, 1, 6 };

//byte ip[]     = { 172, 16, 0, 100 };


void callback(char* topic, byte* payload, unsigned int length) {

  // handle message arrived

}

EthernetClient ethClient;

PubSubClient client(server, 8081, callback, ethClient);

void setup()

{

  Ethernet.begin(mac);

  if (client.connect("*")) {

     Serial.begin(9600);

    Serial.println("Connected to MQTT Server");

    client.publish("outTopic","hello world");

   // client.subscribe("inTopic");

  }

  else

  {

   Serial.println("Could not connect to MQTT Server");

  }

}

void loop()

{

  //client.loop();


}

  • Sign in to reply
  • Cancel

Top Replies

  • neilk
    neilk over 10 years ago in reply to Former Member +3
    generk4 and organtin Hi Radhamani and Giovanni - I had 30 minutes to spare so I copied the program from comment 19 and posted it into the Arduino IDE (I am using 1.6.1), compiled and uploaded it to a genuine…
  • Former Member
    Former Member over 10 years ago +3
    Hi Bob, Neil and Clem, I tried LM35 Temperature sensor with MQTT Arduino sketch and it works fine for me I am sooo happy Thanks once again for your wonderful support and help
  • Former Member
    Former Member over 10 years ago in reply to bobcroft +2
    Hi bob,Neil,Clem and many others who have helped and guided me in this issue, I have successfully completed MQTT program and Arduino is successfully publishing and subscribing messages Next step,I am going…
Parents
  • organtin
    organtin over 10 years ago

    As the author of the suggested post, I add here few hints (besides those I sent privately by email).


    Install the sketch suggested by Clem Martins to your Arduino: just change the PORT from 5000 to 23. Then use any telnet client to try to connect to the Arduino. If it answer you are done.


    The telnet client, as well as the correct set of parameters to be used, depend on your network and OS configuration. If you own a Linux or a MAC OS X box, just open a terminal and type


    telnet xxx.yyy.zzz.hhh


    where xxx.yyy.zzz.hhh is the IP address of the Arduino. If you have a Windoze box find some tutorial searching for "telnet for windows 8" in google (for windows 8).


    You can get the appropriate parameters to configure your network using /sbin/ifconfig in a terminal in Linux of MAC OS X. For mine, e.g., this reads


    eth0      Link encap:Ethernet  HWaddr aa:bb:cc:dd:ee:ff

              inet addr:ggg.hhh.iii.jjj  Bcast:kkk.lll.mmm.nnn  Mask:ooo.ppp.qqq.rrr.sss

              inet6 addr: [...omissis...] Scope:Link

              UP BROADCAST RUNNING MULTICAST  MTU:1500  Metric:1

              RX packets:21735485 errors:0 dropped:0 overruns:0 frame:0

              TX packets:11473256 errors:0 dropped:0 overruns:0 carrier:0

              collisions:0 txqueuelen:1000

              RX bytes:5803016757 (5.4 GiB)  TX bytes:10549063051 (9.8 GiB)


    Here, what you need, is kkk.lll.mmm.nnn to be used as the gateway and ooo.ppp.qqq.rrr.sss as the mask. To get your DNS, just type


    dig google.com


    At the end you will see


    ;; Query time: 33 msec

    ;; SERVER: 141.108.35.4#53(141.108.35.4)

    ;; WHEN: Mon Mar 16 16:18:35 2015

    ;; MSG SIZE  rcvd: 116


    141.108.35.4 is the DNS.

    • Cancel
    • Vote Up 0 Vote Down
    • Sign in to reply
    • Cancel
  • Former Member
    Former Member over 10 years ago in reply to organtin

    Thanks much for your guidance..


    This is the output of dig google.com

    ;; Query time: 31 msec

    ;; SERVER: 203.145.184.32#53(203.145.184.32)

    ;; WHEN: Mon Mar 16 23:25:56 2015

    ;; MSG SIZE  rcvd: 204


    ==================================

    Here is the excerpt from the output of ipconfig/all


      Default Gateway . . . . . . . . . : 192.168.1.1

      DHCP Server . . . . . . . . . . . : 192.168.1.1

      DHCPv6 IAID . . . . . . . . . . . : 319607442

      DHCPv6 Client DUID. . . . . . . . : 00-01-00-01-1A-0F-5B-36-20-1A-06-34-92-D3

      DNS Servers . . . . . . . . . . . : 203.145.184.32

    =======================================

    I used the below code from the link you have mentioned,


    #include <Ethernet.h>

    #include <SPI.h>

    #define PORT 23

    byte mac[] = {0x5e, 0xa4, 0x18, 0xf0, 0x8a, 0xf6};

    IPAddress arduinoIP(192, 168, 1, 67);

    IPAddress dnsIP(203, 145, 184, 32);

    IPAddress gatewayIP(192, 168, 1, 1);

    IPAddress subnetIP(255, 255, 255, 0);


    EthernetServer server(PORT);

    boolean notYetConnected;


    void setup() {

      Ethernet.begin(mac, arduinoIP, dnsIP, gatewayIP, subnetIP);

      notYetConnected = true;

    }


    void loop(){

    }

    ======================

    Results of telnet:

    C:\Users\Radhamani>telnet 192.168.1.67 23

    Connecting To 192.168.1.67...Could not open connection to the host, on port 23:

    Connect failed


    image Still not working..I am so worried.Not sure where it is going wrong..

    • Cancel
    • Vote Up 0 Vote Down
    • Sign in to reply
    • Cancel
  • organtin
    organtin over 10 years ago in reply to Former Member

    Ok. What you have done so far is correct. However, you still must add some code to the sketch to make the Arduino answer to your telnet requests. The sketch you have deployed, in fact, does nothing but configuring the Ethernet shield, i.e. it acquire an address on the network but it is not able to do anything useful.


    To test your shield you must upload the sketch (modified as above) shown in my last post http://www.element14.com/community/groups/arduino/blog/2015/03/14/getting-data-over-the-internet-with-arduino. Don't care if you do not have any sensor attached: numbers will be (almost) random, but you should be able to see them. In that sketch the loop() answer to your request with telnet writing some characters over the connection.


    Once deployed you should be able to telnet the shield (be patient even up to 20-30 s...it may take time to establish the connection). Then you should see something like


    Giovanni-Organtini:~ organtin$ telnet 192.168.1.67

    Trying 192.168.1.67...

    Connected to 192.168.1.67.

    Escape character is '^]'.


    Then, type any character. You would see the "Welcome!" message (but in fact you should be quite fast) and a long list of numbers. To interrupt it type Ctrl+C, then Ctrl+] to exit from telnet.

    • Cancel
    • Vote Up 0 Vote Down
    • Sign in to reply
    • Cancel
Reply
  • organtin
    organtin over 10 years ago in reply to Former Member

    Ok. What you have done so far is correct. However, you still must add some code to the sketch to make the Arduino answer to your telnet requests. The sketch you have deployed, in fact, does nothing but configuring the Ethernet shield, i.e. it acquire an address on the network but it is not able to do anything useful.


    To test your shield you must upload the sketch (modified as above) shown in my last post http://www.element14.com/community/groups/arduino/blog/2015/03/14/getting-data-over-the-internet-with-arduino. Don't care if you do not have any sensor attached: numbers will be (almost) random, but you should be able to see them. In that sketch the loop() answer to your request with telnet writing some characters over the connection.


    Once deployed you should be able to telnet the shield (be patient even up to 20-30 s...it may take time to establish the connection). Then you should see something like


    Giovanni-Organtini:~ organtin$ telnet 192.168.1.67

    Trying 192.168.1.67...

    Connected to 192.168.1.67.

    Escape character is '^]'.


    Then, type any character. You would see the "Welcome!" message (but in fact you should be quite fast) and a long list of numbers. To interrupt it type Ctrl+C, then Ctrl+] to exit from telnet.

    • Cancel
    • Vote Up 0 Vote Down
    • Sign in to reply
    • Cancel
Children
  • Former Member
    Former Member over 10 years ago in reply to organtin

    Thankyou...I will do as you have suggested..

    I also replaced the EthernetShield as I checked with the vendor.They confirmed that the IC has gone due to short circuit.

    I previously connected only USB cable with Arduino+Ethernet Shield.I didn't connect external powersupply.Vendor adviced me to use both..


    I will do both the USB and external powersupply connections with the new Ethernetshield and proceed with what you have adviced now.

    I will update you the progress.

    • Cancel
    • Vote Up 0 Vote Down
    • Sign in to reply
    • Cancel
  • clem57
    clem57 over 10 years ago in reply to Former Member

    Never thought to ask about power. That could help! Thanks for the update.

    Clem

    • Cancel
    • Vote Up 0 Vote Down
    • Sign in to reply
    • Cancel
  • Former Member
    Former Member over 10 years ago in reply to organtin

    I am using new Ethernet Shield which the vendor told working component.I connected both the power supply and USB.

    Pics of Power supply adapter and Connections for your reference below..

    imageimage

    I used below code as per Giovanni's blog,

    #include <Ethernet.h>

    #include <SPI.h>

    #define PORT 23

    #define LM35PIN A0

    byte mac[] = {0x5e, 0xa4, 0x18, 0xf0, 0x8a, 0xf6};

    IPAddress arduinoIP(192, 168, 1, 67);

    IPAddress dnsIP(203, 145, 184, 32);

    IPAddress gatewayIP(192, 168, 1, 1);

    IPAddress subnetIP(255, 255, 255, 0);

    EthernetServer server(PORT);

    boolean notYetConnected;

    void setup() {

      Ethernet.begin(mac, arduinoIP, dnsIP, gatewayIP, subnetIP);

    notYetConnected = true;

    }

    void loop() {

        int i = 0;

        EthernetClient client = server.available();

        if (client) {

          if (notYetConnected) {

            client.println("Welcome!");

            notYetConnected = false;

          }

          if (client.available()) {

            unsigned long now = millis();

           int lm35 = analogRead(LM35PIN);

            now += millis();

            double T = 5000.*lm35/10240.;

            server.print(0.5*now);

           server.print(" ");

            server.println(T);

          }

        }

    }


    Still serial monitor is,

    Starting ethernet...0.0.0.0


    Telnet is,

    C:\Users\Radhamani>telnet 192.168.1.67

    Connecting To 192.168.1.67...Could not open connection to the host, on port 23:

    Connect failed


    Ping is,

    C:\Users\Radhamani>ping 192.168.1.67


    Pinging 192.168.1.67 with 32 bytes of data:

    Request timed out.

    Reply from 192.168.1.3: Destination host unreachable.

    Reply from 192.168.1.3: Destination host unreachable.

    Reply from 192.168.1.3: Destination host unreachable.


    Ping statistics for 192.168.1.67:

        Packets: Sent = 4, Received = 3, Lost = 1 (25% loss),


    Browser also no result image

    • Cancel
    • Vote Up 0 Vote Down
    • Sign in to reply
    • Cancel
  • organtin
    organtin over 10 years ago in reply to Former Member

    How the Ethernet shield is connected to the network? You should plug the RJ45 cable to a router.

    • Cancel
    • Vote Up 0 Vote Down
    • Sign in to reply
    • Cancel
  • Former Member
    Former Member over 10 years ago in reply to organtin

    Yes sir...Its connected to  Binatone Wireless ADSL2+ Router.Thats the green colour wire (RJ45) shown in picture.RJ45 is working fine.I connected it separately to my PC from Router and verified Internet is working fine in LAN.

    • Cancel
    • Vote Up 0 Vote Down
    • Sign in to reply
    • Cancel
  • organtin
    organtin over 10 years ago in reply to Former Member

    Ok, let me check something on my setup.

    I will not be able to do that until tomorrow.

    • Cancel
    • Vote Up 0 Vote Down
    • Sign in to reply
    • Cancel
  • neilk
    neilk over 10 years ago in reply to Former Member

    generk4 and organtin Hi Radhamani and Giovanni - I had 30 minutes to spare so I copied the program from comment 19 and posted it into the Arduino IDE (I am using 1.6.1), compiled and uploaded it to a genuine Arduino UNO R2, fitted with a compatible Ethernet shield.(HanRun HR911105A 12/11) which carries a Wiznet chip.


    The Ethernet shield was connected to my Router with a standard Ethernet Cable.


    I was able to get the following:

    image

    So I think the problem must be with your setup, Radhamani.


    1. I didn't find it necessary to connect both the USB AND an external PSU to the Arduino. Not sure why you have been advised to do that.
    2. There is a bank of LEDs on the Ethernet shield....do they light up, proving that your shield is actually connected to your network?image

    Try pressing the RESET button if they don't light up; make sure the ICSP connector is properly pushed home; try a different Ethernet cable.


    Hope you get it working


    Neil


    Postscript - I was also able to telnet to it and get the elapsed time and reading


    Neil

    • Cancel
    • Vote Up +3 Vote Down
    • Sign in to reply
    • Cancel
  • Former Member
    Former Member over 10 years ago in reply to neilk

    Hi Neil,

    Thanks for your update...

    Actually,the vendor technical person told that he didnt replace with new Ethernet Shield.Hence,i might be testing with old Ethernet shield only.

    The technical person who gave me the product told i have to connect External powersupply otherwise chip will shor-circuit and go off.He is asking me to pay another 1000 bugs to get new one... image Feeling like they are cheating ...


    In the Ethernet Shield,all the 4 lights are blinking.And,RJ45 cable is working fine.I tested by connecting the cable directly from Router to my PC in LAN and Internet is connected without  issues..

    As all the lights are glowing,not sure why Ethernet shield is still having problem in IP setup.

    • Cancel
    • Vote Up 0 Vote Down
    • Sign in to reply
    • Cancel
  • neilk
    neilk over 10 years ago in reply to Former Member

    generk4  Hi Radhamani. Maybe the shield is faulty in some way. I can't think of anything else to suggest you try.


    Where are you in the world? How much is 1000 bugs in GBPounds or USDollars?


    Can you buy on eBay? There are lots of vendors  selling compatible Ethernet shields at reasonable prices, with genuine Arduino Shields costing more.


    Neil

    • Cancel
    • Vote Up 0 Vote Down
    • Sign in to reply
    • Cancel
  • Former Member
    Former Member over 10 years ago in reply to neilk

    I am from India..Actually I am doing my college project and in only 2 more weeks I have to submit the project.And due to Ethernet shield issue,I am stuck with the project.Earlier I ordered in Ebay ,but they said they have ran out of stock.

    I am thatswhy trying to get the Shield directly from Electronics labs due to less time.


    I am planning to buy "PoEthernet Shield, cmostronics".Could you please suggest whether this component is right one for Arduino UNO?

    • Cancel
    • Vote Up 0 Vote Down
    • Sign in to reply
    • Cancel
element14 Community

element14 is the first online community specifically for engineers. Connect with your peers and get expert answers to your questions.

  • Members
  • Learn
  • Technologies
  • Challenges & Projects
  • Products
  • Store
  • About Us
  • Feedback & Support
  • FAQs
  • Terms of Use
  • Privacy Policy
  • Legal and Copyright Notices
  • Sitemap
  • Cookies

An Avnet Company © 2025 Premier Farnell Limited. All Rights Reserved.

Premier Farnell Ltd, registered in England and Wales (no 00876412), registered office: Farnell House, Forge Lane, Leeds LS12 2NE.

ICP 备案号 10220084.

Follow element14

  • X
  • Facebook
  • linkedin
  • YouTube