element14 Community
element14 Community
    Register Log In
  • Site
  • Search
  • Log In Register
  • About Us
  • Community Hub
    Community Hub
    • What's New on element14
    • Feedback and Support
    • Benefits of Membership
    • Personal Blogs
    • Members Area
    • Achievement Levels
  • Learn
    Learn
    • Ask an Expert
    • eBooks
    • element14 presents
    • Learning Center
    • Tech Spotlight
    • STEM Academy
    • Webinars, Training and Events
    • Learning Groups
  • Technologies
    Technologies
    • 3D Printing
    • FPGA
    • Industrial Automation
    • Internet of Things
    • Power & Energy
    • Sensors
    • Technology Groups
  • Challenges & Projects
    Challenges & Projects
    • Design Challenges
    • element14 presents Projects
    • Project14
    • Arduino Projects
    • Raspberry Pi Projects
    • Project Groups
  • Products
    Products
    • Arduino
    • Avnet Boards Community
    • Dev Tools
    • Manufacturers
    • Multicomp Pro
    • Product Groups
    • Raspberry Pi
    • RoadTests & Reviews
  • Store
    Store
    • Visit Your Store
    • Choose another store...
      • Europe
      •  Austria (German)
      •  Belgium (Dutch, French)
      •  Bulgaria (Bulgarian)
      •  Czech Republic (Czech)
      •  Denmark (Danish)
      •  Estonia (Estonian)
      •  Finland (Finnish)
      •  France (French)
      •  Germany (German)
      •  Hungary (Hungarian)
      •  Ireland
      •  Israel
      •  Italy (Italian)
      •  Latvia (Latvian)
      •  
      •  Lithuania (Lithuanian)
      •  Netherlands (Dutch)
      •  Norway (Norwegian)
      •  Poland (Polish)
      •  Portugal (Portuguese)
      •  Romania (Romanian)
      •  Russia (Russian)
      •  Slovakia (Slovak)
      •  Slovenia (Slovenian)
      •  Spain (Spanish)
      •  Sweden (Swedish)
      •  Switzerland(German, French)
      •  Turkey (Turkish)
      •  United Kingdom
      • Asia Pacific
      •  Australia
      •  China
      •  Hong Kong
      •  India
      •  Korea (Korean)
      •  Malaysia
      •  New Zealand
      •  Philippines
      •  Singapore
      •  Taiwan
      •  Thailand (Thai)
      • Americas
      •  Brazil (Portuguese)
      •  Canada
      •  Mexico (Spanish)
      •  United States
      Can't find the country/region you're looking for? Visit our export site or find a local distributor.
  • Translate
  • Profile
  • Settings
Arduino
  • Products
  • More
Arduino
Arduino Forum Detect whether a pin is connected to GND
  • Blog
  • Forum
  • Documents
  • Quiz
  • Events
  • Polls
  • Files
  • Members
  • Mentions
  • Sub-Groups
  • Tags
  • More
  • Cancel
  • New
Join Arduino to participate - click to join for free!
Actions
  • Share
  • More
  • Cancel
Forum Thread Details
  • State Suggested Answer
  • Replies 19 replies
  • Answers 8 answers
  • Subscribers 391 subscribers
  • Views 2791 views
  • Users 0 members are here
  • arduino uno
  • iot
Related

Detect whether a pin is connected to GND

tim687
tim687 over 8 years ago

Hi everyone!


Recently I've started working on my own IoT project. An Airco that has no connectivity to the world (except for a remote, that I never use), to connect it to the internet.


Note: The Arduino Uno is connected with an NodeMCU ESP-12F via serial. The Arduino Uno communicates with the AC circuitry.


However, I'm facing a serious problem that stops me from continuing with the project.


The AC has got three modes, Cool, Dry and Fan. Microprocessor controls the specialised equipment inside the AC (such as the refrig., the pump etc) so there is no line going to the other control board that is high when one of the three modes is active.

The MIP (microprocessor) controls three leds to let the user know which mode is active. (here comes the, for me, very difficult part)

The GND connections of the LED's are connected to the MIP (pulls, I guess) and they are being connected to GND when a mode is active.

The challenge for me, with my Arduino Uno, is to check which GND connection of the three LED's is connected to the GND line of the external circuitry.


I've made a beginning, for each line I've used this setup:


image

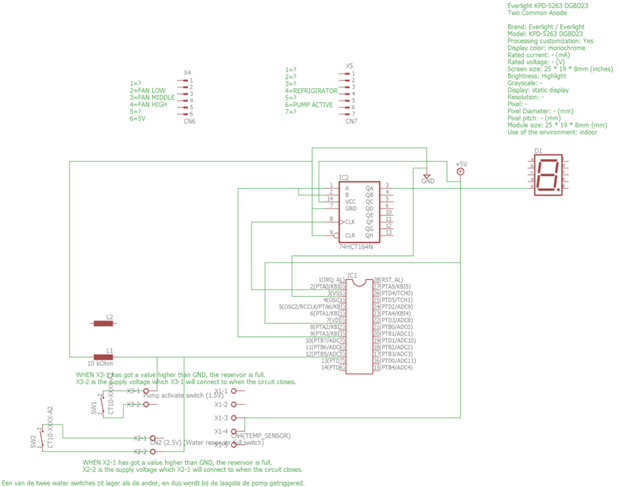
My selfmade and NOT complete schematic of the AC circuit

image


The values I get are usable, but they require taking loads of samples, and taking the average of all the samples, to check which line has got the lowest value (and thus is connected to GND). However, the values are fluctuating very much, and are not very accurate.

As required, the GND of the Arduino is connected to the GND of the AC circuitry.


If you want to see a few pictures of the AC circuitry, check out my Google Drive here.


The project is a hobby project, next to my school projects, so there is no deadline or something image


Thank you in advance for your help,


Tim


Message was edited by: Tim Koers Added the AC circuitry schematic

  • Sign in to reply
  • Cancel

Top Replies

  • jc2048
    jc2048 over 8 years ago in reply to tim687 +2 suggested
    If you're going to do all that, I think it would be worth your while sitting down with large sheet of paper and drawing out the circuit. It should be easy to do - you can see all the tracks, and the conventional…
  • jc2048
    jc2048 over 8 years ago +1 suggested
    Are you sure the drive is direct. [It's difficult to make out from your photographs because of the large blob of silicone over the capacitor that they've added.] The processor (assuming it is a processor…
Parents
  • jc2048
    0 jc2048 over 8 years ago

    Good start on the schematic.


    It's more usual to use R as an identifier for a resistor - L usually indicates an inductor (coil).


    The HC164 has CMOS logic levels at the inputs, the HCT164 has TTL logic levels. It would be good to have the HC part on the schematic if you can find one (I don't know Eagle, so I can't help you locate one - there's a fairly active Eagle contingent here, but you'll probably need to post questions in their area of the site to get their attention).


    Are you sure that the CLR input connects to GND? That would hold the output in the clear state permanently (the clear input is active low and, from memory - though it's a long, long time ago - I think it overrides everything else)?


    Does the QA output really connect directly to the e segment? Are you sure that there isn't a resistor along the way? The way you've got it, there wouldn't be any current limiting for the LEDs that form the segment.

    • Cancel
    • Vote Up 0 Vote Down
    • Sign in to reply
    • Verify Answer
    • Reject Answer
    • Cancel
Reply
  • jc2048
    0 jc2048 over 8 years ago

    Good start on the schematic.


    It's more usual to use R as an identifier for a resistor - L usually indicates an inductor (coil).


    The HC164 has CMOS logic levels at the inputs, the HCT164 has TTL logic levels. It would be good to have the HC part on the schematic if you can find one (I don't know Eagle, so I can't help you locate one - there's a fairly active Eagle contingent here, but you'll probably need to post questions in their area of the site to get their attention).


    Are you sure that the CLR input connects to GND? That would hold the output in the clear state permanently (the clear input is active low and, from memory - though it's a long, long time ago - I think it overrides everything else)?


    Does the QA output really connect directly to the e segment? Are you sure that there isn't a resistor along the way? The way you've got it, there wouldn't be any current limiting for the LEDs that form the segment.

    • Cancel
    • Vote Up 0 Vote Down
    • Sign in to reply
    • Verify Answer
    • Reject Answer
    • Cancel
Children
  • tim687
    0 tim687 over 8 years ago in reply to jc2048

    I wasn't even aware of the L and R identifiers. I searched for resistor in the Eagle Library, and since some parts are very hard to find, I used the first one that I saw (the one with the L as the identifier) I'll edit that when I get back working on it at the end of this weer or something.

    I'll check the connection of CLR to GND to make sure that it's connected as it's supposed to. Furthermore, the segment display is common annode, so the shift register should output a GND signal to make a letter visisble. This means that there should be current limiting resistors on the annode lines of the display. (and as far as I can remember, they are there)


    rsc The project is a hobby project, and I don't have them laying around, so I don't think that that is a good option. However, I'll keep the optocoupler in mind when designing a project in the near future!

    Thanks for your input though!


    Tim

    • Cancel
    • Vote Up 0 Vote Down
    • Sign in to reply
    • Verify Answer
    • Reject Answer
    • Cancel
element14 Community

element14 is the first online community specifically for engineers. Connect with your peers and get expert answers to your questions.

  • Members
  • Learn
  • Technologies
  • Challenges & Projects
  • Products
  • Store
  • About Us
  • Feedback & Support
  • FAQs
  • Terms of Use
  • Privacy Policy
  • Legal and Copyright Notices
  • Sitemap
  • Cookies

An Avnet Company © 2025 Premier Farnell Limited. All Rights Reserved.

Premier Farnell Ltd, registered in England and Wales (no 00876412), registered office: Farnell House, Forge Lane, Leeds LS12 2NE.

ICP 备案号 10220084.

Follow element14

  • X
  • Facebook
  • linkedin
  • YouTube