element14 Community
element14 Community
    Register Log In
  • Site
  • Search
  • Log In Register
  • Community Hub
    Community Hub
    • What's New on element14
    • Feedback and Support
    • Benefits of Membership
    • Personal Blogs
    • Members Area
    • Achievement Levels
  • Learn
    Learn
    • Ask an Expert
    • eBooks
    • element14 presents
    • Learning Center
    • Tech Spotlight
    • STEM Academy
    • Webinars, Training and Events
    • Learning Groups
  • Technologies
    Technologies
    • 3D Printing
    • FPGA
    • Industrial Automation
    • Internet of Things
    • Power & Energy
    • Sensors
    • Technology Groups
  • Challenges & Projects
    Challenges & Projects
    • Design Challenges
    • element14 presents Projects
    • Project14
    • Arduino Projects
    • Raspberry Pi Projects
    • Project Groups
  • Products
    Products
    • Arduino
    • Avnet & Tria Boards Community
    • Dev Tools
    • Manufacturers
    • Multicomp Pro
    • Product Groups
    • Raspberry Pi
    • RoadTests & Reviews
  • About Us
    About the element14 Community
  • Store
    Store
    • Visit Your Store
    • Choose another store...
      • Europe
      •  Austria (German)
      •  Belgium (Dutch, French)
      •  Bulgaria (Bulgarian)
      •  Czech Republic (Czech)
      •  Denmark (Danish)
      •  Estonia (Estonian)
      •  Finland (Finnish)
      •  France (French)
      •  Germany (German)
      •  Hungary (Hungarian)
      •  Ireland
      •  Israel
      •  Italy (Italian)
      •  Latvia (Latvian)
      •  
      •  Lithuania (Lithuanian)
      •  Netherlands (Dutch)
      •  Norway (Norwegian)
      •  Poland (Polish)
      •  Portugal (Portuguese)
      •  Romania (Romanian)
      •  Russia (Russian)
      •  Slovakia (Slovak)
      •  Slovenia (Slovenian)
      •  Spain (Spanish)
      •  Sweden (Swedish)
      •  Switzerland(German, French)
      •  Turkey (Turkish)
      •  United Kingdom
      • Asia Pacific
      •  Australia
      •  China
      •  Hong Kong
      •  India
      •  Japan
      •  Korea (Korean)
      •  Malaysia
      •  New Zealand
      •  Philippines
      •  Singapore
      •  Taiwan
      •  Thailand (Thai)
      •  Vietnam
      • Americas
      •  Brazil (Portuguese)
      •  Canada
      •  Mexico (Spanish)
      •  United States
      Can't find the country/region you're looking for? Visit our export site or find a local distributor.
  • Translate
  • Profile
  • Settings
Arduino
  • Products
  • More
Arduino
Arduino Forum Need Help with some Code
  • Blog
  • Forum
  • Documents
  • Quiz
  • Events
  • Polls
  • Files
  • Members
  • Mentions
  • Sub-Groups
  • Tags
  • More
  • Cancel
  • New
Join Arduino to participate - click to join for free!
Actions
  • Share
  • More
  • Cancel
Forum Thread Details
  • State Not Answered
  • Replies 10 replies
  • Subscribers 417 subscribers
  • Views 1229 views
  • Users 0 members are here
Related

Need Help with some Code

e14 Contributor
e14 Contributor over 12 years ago

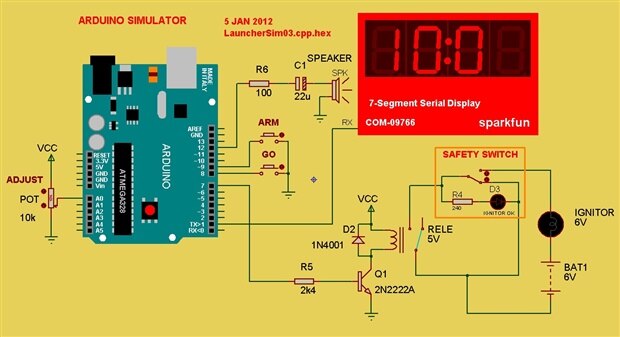
Hi, i'm new to arduino so i don't know much (yet image) but i'm working on an device for airsoft simulation that will light a pyro when the countdown hits 00:00

I saw a project on the internet and got the parts and code and it works.. but not quite in the way i would like it to.


First thing i would like to modify is the code that is already working. It uses a potentiometer to adjust the time to countdown (5s-60s) but i want to be able to count down from 10s or 9999s  10s being min time & 9999s being max time

Another thing is, the guy who wrote the code made it that only 3 digits are used but i would like to use all 4


I'm using a

7-Segment Serial Display - Red - COM-11441 - SparkFun  for the display


The code and schematic are posted below


If anyone can help me the would be much appreciated


Thanks


/*RocketLauncher

ROCKET LAUNCHER CONTROLLER.

Arduining.com  05 Jan 2012 (hardware implemented version)


-A count-down TIMER is implemented.

-The potentiometer is used to set the TIMER.

-Two Push-Buttons: "ARM" to set the counter and "GO" to start the counter.

-Display: Sparkfun's Serial 4 Digit 7-Segment Display . COM-09766 (RED).

-SoftwareSerial library is used to avoid random commands to the display

during program downloading.

*/

#define FuseTIME      1500  //Fuse current duration in milliminute.


#include <SoftwareSerial.h>  //Usinf the SoftwareSerial library.


#define Fuss     7          //Pin connected to the Fuse relay.

#define GoButt   8          //Pin connected to the GO button.

#define ArmButt  9          //Pin connected to the ARM button.

#define BuzzPin  4          //Connected to the Speaker.

#define TXdata   3          //Conneted to Rx of the Display.

#define RXdata   2          //not used in this project

#define SetPot   0          //Analog Pin connected to the Pot.


SoftwareSerial mySerialPort(RXdata,TXdata);


void setup(){

  pinMode(TXdata,OUTPUT);

  pinMode(RXdata,INPUT);

  pinMode(Fuss,OUTPUT);

  pinMode(ArmButt, INPUT);        // set "ARM" button pin to input

  pinMode(GoButt, INPUT);         // set "GO" button pin to input

  digitalWrite(Fuss,LOW);         //OPEN the fuse circuit.

  digitalWrite(ArmButt, HIGH);    // turn on pullup resistor

  digitalWrite(GoButt, HIGH);     // turn on pullup resistor

  mySerialPort.begin(9600);

  delay(10);                      //Wait for Serial Display startup.

  mySerialPort.print("v");        //Reset the display.

  mySerialPort.print("z");        //Brightness Control.

  mySerialPort.write(0x40);       //3/4 Intensity.


}


int  DownCntr;                    // down counter (1/10 Secs.)

int  Go=0;                        // Stopped


//================================================================

void loop(){

  if(!digitalRead(GoButt)||!digitalRead(ArmButt)){

    Go=0;                         //ABORT!!!

    tone(BuzzPin, 440, 1500);

    delay(1500);

  }


  if(Go==0){

    WaitARM();

    WaitGO();

  }

  ShowTimer();

  if (DownCntr > 50){

      if (DownCntr % 10 ==0)tone(BuzzPin, 1000, 50);  //Tone every second.

     }

  else if (DownCntr % 2 ==0)tone(BuzzPin, 1000, 50);  //Tone every 1/5 second.


  if (DownCntr ==0){

    //------------------ ROCKET LAUNCH! --------------------

    tone(BuzzPin, 440, FuseTIME);  //Launch audible signal

    digitalWrite(Fuss,HIGH);       //CLOSE the fuse circuit

    delay(FuseTIME);

    delay(FuseTIME);

    delay(FuseTIME);

    delay(FuseTIME);

    digitalWrite(Fuss,LOW);        //OPEN the fuse circuit.

    //------------------------------------------------------

     Go=0;

    }

  while (millis()% 100);        //Wait until the next 1/10 of second.

  delay(50);

  DownCntr--;

}


//----------------------------------------

void WaitGO(){

  ShowTimer();

  while(digitalRead(GoButt));

  Go=1;

  delay(20);

  while(!digitalRead(GoButt));  //Debounce GO button.

}


//------------------------------------------------------

void ReadTimer(){

  DownCntr = map(analogRead(SetPot), 0, 1023, 5, 99);

  DownCntr*=10;

}

//------------------------------------------------------

void ShowTimer(){

  String minute = String (DownCntr, DEC);

  while(minute.length()<3)minute= "0" + minute;     //format to 3 numbers.

  mySerialPort.print(minute);                         //Write to Display.

  mySerialPort.print("0");                             //Last digit off.

}


//------------------------------------------------------

void WaitARM(){

  while(digitalRead(ArmButt)==1){

     ReadTimer();

     delay(50);

     ReadTimer();

     ShowTimer();                   //Show Digits.

     delay(150);

  }


  Go=0;

  ShowTimer();

  tone(BuzzPin, 2000, 150);

  delay(200);

  tone(BuzzPin, 2000, 150);

  delay(200);

  tone(BuzzPin, 2000, 150);


  delay(20);

  while(!digitalRead(ArmButt));  //Debounce ARM button.


}


image

  • Sign in to reply
  • Cancel
Parents
  • Robert Peter Oakes
    0 Robert Peter Oakes over 12 years ago

    First this is needing to be changed

    void ReadTimer(){
      DownCntr = map(analogRead(SetPot), 0, 1023, 5, 99);
      DownCntr*=10;


    to


    void ReadTimer(){
      DownCntr = map(analogRead(SetPot), 0, 1023, 10, 9999);
      DownCntr*=10;


    and change this

    void ShowTimer(){
      String minute = String (DownCntr, DEC);
      while(minute.length()<3)minute= "0" + minute;     //format to 3 numbers.
      mySerialPort.print(minute);                         //Write to Display.
      mySerialPort.print("0");                             //Last digit off.
    }


    to this

    void ShowTimer(){
      String minute = String (DownCntr, DEC);
      while(minute.length()<4)minute= "0" + minute;     //format to 3 numbers.
      mySerialPort.print(minute);                         //Write to Display.
      mySerialPort.print("0");                             //Last digit off. <-- this line may need to be deleted
    }


    This should be enough from what I can see


    The display in the diagram is not connected to the same pins as the code indicates

    • Cancel
    • Vote Up 0 Vote Down
    • Sign in to reply
    • Verify Answer
    • Cancel
  • e14 Contributor
    0 e14 Contributor over 12 years ago in reply to Robert Peter Oakes

    Hi, thanks for the reply.


    I changed what you said to and when i upload to the arduino the display flickers random numbers


    i also tried removing the line     mySerialPort.print("0");                             //Last digit off. <-- this line may need to be deleted

    • Cancel
    • Vote Up 0 Vote Down
    • Sign in to reply
    • Verify Answer
    • Cancel
  • Robert Peter Oakes
    0 Robert Peter Oakes over 12 years ago in reply to e14 Contributor

    what happens if you only apply the first fix ?


    I dont have your hardware so im trying to provide help through manual examination of the code ?


    Peter

    • Cancel
    • Vote Up 0 Vote Down
    • Sign in to reply
    • Verify Answer
    • Cancel
  • e14 Contributor
    0 e14 Contributor over 12 years ago in reply to Robert Peter Oakes

    Random numbers scroll across the screen

    • Cancel
    • Vote Up 0 Vote Down
    • Sign in to reply
    • Verify Answer
    • Cancel
  • Robert Peter Oakes
    0 Robert Peter Oakes over 12 years ago in reply to e14 Contributor

    just tested using the serial console as I dont have a LED display like the one you have


    this works for the two functions (Thats all that needs changing)

    /

    /------------------------------------------------------
    void ReadTimer(){
      DownCntr = map(analogRead(SetPot), 0, 1023, 10, 9999);
      //DownCntr*=10;
    }
    //------------------------------------------------------
    void ShowTimer(){
      String minute = String (DownCntr, DEC);
      while(minute.length()<4)minute= "0" + minute;     //format to 4 numbers.
      mySerialPort.println(minute);                         //Write to Display.
      //mySerialPort.println("0");                             //Last digit off.
    }


    be aware though that you are up scaling the reading from the POT now so a count of 1023 will give you 9999 (10* the pot reading), you will not be able to adjust to exact time setting but it works aside from that


    oh and you may well find the last 2 digits may ghange even though your not adjusting the pot, this is expected and normal due to the ADC reading slightly different each time and multiplying up the result

    • Cancel
    • Vote Up 0 Vote Down
    • Sign in to reply
    • Verify Answer
    • Cancel
  • e14 Contributor
    0 e14 Contributor over 12 years ago in reply to Robert Peter Oakes

    I have uploaded the new code and the display flicks between d010 & 10d0  image

    • Cancel
    • Vote Up 0 Vote Down
    • Sign in to reply
    • Verify Answer
    • Cancel
  • Robert Peter Oakes
    0 Robert Peter Oakes over 12 years ago in reply to e14 Contributor

    does the orgional code work ok and do you have the display connected and set to use serial rather than I2C or SPI ??, because that seems to make no sence, I ran you code with the exception of changing the myserial print statements to output to the normal serial port and it works just great


    as in this (With my modes)


    /*RocketLauncher

    ROCKET LAUNCHER CONTROLLER.

    Arduining.com  05 Jan 2012 (hardware implemented version)


    -A count-down TIMER is implemented.

    -The potentiometer is used to set the TIMER.

    -Two Push-Buttons: "ARM" to set the counter and "GO" to start the counter.

    -Display: Sparkfun's Serial 4 Digit 7-Segment Display . COM-09766 (RED).

    -SoftwareSerial library is used to avoid random commands to the display

    during program downloading.

    */

    #define FuseTIME      1500  //Fuse current duration in milliminute.


    //#include <SoftwareSerial.h>  //Usinf the SoftwareSerial library.


    #define Fuss     7          //Pin connected to the Fuse relay.

    #define GoButt   8          //Pin connected to the GO button.

    #define ArmButt  9          //Pin connected to the ARM button.

    #define BuzzPin  4          //Connected to the Speaker.

    #define TXdata   3          //Conneted to Rx of the Display.

    #define RXdata   2          //not used in this project

    #define SetPot   0          //Analog Pin connected to the Pot.


    //SoftwareSerial Serial(RXdata,TXdata);


    void setup(){

      pinMode(TXdata,OUTPUT);

      pinMode(RXdata,INPUT);

      pinMode(Fuss,OUTPUT);

      pinMode(ArmButt, INPUT);        // set "ARM" button pin to input

      pinMode(GoButt, INPUT);         // set "GO" button pin to input


      digitalWrite(Fuss,LOW);         //OPEN the fuse circuit.

      digitalWrite(ArmButt, HIGH);    // turn on pullup resistor

      digitalWrite(GoButt, HIGH);     // turn on pullup resistor

      Serial.begin(9600);

      delay(10);                      //Wait for Serial Display startup.

      Serial.print("v");        //Reset the display.

      Serial.print("z");        //Brightness Control.

      Serial.write(0x40);       //3/4 Intensity.

    Serial.println();


    }


    int  DownCntr;                    // down counter (1/10 Secs.)

    int  Go=0;                        // Stopped


    //================================================================

    void loop(){

      if(!digitalRead(GoButt)||!digitalRead(ArmButt)){

        Go=0;                         //ABORT!!!

        tone(BuzzPin, 440, 1500);

        delay(1500);

      }


      if(Go==0){

        WaitARM();

        WaitGO();

      }

      ShowTimer();

      if (DownCntr > 50){

          if (DownCntr % 10 ==0)tone(BuzzPin, 1000, 50);  //Tone every second.

         }

      else if (DownCntr % 2 ==0)tone(BuzzPin, 1000, 50);  //Tone every 1/5 second.


      if (DownCntr ==0){

        //------------------ ROCKET LAUNCH! --------------------

        tone(BuzzPin, 440, FuseTIME);  //Launch audible signal

        digitalWrite(Fuss,HIGH);       //CLOSE the fuse circuit

        delay(FuseTIME);

        delay(FuseTIME);

        delay(FuseTIME);

        delay(FuseTIME);

        digitalWrite(Fuss,LOW);        //OPEN the fuse circuit.

        //------------------------------------------------------

         Go=0;

        }

      while (millis()% 100);        //Wait until the next 1/10 of second.

      delay(50);

      DownCntr--;

    }


    //----------------------------------------

    void WaitGO(){

      ShowTimer();

      while(digitalRead(GoButt));

      Go=1;

      delay(20);

      while(!digitalRead(GoButt));  //Debounce GO button.

    }


    //------------------------------------------------------

    void ReadTimer(){

      DownCntr = map(analogRead(SetPot), 0, 1023, 10, 9999);

      //DownCntr*=10;

    }

    //------------------------------------------------------

    void ShowTimer(){

      String minute = String (DownCntr, DEC);

      while(minute.length()<4)minute= "0" + minute;     //format to 3 numbers.

      Serial.println(minute);                         //Write to Display.

      //Serial.println("0");                             //Last digit off.

    }


    //------------------------------------------------------

    void WaitARM(){

      while(digitalRead(ArmButt)==1){

         ReadTimer();

         delay(50);

         ReadTimer();

         ShowTimer();                   //Show Digits.

         delay(150);

      }


      Go=0;

      ShowTimer();

      tone(BuzzPin, 2000, 150);

      delay(200);

      tone(BuzzPin, 2000, 150);

      delay(200);

      tone(BuzzPin, 2000, 150);


      delay(20);

      while(!digitalRead(ArmButt));  //Debounce ARM button.


    }

    • Cancel
    • Vote Up 0 Vote Down
    • Sign in to reply
    • Verify Answer
    • Cancel
  • e14 Contributor
    0 e14 Contributor over 12 years ago in reply to Robert Peter Oakes

    The original code set to 5-99s with 3 digits works and yes the display is setup using serial UART

    • Cancel
    • Vote Up 0 Vote Down
    • Sign in to reply
    • Verify Answer
    • Cancel
  • Robert Peter Oakes
    0 Robert Peter Oakes over 12 years ago in reply to e14 Contributor

    try the program i posted and see if it displays correctly over the serial port of the PC IDE serial console ? and let me know the result


    Thanks

    • Cancel
    • Vote Up 0 Vote Down
    • Sign in to reply
    • Verify Answer
    • Cancel
  • e14 Contributor
    0 e14 Contributor over 12 years ago in reply to Robert Peter Oakes

    Hi, it works in the serial monitor on the pc

    • Cancel
    • Vote Up 0 Vote Down
    • Sign in to reply
    • Verify Answer
    • Cancel
Reply
  • e14 Contributor
    0 e14 Contributor over 12 years ago in reply to Robert Peter Oakes

    Hi, it works in the serial monitor on the pc

    • Cancel
    • Vote Up 0 Vote Down
    • Sign in to reply
    • Verify Answer
    • Cancel
Children
No Data
element14 Community

element14 is the first online community specifically for engineers. Connect with your peers and get expert answers to your questions.

  • Members
  • Learn
  • Technologies
  • Challenges & Projects
  • Products
  • Store
  • About Us
  • Feedback & Support
  • FAQs
  • Terms of Use
  • Privacy Policy
  • Legal and Copyright Notices
  • Sitemap
  • Cookies

An Avnet Company © 2026 Premier Farnell Limited. All Rights Reserved.

Premier Farnell Ltd, registered in England and Wales (no 00876412), registered office: Farnell House, Forge Lane, Leeds LS12 2NE.

Follow element14

  • X
  • Facebook
  • linkedin
  • YouTube