


Note: 2/22/2021
This blog has been updated to reference a new GitHub repo and the most recent SDK changes.
Note: 2/12/2020
This blog has been updated for the recent SDK changes. The sample project and these instructions have been updated to utilize the CMAKE build process and the repository has been updated to support connecting to the Azure IoT Hub/IoT Central using a Device Provisioning Service (DPS).
Note: 6/9/2020
The GitHub projects have been updated to support the VS Code development environment. Note that when you first open the project in VS Code the CMake file generation will fail. If you open the CMakeLists.txt file, add a space and save the file, then CMake will regenerate the build files and the process will succeed. If anyone knows how to fix this issue, please add a comment and I'll get it corrected.
- Introduction
- IoT Hub Application
-
Create a Device Provisioning Service (DPS)
- Create a new DPS
-
Prove to DPS that we own the tenant
- Download the authentication CA certificate for your Azure Sphere tenant from the Azure Sphere Security Service.
- Upload the CA certificate to DPS to tell it that you own all devices whose certificates are signed by this CA. In return, the DPS presents a challenge code.
- Generate and download a validation certificate from the Azure Sphere Security Service, which signs the challenge code. Upload the validation certificate to prove to DPS that you own the CA.
- Create a device enrollment group, which will enroll any newly claimed Azure Sphere device whose certificate is signed by the validated tenant CA.
- Modify the Azure Sphere source code
- Build and run the application
- Device Twins
- Time Series Insights
- Clean up the resources
- Review
- Additional Azure Sphere Resources
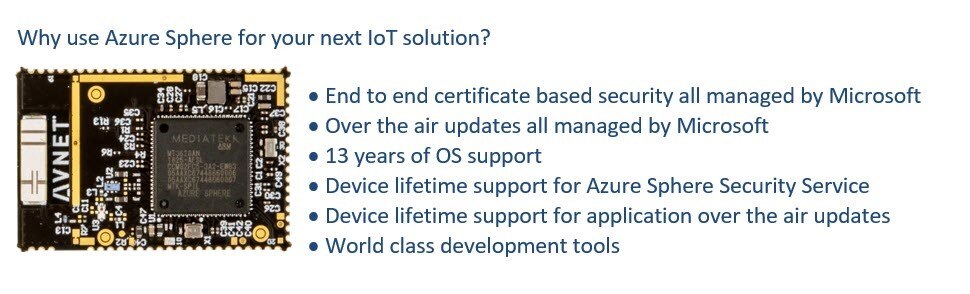
Introduction
Welcome to part 2 of the Avnet Azure Sphere Starter-Kit (Out of Box Demo). In this follow-up blog, we'll walk through connecting the example application to a Azure IoT Hub using a Device Provisioning Service (DPS). After we connect our device to the IoT Hub, I'll walk through device twins and demonstrate how we can control devices on our board from Azure. An finally, we'll provision a Time Series Insights resource in Azure to visualize the telemetry data that our device is sending to Azure.
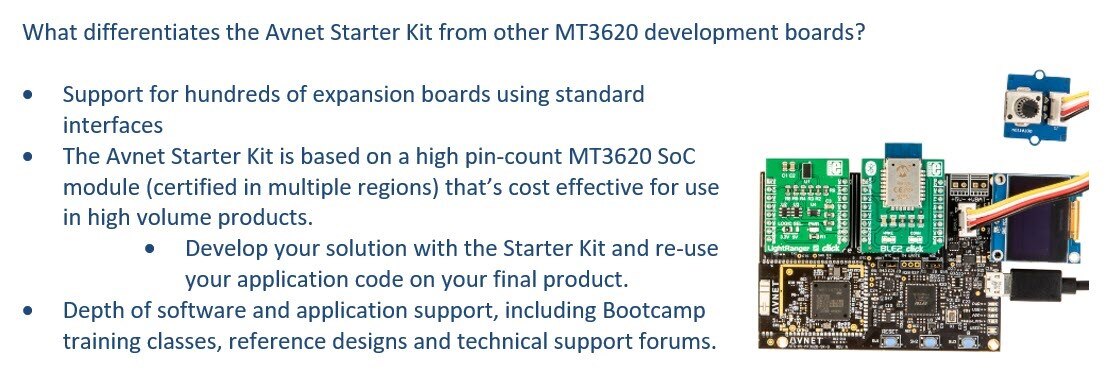
The Starter Kit is available for order here.
We've put together three different blogs to showcase the Avnet Azure Sphere Starter Kit and how it can be used for your next IoT project . . .
- Blog #1: Simple non-connected demo
- Reads on-board sensors every 5 seconds
- Reports sensor readings to the Visual Studio debug console
- http://avnet.me/mt3620-kit-OOB-ref-design-blog
- Blog #2: Hands-on connected demo using a generic IoT Hub, DPS and Time Series Insights (this blog)
- Must complete blog 1 demo before moving on to blog 2
- Configures IoT Hub, DPS and Time Series Insights Azure resources
- Manipulate the device twin
- Visualize data using Time Series Insights
- Blog #3: Hands-on, connected demo using IoT Central
- Must complete blog 1 before moving on to part 3
- Walks the user though configuring a IoT Central Application to create a custom visualization and device control application
- Advanced Blog: Hands-on, connected demo using IoT Central
- Must complete blog 1 before moving on to the Advanced Blog
- Adds OLED functionality to the Starter Kit
- Walks through using a real-time Bare-Metal M4 application to read the on-board light sensor
- Uses a IoT Central Template to quickly stand up a new IoT Central Application
- http://avnet.me/azsphere-tutorial
IoT Hub Application
If this is your first time working with one of the cloud providers, don’t worry. While Azure has hundreds of different resources you can utilize, we’re only going to need a few of things. I’ll walk us through all the details, it’s not as hard as you may think.
Before we begin, I’ll make the assumption that you’ve completed the simplified non-connected example. If not, please go back and complete that tutorial here. For the IoT Hub tutorial the following prerequisites must be met.
- Visual Studio 2019 and the Azure Sphere SDK are installed and confirmed working
- You were able to run the non-connected example without any issues (link)
- Your device is connected to a Wi-Fi access point and has access to the internet
- Help with WI-FI connections (link)
- You have an Azure account.
- You can sign up for a free Azure account here.
Create an IoT Hub
The first thing we need to do is create an IoT Hub. The IoT Hub is a collection point for IoT devices connecting into Azure. Once a device is connected to an IoT Hub and streaming telemetry data, other Azure services can ingest the data and do meaningful things. Azure IoT Hubs can manage connections to hundreds of thousands of devices.
- Log into Azure https://portal.azure.com
- Click on “+ Create a resource” à “Internet of Things” à “IoT Hub.” The IoT hub form will open.
- You can also use the search bar to search for "IoT Hub."

- In the IoT hub form fill in each entry
- Subscription: Whatever your subscription is, it may be a “Free” or “Pay-as-you-Go” subscription.
- Resource Group: Click on the “Create new” link under the entry box and give your new Resource Group a name. For example “DemoRG”.
- Region: Select the region closest to your physical location.
- IoT Hub Name: Select a name for your IoT Hub. Note that the IoT Hub name must be unique across all of Azure. Your entry will be validated and if the name you used is not available, the form will display an error. Azure will generate a FQDN for your IoT Hub, so it must be unique.
- Click on the “Review + create” button

- Review the properties for your new IoT Hub. The “Pricing and scale tier” should be set to S1, the default. This tier will accommodate 400,000 data messages/day to/from your Azure Sphere device. After you’re happy with the properties, click on the “Create” button at the bottom of the form.

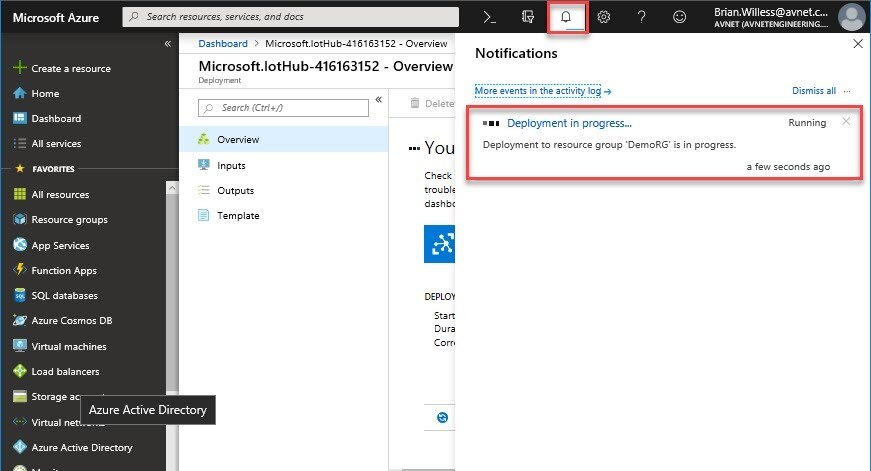
- Azure will start to work on deploying your IoT Hub. This can take a few minutes. You can monitor the progress/status of your deployment by clicking on the bell icon in the header.
Create a Device Provisioning Service (DPS)
Now that we have an IoT Hub, we need to provision or add devices to our Hub. Devices must be provisioned to an IoT Hub; the IoT Hub will reject any connection attempts from un-provisioned devices.
When we’re talking about IoT this usually implies that we’ll have a very large number of devices. This allows us to collect large amounts of data that can be used to gain insights about our system so that we can make smart, data-driven, business decisions.
But how do we provision all these devices? One way is to manually add each device to an IoT Hub and use an IoT Hub connection string specific to that device. This works for a single device, but what about when you have 10, 100, or 100,000 devices. This approach would require some poor engineer to manually add 100 different devices to the IoT Hub, and would require 100 different application builds, each with its own specific connection string. It’s easy to see this this is not a scalable approach.
To make connecting 100, 100,000, or 1,000,000 devices to Azure easy, Microsoft provides a Device Provisioning Service (DPS). DPS allows large scale deployments without any manual provisioning steps. When you have 10 or 1,000,000 devices this is a great thing!
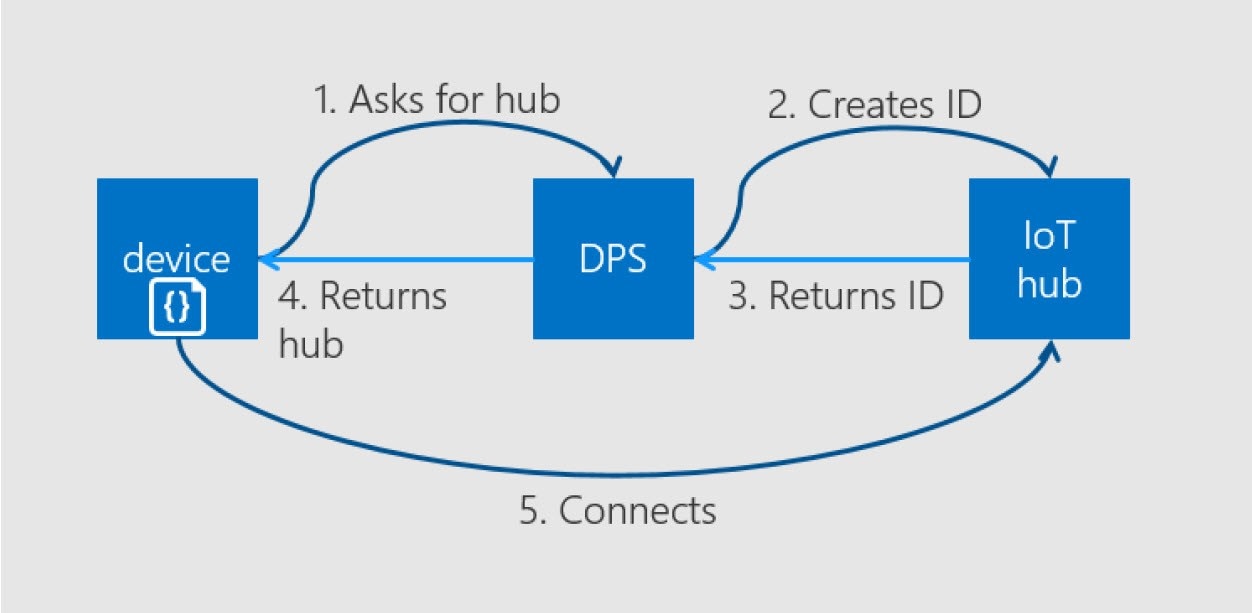
From the developer’s point of view, I can create a single application build that can be deployed on all my devices. When my devices first connect to the Internet they will contact the global DPS server that will use some specific information in my application to provision my devices onto my IoT Hub(s). The diagram below illustrates how DPS works. After step #5 the device is provisioned and connected to the IoT Hub!
Create a new DPS
- In your Azure portal click on the “Create a resource” button
- Search the marketplace for “Device Provisioning Service”
- Select IoT Hub Device Provisioning Service
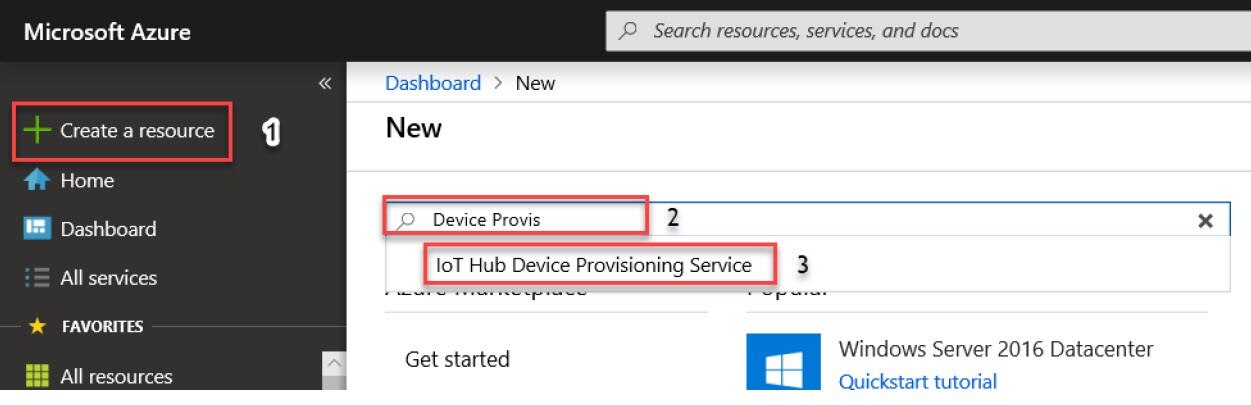
- Click Create
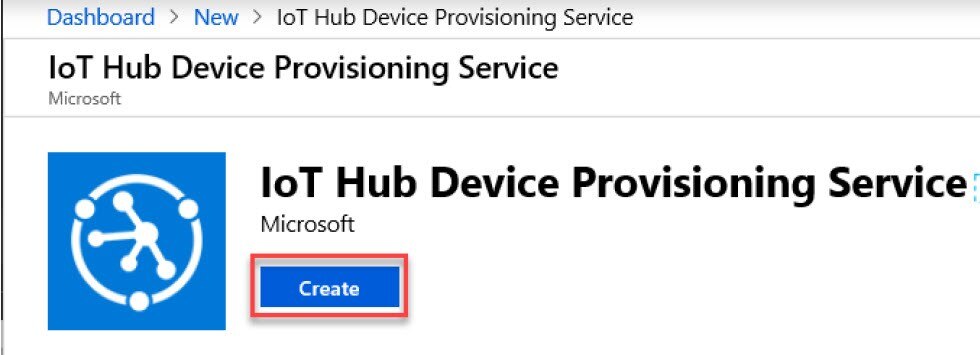
- In the IoT Hub Device Provisioning Service form fill in each entry
- Name: Select a name for your DPS
- Subscription: Select your subscription, it may be a “Free” or a “Pay-as-you-Go” subscription
- Resource Group: Select the same resource group that you created when you created your IoT Hub
- Region: Select the region closest to your physical location.
- Click on the “Create” button

- Wait for your DPS to be deployed
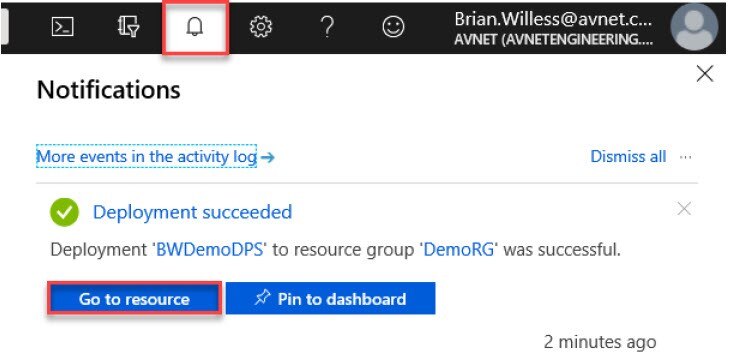
Next we need to configure our DPS. Find your new DPS resource. One way to find your new resource is from the notification icon at the top of the Azure Portal (the bell), click on this icon to see the resources you recently created.
- Click on the “Go to resource” link
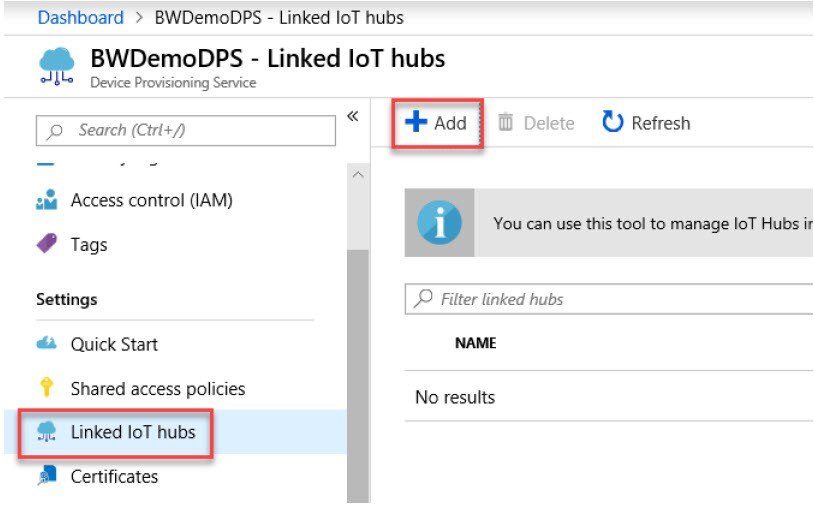
Next we need to associate our DPS with our IoT Hub. This way when a device connects to the DPS, the DPS will know which IoT Hub to provision the device.
- From the DPS resource find the “Linked IoT hubs” blade (In Azure these configuration categories are called blades)
- Click on the “+ Add” link
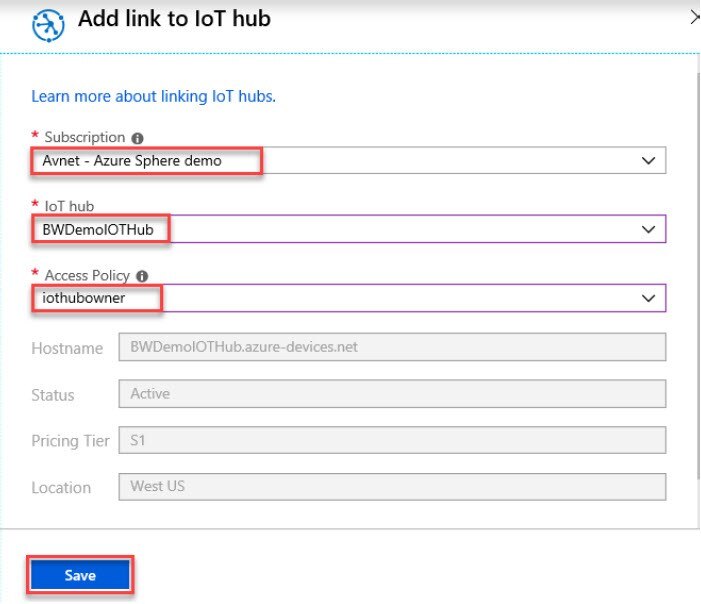
- In the Add link to IoT hub form fill in each entry
- Subscription: Select your subscription, it may be a “Free” or a “Pay-as-you-Go” subscription
- IoT hub: Select the IoT Hub we created earlier
- Access Policy: Select iothubowner from the drop down list
- Click on the “Save” button
- You will see your IoT Hub listed by its FQDN
- If you don’t see your IoT Hub, click on the refresh button at the top of the form

Prove to DPS that we own the tenant
The next thing we need to do is to prove to the DPS that we own the Azure Sphere tenant that our devices are claimed to. This is another slick security feature of the Azure Sphere system. After everything is setup, only devices in your tenant will be able to use your DPS to connect to your IoT Hub. That means that if someone where to get hold of your application and side load it onto their Azure Sphere device, that device would not be allowed to connect to your DPS or your IoT Hub. DPS will reject the connection based on an incorrect tenant certificate. Only devices claimed to your Azure Sphere Tenant will be allowed to connect to your DPS and IoT Hub because they will have the correct tenant certificate.
The steps to setup this trust relationship are listed below. This is a one-time setup task. Once this is all setup and configured, you’ll only have to do this again if you setup a new DPS with a new IoT Hub.
- Download the authentication CA certificate for your Azure Sphere tenant from the Azure Sphere Security Service.
- Upload the CA certificate to DPS to tell it that you own all devices whose certificates are signed by this CA. In return, the DPS presents a challenge code.
- Generate and download a validation certificate from the Azure Sphere Security Service, which signs the challenge code. Upload the validation certificate to prove to DPS that you own the CA.
- Create a device enrollment group, which will enroll any newly claimed Azure Sphere device whose certificate is signed by the validated tenant CA.
Download the authentication CA certificate for your Azure Sphere tenant from the Azure Sphere Security Service.
- Go back to your “Azure Sphere Developer Command Prompt” application
- Start --> Azure Sphere --> Azure Sphere Developer Command Prompt
- Make sure you’re logged into your tenant:
- Azure Sphere CLI V1 and V2
- azsphere login
- Copy and paste in the command:
- CLI V1
- azsphere ca download --output CAcertificate.cer
- CLI V2
- azsphere ca-certificate download --destination-file CAcertificate.cer
- Note the output file must have the .cer extension
Upload the CA certificate to DPS to tell it that you own all devices whose certificates are signed by this CA. In return, the DPS presents a challenge code.
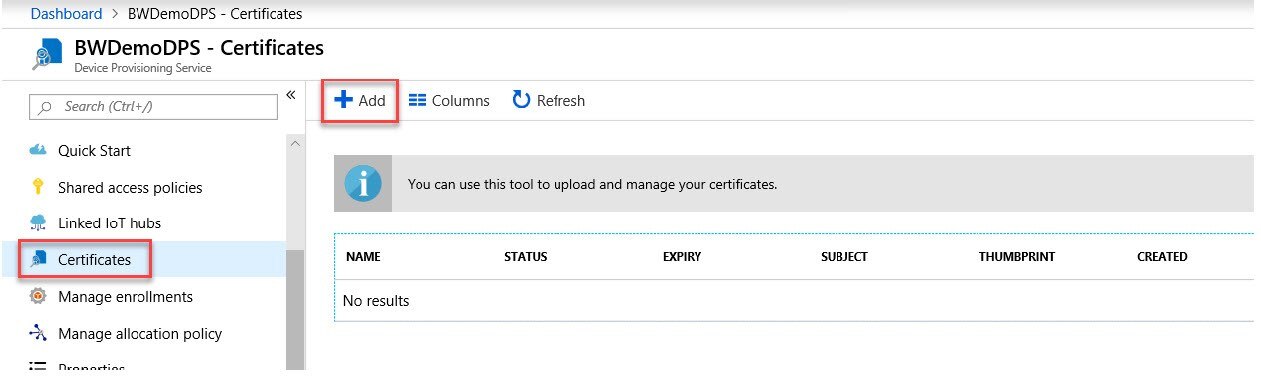
- Back in your Azure Portal navigate to the DPS that you created
- Open the Certificates blade from the list
- Click on the “+ Add” link at the top of the form
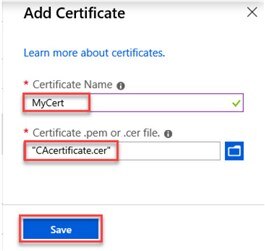
- In the Add Certificate form fill in each entry
- Certificate Name: Create a name for your certificate, I recommend using the same name as your Azure Sphere Tenant
- Certificate *: Browse to the certificate file we just downloaded
- Click on the “Save” button
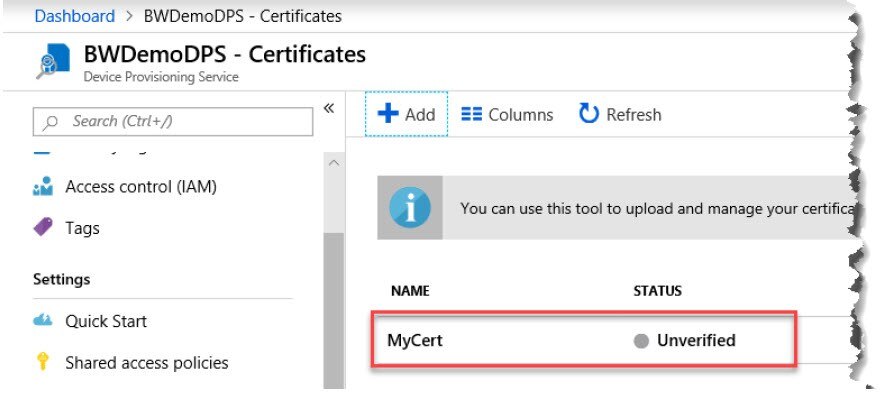
Your certificate will be added to the list and its state will be “Unverified.” Technically, we could have gained access to someone’s tenant ca. Just because we have this public certificate it does not prove that we own the tenant. Next we need to verify the certificate.
Generate and download a validation certificate from the Azure Sphere Security Service, which signs the challenge code. Upload the validation certificate to prove to DPS that you own the CA.
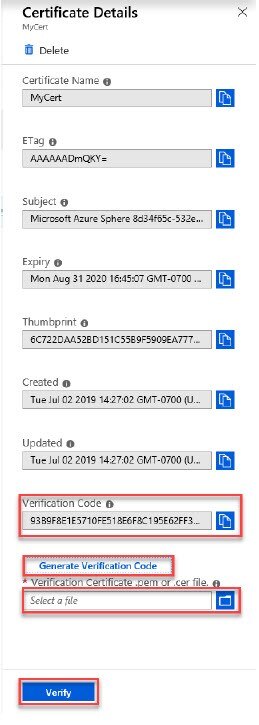
- Click on your certificate in the list, this brings up the Certificates Details form
- Return to the Azure Sphere Developer Command Prompt
- Copy and paste the following command into the application but do not execute the command yet, as a verification code still needs to be added
- CLI V1
- azsphere ca download-proof --output validation.cer --verificationcode <code>
- CLI V2
- azsphere ca-certificate download-proof --destination-file validation.cer --verification-code <code>
- CLI V1
- Click on the “Generate Verification Code” link towards bottom of the form, a Verification code is generated and displayed in the “Verification Code” box.
- Copy the verification code, there’s a copy link to right of the box
- Back in the command window, replace the <code> text with your verification code and execute the command
The Azure Sphere Security Service creates a new certificate using the verification code as the subject. The validation certificate is encrypted with the devices private cert. Since we uploaded the CA public cert, DPS can decrypt the verification cert and validate that the verification code matches the code it generated. This way DPS confirms that you own, or have access to the Azure Sphere tenant.
- Back in your Azure portal, upload the new Verification Certificate by browsing to the file.
- Click the “Verify” link at the bottom of the form
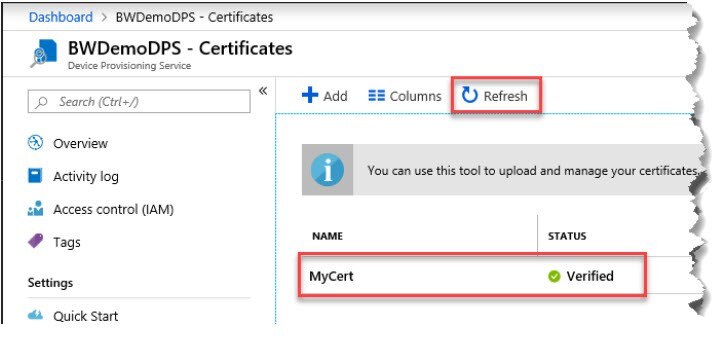
You should see that your certificate is now shown as Verified. If not, click on the “Refresh” link at the top of the form.
Create a device enrollment group, which will enroll any newly claimed Azure Sphere device whose certificate is signed by the validated tenant CA.
We’re almost done!
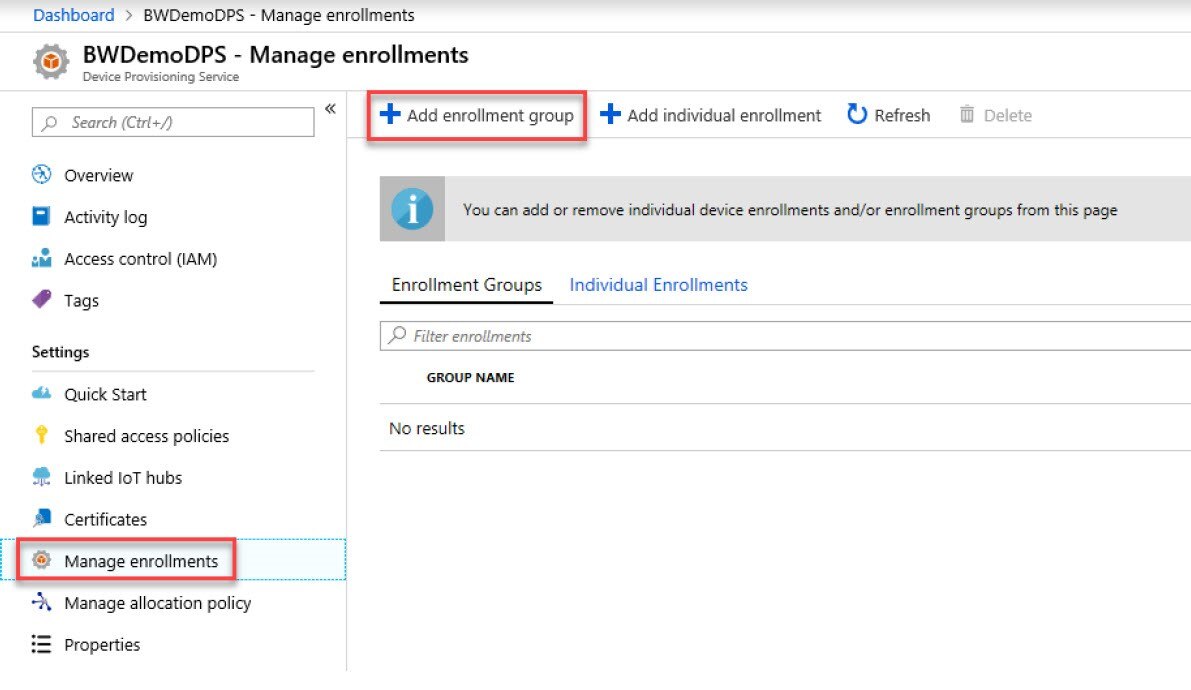
- Back in your Azure Portal, navigate to your DPS resource
- Find and click on the “Manage enrollments” blade
- Click on the “Add enrollment group” link at the top of the form
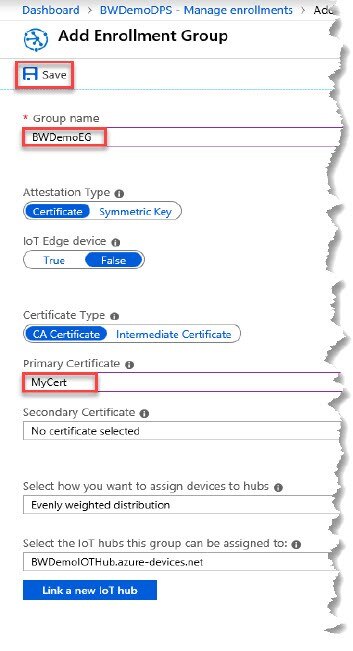
- In the Add Enrollment Group form fill in each entry
- Group Name: Create a name for your enrollment group
- Primary Certificate: Select the certificate that we just uploaded and validated
- Leave all other fields at the default selections
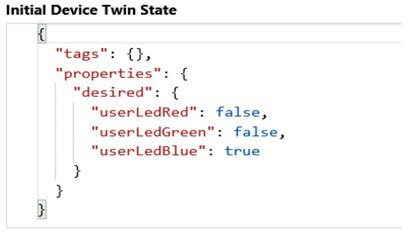
- Update Initial Device Twin State by adding three userLed entries as shown below, ie.
"userLedRed": false,
"userLedGreen": false,
"userLedBlue": true
Click on the “Save” button at the top of the form
The Initial Device Twin State is a cool feature and the reason why we selected the S1 IoT Hub tier. When devices are provisioned by this DPS, they will get these initial device twin properties. By setting one or more of the userLed properties to true we’ll be able to see when our device connects to our IoT Hub. When the device connects to the IoT Hub it will receive this update and turn on any LED set to true!
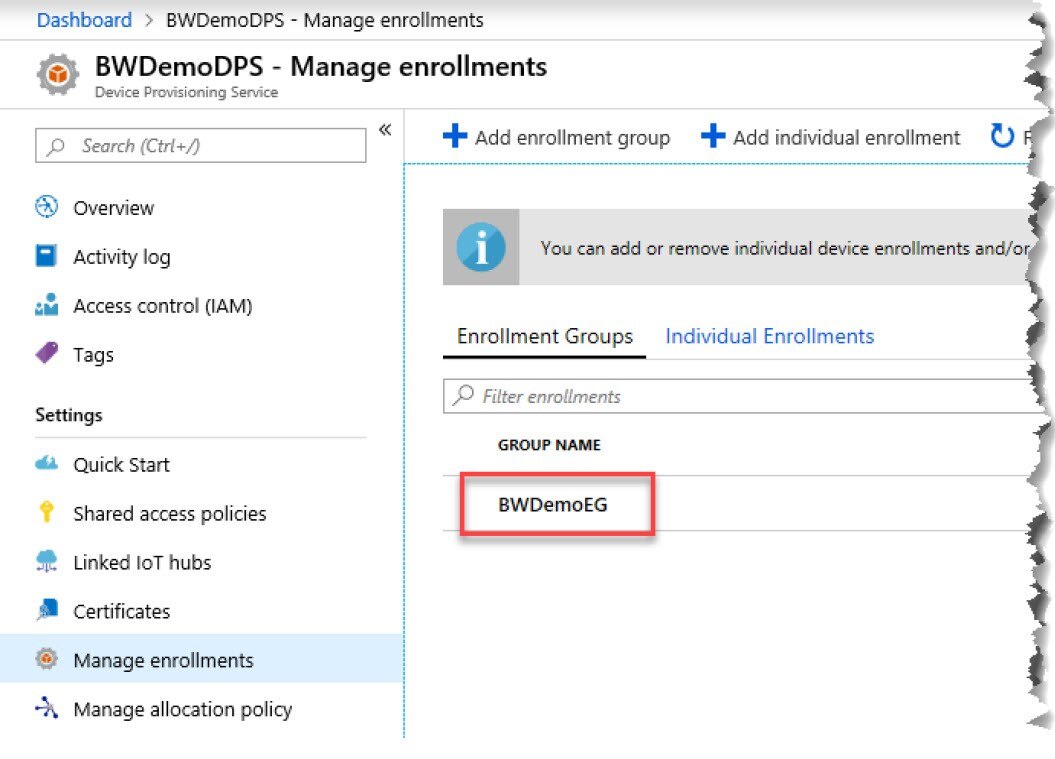
You should see your new Enrollment Group appear in the list
Modify the Azure Sphere source code
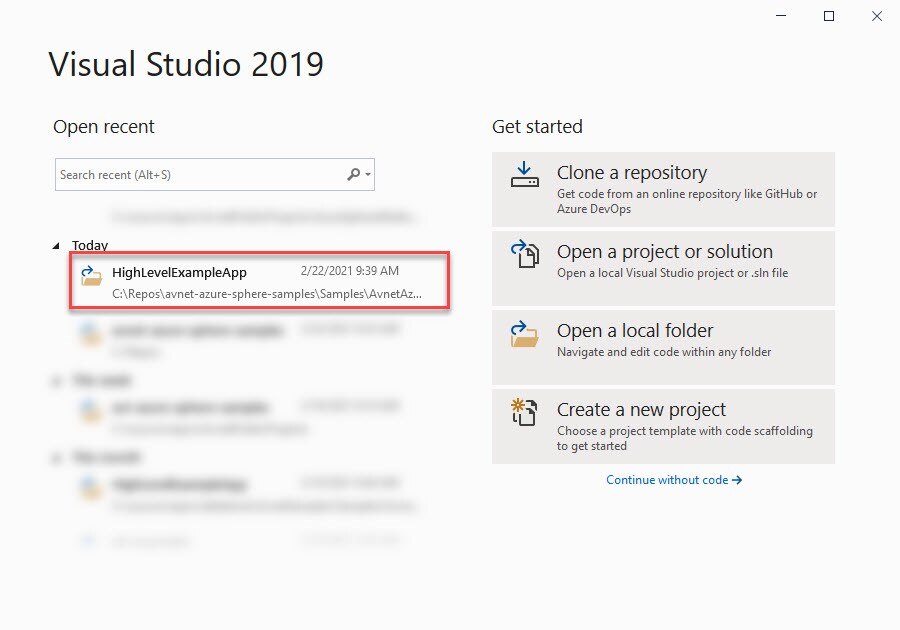
Now let’s go back to Visual Studio. If it’s not open, go ahead and launch the Visual Studio application and open the /Samples/AvnetAzureSphereHacksterTTC/HighLevelExampleApp project. Visual Studio keeps a list of recent projects, your project should be found in that list.
Remember in the simple non-connected application we discussed the two different build configurations:
- No cloud connectivity. This is the simplest configuration. The application runs and you can monitor sensor data from the Visual Studio debug window.
- IoT Hub connectivity. This configuration requires an Azure IoT Hub and DPS. Once we have the Hub configured and the application connecting to the IoT Hub, we’ll walk through how to provision a Time Series Insights (TSI) application to visualize the sensor data and control GPIOs on the board from the cloud.
For this example we’ll enable the IoT Hub Connectivity configuration.
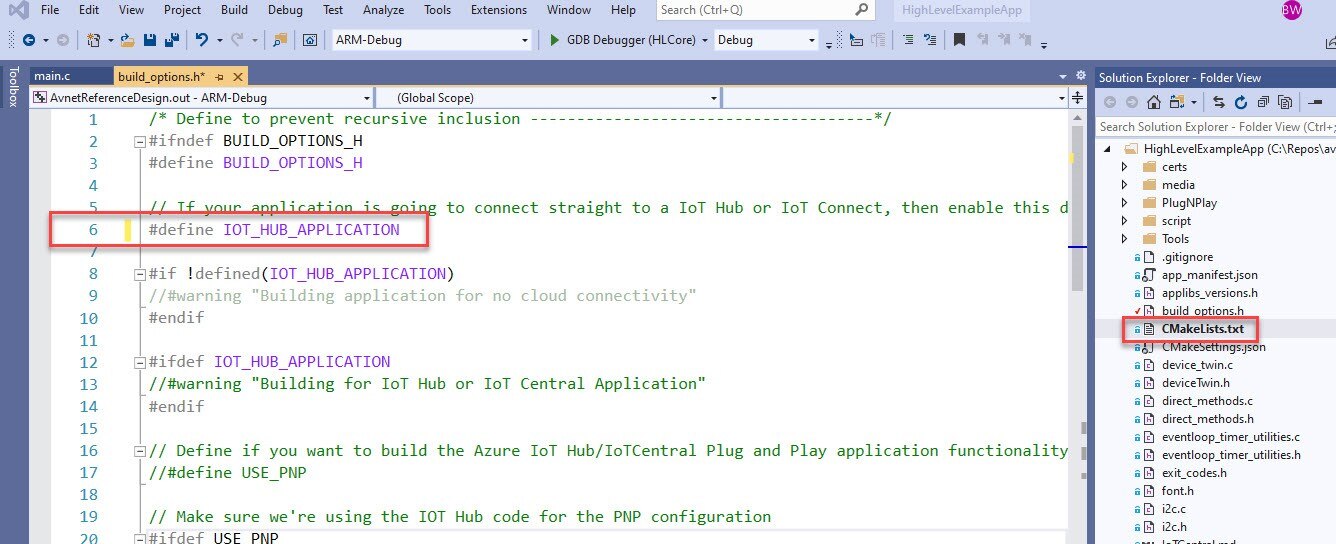
- Open the build_options.h file
- On about line #6 remove the “//” comment characters to enable the #define IOT_HUB_APPLICATION configuration. Save your work by typing (Ctrl+S).
Next we need to add DPS and IoT Hub details to our project.
Updating the app_manifest.json file
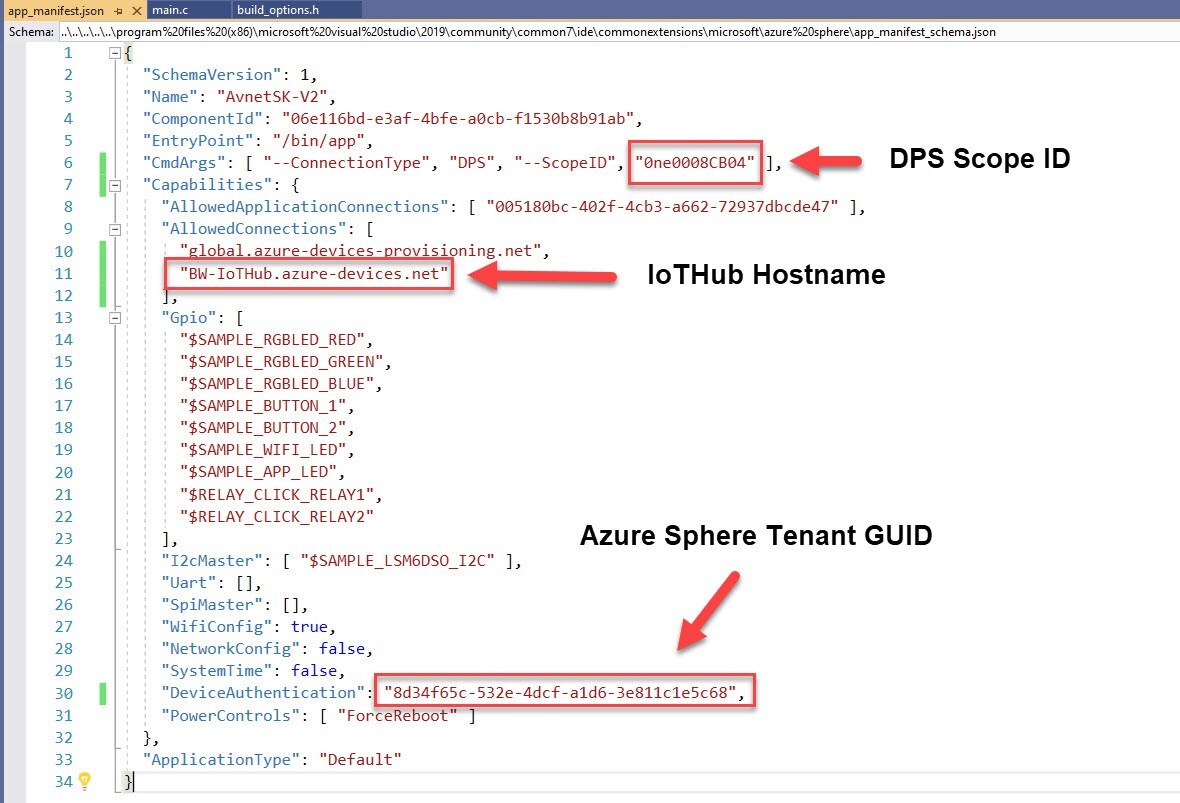
Open the app_manifest.json file for this application. There are three items we need to include in order for our application to use DPS and connect to our IoT Hub:
- DPS Scope ID: This is used when our application connects to the global DPS, this allows the global DPS to route our request to our DPS.
- AllowedConnections : The “AllowedConnections” parameter is required to open a network firewall on the Azure Sphere device. We will locate and add the following detail:
- The IoT Hub’s Hostname
- DeviceAuthentication: This is the GUID for your Azure Sphere Tenant. This is included so that this application will only work on devices claimed to our Azure Sphere Tenant. So if someone was able to get our application and side load it onto an Azure Sphere device, that device would not be able to connect to our Azure services, unless it’s in the same Azure Sphere Tenant.
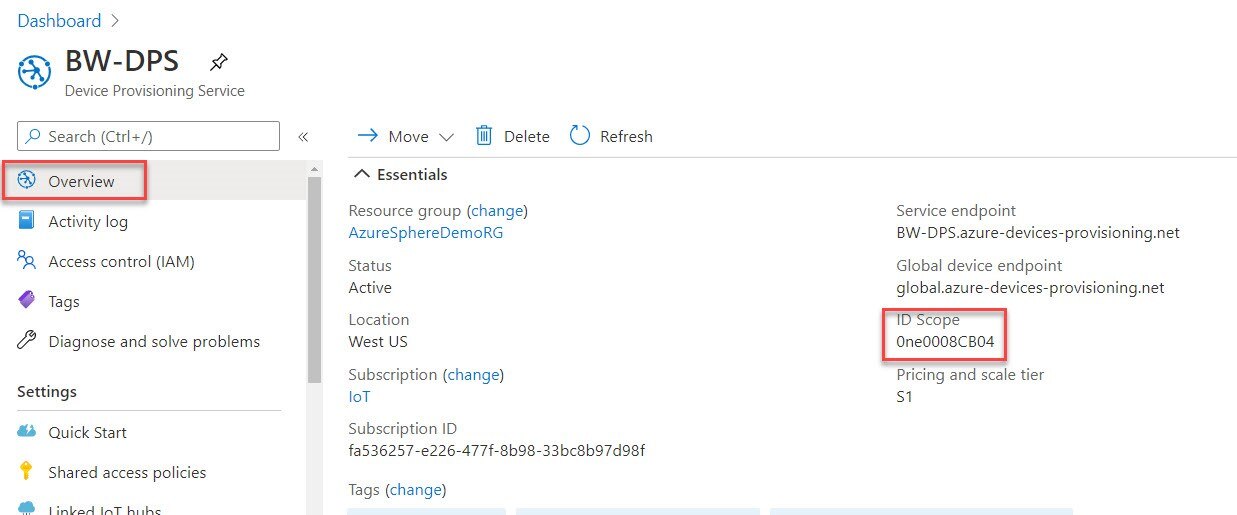
DPS Scope ID and DPS global device endpoint FQDN
Open your DPS resource in Azure and on the “Overview” blade locate:
- ID Scope: Copy + paste this FQDN into the “CmdArgs” line in the app_manifest.json file.
IoT Hub Hostname
From Azure also locate and copy the IoT Hub Hostname. Navigate to your IoT Hub resource and in the “Overview” blade find and copy your IoT Hub hostname. Add the hostname to your “AllowedConnections” line in your app_manifest.json file.

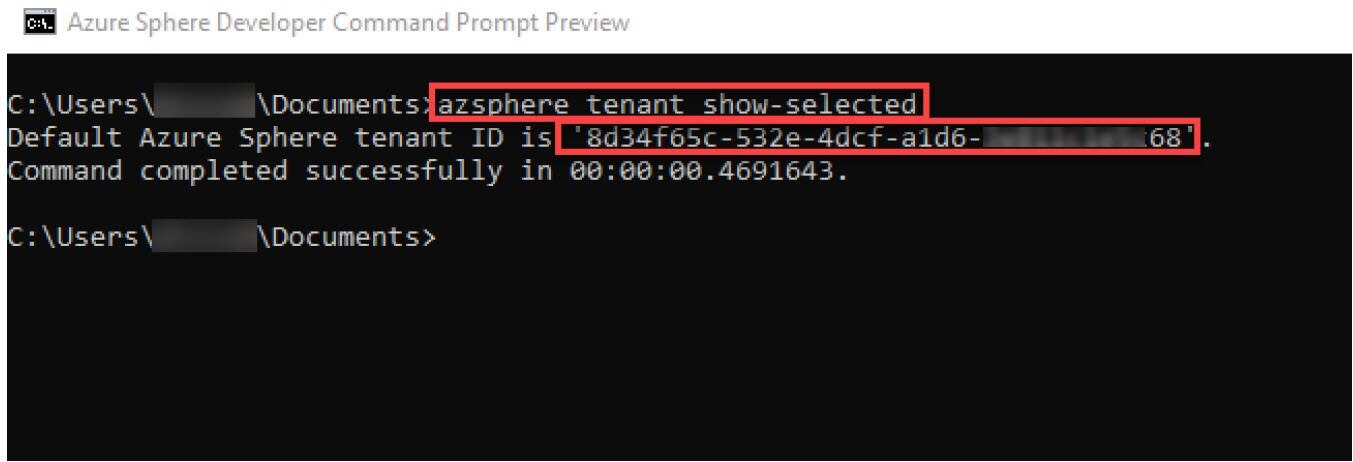
DeviceAuthentication (Azure Sphere Tenant ID)
The “DeviceAuthentication” GUID is really just your Azure Sphere Tenant GUID. Get this by using the command line interface and the command azsphere tenant show-selected (You may be asked to login to your tenant to do this). Copy the reported GUID and paste this in the “DeviceAuthentication” line of your app_manifest.json file.
Below is a capture of an app_manifest.json file with the changes identified.
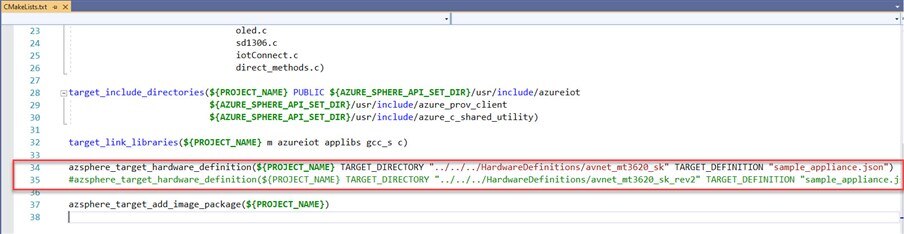
Update the CMakeLists.txt file to define which Avnet Azure Sphere Kit you are using Rev1 or Rev1
- Open the CMakeLists.txt file in the project
- Determine which Starter Kit revision you have Rev1 or Rev2. This can be determined by looking at the silk screen text under the Avnet Azure Sphere certified module
- Find the azsphere_target_hardware_definitions lines. Make sure you uncomment the line that describes which kit you have
- In the example below I 'm using a Rev1 kit
- If you get this wrong, the wifiLED device twin control will not work correctly since the GPIO driving the LED is different between the two kits
To review. The modifications we made to the source code . . .
- We enabled the IOT_HUB_APPLICATION define in build_options.h
- We added our DPS Scope ID to the "CmdArgs" line in the app_manifest.json file
- We added our IoTHub hostname string to the “AllowedConnection” entry in the app_manifest.json file
- We added our Azure Sphere Tenant GUID to the "DeviceAuthentication" entry in the app_manifest.jston file
- We updated the CMakeLists.txt file to identify which Avnet Azure Spehre Starter Kit we're using
We should be ready to build the IoT Hub configuration!
Build and run the application
- Make sure your device is connected to your PC
- Ensure your device has a Wi-Fi connection
- azsphere device wifi show-status
- To compile, link and load the application onto your Starter Kit, you just need to click on the “Remote GDB Debugger” button in the toolbar.
- If you're asked to save the changes click "OK."

You’ll see the build process run and a popup box stating that Visual Studio is starting the application. If you look at the output window, you should see something similar to the text below.

Let's review this output . . .
AZURE_SPHERE_PROV_RESULT_OK
This output is showing that our device was provisioned on our IoT Hub by our Device Provisioning Service
IOTHUB_CLIENT_CONNECTION_OK
This output shows that our device has connected to our IoT Hub. If you don't see your device connect to the IoT Hub, please review the Troubleshooting Azure IoT Hub Connection Issues blog entry.
Device sends up Device Twin Reported properties
The application sends up reported properties for all the device twins that I knows about. This seeds the device in the IoT hub with all the device twins that the application supports.
Sending telemetry:
This output shows the telemetry data we’re sending to Azure. We’re sending JSON key: value pairs. To send telemetry, you just need a valid JSON structure. The IoT Hub will collect this data and simply pass it on to any services that subscribe to the IoT Hub.
Device Twin Desired Properties
This debug is from the initial device twin desired properties we put into the DPS Enrollment Group. When the device connects to the IoTHub, it will send down all desired properties so that the device can sync up with the cloud configuration. After processing each item, a reported property message is sent with the new value as requested in the desired property. On my device, the Blue element of the RGB LED is on after processing these messages.
Device Twins
Device Twins are a digital representation of the device state that lives in Azure. You can look at the device twin for your device in Azure. Detailed device twin documentation can be reviewed here.
- If you still have your IoT device open, you'll need to click on the "Refresh" link to see the Device Twin link.
- If you don't still have your IoT device open . . .
- Log into your Azure account https://portal.azure.com.
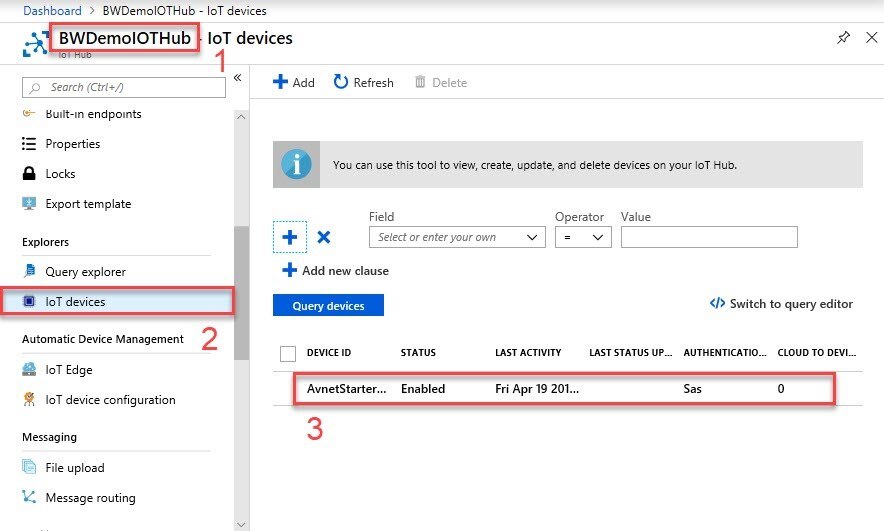
- Navigate to your IoT Hub (1)
- Find and click on the “IoT devices” blade (2)
- Click on your device (3)
Click on the “Device twin” link.
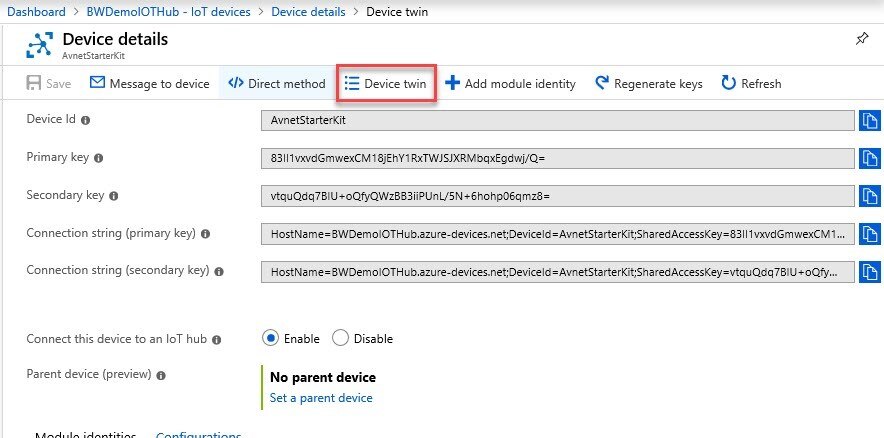
The Device Twin page opens up and displays a scrolling window with the contents of our device twin.
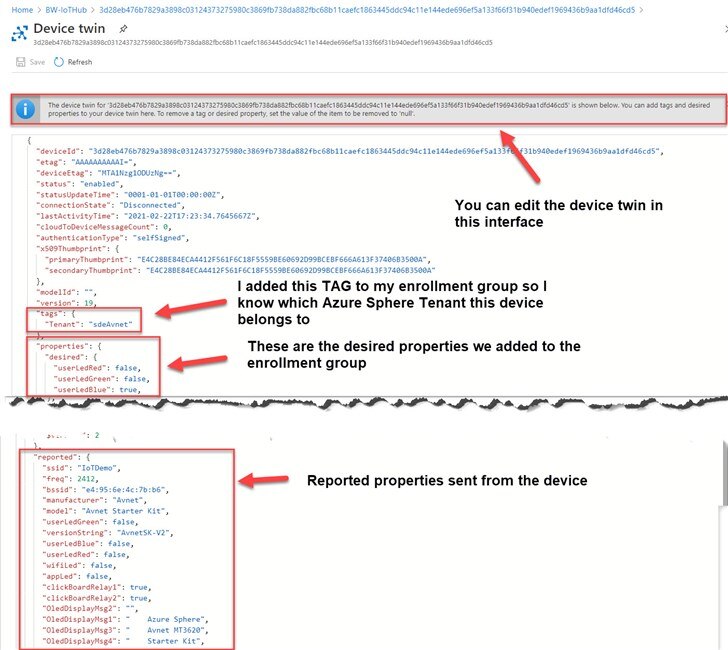
A few things I want to point out here.
- Notice the information bar stating that we can modify the device twin from this interface.
- Desired properties. This object contains the initial device twin structure we added to the DPS enrollment group. We can add additional desired properties and Azure will send Cloud to Device (C2D) messages to our application with the desired {key: value} pairs. More on this soon.
- Reported object. This JSON object has all the device twin properties that our application sent up on startup. Remember we did not do anything special on the Azure side to pre-define these properties. Our application sent them up, and Azure populated them into our device twin.
The reported properties is a cool feature. For instance, we sent up the “versionString.” This could be used when managing a large number of devices to make sure all devices in the field are running the correct application version.
Desired Properties
The desired properties are used to communicate to our device that we want to change something or set some state. In our software application we have already defined a list of desired properties. For each of these properties we take some kind of an action. Here’s a list of the desired properties implemented in the application. Review device_twin.c for all the dirty details.
Key | Value |
|
userLedRed | true | false | enables/disables the red LED of the user RGB LED |
userLedGreen | true | false | enables/disables the green LED of the user RGB LED |
userLedBlue | true | false | enables/disables the blue LED of the user RGB LED |
appLed | true | false | enables/disables the application LED |
wifiLed | true | false | enables/disables the WI-FI LED |
clickBoardRelay1 | true | false | enables/disables relay #1 on a Relay Click board if installed in Click Module socket #2 |
clickBoardRelay2 | true | false | enables/disables relay #2 on a Relay Click board if installed in Click Module socket #2 |
| oledDisplayMsg1 | string | Configures a custom message to display on line 1 of the optional oled display |
| oledDisplayMsg2 | string | Configures a custom message to display on line 2 of the optional oled display |
| oledDisplayMsg3 | string | Configures a custom message to display on line 3 of the optional oled display |
| oledDisplayMsg4 | string | Configures a custom message to display on line 4 of the optional oled display |
So how do we use these desired properties to change something on the board. It’s easy, we simply add a new key: value pair to the desired properties section of the device twin.
- Make sure your application is running on your Avnet Starter Kit
- In Azure you should still have the device twin page open, if not open it now
- In the desired object add a new line and enter "wifiLed ": true,
- Click on the “Save” link at the top of the form
- When you clicked “Save” Azure sent down a desired properties message to our device with the key value pair {“wifiLed”: true}. You should also see debug in Visual Studio
Received device update. New wifiLed is true
[MCU] Updating device twin: {"wifiLed": true}
- The application received this message, parsed out the key “wifiLed”, looked up what to do with that key, pulled the value out of the message and, in this case, toggled a GPIO pin connected to the wifi LED of the user LED! Pretty cool!
- Back in Azure, click on the “Refresh” button to refresh the device twin, and notice that there the wifiLed entry is now set to true
I invite you to play with some more of the desired properties detailed in the table above. They will all behave the same way. Note that if you want to use the clickBoardRelay1, and clickBoardRelay2 properties, you’ll need to purchase a Relay Click and insert it into mikroBUS socket #2.
 Did you know? Did you know? |
|---|
|
Time Series Insights
Our application is also streaming lots of telemetry data. What can we do in Azure to view this data? One answer is to setup a Time Series Insights (TSI) environment. TSI documentation is here. There are other services available in Azure to visualize your data, TSI is easy to setup and is a powerful tool.
“Azure Time Series Insights provides powerful data exploration and telemetry tools to help you refine operational analysis.”
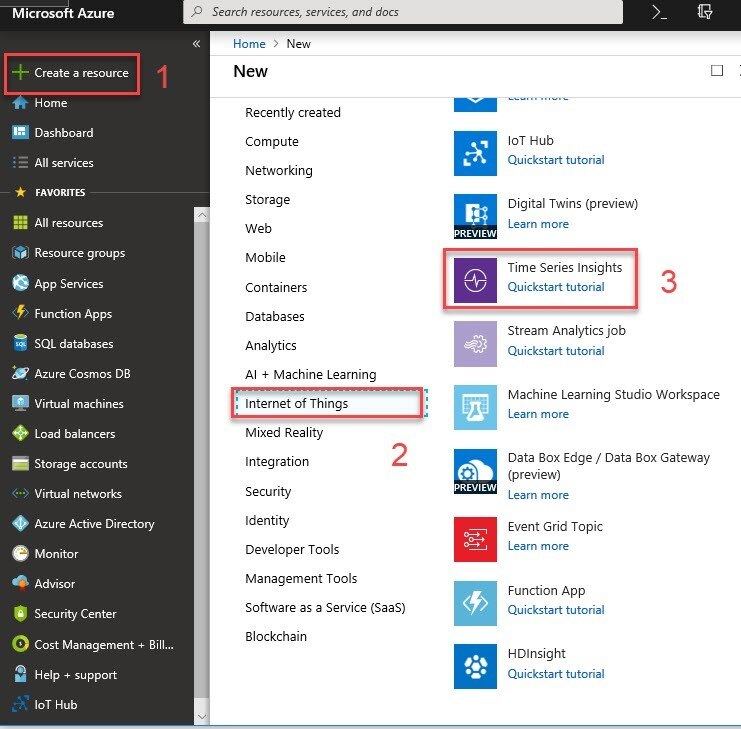
- Login to your Azure account: https://portal.azure.com
- Click on the “+ Create a resource” link (1)
- Click on the “Internet of Things” category (2)
- Click on the “Time Series Insights” link (3)
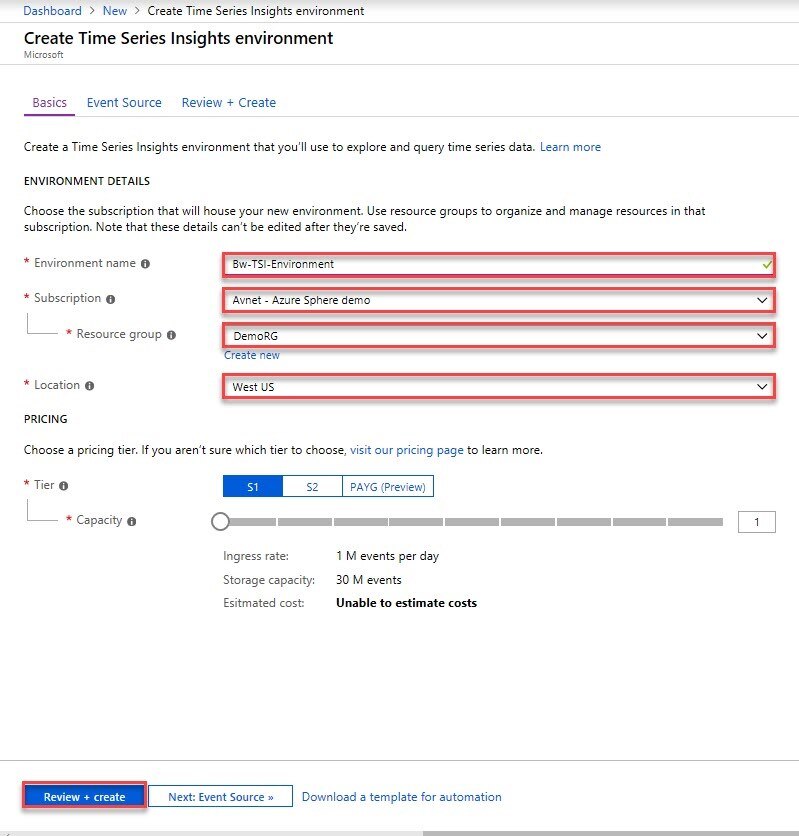
On the “Basics” Tab fill in the form
- Enter a name for your TSI environment
- Select your Subscription
- Select the same Resource Group you used for the IoT Hub
- Select the Location closest to your physical location
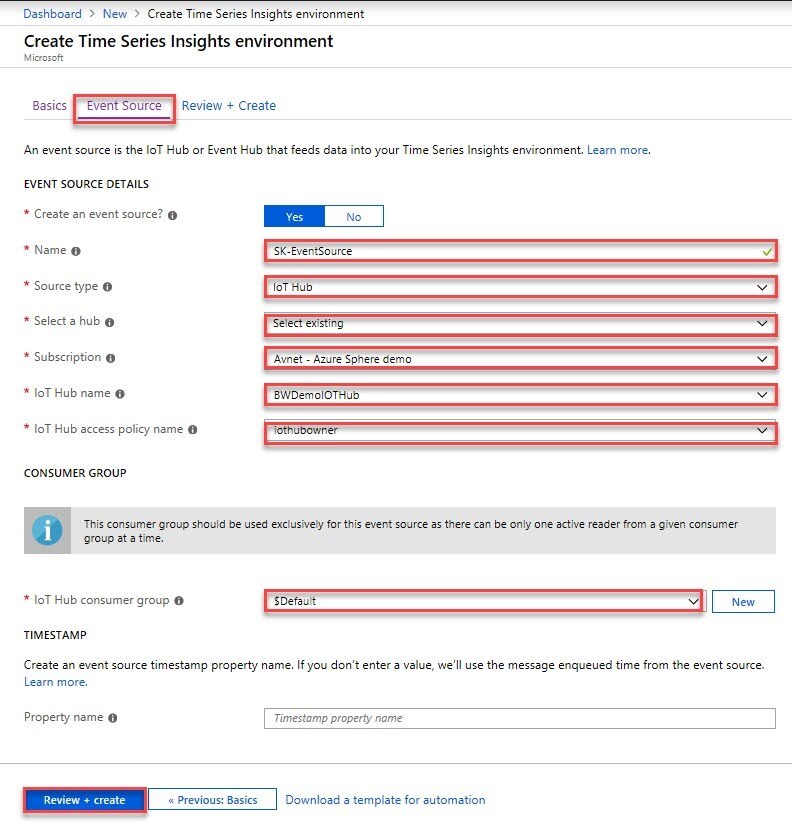
Next click on the “Event Source” tab.
- Name: Select a name for your event
- Source Type: Select “IoT Hub”
- Select a Hub: Select “Select existing”
- Subscription: Select your subscription
- IoT Hub Name: Select the name of your IoT Hub from the list
- IoT Hub access policy name: Select “iothubowner”
- IoT Hub consumer group: Select “$Default”
- Click on “Review + create”
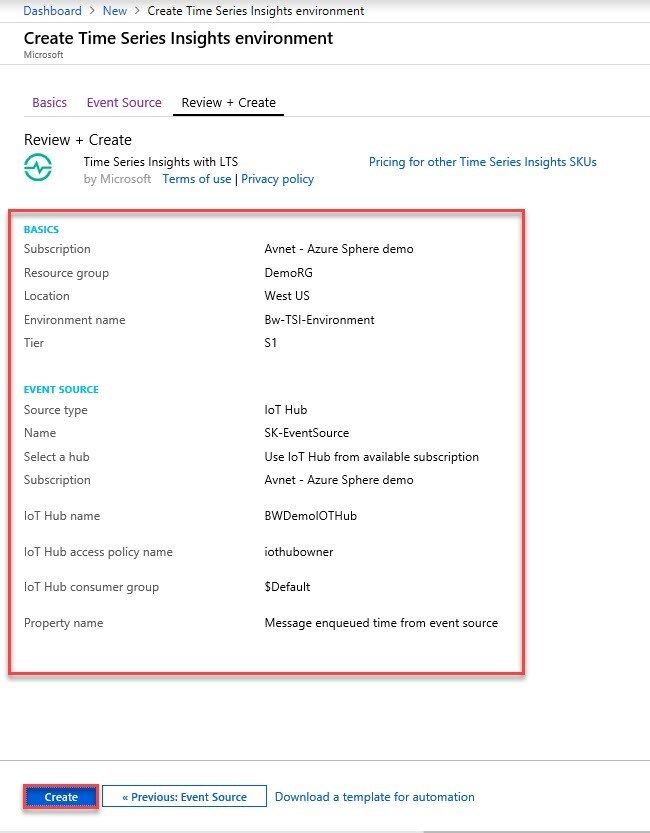
On the “Review + Create” screen, review your settings and if they look good, click on the “Create” button at the bottom of the form.
You’ll see your TSI environment being provisioned:
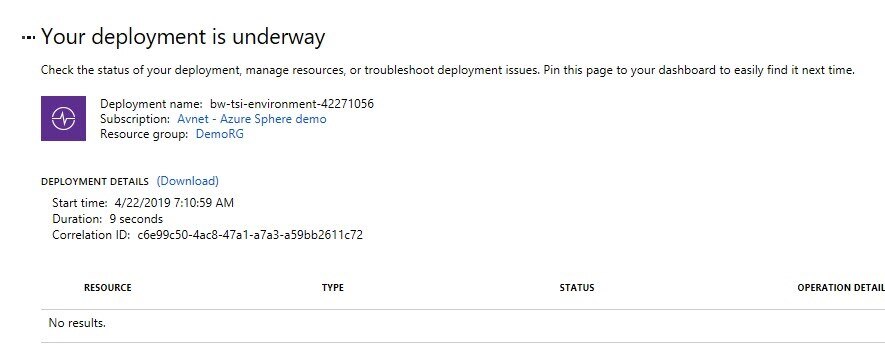
Once your deployment is complete (mine took 42 seconds), navigate to your new TSI resource.
- From the left most column, click on “Resource Groups”
- Select your resource group
- Select your TSI Environment
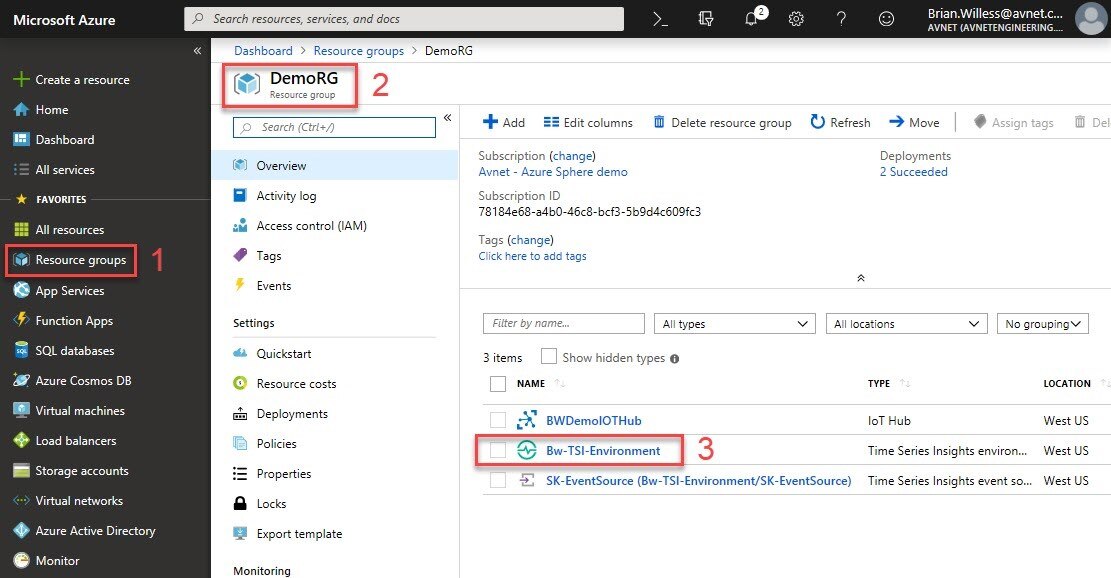
- Click on the “Go to Environment” link
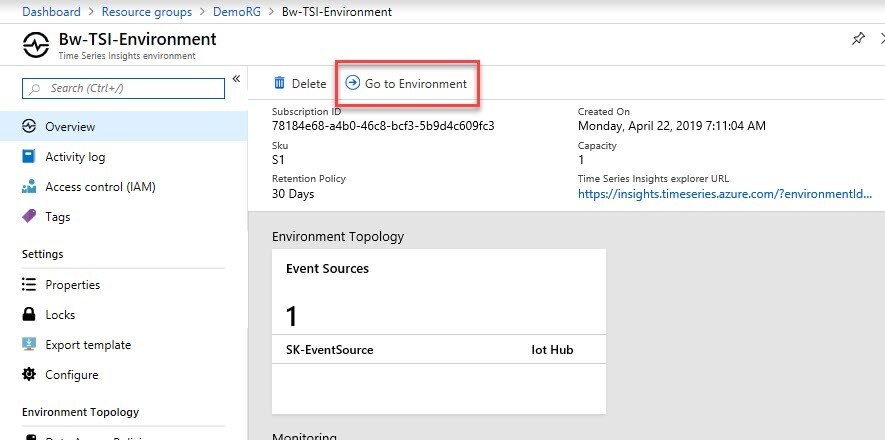
The Environment will open, but you won’t see any data
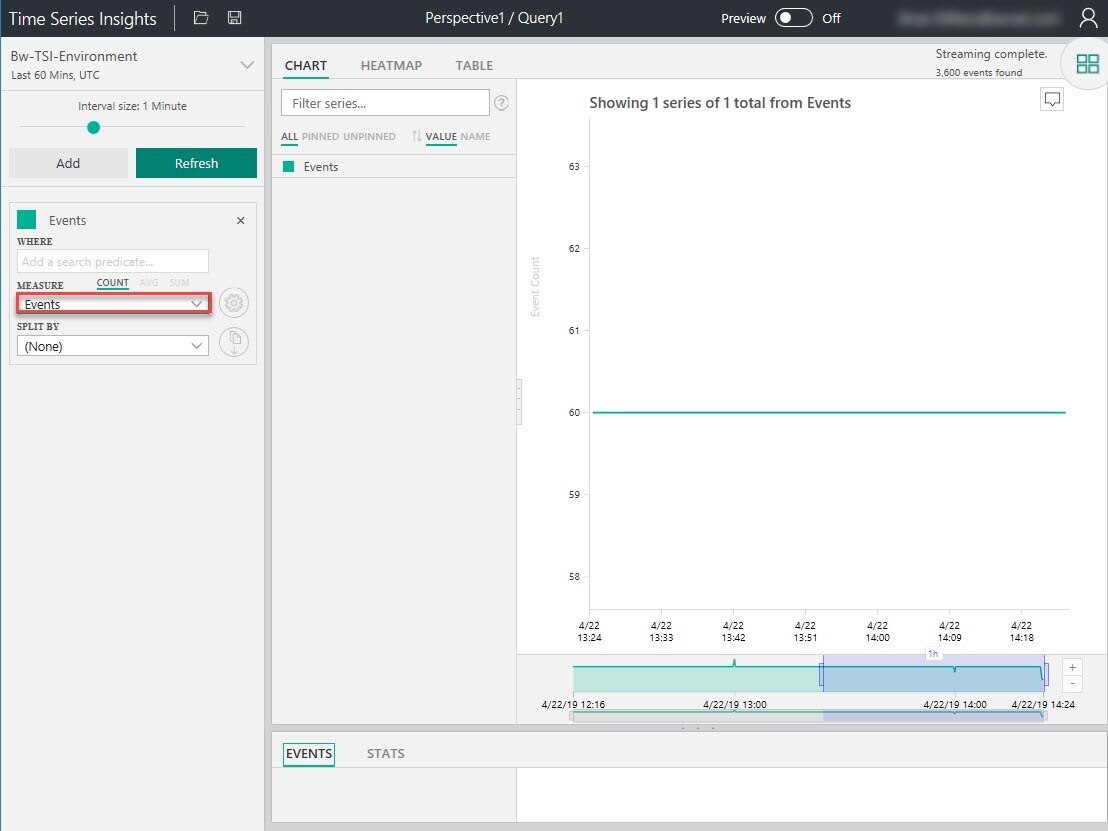
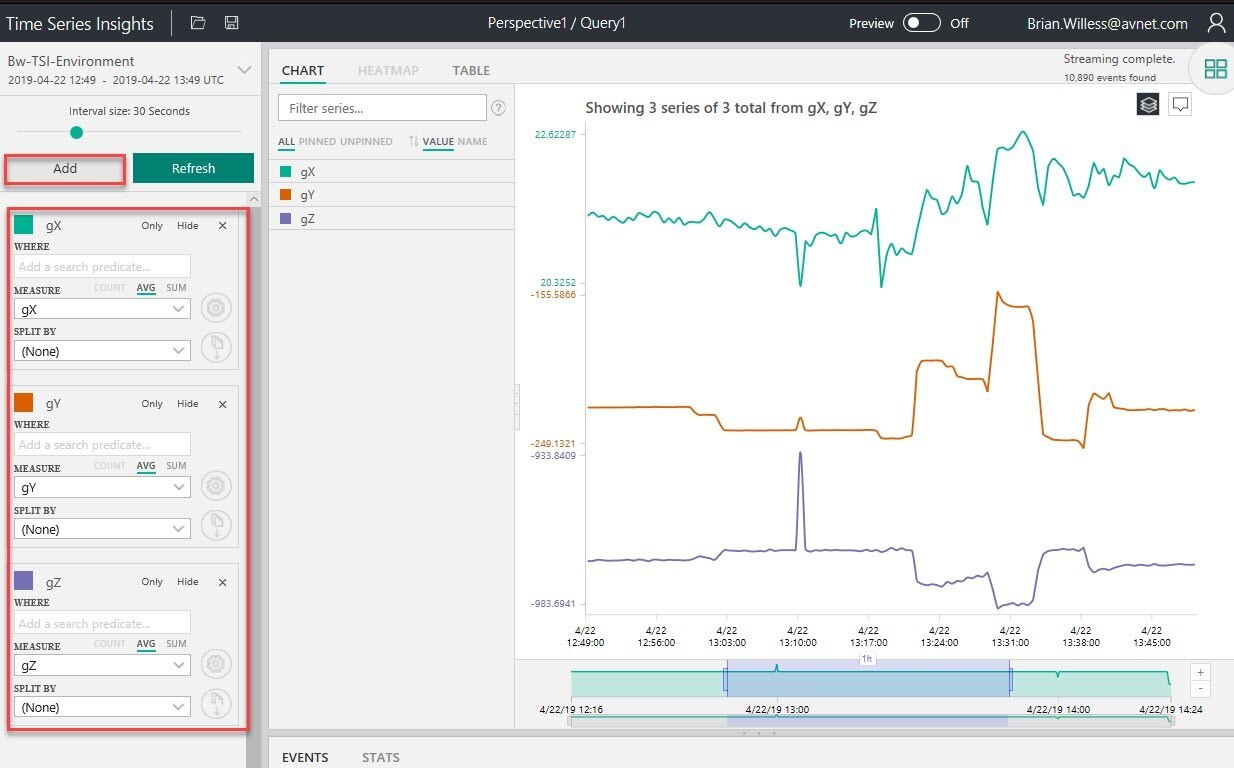
Select the “Events” pull down menu. You’ll see entries for all the different telemetry items the application sends up, select the “gX” entry. You can add additional measurements to the graph by clicking the “Add” button. The graphic below shows the gX, gY, and gZ data all plotted. I was moving my Starter Kit around on the different axis’s to generate this data.
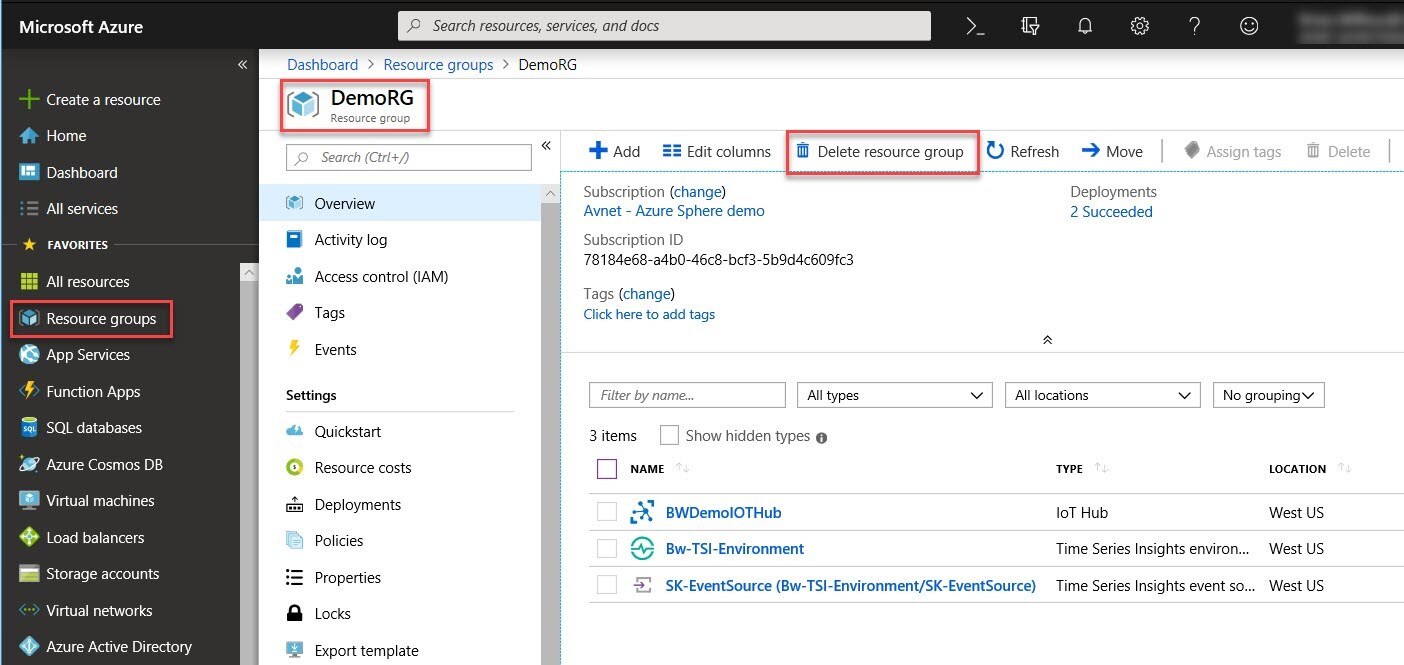
Clean up the resources
When you’re finished playing with the graph and the demo, you should delete the Azure resources. If you don’t delete them, then you’ll see monthly charges for the IoT Hub, and for the Time Series Insights resources. The quick and easy way to remove all these resources is to delete the Resource Group.
- Open the Azure Portal: https://portal.azure.com
- In the left most column, select “Resource Groups”
- Select your resource group
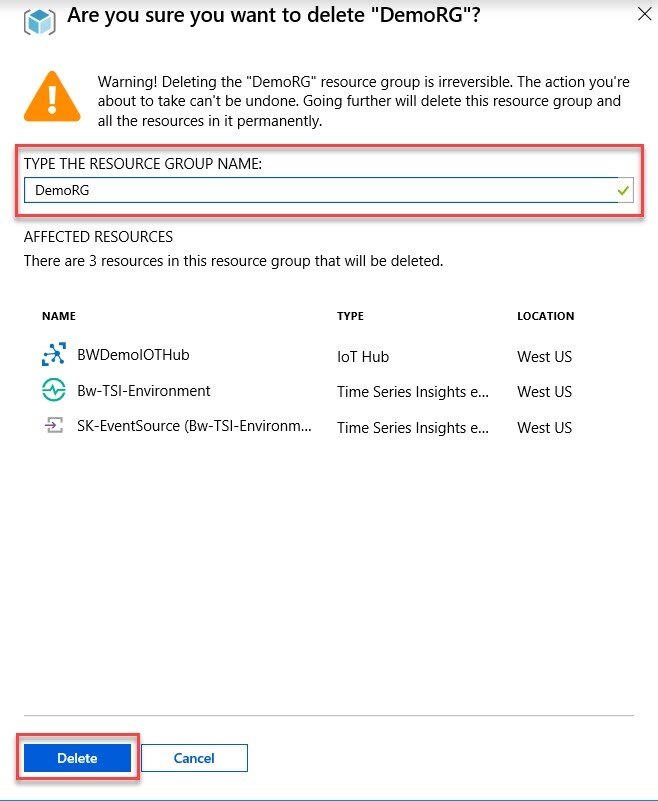
- At the top select “Delete resource group”
- Type the name of your resource group into the form
- Click on the “Delete” button at the bottom of the form.
Review
In this demo we learned . . .
- How to setup an IoT Hub
- How to setup DPS
- How to configure the Azure Sphere demo application to connect to the IoT Hub
- How to view the Device Twin for our device
- How to modify the Device Twin
- How to setup Time Series Insights (TSI)
- How to view our data in TSI
- How to clean up our Azure resources
The last blog entry in this series will walk you through how to setup an IoT Central Application to work with the Starter Kit example project.
Avnet's Azure Sphere Starter-Kit (Out of Box Demo) Part 3 of 3
Additional Azure Sphere Resources
- Free Azure Sphere training from Microsoft: http://avnet.me/azureSphereMSFTLearningPath
- Listing of all the Avnet Azure Sphere Blogs on Element14 plus other resources: http://avnet.me/azure-sphere-resources
Top Comments