


NFC Reader
In my last posts
I introduced NFC and explained how it worked in simplistic terms.
In this post I want to show how easy it is to use NFC or RFID readers and make them do something.
Common Terms
Reader
The term 'reader' if often used, but depending on the card/tag type and the software, many 'readers' are also capable of writing to RFID devices.
Card
The term card refers to a credit card sized RFID device which may or may not have a magnetic stripe.
Generally the card type tags have physically larger antenna and can work at a larger distance from the reader.
Cards can be printed on with advertising, use or anything else.
BUT if you print " xyz House " then it is the same as adding a tag on your keyring with you home address, so be secure.
Button, Tags, Stickers
These are all smaller tags made of different materials, and generally work at reduced distance.
Some are OTP (One Time Program), while others can be written to and have differing storage capacities.
Antenna
The antenna is the most important part of a reader.
It is tuned to the correct frequency and the ideal design has a very high Q to maximise the sensitivity.
Swapping antenna may be possible, but generally the manufacturer will offer antenna to suit that reader.
SO buying xyz's antenna to stick on abc's reader might not work.
EXPLORE-NFC
This is a very cost effective kit provided by NXP (Phillips for us who remember earlier times) and fits the Raspberry Pi.
It is nice tidy hardware solution that suits certain 13.5MHz cards/tags and includes some very basic software.
I purchased one some time back and thought it would be great to use with my NFC Ring.
I hadn't actually used it until this conversation appeared, and the OP asked about the software.
It turns out the latest Raspbian distribution has 'broken' some of the previous examples of software.
NXP to their credit have provided a solution.
The instructions have a couple of minor issues that have been passed back to NXP.
I note that element14 have not updated the Quick Start Guide.
Quick Start-up Guide for EXPLORE-NFC working with Raspberry Pi
sect 4.3 Number 5 is incorrect
while the instruction says
sudo dpkg -i libneardal<version>_armhf.deb
wiringpi<version>.deb
neard-explorenfc_<version>_armhf.deb
The contents of SW282711.zip are
libneardal0_0.14-1_armhf.deb
libwiringpi2-2.25-1_armhf.deb
neard-explorenfc_0.1-1_armhf.deb
NXP also spotted the instruction for launching was incorrect
Instead of starting the examples with the command “./explorenfc-<example name>”, it should be started with the command “explorenfc-<example name>”.
So well done for being so responsive and thanks to Dr Christian DeFeo doctorcdf for assisting in getting it sorted.
So does it work. 
Well the new software does give you the ability to read a card/tag, but that is about it.
For a novice user, it leaves you dead in the water.
NXP even suggest downloading their Android App to program the card/tag, and quite frankly the Andriod Apps available on Play Store run rings around it.
(Don't ask about apple as I keep away from itoys)
The card supplied with the kit appears to be unprogrammed, so even the ability to read that is limited.
It is a shame that good affordable hardware is let down so badly by a lack of software to support it.
Any new person is going to look at it and decide to go elsewhere.
If they do buy and it leaves a bad taste, then it is likely they might avoid NXP products in the future (once bitten, twice shy  ).
).
Hence you have to make a good first impression, and since you have coupled this to Raspberry Pi, then chances are it is a novice who will be buying it.
At the very least something that reads the card and controls a GPIO pin would be the minimum example in python.
You don't need to change the hardware to incorporate it, just point the user at this.
PiFace SHIM GPIO Duplication Board for Raspberry Pi
SO are there alternatives
There are a few other boards around for 13.5MHz, and some even use NXP chipsets.
Some have external antenna, and others are quite large and cumbersome looking.
I haven't tried any others, so linking to an unknown product won't help.
If you want to play, most smart phones have NFC and are very inexpensive.
It doesn't help you making a door lock, or similar but IMO using a RPi for that is a waste anyway.
If you look for a RFID board that uses serial then it will be suitable for other controllers.
125KHz Readers
There are many other readers available.
element14 has a few VERY expensive units, and a few tags, but the focus does appear to be 13.5MHz.
Luckily for us makers there is other sources.
Most readers use serial to send and receive the data, and for Arduino UNO/Nano/Pro, etc it is easer to use SoftSerial to keep the Tx/Rx pins free for programming and debugging.
Many readers require 5v, and for our project to assist the elderly, we used a boost converter to raise the LiPo 3.7v upto 5v.
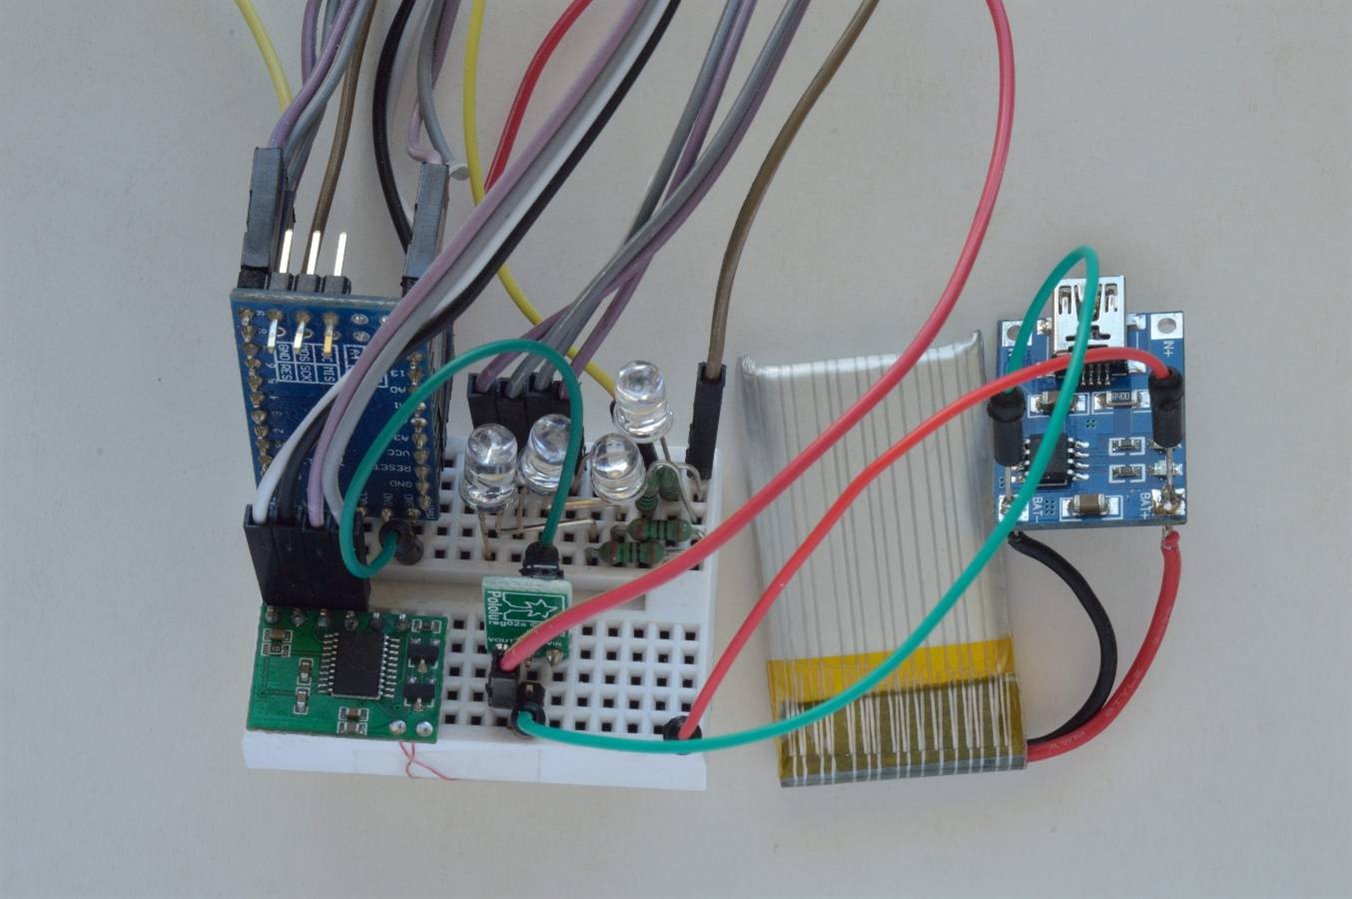
photo source 3 minions (me, myself and I)
In this image the reader is in the lower left, while the 5v out boost module is to the right.
The USB charger for the LiPo is on the right side, and an Arduino Nano is standing vertically.
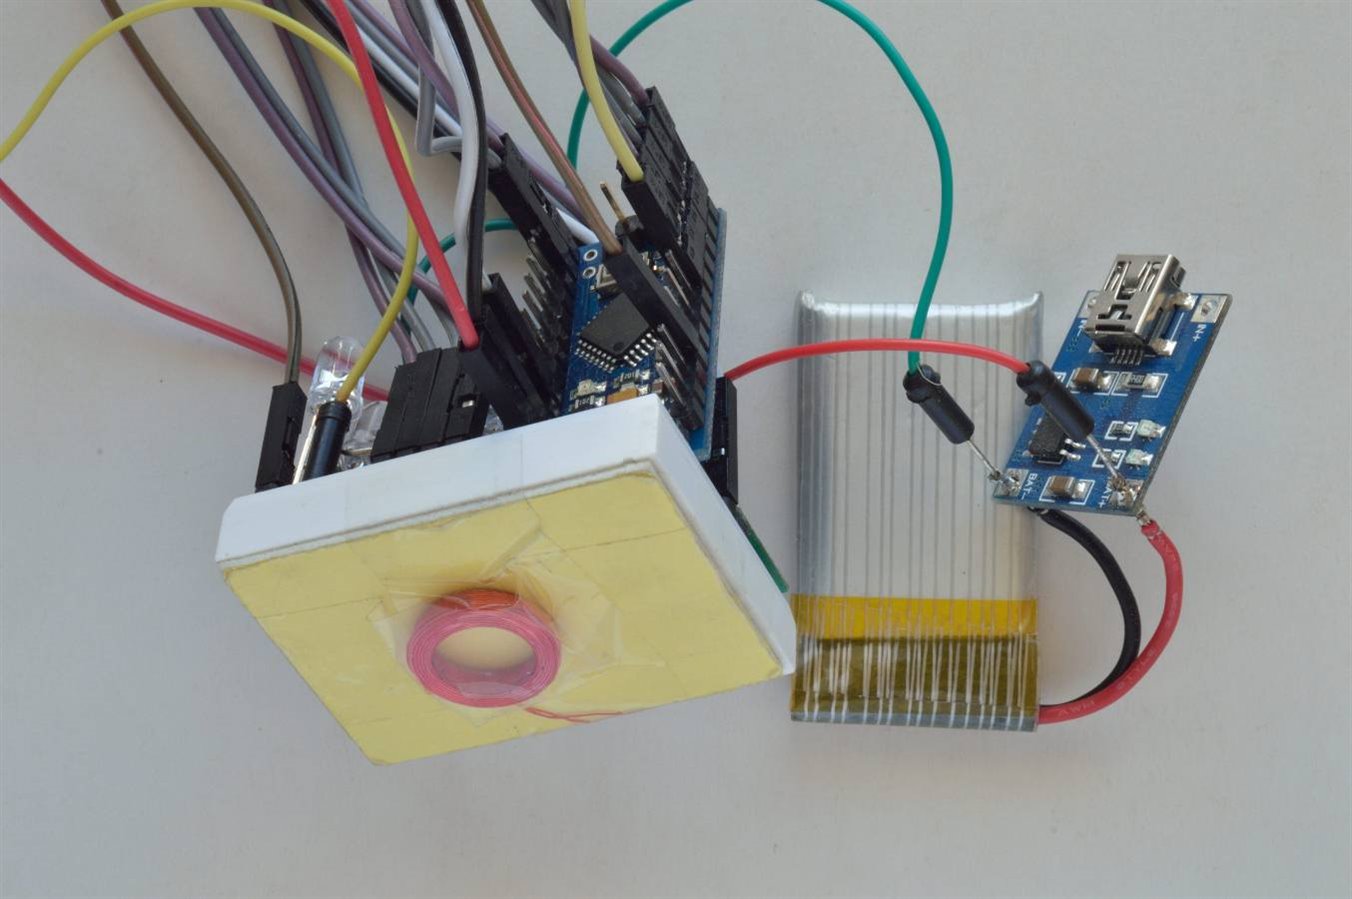
photo source 3 minions (me, myself and I)
This image shows the antenna attached to the bottom.
This unit was used to determine the read distance of the card and tag against various surfaces.
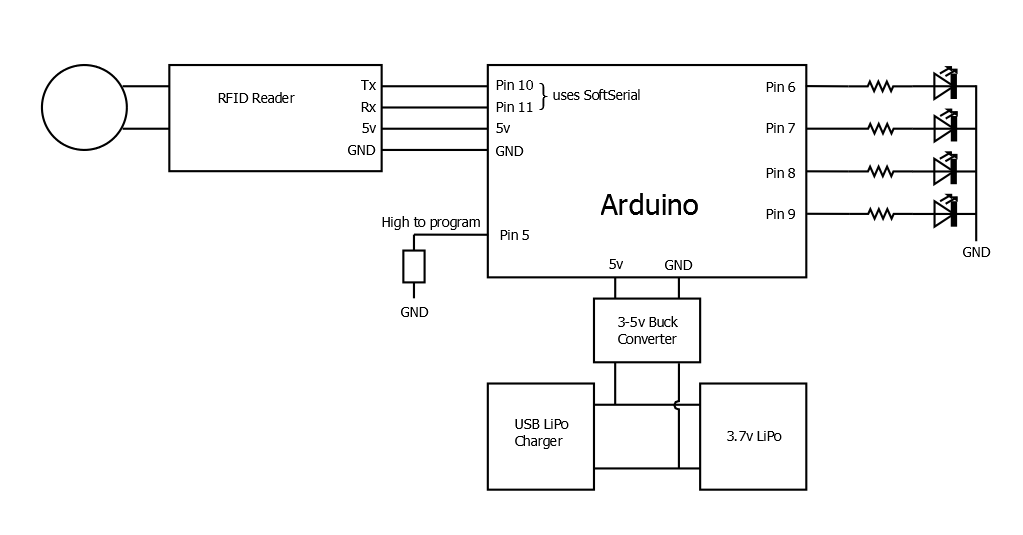
The block diagram shows the interconnection, and I've attached the sketch at the end.
The credit for putting it together along with the sketch goes to Morgan, who was also mentoring the students.
How does it work.? 
When the reader detects a card, it sends the information out the Tx pin.
The Arduino uses SoftSerial ( Arduino - SoftwareSerial ) to read Pin10 and process it.
In this case it matches the card number against 4 stored cards in the EEProm, and lights the appropriate LED.
If the card is not one of the 4 stored card numbers, then it cycles through each LED to indicate it did something.
Is that it.? 
Well yes it is that simple.
The rest of the circuitry simply provides a charging solution for the battery, and a booster to bring it up to 5v.
The design was a portable handheld reader, so the final production would be a single board and could be smaller.
What did the finished product look like.?
Sadly I didn't see the final product.
As I understand the students designed and 3D printed a holder which had 4 keys and the 4 LED's in a pocket/handbag sized package.
The students fitted swivels between the key and holder, so the key could be turned.
They also ensured the design would allow doors with a lock close to the door jam to work.
In all quite a bit of thought and engineering went into what at first glance seems a simple piece.
Care to share the code?
I've attached the code at the end of this to show how easy it is.
It needs some polishing for saving the tags, and flashing the LEDs, but the general concept is there to use in projects.
The code includes the connections, and the later versions of Arduino IDE include SoftSerial.
If you use an earlier version you can find it here
In the next post I'll detail a simple reader that drives a relay and a LED.
The intention is to include some options such as Latching ON v Momentary, and I'll look at using a 'master' card for programming.
In the meanwhile I'll have a think about what other options could be useful, and whether to include them as hardware options or software choices that you 'uncomment'.
Mark
Top Comments