element14 Community
element14 Community
    Register Log In
  • Site
  • Search
  • Log In Register
  • About Us
  • Community Hub
    Community Hub
    • What's New on element14
    • Feedback and Support
    • Benefits of Membership
    • Personal Blogs
    • Members Area
    • Achievement Levels
  • Learn
    Learn
    • Ask an Expert
    • eBooks
    • element14 presents
    • Learning Center
    • Tech Spotlight
    • STEM Academy
    • Webinars, Training and Events
    • Learning Groups
  • Technologies
    Technologies
    • 3D Printing
    • FPGA
    • Industrial Automation
    • Internet of Things
    • Power & Energy
    • Sensors
    • Technology Groups
  • Challenges & Projects
    Challenges & Projects
    • Design Challenges
    • element14 presents Projects
    • Project14
    • Arduino Projects
    • Raspberry Pi Projects
    • Project Groups
  • Products
    Products
    • Arduino
    • Avnet Boards Community
    • Dev Tools
    • Manufacturers
    • Multicomp Pro
    • Product Groups
    • Raspberry Pi
    • RoadTests & Reviews
  • Store
    Store
    • Visit Your Store
    • Choose another store...
      • Europe
      •  Austria (German)
      •  Belgium (Dutch, French)
      •  Bulgaria (Bulgarian)
      •  Czech Republic (Czech)
      •  Denmark (Danish)
      •  Estonia (Estonian)
      •  Finland (Finnish)
      •  France (French)
      •  Germany (German)
      •  Hungary (Hungarian)
      •  Ireland
      •  Israel
      •  Italy (Italian)
      •  Latvia (Latvian)
      •  
      •  Lithuania (Lithuanian)
      •  Netherlands (Dutch)
      •  Norway (Norwegian)
      •  Poland (Polish)
      •  Portugal (Portuguese)
      •  Romania (Romanian)
      •  Russia (Russian)
      •  Slovakia (Slovak)
      •  Slovenia (Slovenian)
      •  Spain (Spanish)
      •  Sweden (Swedish)
      •  Switzerland(German, French)
      •  Turkey (Turkish)
      •  United Kingdom
      • Asia Pacific
      •  Australia
      •  China
      •  Hong Kong
      •  India
      •  Korea (Korean)
      •  Malaysia
      •  New Zealand
      •  Philippines
      •  Singapore
      •  Taiwan
      •  Thailand (Thai)
      • Americas
      •  Brazil (Portuguese)
      •  Canada
      •  Mexico (Spanish)
      •  United States
      Can't find the country/region you're looking for? Visit our export site or find a local distributor.
  • Translate
  • Profile
  • Settings
NI LabVIEW Community
  • Products
  • Dev Tools
  • NI LabVIEW Community
  • More
  • Cancel
NI LabVIEW Community
NI Forum PST.. A little project for the Pico SCPI labTool: resistor pass / fail test bed
  • Blog
  • LabVIEW Challenge Blogs
  • Forum
  • Documents
  • Quiz
  • Files
  • Members
  • Mentions
  • Sub-Groups
  • Tags
  • More
  • Cancel
  • New
Join NI LabVIEW Community to participate - click to join for free!
Actions
  • Share
  • More
  • Cancel
Forum Thread Details
  • Replies 3 replies
  • Subscribers 126 subscribers
  • Views 1102 views
  • Users 0 members are here
  • pico_usbtmc_scpi
  • labview
  • pico_usb_tmc
Related

PST.. A little project for the Pico SCPI labTool: resistor pass / fail test bed

Jan Cumps
Jan Cumps over 2 years ago

Let's imagine that you have to build a test jig for resistors. The task is to check if they are within tolerance. If the resistor is good, you have to put it in the "good" bin. The others ones need to be rejected.
You can build a LabVIEW process with the Pico SCPI labTool (PST) to run this process. It has the necessary ADC inputs that can be used to test the resistor, and outputs that can control status LEDS*.

Requirements:

  • check tolerance of a resistor. Is its value within range?
  • indicate yes or no
  • indicate if the test jig does not detect a resistor.

image

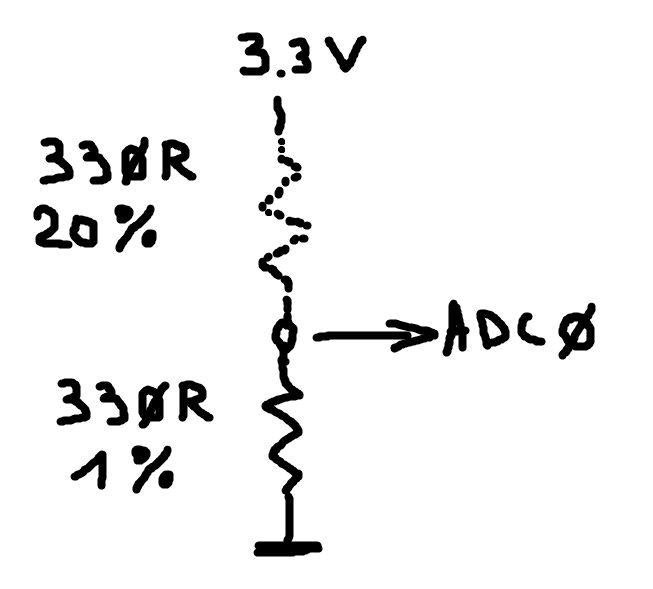
To test the resistor, you can use a divider, with a high precision known resistor and the "resistor under test" in series. You can sample the connection node with a LabVIEW driver ADC block.
Based on the sampled value, you can make the decision if it's within tolerance, and is allowed to be put in the "good" bin.

The GUI could look like this. The 3 cases are shown:
image

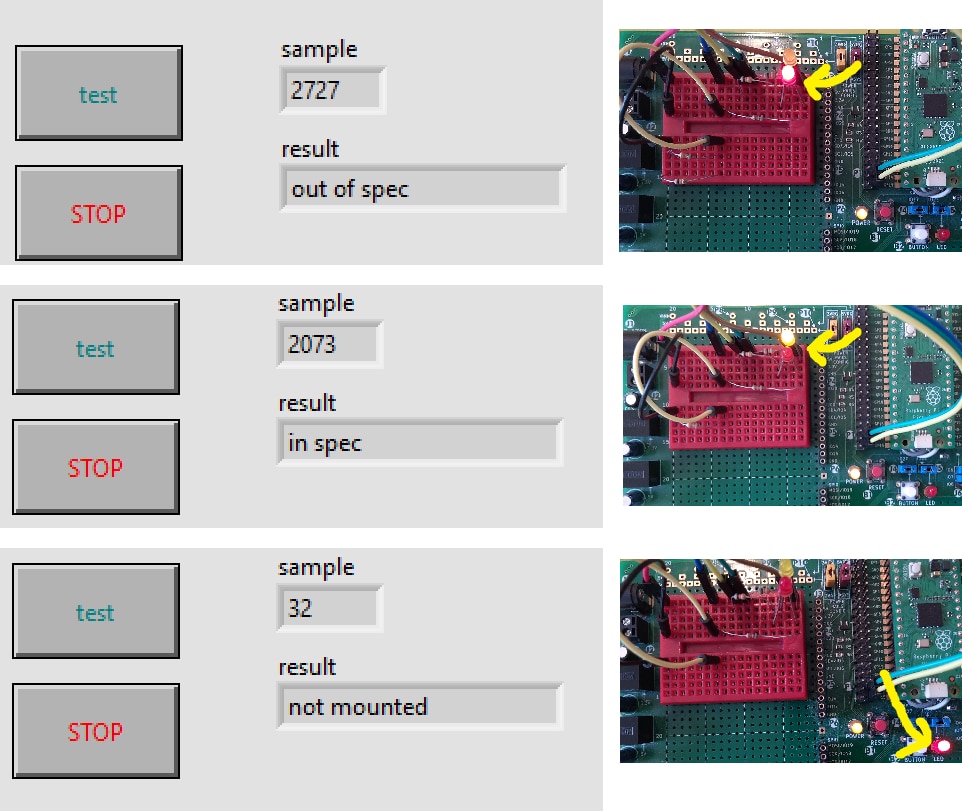
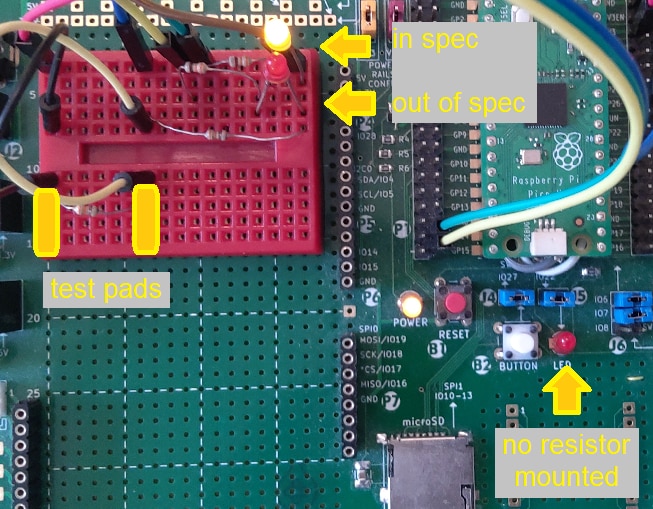
Connect LEDs with a series resistor to the PST digital outputs.
Connect the sample node to a PST analogue input.
Connect the high precision resistor to ground. 
Mount your "resistor under test" between 3.3V and the other side of the high precision one.

image

Flow suggestion:

image

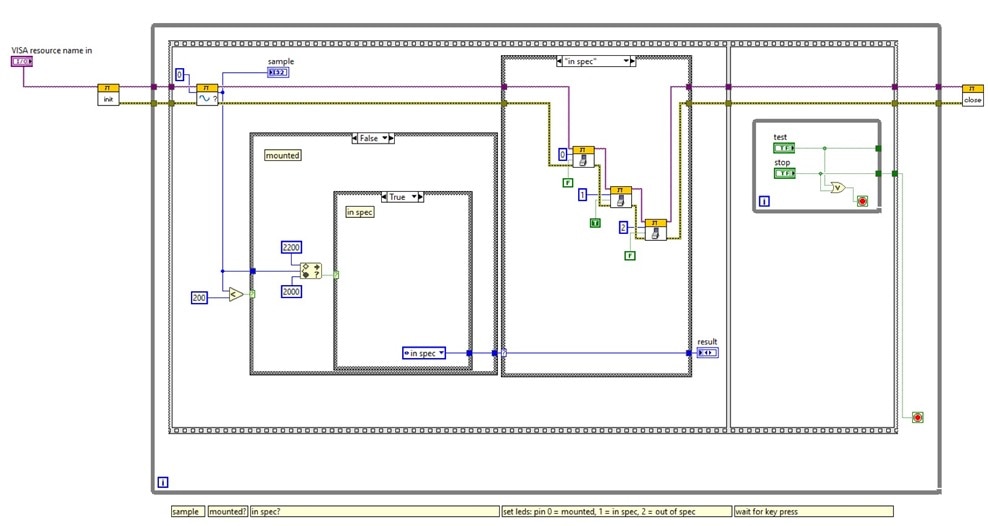
Blocks that look like this are PST LabVIEW driver components:
image
Blocks used:
image
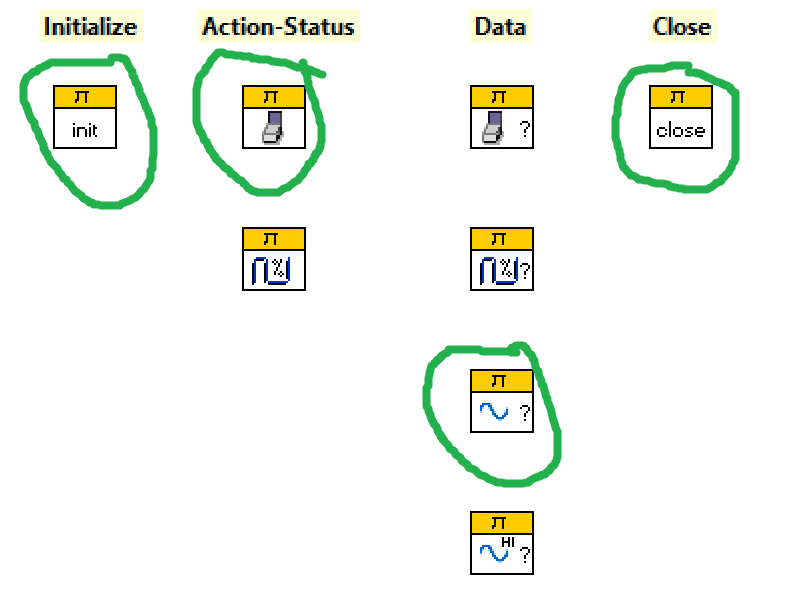
Everything else is out-of-box LabVIEW.

* in a industrial setup, this could be automated. Instead of LEDS, we'd use solenoids to push out-of-spec resistors in the rejected bin. Or sound a horn.
The on-screen button could be replaced by a footswitch or an optocoupler, that would spot if a new resitor is test ready (that is: when we finally implement "digital in" functionality)


link to all posts

  • Sign in to reply
  • Cancel
  • scottiebabe
    scottiebabe over 2 years ago

    Wow! 100

    • Cancel
    • Vote Up 0 Vote Down
    • Sign in to reply
    • Cancel
  • DAB
    DAB over 2 years ago

    Great project Jan.

    • Cancel
    • Vote Up 0 Vote Down
    • Sign in to reply
    • Cancel
  • kmikemoo
    kmikemoo over 2 years ago

    Jan Cumps Nice!  Trying the Pico SCPI labTool is high on the "Try it" list. Thumbsup

    • Cancel
    • Vote Up 0 Vote Down
    • Sign in to reply
    • Cancel
element14 Community

element14 is the first online community specifically for engineers. Connect with your peers and get expert answers to your questions.

  • Members
  • Learn
  • Technologies
  • Challenges & Projects
  • Products
  • Store
  • About Us
  • Feedback & Support
  • FAQs
  • Terms of Use
  • Privacy Policy
  • Legal and Copyright Notices
  • Sitemap
  • Cookies

An Avnet Company © 2025 Premier Farnell Limited. All Rights Reserved.

Premier Farnell Ltd, registered in England and Wales (no 00876412), registered office: Farnell House, Forge Lane, Leeds LS12 2NE.

ICP 备案号 10220084.

Follow element14

  • X
  • Facebook
  • linkedin
  • YouTube