element14 Community
element14 Community
    Register Log In
  • Site
  • Search
  • Log In Register
  • Community Hub
    Community Hub
    • What's New on element14
    • Feedback and Support
    • Benefits of Membership
    • Personal Blogs
    • Members Area
    • Achievement Levels
  • Learn
    Learn
    • Ask an Expert
    • eBooks
    • element14 presents
    • Learning Center
    • Tech Spotlight
    • STEM Academy
    • Webinars, Training and Events
    • Learning Groups
  • Technologies
    Technologies
    • 3D Printing
    • FPGA
    • Industrial Automation
    • Internet of Things
    • Power & Energy
    • Sensors
    • Technology Groups
  • Challenges & Projects
    Challenges & Projects
    • Design Challenges
    • element14 presents Projects
    • Project14
    • Arduino Projects
    • Raspberry Pi Projects
    • Project Groups
  • Products
    Products
    • Arduino
    • Avnet Boards Community
    • Dev Tools
    • Manufacturers
    • Multicomp Pro
    • Product Groups
    • Raspberry Pi
    • RoadTests & Reviews
  • Store
    Store
    • Visit Your Store
    • Choose another store...
      • Europe
      •  Austria (German)
      •  Belgium (Dutch, French)
      •  Bulgaria (Bulgarian)
      •  Czech Republic (Czech)
      •  Denmark (Danish)
      •  Estonia (Estonian)
      •  Finland (Finnish)
      •  France (French)
      •  Germany (German)
      •  Hungary (Hungarian)
      •  Ireland
      •  Israel
      •  Italy (Italian)
      •  Latvia (Latvian)
      •  
      •  Lithuania (Lithuanian)
      •  Netherlands (Dutch)
      •  Norway (Norwegian)
      •  Poland (Polish)
      •  Portugal (Portuguese)
      •  Romania (Romanian)
      •  Russia (Russian)
      •  Slovakia (Slovak)
      •  Slovenia (Slovenian)
      •  Spain (Spanish)
      •  Sweden (Swedish)
      •  Switzerland(German, French)
      •  Turkey (Turkish)
      •  United Kingdom
      • Asia Pacific
      •  Australia
      •  China
      •  Hong Kong
      •  India
      •  Korea (Korean)
      •  Malaysia
      •  New Zealand
      •  Philippines
      •  Singapore
      •  Taiwan
      •  Thailand (Thai)
      • Americas
      •  Brazil (Portuguese)
      •  Canada
      •  Mexico (Spanish)
      •  United States
      Can't find the country/region you're looking for? Visit our export site or find a local distributor.
  • Translate
  • Profile
  • Settings
Test & Tools
  • Technologies
  • More
Test & Tools
Blog PST.. Program the Pico SCPI labTool?
  • Blog
  • Forum
  • Documents
  • Files
  • Members
  • Mentions
  • Sub-Groups
  • Tags
  • More
  • Cancel
  • New
Join Test & Tools to participate - click to join for free!
  • Share
  • More
  • Cancel
Group Actions
  • Group RSS
  • More
  • Cancel
Engagement
  • Author Author: Jan Cumps
  • Date Created: 6 Aug 2023 9:31 AM Date Created
  • Views 5457 views
  • Likes 15 likes
  • Comments 55 comments
  • pico_usbtmc_scpi
  • pico
  • USBTMC
  • Pico SCPI labTool
  • labview
  • scpi
  • PST
  • pyvisa
Related
Recommended

PST.. Program the Pico SCPI labTool?

Jan Cumps
Jan Cumps
6 Aug 2023
PST.. Program the Pico SCPI labTool?

The Pico SCPI labTool (PST) allows you to connect your PC to equipment to control and monitor all sorts of things. It runs on a Raspberry Pico.
In this post: functionality, and how to use SCPI or LabVIEW to program the device.

image

Capabilities

Functions

control output pins Set gpio outputs high or low (can drive a LED, relays, actuator, buzzer, ...)
get output pin status query the current state of an output pin
get input pin status query the state of an input pin (can be a digital signal, switch status, ...) added in release 3
get analogue input query the Pico ADC inputs, or the measurements from an attached ADS1115 added in release 2
set analogue output Control a Pico pin's output value with variable duty cycle added in release 3
get analogue output value query the current set duty cycle of a Pico pin added in release 3
digital input in: registers instrument specific registers for digital input pins added in release 4
service request IEEE488.2 compliant service requests (e.g.: react on digital input status change) added in  release 5

Programming interface

control language SCPI
connectivity Universal Serial Bus Test and Measurement Class (USBTMC), VISA compatible
client software

LabVIEW Virtual Instrument driver (VI)
direct SCPI control with pyVisa, MathLab, LabVIEW
VISA compatible clients 

image

Command reference

This section describes the supported (and not yet supported) commands. It lists

  • the SCPI syntax,
  • LabVIEW Virtual Instrument driver block
  • the pins that are used,
  • parameters, return values.

set digital output

drive digital output pin of PICO high or low

pins:

0: GP22
1: GP14
2: GP15

SCPI DIGItal:OUTPut# <0|1>

example: DIGI:OUTP0 1

#: pin
parameter 1: boolean (0|1 or OFF|ON )
return: na

VI

Public/Action-Status/Digital Out Control

image

inputs:
pin (int)
state (bool)
outputs:
na

get digital output query the state of a digital output

pins:

0: GP22
1: GP14
2: GP15

SCPI DIGItal:OUTPut#?

example: DIGI:OUTP0?

#: pin
return: state (bool 0|1)

VI

Public/Data/Read Digital Out

image

inputs:
pin (int)
outputs:
state (bool 0|1)

get digital input

query the state of a digital input

pins:

0: GP20
1: GP21
2: GP27

SCPI DIGItal:INPut#?

example: DIGI:INP0?

#: pin
return: state (bool 0|1)

VI

Public/Data/Read Digital In

image

inputs:
pin (int)
outputs:
state (bool 0|1)

get analogue input (standard) query an ADC input of the Pico

pins:

0: GP26 (ADC0)
1: GP28 (ADC2)

SCPI ANAlog:INPut#:RAW?

example: ANA:INP0:RAW?

#: pin
return: ADC value(integer 0-4095)

VI

Public/Data/Read Analog

image

inputs:
pin (int)
outputs:
ADC value (integer 0-4095)

get analog input (high resolution) query an input of attached ADS1115 ADC

pins:

ADS1115 pin 0 - 3
developed by shabaz !
See the Extensions section below for hardware requirements.

SCPI ANAlog:HIRES:INPut#:RAW? #: pin
return: ADC value(integer 0-32766)
VI

Public/Data/Read Analog HiRes

image

inputs:
pin (int)
outputs:
ADC value (integer 0-32766)

set analog output control pin of Pico with variable duty cicle

pins:

0: GP16
1: GP17
2: GP18
developed by shabaz 

SCPI ANAlog:OUTPut#:RAW <0-4095> inputs:
pin (int)
Duty cycle value (integer 0-4095)
outputs:
na
VI

Public/Action-Status/Analog Out Control

image

inputs:
pin (int)
duty cycle (integer 0-4095)
outputs:
na

get analog output query the set duty cycle set on a pin of Pico

pins:

0: GP16
1: GP17
2: GP18
developed by shabaz 

SCPI ANAlog:OUTPut#:RAW? inputs:
pin (int)
outputs:
Duty cycle value (integer 0-4095)
VI

Public/Data/Read Analog Out

image

inputs:
pin (int)
outputs:
duty cycle (integer 0-4095)

init resource initiate connection VISA url: USB0::0xCAFE::0x4000::123456::INSTR
SCPI na, connect via VISA API client dependent
VI

Public/Initialize

image

inputs:
VISA url
outputs:
na

close resource release connection
SCPI na, disconnect via VISA API client dependent
VI

Public/Close

image

inputs:
na
outputs:
na

Command reference: instrument specific registers

This section describes the supported (and not yet supported) commands. It lists

  • the SCPI syntax,
  • registers and bits that are used,
digital input registers query the registers of a digital input, set filter and fan-out to IEEE488.2 Operation Status register

bits:

0: GP20
1: GP21
2: GP27

registers:

CONDition
PTRansition
NTRansition
EVENt
ENABle

fan-out to IEEE488.2:

Operation Status[0]

SCPI STATus:OPERation:DIGItal:INPut:CONDition?
STATus:OPERation:DIGItal:INPut:PTRansition
STATus:OPERation:DIGItal:INPut:PTRansition?
STATus:OPERation:DIGItal:INPut:NTRansition
STATus:OPERation:DIGItal:INPut:NTRansition?
STATus:OPERation:DIGItal:INPut:EVENt?
STATus:OPERation:DIGItal:INPut:ENABle
STATus:OPERation:DIGItal:INPut:ENABle?

Example

To run your first LabVIEW flow on the instrument, go to the Downloads section below, and get the latest firmware and LabVIEW VI driver with examples.

VI read analogue pin

image image 
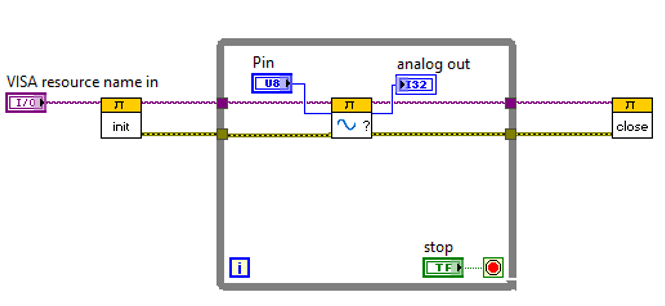
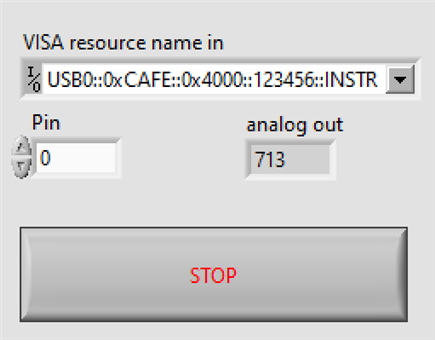
This is one of the examples that's included in the LabVIEW VI Driver download

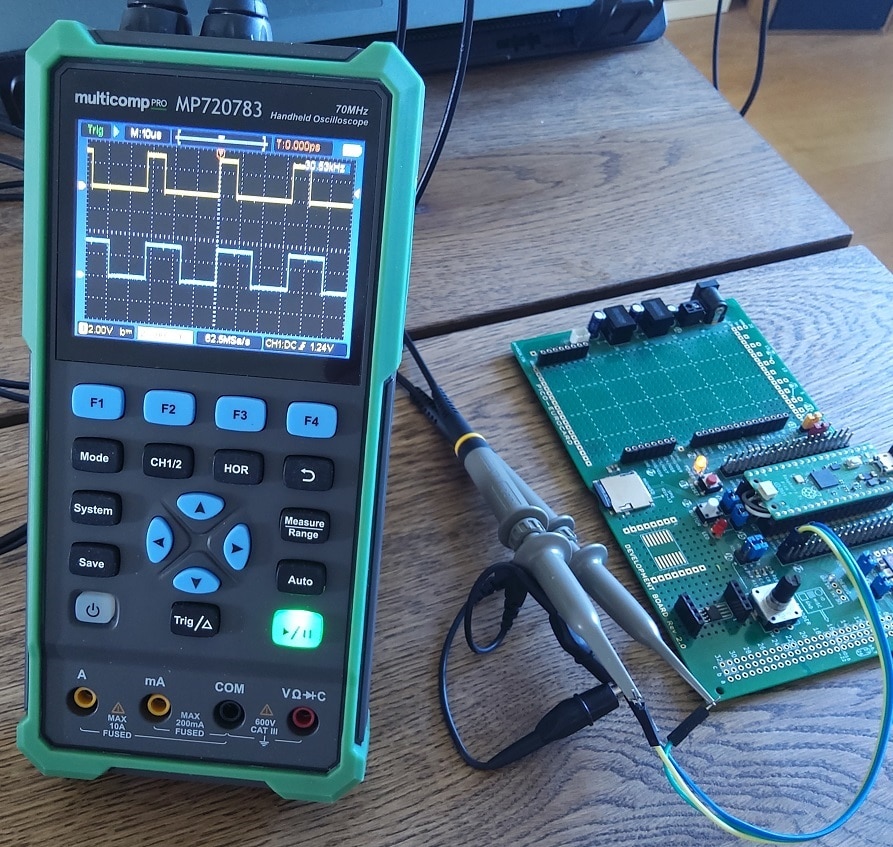
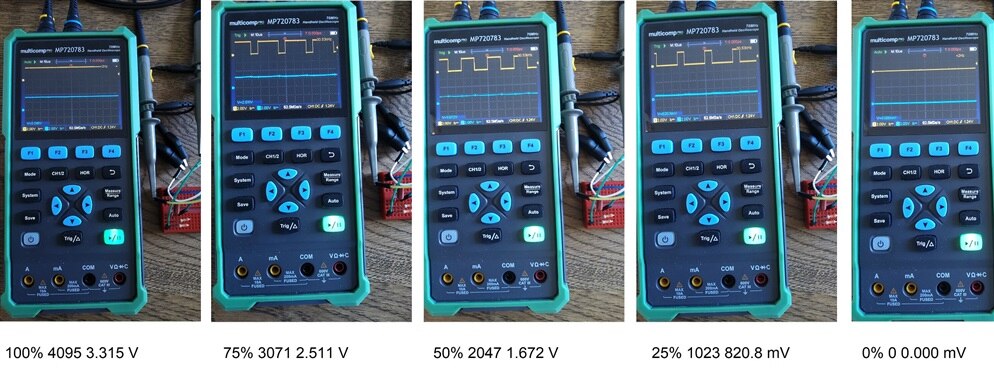
PyVISA control and query digital output pins

ANA:OUT test at 100, 75, 50, 25 and 0%

image

Extensions

Connect an ADS1115 ADC to Pico I2C0 (GP4[SDA], GP5[SCL]) to enable the get analog input (high resolution) function. 

Contributors

 shabaz  analogue output, high resolution analogue support,
code reviews
 ggabe  IEEE488.2 service request support

If you want to contribute to this project, check PST.. Have you worked with the Pico SCPI labTool? and github instructions.

If you want to use this project start your own SCPI instrument, check these 2 posts:

  •  Do you want to create your own Pico SCPI device, based on PST.. Pico SCPI USBTMC labLib (and labTool)? 
  •  PSA.. SCPI firmware for Pico Data Acquisition Board as a plug-in module 

Downloads

The release has all you need to get started. The firmware contains the binary .uf2 that you can copy on your Pico. The LabVIEW VI Driver contains examples that you can run right away.

software latest release (source and bin) development branch (source)
Pico Firmware github release github branch
LabVIEW Virtual Instrument driver with examples github release github branch

link to all posts

  • Sign in to reply

Top Comments

  • scottiebabe
    scottiebabe over 1 year ago in reply to Jan Cumps +2
    Your Widget has made a new friend...
  • Jan Cumps
    Jan Cumps over 1 year ago in reply to scottiebabe +1
    untested 21.0 version community.element14.com/.../usbtmc_5F00_scpi_5F00_labtool-Folder.zip
  • Jan Cumps
    Jan Cumps over 1 year ago in reply to scottiebabe +1
    scottiebabe , the binary that supports the same functions of the LabVIEW driver isn't released yet (source is available, under branch "development-set-3"). Here's a binary: community.element14.com…
  • Jan Cumps
    Jan Cumps over 1 year ago in reply to Jan Cumps

    Works on two cores too now:  PST.. Pico SCPI labTool can run multi-core on FreeRTOS SMP 

    • Cancel
    • Vote Up 0 Vote Down
    • Sign in to reply
    • More
    • Cancel
  • Jan Cumps
    Jan Cumps over 1 year ago

    Experiment: run the labTool on FreeRTOS:

    image

    I have it working on RTOS standard (single core). Goal is to run tasks on both cores later. That could be useful for designs like the  Data Acquisition Board for Pi Pico .

    GitHub repo: https://github.com/jancumps/pst_rtos

    • Cancel
    • Vote Up 0 Vote Down
    • Sign in to reply
    • More
    • Cancel
  • taifur
    taifur over 1 year ago in reply to Jan Cumps

    Thanks Jan.

    • Cancel
    • Vote Up 0 Vote Down
    • Sign in to reply
    • More
    • Cancel
  • Jan Cumps
    Jan Cumps over 1 year ago in reply to taifur

    Window -> Show Block Diagram

    image

    • Cancel
    • Vote Up 0 Vote Down
    • Sign in to reply
    • More
    • Cancel
  • taifur
    taifur over 1 year ago

    Hello,

    I am new to LabVIEW. When I open the driver example it only opens the front panel like the image below. How can I open the block editor?

    image

    • Cancel
    • Vote Up 0 Vote Down
    • Sign in to reply
    • More
    • Cancel
>
element14 Community

element14 is the first online community specifically for engineers. Connect with your peers and get expert answers to your questions.

  • Members
  • Learn
  • Technologies
  • Challenges & Projects
  • Products
  • Store
  • About Us
  • Feedback & Support
  • FAQs
  • Terms of Use
  • Privacy Policy
  • Legal and Copyright Notices
  • Sitemap
  • Cookies

An Avnet Company © 2025 Premier Farnell Limited. All Rights Reserved.

Premier Farnell Ltd, registered in England and Wales (no 00876412), registered office: Farnell House, Forge Lane, Leeds LS12 2NE.

ICP 备案号 10220084.

Follow element14

  • X
  • Facebook
  • linkedin
  • YouTube