Hello!
Before we begin today’s post, I want to thank you for your support over the last few months. This has been a great series showcasing the PSoC 4 Pioneer board. There have been a wide range of projects from LED blinky (), to an Android controlled robot (), to a Rice Cooker (). WhiIe you have been reading my posts each day, the big credit goes to the nearly 40+ Cypress engineers that put in the time to write and create each of these examples. It has been an exciting series. In the next few days I’ll be making some additional posts for complete downloads of the series and complete lists of web links for each project. The big question is, are we stopping this series? The answer is No. We will continue to post more and more examples to this forum, though it will be at a reduced rate. My hope is that we can continue to post one example each week. I have a couple of great projects that we’ll post next week. Stay tuned to this forum for more info and examples. Now that the platitudes are over, let’s get to that 100th project in 100 days.
Today’s post is an exciting one. We all know the classic ‘Hello World’ example for embedded microcontroller kits, this is the popular ‘LED Blinky’.
In have . Today’s post may be the mother of all LED Blinky projects.
We are showcasing our PSoC 4 controlled LED RGB Billboard. In this example we showcase an LED Billboard with an array of 16x60, or 960 RBG LEDs, being controlled by a single PSoC 4 Pioneer board. That is nearly 3000 LEDs for this billboard.
This example utilizes the popular WS2811/12 driven strips of individually addressable RGB LEDs. You will need to ensure that the LED strips you are using utilize this LED driver. These LED strips are sold at places like Ebay or Adafruit. These strips are connected to the PSoC 4 through a prototyping shield. The entire billboard is powered using a PC power supply wired to the 5V supply. At peak power this display will consume up to 50-60 amps of current when all LEDs are set to white and at full brightness. We have included a video below showcasing the billboard in action.
To help ease development we have created a custom component that allows the user to easily configure their PSoC 4 device to drive these LEDs using available API calls. You may see some projects online where Arduino kits are used to drive these LED strips. Here we take away the timing concerns and integrate the data communication into the digital UDBs. This frees up the user to perform other actions, where the Arduino kits would be consumed performing bit banging operations. We have also included the Component datasheet at the bottom of this post.
In the example project included at the bottom of this post we have included both the example in the video, and an example for a single strip of LEDs covering both the PSoC 4 and the PSoC 5LP devices. That means you can use this example on PSoC 4 and PSoC 5LP devices. The single strip example will be useful to users who want to test out the LED strips without having to spend too much money building a billboard.
Forum Post Attachments:
At the bottom of this post we are including the following items:
- Example Project Zip File
- Project Images
- Component Datasheet
- LED Driver Datasheet
Components Used:
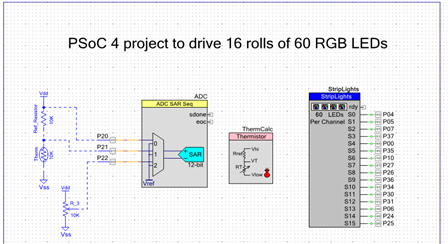
The user can download the example project at the bottom of this post. The project uses the following list of Creator Components:
- ADC
- ThermCalc
- StripLights (custom component)
Firmware Description:
The main.c firmware is included in the example project. Please review the commented sections for more details.
Today’s project focuses on using the StripLights custom component. This component drives the popular WD2811/12 RGB LEDs. The component will support from 1 to 16 strings of LEDs. In the component we have support for a 24-bit RGB color lookup table and the ability to display 5x7 character font. Also supported are Pixel, line, rectangle, and circle primitives. The component supports both the 400 and 800 kHz LED controllers. The StripLights component will consume between 2 and 4 UDBs depending on the channel count selected by the user. The StripLights example supports the following APIs for application development:
- Start
- Stop
- DisplayClear
- MemClear
- Trigger
- Pixel
- DrawLine
- DrawRect
- DrawCircle
- ColorInc
- Dim
- Ready
- SetFont
- PutChar
- PutString
- IRQ_Enable
- IRQ_Disable
As part of the 16x60 LED demo we also include two source files named Demo.h and Demo.c. These two files includes additional APIs to create interesting graphics on the display. These files support the following API calls:
- SimpleScope
- DisplayTempSAR
- DisplayTemp
- IntToString
- GetTemp
- SlideFlag
- DrawFlag
- PsocRocks
- ScrollRect
- ScrollCircle
- ScrollTextLeftTo
- ScrollText
- Flash
- Rainbow
- Stripe
- Burst
- CircleRainbow
- RectRainbow
Hardware Connections:
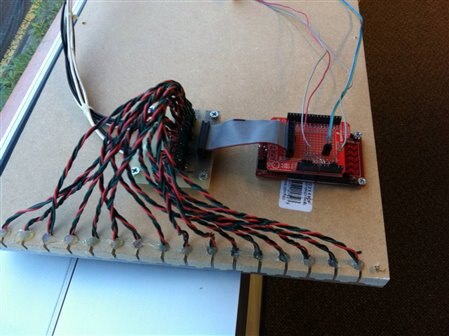
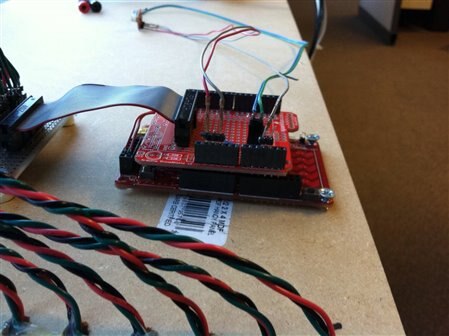
In the images below you will see our hardware configuration for this billboard. In the design powered our system using a PC power supply. We connected the 5V supply and ground line to a breadboard. From that breadboard we powered each of the 16 LED strips. From the breadboard we connected the 16 data lines from the PSoC 4 and the power and ground connections. In this example the PC power supply is powering the LEDs and the Pioneer board. Also connected to this example was a Thermistor and a resistor. This allowed us to display the ambient temperature on the display. The Thermistor layout is detailed in the schematic design.
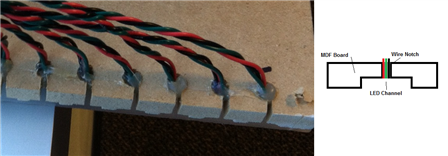
The LED display was built using MDF particle board. We used a wood router to machine 16 channels 1 meter long. The LED strips were then placed in the channels. At the end of the channel a notch was cut to allow the wires to easily exit the back of the display. Clear caulking was added to hold the wires in place. The protoboard and the Pioneer board were connected to the MDF board using wood screws. A thin plastic diffuser was connected to the top of the MDF board using wood screws. We used a plastic diffuser to diffuse the LED light. The LEDs can tend to be direct and very bright. The diffuser allowed for a clean and continuous display.
Test Your Project:
Build up the hardware using the LED strips. A single LED strip example is included in the project below. Then program the Pioneer board and begin using the example code to create a display.
I hope this example can help you in your design.
Best,
Matt


