element14 Community
element14 Community
    Register Log In
  • Site
  • Search
  • Log In Register
  • About Us
  • Community Hub
    Community Hub
    • What's New on element14
    • Feedback and Support
    • Benefits of Membership
    • Personal Blogs
    • Members Area
    • Achievement Levels
  • Learn
    Learn
    • Ask an Expert
    • eBooks
    • element14 presents
    • Learning Center
    • Tech Spotlight
    • STEM Academy
    • Webinars, Training and Events
    • Learning Groups
  • Technologies
    Technologies
    • 3D Printing
    • FPGA
    • Industrial Automation
    • Internet of Things
    • Power & Energy
    • Sensors
    • Technology Groups
  • Challenges & Projects
    Challenges & Projects
    • Design Challenges
    • element14 presents Projects
    • Project14
    • Arduino Projects
    • Raspberry Pi Projects
    • Project Groups
  • Products
    Products
    • Arduino
    • Avnet Boards Community
    • Dev Tools
    • Manufacturers
    • Multicomp Pro
    • Product Groups
    • Raspberry Pi
    • RoadTests & Reviews
  • Store
    Store
    • Visit Your Store
    • Choose another store...
      • Europe
      •  Austria (German)
      •  Belgium (Dutch, French)
      •  Bulgaria (Bulgarian)
      •  Czech Republic (Czech)
      •  Denmark (Danish)
      •  Estonia (Estonian)
      •  Finland (Finnish)
      •  France (French)
      •  Germany (German)
      •  Hungary (Hungarian)
      •  Ireland
      •  Israel
      •  Italy (Italian)
      •  Latvia (Latvian)
      •  
      •  Lithuania (Lithuanian)
      •  Netherlands (Dutch)
      •  Norway (Norwegian)
      •  Poland (Polish)
      •  Portugal (Portuguese)
      •  Romania (Romanian)
      •  Russia (Russian)
      •  Slovakia (Slovak)
      •  Slovenia (Slovenian)
      •  Spain (Spanish)
      •  Sweden (Swedish)
      •  Switzerland(German, French)
      •  Turkey (Turkish)
      •  United Kingdom
      • Asia Pacific
      •  Australia
      •  China
      •  Hong Kong
      •  India
      •  Korea (Korean)
      •  Malaysia
      •  New Zealand
      •  Philippines
      •  Singapore
      •  Taiwan
      •  Thailand (Thai)
      • Americas
      •  Brazil (Portuguese)
      •  Canada
      •  Mexico (Spanish)
      •  United States
      Can't find the country/region you're looking for? Visit our export site or find a local distributor.
  • Translate
  • Profile
  • Settings
Cypress Kits
  • Products
  • Dev Tools
  • Cypress Kits
  • More
  • Cancel
Cypress Kits
Forum CY3280-MBR3 Example with Raspberry Pi
  • Blog
  • Forum
  • Documents
  • Polls
  • Files
  • Members
  • Mentions
  • Sub-Groups
  • Tags
  • More
  • Cancel
  • New
Join Cypress Kits to participate - click to join for free!
Actions
  • Share
  • More
  • Cancel
Forum Thread Details
  • Replies 4 replies
  • Subscribers 27 subscribers
  • Views 722 views
  • Users 0 members are here
Related

CY3280-MBR3 Example with Raspberry Pi

cy.wbz
cy.wbz over 11 years ago

Hello!


Today I’m posting an example project using our new CY3280-MBR3CY3280-MBR3 CapSense evaluation kit with the popular Raspberry Pi development tool. This example builds on our earlier example showing the CY3280-MBR3CY3280-MBR3 kit working with the Arduino development kits.


Fullscreen 8865.contentimage_112863.html Download
<html><head><title>Jive SBS</title></head>
<body><font face="arial,helvetica,sans-serif">
<b>Error</b><br><font size="-1">
An general error occurred while processing your request.
</font></font></body></html>


In this example we show how the user can configure the CY3280-MBR3CY3280-MBR3 kit using a python script on their Raspberry Pi development environment. In this example the python code runs on the Raspberry Pi model B board using the Rasbian Wheezy image and configures the MBR3 device with the Water Tolerance demonstration. The python example code also reads and displays the button status on the python shell output.


The CY3280-MBR3CY3280-MBR3 evaluation kit interfaces with our EZ-Click software tool. Note this development tool is not supported on Linux systems. The output files are text files and can be send or copied onto a the Raspberry Pi.


www.cypress.com/go/EZ-Click


Forum Post Attachments:

At the bottom of this post we are including the following items:

  • EZ-Click MBR3 example project
  • Raspberry Pi Python Script
  • Example Guide


Software:


The following example will need software versions:

  • Configured Raspberry Pi System
  • MBR3 Python script
  • EZ-Click 2.0


Firmware:


What is important to understand is that there is no firmware development for the MBR3 device family. The MBR3 devices are configured over I2C setting registers inside of the device to enable or disable certain features. On the MBR3 kit we support four CapSense buttons and one Proximity loop sensor. This kit can easily provide a CapSense front panel to your design.


We have provided in the download section of the post we have included the Python script for the Raspberry Pi. The Water Tolerance example project is available in the kit installer for the CY3280-MBR3 kit.


In this example project the python script configures the target MBR3 device and then reads and displays the button status on the output window.


Attached to this example is an example guide that can help you navigate through the example.


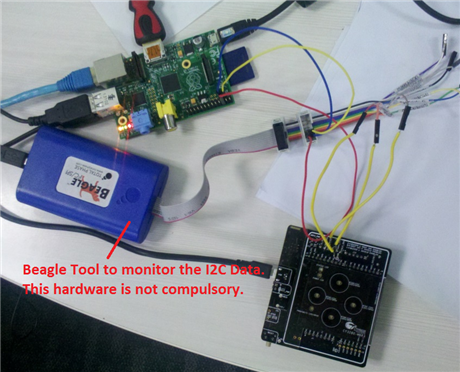
Hardware Connections:


The following list of steps will help you configure your hardware to ensure proper functionality.

  1. Connect the MBR3 I2C Lines from pin-2 of J13 and J14 jumpers to corresponding I2C lines of Ras pi available on P1 header.
  2. Connect the MBBR3 GND to Ras Pi GND on available on P1 header
  3. Power the MBR3 kit separately using the Mini USB cable
  4. Note: Don’t power the Kit from the 5V connection available on P1 header of the Ras Pi.
  5. Keep the Jumper J11, J12 shunted.
  6. Keep J15 jumper in “C” configuration i.e. Enable Buzzer and Water Tolerance enabled.
  7. If you want to enable different features just generate the 128 byte of configuration data using Ez-Click and replace the data of configData = [ ] array.


Fullscreen 7360.contentimage_112864.html Download
<html><head><title>Jive SBS</title></head>
<body><font face="arial,helvetica,sans-serif">
<b>Error</b><br><font size="-1">
An general error occurred while processing your request.
</font></font></body></html>


Test Your Project:


After enabling the Raspberry PI system please take a moment to review the Raspberry Pi I2C Python step steps linked below. These steps will help you enable the I2C drivers on the Pi.

http://www.instructables.com/id/Raspberry-Pi-I2C-Python/#step1


image


Download the example python code from this post and run the code using the IDLE which is installed as part of the Raspbian image.


Best,

Matthew Buza

Attachments:
Raspberry Pi code.zip
  • Sign in to reply
  • Cancel

Top Replies

  • b4ux1t3
    b4ux1t3 over 11 years ago +2
    This helped a lot with the project I am using for the RoadTest. I am currently writing a module that simplifies the commands and makes an EZ Click-esque interface to configure the MBR3 over I2C using the…
  • malakai
    malakai over 11 years ago

    The example doc link isn't working for me. Any chance you can check into it. Looks very interesting to use in various Raspberry Pi projects.

    • Cancel
    • Vote Up 0 Vote Down
    • Sign in to reply
    • Cancel
  • cy.gul
    cy.gul over 11 years ago in reply to malakai

    Todd,

    here's a copy-paste of the contents of that example document:


    CY3280-MBR3CY3280-MBR3 example with Raspberry-Pi (ras pi) host.


    The python example code runs on ras pi Rev B board having Rasbian Wheezy Image.

    In this example code the Ras pi configures the MBR3 kit in default configuration i.e. all 4 buttons & corresponding LEDs and Water tolerance is enabled. The example code also reads and displays the button status on the python shell output.


    Details:


    Hardware:

    1. CY3280MBR3 Kit
    2. Raspberry Pi Rev B and its accouterments


    Software:

    1. Ez-Click 2.0


    Example Code Overview:

    The example code configures the MBR3 device and reads the button status continuously in a thread. The read button status thread ‘readButtonStatThread()’ is updating a global variable ‘buttonStat’  that is used to in the main thread to display/print the status on the python shell.


    Raspberry-Pi:


    In this project RPi runs on Raspbian, a free OS based on Debian. The example code is written in Python which can be run using the already installed python (IDLE).


    Raspberry Pi Block Diagram:


    Raspberry-Pi P1 Header contains the lower-level interfaces, these pins uses 3.3 V and is not tolerant to 5V.


    Hardware Setup


    Hardware Connections:


    1. Connect the MBR3 I2C Lines from pin-2 of J13 and J14 jumpers to corresponding I2C lines of Ras pi available on P1 header.
    2. Connect the MBBR3 GND to Ras Pi GND on available on P1 header
    3. Power the MBR3 kit separately using the Mini USB cable

    Note: Don’t power the Kit from the 5V connection available on P1 header of the Ras Pi.

    1. Keep the Jumper J11, J12 shunted.
    2. Keep J15 jumper in “C” configuration i.e. Enable Buzzer and Water Tolerance enabled.
    3. If you want to enable different features just generate the 128 byte of configuration data using Ez-Click and replace the data of configData = [ ] array.


    Procedure:

    1. Set up the Raspberry SD card and get it running.
    2. Follow the step by step procedures mentioned at the link below to enable the I2C drivers

    http://www.instructables.com/id/Raspberry-Pi-I2C-Python/#step1

    1. Check if the hardware connection is as indicated above.
    2. Download/Copy the example python code and run the code using the IDLE which is already installed.


    Raspberry Pi References


    1. Raspberry Pi Low-level peripherals: http://elinux.org/RPi_Low-level_peripherals
    2. I2C : http://www.instructables.com/id/Raspberry-Pi-I2C-Python/#step1
    3. The keyboardinterrupt exception: http://effbot.org/zone/stupid-exceptions-keyboardinterrupt.htm
    4. Python Control Flow: http://docs.python.org/2/tutorial/controlflow.html
    • Cancel
    • Vote Up 0 Vote Down
    • Sign in to reply
    • Cancel
  • malakai
    malakai over 11 years ago in reply to cy.gul

    Fantastic thank you.

    • Cancel
    • Vote Up 0 Vote Down
    • Sign in to reply
    • Cancel
  • b4ux1t3
    b4ux1t3 over 11 years ago

    This helped a lot with the project I am using for the RoadTest. I am currently writing a module that simplifies the commands and makes an EZ Click-esque interface to configure the MBR3 over I2C using the example code blow as a base, since there's no Linux support that I can find for EZ Click.

    • Cancel
    • Vote Up +2 Vote Down
    • Sign in to reply
    • Cancel
element14 Community

element14 is the first online community specifically for engineers. Connect with your peers and get expert answers to your questions.

  • Members
  • Learn
  • Technologies
  • Challenges & Projects
  • Products
  • Store
  • About Us
  • Feedback & Support
  • FAQs
  • Terms of Use
  • Privacy Policy
  • Legal and Copyright Notices
  • Sitemap
  • Cookies

An Avnet Company © 2025 Premier Farnell Limited. All Rights Reserved.

Premier Farnell Ltd, registered in England and Wales (no 00876412), registered office: Farnell House, Forge Lane, Leeds LS12 2NE.

ICP 备案号 10220084.

Follow element14

  • X
  • Facebook
  • linkedin
  • YouTube