


Hello!
Today I’m posting an example project using our new CY3280-MBR3CY3280-MBR3 CapSense evaluation kit with the popular Raspberry Pi development tool. This example builds on our earlier example showing the CY3280-MBR3CY3280-MBR3 kit working with the Arduino development kits.
<html><head><title>Jive SBS</title></head>
<body><font face="arial,helvetica,sans-serif">
<b>Error</b><br><font size="-1">
An general error occurred while processing your request.
</font></font></body></html>
In this example we show how the user can configure the CY3280-MBR3CY3280-MBR3 kit using a python script on their Raspberry Pi development environment. In this example the python code runs on the Raspberry Pi model B board using the Rasbian Wheezy image and configures the MBR3 device with the Water Tolerance demonstration. The python example code also reads and displays the button status on the python shell output.
The CY3280-MBR3CY3280-MBR3 evaluation kit interfaces with our EZ-Click software tool. Note this development tool is not supported on Linux systems. The output files are text files and can be send or copied onto a the Raspberry Pi.
Forum Post Attachments:
At the bottom of this post we are including the following items:
- EZ-Click MBR3 example project
- Raspberry Pi Python Script
- Example Guide
Software:
The following example will need software versions:
- Configured Raspberry Pi System
- MBR3 Python script
- EZ-Click 2.0
Firmware:
What is important to understand is that there is no firmware development for the MBR3 device family. The MBR3 devices are configured over I2C setting registers inside of the device to enable or disable certain features. On the MBR3 kit we support four CapSense buttons and one Proximity loop sensor. This kit can easily provide a CapSense front panel to your design.
We have provided in the download section of the post we have included the Python script for the Raspberry Pi. The Water Tolerance example project is available in the kit installer for the CY3280-MBR3 kit.
In this example project the python script configures the target MBR3 device and then reads and displays the button status on the output window.
Attached to this example is an example guide that can help you navigate through the example.
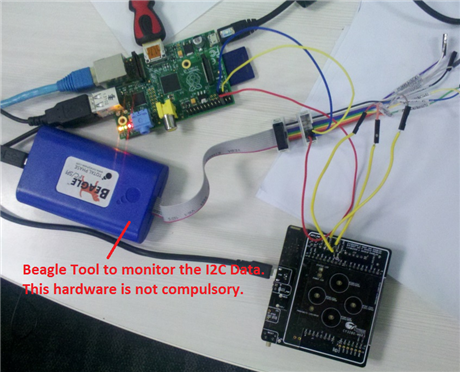
Hardware Connections:
The following list of steps will help you configure your hardware to ensure proper functionality.
- Connect the MBR3 I2C Lines from pin-2 of J13 and J14 jumpers to corresponding I2C lines of Ras pi available on P1 header.
- Connect the MBBR3 GND to Ras Pi GND on available on P1 header
- Power the MBR3 kit separately using the Mini USB cable
- Note: Don’t power the Kit from the 5V connection available on P1 header of the Ras Pi.
- Keep the Jumper J11, J12 shunted.
- Keep J15 jumper in “C” configuration i.e. Enable Buzzer and Water Tolerance enabled.
- If you want to enable different features just generate the 128 byte of configuration data using Ez-Click and replace the data of configData = [ ] array.
<html><head><title>Jive SBS</title></head>
<body><font face="arial,helvetica,sans-serif">
<b>Error</b><br><font size="-1">
An general error occurred while processing your request.
</font></font></body></html>
Test Your Project:
After enabling the Raspberry PI system please take a moment to review the Raspberry Pi I2C Python step steps linked below. These steps will help you enable the I2C drivers on the Pi.
http://www.instructables.com/id/Raspberry-Pi-I2C-Python/#step1
Download the example python code from this post and run the code using the IDLE which is installed as part of the Raspbian image.
Best,
Matthew Buza


