element14 Community
element14 Community
    Register Log In
  • Site
  • Search
  • Log In Register
  • About Us
  • Community Hub
    Community Hub
    • What's New on element14
    • Feedback and Support
    • Benefits of Membership
    • Personal Blogs
    • Members Area
    • Achievement Levels
  • Learn
    Learn
    • Ask an Expert
    • eBooks
    • element14 presents
    • Learning Center
    • Tech Spotlight
    • STEM Academy
    • Webinars, Training and Events
    • Learning Groups
  • Technologies
    Technologies
    • 3D Printing
    • FPGA
    • Industrial Automation
    • Internet of Things
    • Power & Energy
    • Sensors
    • Technology Groups
  • Challenges & Projects
    Challenges & Projects
    • Design Challenges
    • element14 presents Projects
    • Project14
    • Arduino Projects
    • Raspberry Pi Projects
    • Project Groups
  • Products
    Products
    • Arduino
    • Avnet Boards Community
    • Dev Tools
    • Manufacturers
    • Multicomp Pro
    • Product Groups
    • Raspberry Pi
    • RoadTests & Reviews
  • Store
    Store
    • Visit Your Store
    • Choose another store...
      • Europe
      •  Austria (German)
      •  Belgium (Dutch, French)
      •  Bulgaria (Bulgarian)
      •  Czech Republic (Czech)
      •  Denmark (Danish)
      •  Estonia (Estonian)
      •  Finland (Finnish)
      •  France (French)
      •  Germany (German)
      •  Hungary (Hungarian)
      •  Ireland
      •  Israel
      •  Italy (Italian)
      •  Latvia (Latvian)
      •  
      •  Lithuania (Lithuanian)
      •  Netherlands (Dutch)
      •  Norway (Norwegian)
      •  Poland (Polish)
      •  Portugal (Portuguese)
      •  Romania (Romanian)
      •  Russia (Russian)
      •  Slovakia (Slovak)
      •  Slovenia (Slovenian)
      •  Spain (Spanish)
      •  Sweden (Swedish)
      •  Switzerland(German, French)
      •  Turkey (Turkish)
      •  United Kingdom
      • Asia Pacific
      •  Australia
      •  China
      •  Hong Kong
      •  India
      •  Korea (Korean)
      •  Malaysia
      •  New Zealand
      •  Philippines
      •  Singapore
      •  Taiwan
      •  Thailand (Thai)
      • Americas
      •  Brazil (Portuguese)
      •  Canada
      •  Mexico (Spanish)
      •  United States
      Can't find the country/region you're looking for? Visit our export site or find a local distributor.
  • Translate
  • Profile
  • Settings
BeagleBoard
  • Products
  • Dev Tools
  • Single-Board Computers
  • BeagleBoard
  • More
  • Cancel
BeagleBoard
Blog BeagleBone: Getting Started
  • Blog
  • Forum
  • Documents
  • Quiz
  • Polls
  • Files
  • Members
  • Mentions
  • Sub-Groups
  • Tags
  • More
  • Cancel
  • New
Join BeagleBoard to participate - click to join for free!
  • Share
  • More
  • Cancel
Group Actions
  • Group RSS
  • More
  • Cancel
Engagement
  • Author Author: oneleggedredcow
  • Date Created: 14 May 2013 7:33 PM Date Created
  • Views 1522 views
  • Likes 0 likes
  • Comments 2 comments
  • codexstart
  • BeagleBone
  • bb_black
Related
Recommended

BeagleBone: Getting Started

oneleggedredcow
oneleggedredcow
14 May 2013

Installing Software

Connecting to the BeagleBone board is pretty easy, here’s the quick run down of how to do it:


1) Download and install the driver:


32 bit

64 bit


2) Download and install putty:


PuTTY


Connecting

Now that you have all of the necessary software installed, you need to figure connect to the board. To do this, open device manager. I always forget where it is, so I think the easiest way to get to it is just to search for it:


Start -> Search Text Box : “Device Manager”


Once in the device manager, expand the “Ports (COM & LPT)” section.  This is where the BeagleBone will show up once it is plugged in.


Now plug in the BeagleBone. The “Ports (COM & LPT)” section should update and the BeagleBone board should show up there.  For me it was difficult figuring out which one it was, so I had to watch the list pretty closely.


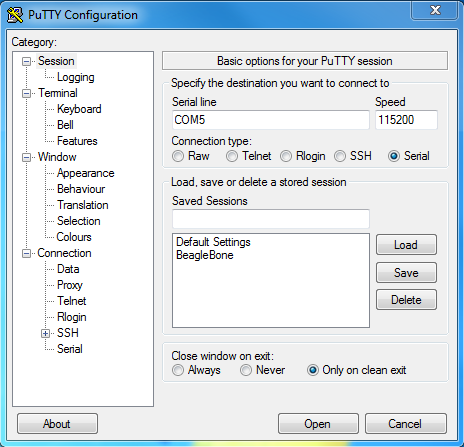
The important part is what COM port it was assigned.  Once you know this open up PuTTY and:


Change the “Connection Type” to “Serial”

Set the “Serial Line” to COM<X> where <X> is the number that you found in the Device Manager.

Set the “Speed” to 115200

Click “Open”


image


I don’t know why, but mine comes up blank and I have to hit enter before it does anything.  Once I hit enter, it prompts me for a “beaglebone login”, which is “root”.


image


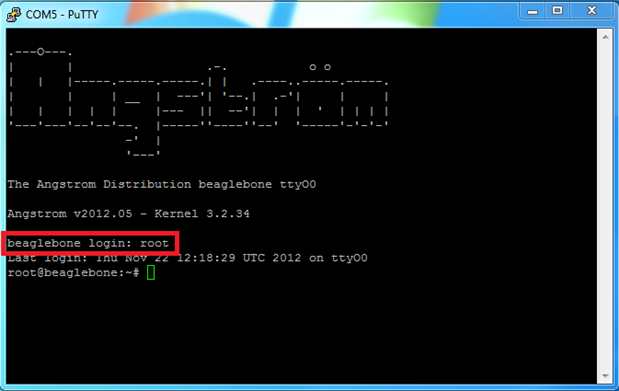
At this point you should be up and running with your BeagleBone.

Ethernet

Now that we are connected to the BeagleBone through the USB connection, we want to be able to connect to it through Ethernet.  To do this, we first need to figure out its IP Address, which can be obtained through the command:


Ifconfig -a


image


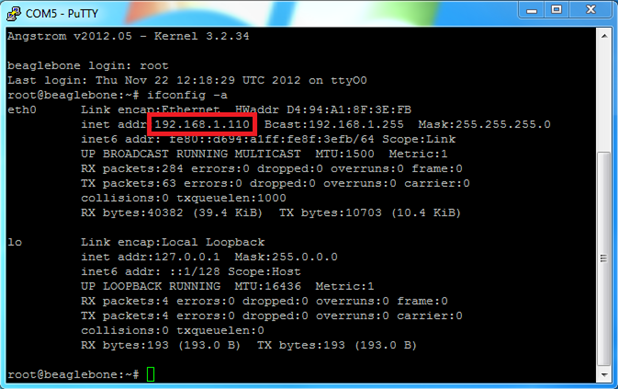
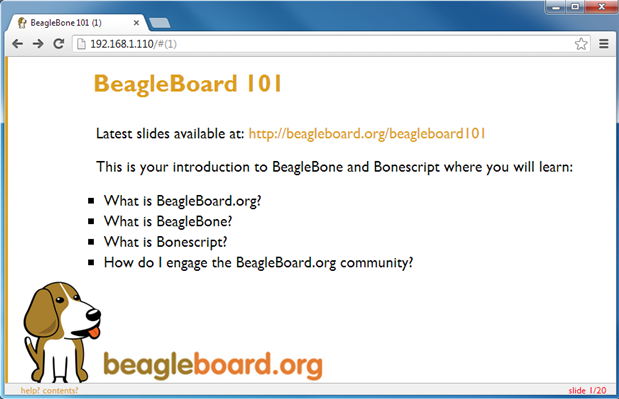
Then take the eth0 IP address and type that into Firefox or Chrome.  That should land you on a BeagleBoard 101 page.


image


Blink an LED

Create a circuit like the one shown here:


image


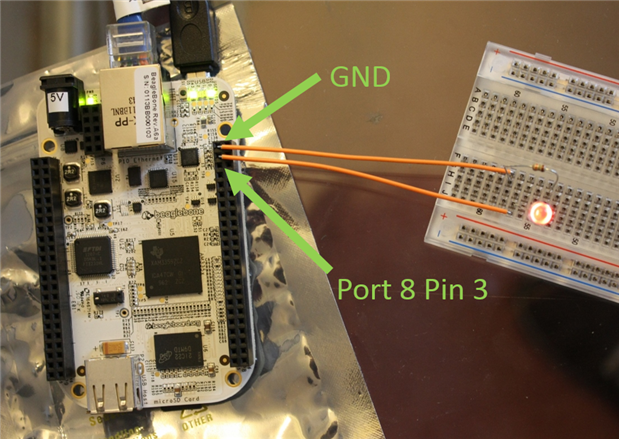
Now that we have the circuit built, we need to run a program that blinks the LED.  Fortunately, an example comes built in with the BeagleBone board.  To access it, fire up Cloud9, which is their built in Integrated Development Environment (IDE).  To do this, go to <IP_Address>:3000 in your browser:


image


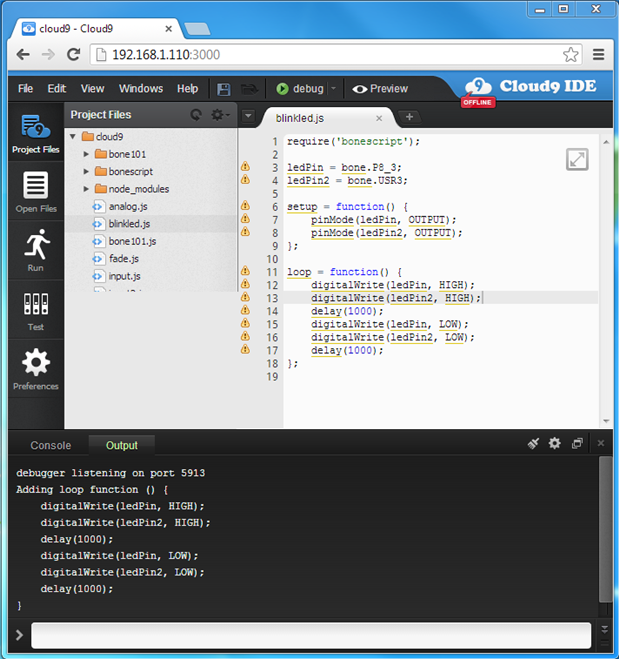
Once you have the browser up, double click blinkled.js.  This is a simple program that blinks an LED.  To run the program, just click the green play button at the top, next to the word “debug”.

Conclusion

Setting up the BeagleBone is really easy.  In a couple of minutes, we went from opening up the box to running a program that blinks an LED.  Not bad at all.

  • Sign in to reply
Parents
  • ericwertz
    ericwertz over 12 years ago

    "I don’t know why, but mine comes up blank and I have to hit enter before it does anything."


    By the time you open putty, the login prompt has already been output and you've missed it.  By hitting enter (a blank username), it re-issues the prompt.  If you open putty early enough, you'll likely catch the first prompt.  Anything that you type before enter is going to be taken as a username, and the first enter will send that and then ask for a password.


    On a generic two-wire serial connection, this is pretty much how it has to be -- login (or getty on classic u*ix) can't tell that you've connected and issue you a prompt at that time  Serial port logins have behaved this way for 40+ years.


    Getting a login prompt over the network (with telnet, ssh, etc.) relies on a totally different connection mechanism, and so doesn't have this behavior.


    Looks easy to get started -- thanks.

    • Cancel
    • Vote Up 0 Vote Down
    • Sign in to reply
    • More
    • Cancel
  • oneleggedredcow
    oneleggedredcow over 12 years ago in reply to ericwertz

    Thanks for the helpful comment!  That's good to know!

    • Cancel
    • Vote Up 0 Vote Down
    • Sign in to reply
    • More
    • Cancel
Comment
  • oneleggedredcow
    oneleggedredcow over 12 years ago in reply to ericwertz

    Thanks for the helpful comment!  That's good to know!

    • Cancel
    • Vote Up 0 Vote Down
    • Sign in to reply
    • More
    • Cancel
Children
No Data
element14 Community

element14 is the first online community specifically for engineers. Connect with your peers and get expert answers to your questions.

  • Members
  • Learn
  • Technologies
  • Challenges & Projects
  • Products
  • Store
  • About Us
  • Feedback & Support
  • FAQs
  • Terms of Use
  • Privacy Policy
  • Legal and Copyright Notices
  • Sitemap
  • Cookies

An Avnet Company © 2025 Premier Farnell Limited. All Rights Reserved.

Premier Farnell Ltd, registered in England and Wales (no 00876412), registered office: Farnell House, Forge Lane, Leeds LS12 2NE.

ICP 备案号 10220084.

Follow element14

  • X
  • Facebook
  • linkedin
  • YouTube