element14 Community
element14 Community
    Register Log In
  • Site
  • Search
  • Log In Register
  • About Us
  • Community Hub
    Community Hub
    • What's New on element14
    • Feedback and Support
    • Benefits of Membership
    • Personal Blogs
    • Members Area
    • Achievement Levels
  • Learn
    Learn
    • Ask an Expert
    • eBooks
    • element14 presents
    • Learning Center
    • Tech Spotlight
    • STEM Academy
    • Webinars, Training and Events
    • Learning Groups
  • Technologies
    Technologies
    • 3D Printing
    • FPGA
    • Industrial Automation
    • Internet of Things
    • Power & Energy
    • Sensors
    • Technology Groups
  • Challenges & Projects
    Challenges & Projects
    • Design Challenges
    • element14 presents Projects
    • Project14
    • Arduino Projects
    • Raspberry Pi Projects
    • Project Groups
  • Products
    Products
    • Arduino
    • Avnet Boards Community
    • Dev Tools
    • Manufacturers
    • Multicomp Pro
    • Product Groups
    • Raspberry Pi
    • RoadTests & Reviews
  • Store
    Store
    • Visit Your Store
    • Choose another store...
      • Europe
      •  Austria (German)
      •  Belgium (Dutch, French)
      •  Bulgaria (Bulgarian)
      •  Czech Republic (Czech)
      •  Denmark (Danish)
      •  Estonia (Estonian)
      •  Finland (Finnish)
      •  France (French)
      •  Germany (German)
      •  Hungary (Hungarian)
      •  Ireland
      •  Israel
      •  Italy (Italian)
      •  Latvia (Latvian)
      •  
      •  Lithuania (Lithuanian)
      •  Netherlands (Dutch)
      •  Norway (Norwegian)
      •  Poland (Polish)
      •  Portugal (Portuguese)
      •  Romania (Romanian)
      •  Russia (Russian)
      •  Slovakia (Slovak)
      •  Slovenia (Slovenian)
      •  Spain (Spanish)
      •  Sweden (Swedish)
      •  Switzerland(German, French)
      •  Turkey (Turkish)
      •  United Kingdom
      • Asia Pacific
      •  Australia
      •  China
      •  Hong Kong
      •  India
      •  Korea (Korean)
      •  Malaysia
      •  New Zealand
      •  Philippines
      •  Singapore
      •  Taiwan
      •  Thailand (Thai)
      • Americas
      •  Brazil (Portuguese)
      •  Canada
      •  Mexico (Spanish)
      •  United States
      Can't find the country/region you're looking for? Visit our export site or find a local distributor.
  • Translate
  • Profile
  • Settings
RIoTboard
  • Products
  • Dev Tools
  • Single-Board Computers
  • RIoTboard
  • More
  • Cancel
RIoTboard
Blog Getting close to the Marine Aquarium Interface DreamBoard with RIoTBoard + Wifi
  • Blog
  • Forum
  • Documents
  • Files
  • Members
  • Mentions
  • Sub-Groups
  • Tags
  • More
  • Cancel
  • New
Join RIoTboard to participate - click to join for free!
  • Share
  • More
  • Cancel
Group Actions
  • Group RSS
  • More
  • Cancel
Engagement
  • Author Author: oneleggedredcow
  • Date Created: 31 Jul 2015 1:56 PM Date Created
  • Views 808 views
  • Likes 5 likes
  • Comments 0 comments
  • riotboard
Related
Recommended

Getting close to the Marine Aquarium Interface DreamBoard with RIoTBoard + Wifi

oneleggedredcow
oneleggedredcow
31 Jul 2015

image

This blog post describes how I set up my RioTBoard RioTBoard to be a media center. I was inspired by brixtonian1970's Marine Aquarium Interface DreamBoard, and I decided to basically copy it with a RIoTBoard running Android and a compatible WiFi moduleWiFi module. My goal was to build a media center in the garage so that I could listen to music or keep an eye on the latest football game while doing some work out there.


Installing Android

There is already a good tutorial out there on how to install Android on the RIoTBoard:


Flashing a new Android Image to the RIoTBoard | MCU on Eclipse


So, I won't repeat any of that information here.  The above article also has information about how to get the latest Android image.


Of course, another option would be to build it from source:


Building Android from Source


Connect to Wifi


image


With the latest version of Android installed, it should be super easy to get Wifi up and running.  Meaning all you need to do is turn on Wifi, and then click on the network that you would like to connect to.  As a side note, some Wifi dongles work better than others.  The Wi-PiWi-Pi works well right out of the box with the latest Andriod image.


Installing Kodi


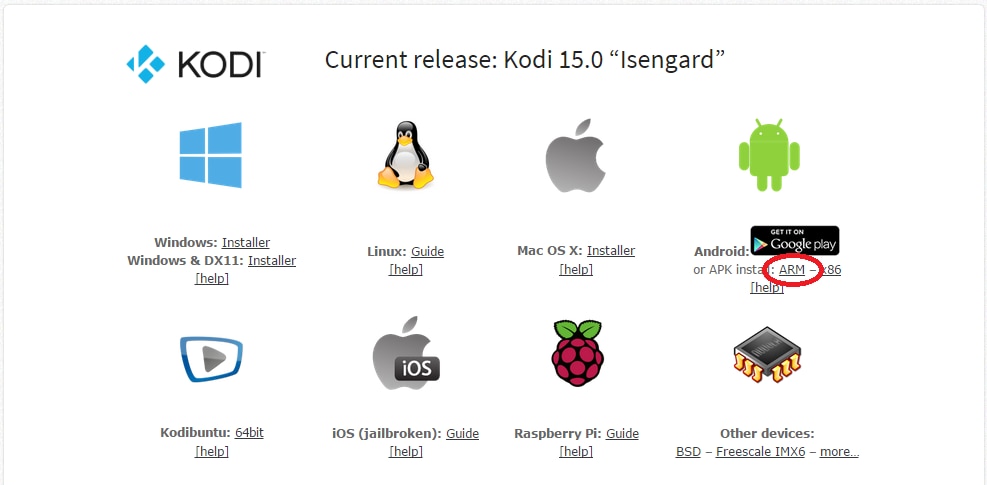
Once Wifi is up and working, either navigate your browser to:


http://kodi.tv/download


Or click on the Google search bar and search for “Kodi”. The official website should be the first result and then navigate to the downloads section.


Once within the downloads section, click on the Android – ARM option.

image

There are two ways to get to the downloaded file. The first is to swipe down from the top-left of the screen. There will be a little down arrow there. This will bring up a list of files that have been down loaded. The other is through the apps menu. In there will be a “Downloads” entry.


When you click on this file, you might get a message saying that the install was blocked. This message will have two options: one to cancel and one to go to the settings page. Click on the settings page. Within the settings page, there should be an option called “Unknown sources”. This will allow programs to be installed that do not come through the Google Play store. Click that check mark. It will then prompt you to make sure that you are certain (which you are).


Changing the settings kicked me out of the installation process, so you might have to find the .apk file again and click on it again.


Smart Phone as a Remote Control


You can use your smartphone as a remote control for Kodi. To do this, install Kore on your phone. (Instructions not provided, since it will vary depending on what type of phone you have.)


Once that is installed, we need to configure it. First, go to System – Settings. Then navigate to the Webserver option. Within that menu there should be an option to “Allow control of Kodi via HTTP”, enable that option. Then make sure to set the username and password.


Within Kore, the Add Media Center wizard should come up. This will automatically search for any instances of Kodi on your local network. Once it finds it, you can put in your user name and password.


Now your smartphone is connected to your media center and can be used as a remote control!


Plugins


Kodi has a rich plugin community. These plugins really extend the functionality and take Kodi from a great application to a spectacular one! Here's a list of the 20 best Kodi plugins:


http://www.htpcbeginner.com/best-kodi-addons-2015-for-cordcutters/


Conclusion


Setting up Kodi on the RioTBoard was fairly easy, since everything that we need is built in. It is just a matter of finding the right packages and installing them. Everything seems to run really well, and I'm looking forward to being able to keep an eye on the Browns as I do a little work on the car!

  • Sign in to reply
element14 Community

element14 is the first online community specifically for engineers. Connect with your peers and get expert answers to your questions.

  • Members
  • Learn
  • Technologies
  • Challenges & Projects
  • Products
  • Store
  • About Us
  • Feedback & Support
  • FAQs
  • Terms of Use
  • Privacy Policy
  • Legal and Copyright Notices
  • Sitemap
  • Cookies

An Avnet Company © 2025 Premier Farnell Limited. All Rights Reserved.

Premier Farnell Ltd, registered in England and Wales (no 00876412), registered office: Farnell House, Forge Lane, Leeds LS12 2NE.

ICP 备案号 10220084.

Follow element14

  • X
  • Facebook
  • linkedin
  • YouTube