element14 Community
element14 Community
    Register Log In
  • Site
  • Search
  • Log In Register
  • Community Hub
    Community Hub
    • What's New on element14
    • Feedback and Support
    • Benefits of Membership
    • Personal Blogs
    • Members Area
    • Achievement Levels
  • Learn
    Learn
    • Ask an Expert
    • eBooks
    • element14 presents
    • Learning Center
    • Tech Spotlight
    • STEM Academy
    • Webinars, Training and Events
    • Learning Groups
  • Technologies
    Technologies
    • 3D Printing
    • FPGA
    • Industrial Automation
    • Internet of Things
    • Power & Energy
    • Sensors
    • Technology Groups
  • Challenges & Projects
    Challenges & Projects
    • Design Challenges
    • element14 presents Projects
    • Project14
    • Arduino Projects
    • Raspberry Pi Projects
    • Project Groups
  • Products
    Products
    • Arduino
    • Avnet & Tria Boards Community
    • Dev Tools
    • Manufacturers
    • Multicomp Pro
    • Product Groups
    • Raspberry Pi
    • RoadTests & Reviews
  • About Us
    About the element14 Community
  • Store
    Store
    • Visit Your Store
    • Choose another store...
      • Europe
      •  Austria (German)
      •  Belgium (Dutch, French)
      •  Bulgaria (Bulgarian)
      •  Czech Republic (Czech)
      •  Denmark (Danish)
      •  Estonia (Estonian)
      •  Finland (Finnish)
      •  France (French)
      •  Germany (German)
      •  Hungary (Hungarian)
      •  Ireland
      •  Israel
      •  Italy (Italian)
      •  Latvia (Latvian)
      •  
      •  Lithuania (Lithuanian)
      •  Netherlands (Dutch)
      •  Norway (Norwegian)
      •  Poland (Polish)
      •  Portugal (Portuguese)
      •  Romania (Romanian)
      •  Russia (Russian)
      •  Slovakia (Slovak)
      •  Slovenia (Slovenian)
      •  Spain (Spanish)
      •  Sweden (Swedish)
      •  Switzerland(German, French)
      •  Turkey (Turkish)
      •  United Kingdom
      • Asia Pacific
      •  Australia
      •  China
      •  Hong Kong
      •  India
      •  Japan
      •  Korea (Korean)
      •  Malaysia
      •  New Zealand
      •  Philippines
      •  Singapore
      •  Taiwan
      •  Thailand (Thai)
      •  Vietnam
      • Americas
      •  Brazil (Portuguese)
      •  Canada
      •  Mexico (Spanish)
      •  United States
      Can't find the country/region you're looking for? Visit our export site or find a local distributor.
  • Translate
  • Profile
  • Settings
Raspberry Pi
  • Products
  • More
Raspberry Pi
Blog Building a Thermal Imaging System with the Raspberry Pi 3, Sense HAT and Panasonic Grid-EYE
  • Blog
  • Forum
  • Documents
  • Quiz
  • Events
  • Polls
  • Files
  • Members
  • Mentions
  • Sub-Groups
  • Tags
  • More
  • Cancel
  • New
Join Raspberry Pi to participate - click to join for free!
Featured Articles
Announcing Pi
Technical Specifications
Raspberry Pi FAQs
Win a Pi
GPIO Pinout
Raspberry Pi Wishlist
Comparison Chart
Quiz
  • Share
  • More
  • Cancel
Group Actions
  • Group RSS
  • More
  • Cancel
Engagement
  • Author Author: shabaz
  • Date Created: 9 Nov 2016 12:09 PM Date Created
  • Views 12799 views
  • Likes 19 likes
  • Comments 63 comments
Related
Recommended
  • thermopile sensor
  • pi 3
  • rpiintermediate
  • panasonic grid eye
  • amg8832ek
  • amg8834ek
  • rpibeginner
  • amg8834
  • thermopile
  • amg8832
  • infrared_sensor
  • panasonic grid-eye
  • grid eye
  • thermopile array
  • grid-eye sensor
  • rasberry pi 3
  • javascript
  • panasonic_industrial_europe
  • infrared array
  • node.js
  • pi3-ibm-iot-learnkit
  • grid-eye

Building a Thermal Imaging System with the Raspberry Pi 3, Sense HAT and Panasonic Grid-EYE

shabaz
shabaz
9 Nov 2016

Introduction

Sometimes it is great to be able to see if things are hot or cold with a thermometer or other device. Multiply it by 64 and it is possible to get a graphical image of hot spots or detect humans for instance.

A thermopile array can be used to measure temperature from a distance and a special part from Panasonic called Grid-EYE happens to have 64 of them : )

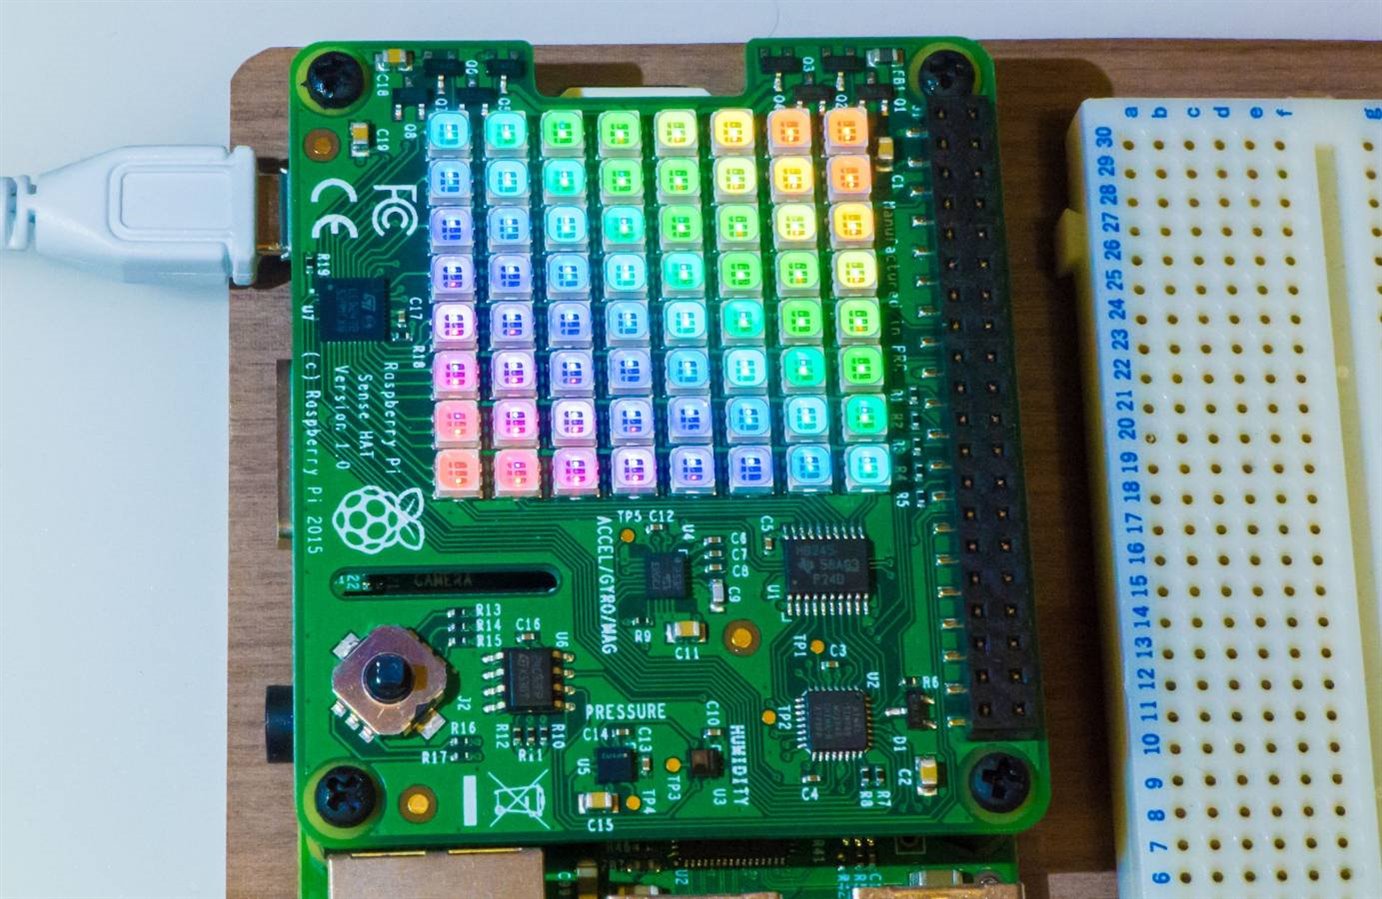
Since the Sense HAT has 64 LEDs, I wanted to try them together : )
image


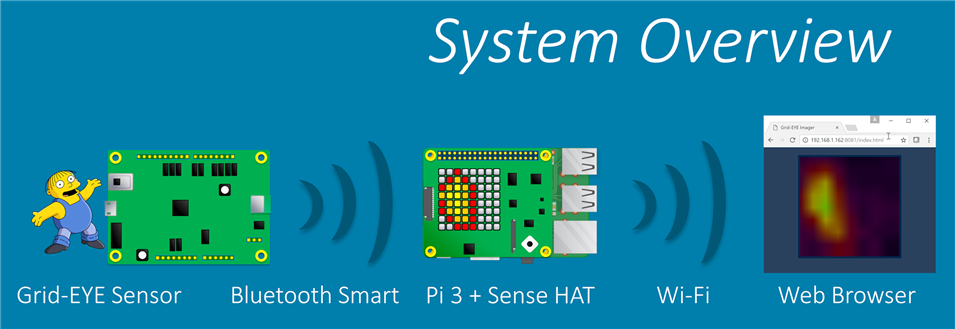
This is what is implemented:

image


For more experiments with the Grid-EYE and a review, see here: Panasonic Grid-EYE RoadTest - Review


What can you do with it?

The Grid-EYE is designed for detecting humans or objects that come into its field of view. It could be used for automatically turning on the heating when a human is detected, or automatically opening doors for instance. It differs greatly from the usual passive infrared (PIR) sensors used in alarm systems; they require movement whereas thermopile sensors will continuously detect objects while they remain in the field of view. By processing the images over time it is possible to see which direction humans or objects are moving. This could be useful for more intelligent automated doors or barriers, or for innovative electronic advertising that is triggered by human presence and actions.


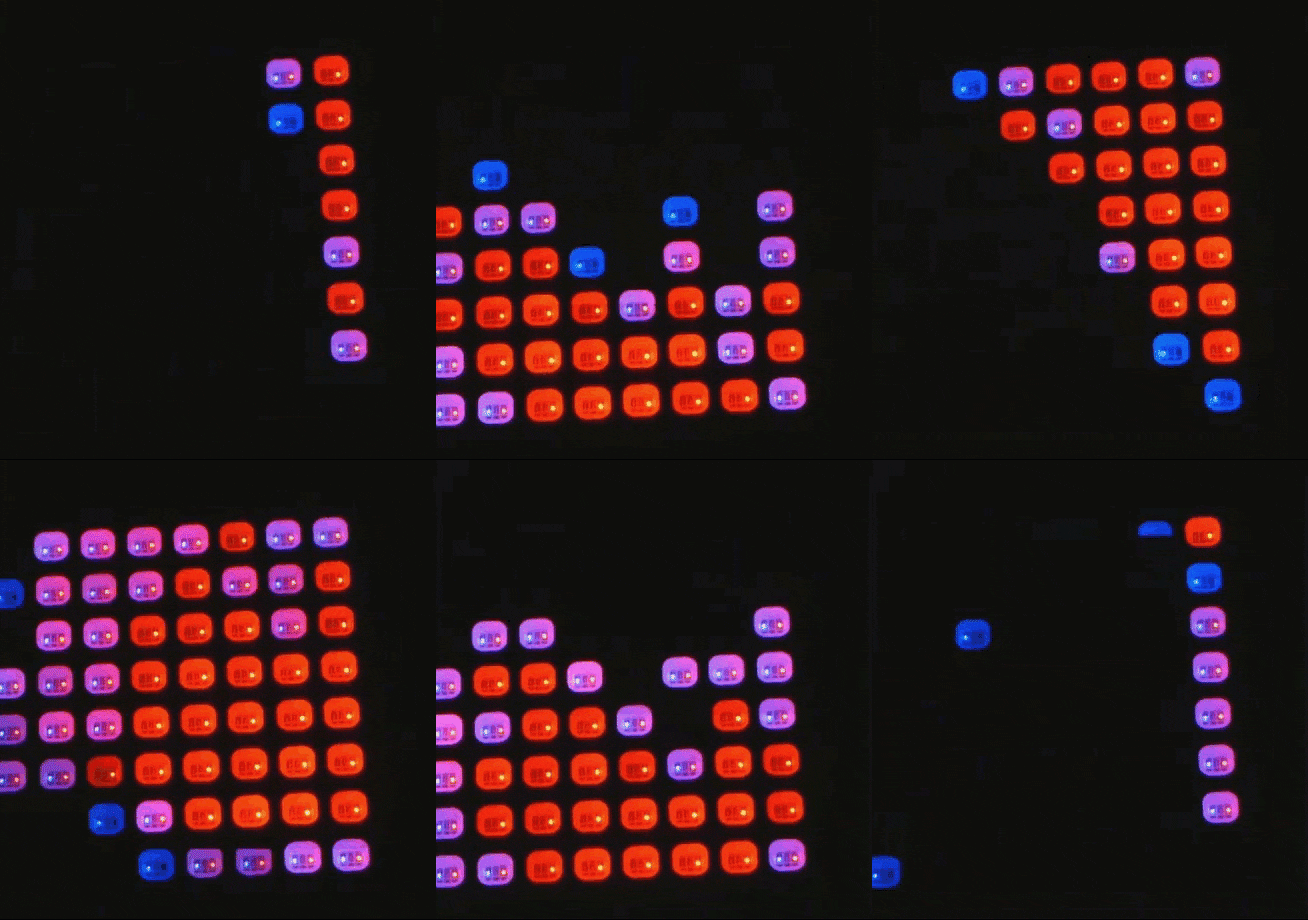
In the brief time that I explored, it was possible to see people from a distance of five metres, and a 10 ohm resistor connected to an AA battery from about an inch away. By experimenting with the software it is possible to choose the spectrum of color that is desired for the particular temperature range of interest.
image


Grid-EYE usefulness for people detection (occupancy sensor) was explored in the Grid-EYE Review blog post.


Build Steps

The project is straightforward and simple, so in the interests of efficiency this report won’t have a lot of text!

To build this project, a Pi 3 and a Sense HAT is needed, and the Grid-Eye evaluation kit. I already had the Pi 3 and Sense HAT (and the associated memory card and power supply) as part of the Pi 3 IBM IoT Learner KitPi 3 IBM IoT Learner Kit reviewed here. The Grid-EYE evaluation board is available separately. The one I had (model AMG8832) is not available any more but there is a better performance AMG8834 Grid-EYE Evaluation ModuleAMG8834 Grid-EYE Evaluation Module that can detect humans up to 7 metres away.


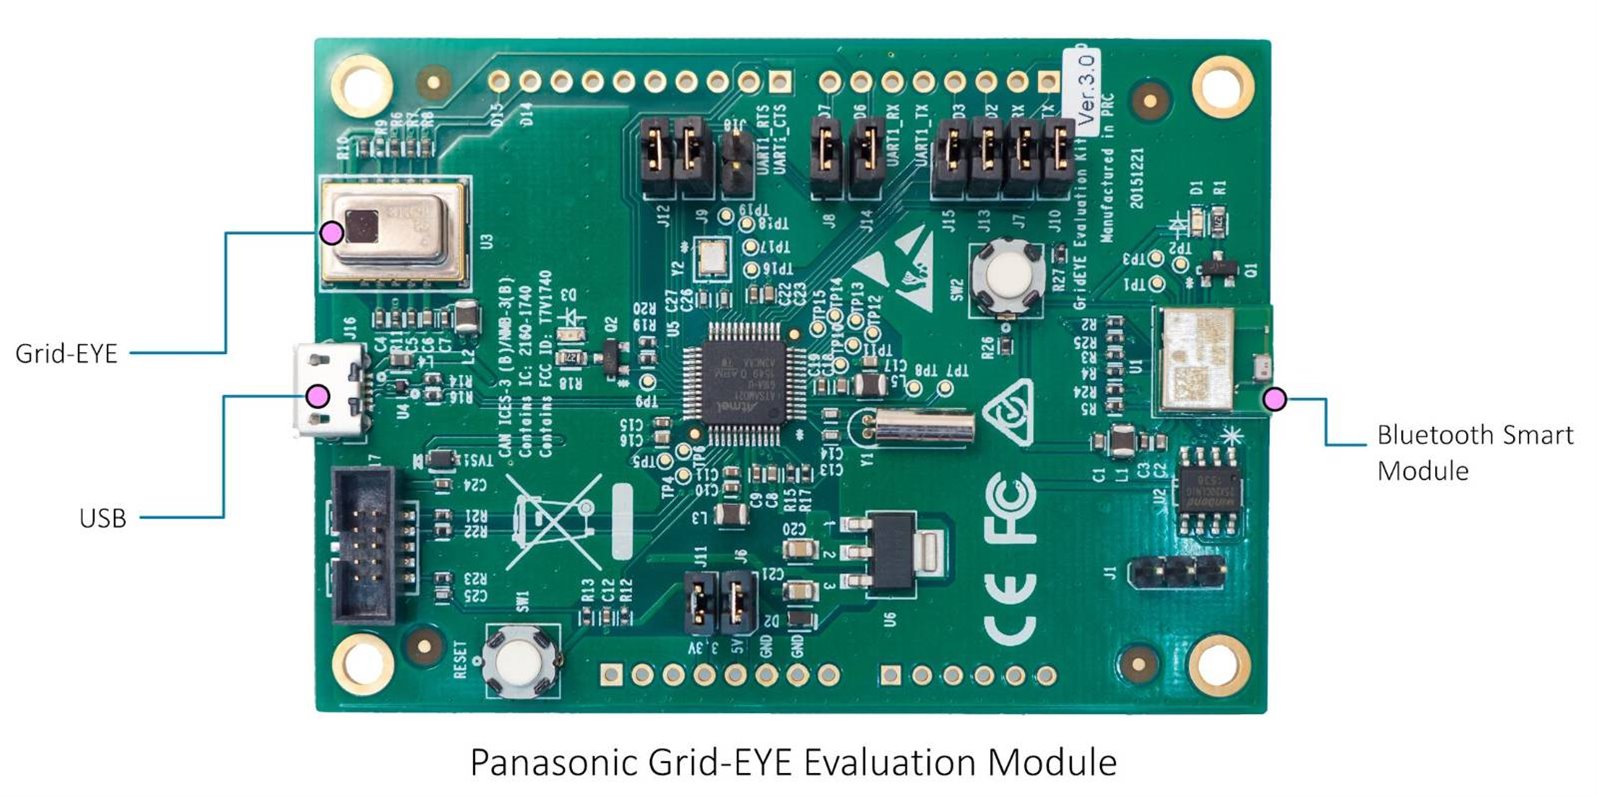
The evaluation board contains the Grid-EYE, a pre-programmed microcontroller and Bluetooth Smart capability. Basically nothing needs to be done with the eval board except plug it into a power supply! The supply can be a 5V mobile phone charger or a PC USB port. The photo here shows the Grid-EYE evaluation board. It is about the footprint of a playing card. The Grid-EYE module itself is very small, about 12mm on its longest dimension.
image


Since the Pi 3 also has Bluetooth Smart capability, the Grid-EYE board connects to the Pi using this. This is great because it means that the imaging can be performed remotely.

The Pi 3 is responsible for translating the 8x8 array of values into colours and sending them to the Sense HAT’s display. The Pi 3 also runs a little web server so any web browser (e.g. PC or mobile phone) can be used to connect to the Pi and view the images live.

Check out the short video (1.5 mins) for some example capture.

You don't have permission to edit metadata of this video.
Edit media
x
image
Upload Preview
image


Here are the instructions to build it. First, as root user (or prepend sudo to these commands):


apt-get install libbluetooth-dev
update-nodejs-and-nodered


Then, as normal user (e.g. pi or your username):


git clone https://github.com/shabaz123/grid-eye
cd grid-eye
npm install noble
npm install sense-hat-led
npm install rotate-matrix
npm install ioctl
npm install socket.io
npm install imagejs


Change the index.js file at grid-eye/node_modules/sense-hat-led using the index.js_mine file (which has been through the babel transpiler) using this command:


cp index.js_mine node_modules/sense-hat-led/index.js


The grid-eye/index.js file will need a modification, search for the line with the text progpath and set it to point to the grid-eye folder. The slash at the end is important. For example for me it says:


var progpath='/home/shabaz/grid-eye/';


That’s it! To run it, as root user (or prepend with sudo) type:


node index.js


Use a browser to navigate to http://xx.xx.xx.xx:8081/index.html

The code works but is just prototype quality and there is lots of room for improvement. It seems to work reasonably well but would benefit from some configuration options (things like temperature range are hard-coded).

Attachments:
index_pc.zip
  • Sign in to reply

Top Comments

  • ajens23
    ajens23 over 9 years ago +5
    Now that is pretty cool! (errr....hot,,,, or something like that) I'm going to have to try that.
  • DAB
    DAB over 9 years ago +5
    Excellent post. I knew that the Grideye sensor had great capability, so it was great to see that it could be as useful as I thought. Now all I need to do is find some time to play with one. DAB
  • beacon_dave
    beacon_dave over 9 years ago +5
    I have been pondering over how well these Grid-EYE sensors might work for room occupancy monitoring purposes. For example if they were mounted on a ceiling over a seating bank, then could they identify…
  • shabaz
    shabaz over 8 years ago in reply to maanas.adi

    It looks like there is no Internet connection on the machine you're running the web browser on? Can you confirm, by trying to access any web page on the Internet on the same browser.

    The error concerns '$' which is part of jQuery, which is downloaded by the browser from the Internet. If you don't have an Internet connection, then you can manually download the required files and place them in the same folder as the rest of the code, and edit the index.html file to point to the local files, instead of downloading from the Internet.

    • Cancel
    • Vote Up 0 Vote Down
    • Sign in to reply
    • More
    • Cancel
  • maanas.adi
    maanas.adi over 8 years ago in reply to shabaz

    image


    attached is the inspect report. Is it possible that there are any changes due to upgrade in the calling of socket.io.

    • Cancel
    • Vote Up 0 Vote Down
    • Sign in to reply
    • More
    • Cancel
  • maanas.adi
    maanas.adi over 8 years ago in reply to shabaz

    I used console.log commands to debug. I found that the code is not going into io.sockets.on('connection'.....) function. Hence io.emit function is never called. Also, I want to know how index.html file calls socket.io.js and why it is written in index.html file.

    • Cancel
    • Vote Up 0 Vote Down
    • Sign in to reply
    • More
    • Cancel
  • shabaz
    shabaz over 8 years ago in reply to maanas.adi

    Hi Maanas,


    I don't have the testbed to reattempt, but in the comments section user 'claudia' confirmed that the web browser was able to display the grid-eye images, so it may be worth doing Ctrl-F and searching for those comments, to see if there is anything you can identify that sounds different to what you may have done. It could be anything to be honest - even a firewall issue, so you may need to troubleshoot, see if any data is being sent or not. Since you're getting the web browser page, but just the image is blue, that could mean that the data is not streaming, or firewall issue, or even some out of range thing causing the entire image to render blue - the code expects the temperature to be within a certain range, so you may need to add some debug commands (e.g. console.log command) to try to troubleshoot.


    EDIT: Also, user rohit also confirmed it working, in the comments. So I think the code should function, but you may need to add some debug to narrow down the issue.

    • Cancel
    • Vote Up +1 Vote Down
    • Sign in to reply
    • More
    • Cancel
  • maanas.adi
    maanas.adi over 8 years ago in reply to rohitshrimal11

    Hi,

    I am facing the same problem. The web browser only shows the blue colour. What was the issue?


    kindly help me.

    shabaz I am getting all the data on the console screen and on to datafile.txt but web browser does not show any images. What am I doing wrong.

    • Cancel
    • Vote Up 0 Vote Down
    • Sign in to reply
    • More
    • Cancel
<>
element14 Community

element14 is the first online community specifically for engineers. Connect with your peers and get expert answers to your questions.

  • Members
  • Learn
  • Technologies
  • Challenges & Projects
  • Products
  • Store
  • About Us
  • Feedback & Support
  • FAQs
  • Terms of Use
  • Privacy Policy
  • Legal and Copyright Notices
  • Sitemap
  • Cookies

An Avnet Company © 2026 Premier Farnell Limited. All Rights Reserved.

Premier Farnell Ltd, registered in England and Wales (no 00876412), registered office: Farnell House, Forge Lane, Leeds LS12 2NE.

Follow element14

  • X
  • Facebook
  • linkedin
  • YouTube