element14 Community
element14 Community
    Register Log In
  • Site
  • Search
  • Log In Register
  • Community Hub
    Community Hub
    • What's New on element14
    • Feedback and Support
    • Benefits of Membership
    • Personal Blogs
    • Members Area
    • Achievement Levels
  • Learn
    Learn
    • Ask an Expert
    • eBooks
    • element14 presents
    • Learning Center
    • Tech Spotlight
    • STEM Academy
    • Webinars, Training and Events
    • Learning Groups
  • Technologies
    Technologies
    • 3D Printing
    • FPGA
    • Industrial Automation
    • Internet of Things
    • Power & Energy
    • Sensors
    • Technology Groups
  • Challenges & Projects
    Challenges & Projects
    • Design Challenges
    • element14 presents Projects
    • Project14
    • Arduino Projects
    • Raspberry Pi Projects
    • Project Groups
  • Products
    Products
    • Arduino
    • Avnet & Tria Boards Community
    • Dev Tools
    • Manufacturers
    • Multicomp Pro
    • Product Groups
    • Raspberry Pi
    • RoadTests & Reviews
  • About Us
  • Store
    Store
    • Visit Your Store
    • Choose another store...
      • Europe
      •  Austria (German)
      •  Belgium (Dutch, French)
      •  Bulgaria (Bulgarian)
      •  Czech Republic (Czech)
      •  Denmark (Danish)
      •  Estonia (Estonian)
      •  Finland (Finnish)
      •  France (French)
      •  Germany (German)
      •  Hungary (Hungarian)
      •  Ireland
      •  Israel
      •  Italy (Italian)
      •  Latvia (Latvian)
      •  
      •  Lithuania (Lithuanian)
      •  Netherlands (Dutch)
      •  Norway (Norwegian)
      •  Poland (Polish)
      •  Portugal (Portuguese)
      •  Romania (Romanian)
      •  Russia (Russian)
      •  Slovakia (Slovak)
      •  Slovenia (Slovenian)
      •  Spain (Spanish)
      •  Sweden (Swedish)
      •  Switzerland(German, French)
      •  Turkey (Turkish)
      •  United Kingdom
      • Asia Pacific
      •  Australia
      •  China
      •  Hong Kong
      •  India
      • Japan
      •  Korea (Korean)
      •  Malaysia
      •  New Zealand
      •  Philippines
      •  Singapore
      •  Taiwan
      •  Thailand (Thai)
      • Vietnam
      • Americas
      •  Brazil (Portuguese)
      •  Canada
      •  Mexico (Spanish)
      •  United States
      Can't find the country/region you're looking for? Visit our export site or find a local distributor.
  • Translate
  • Profile
  • Settings
Raspberry Pi
  • Products
  • More
Raspberry Pi
Blog Control Raspberry Pi GPIOs with WebSockets
  • Blog
  • Forum
  • Documents
  • Quiz
  • Events
  • Polls
  • Files
  • Members
  • Mentions
  • Sub-Groups
  • Tags
  • More
  • Cancel
  • New
Join Raspberry Pi to participate - click to join for free!
Featured Articles
Announcing Pi
Technical Specifications
Raspberry Pi FAQs
Win a Pi
GPIO Pinout
Raspberry Pi Wishlist
Comparison Chart
Quiz
  • Share
  • More
  • Cancel
Group Actions
  • Group RSS
  • More
  • Cancel
Engagement
  • Author Author: rados-dp
  • Date Created: 16 Aug 2016 10:21 AM Date Created
  • Views 3127 views
  • Likes 1 like
  • Comments 3 comments
Related
Recommended
  • python
  • remote control
  • remote io
  • client-server
  • raspberry-pi-projects

Control Raspberry Pi GPIOs with WebSockets

rados-dp
rados-dp
16 Aug 2016

Overview

There are four components in this system:

  • Breadboard with LEDs attached to GPIO on a Raspberry Pi
  • Web application on Raspberry Pi
  • Websockets server application on Raspberry Pi
  • Internet browser
This example uses both HTTP and WebSockets where:
  • HTTP is used to serve a website from your Pi which comprises some static HTML and JavaScript files.
  • A WebSocket is then used to transmit LED ON/OFF commands to the server.

Once the static webpage is loaded into the browser, you will see some ON/OFF buttons to control the LEDs. After loading the page, some JavaScript code running in the browser will open a WebSocket connection back to the server application running on the Pi. When you click one of the buttons, an instruction to enable or disable an LED is sent via the WebSocket to the Pi, where it is processed and the LED state is adjusted.

Connect the LEDs to your Raspberry Pi GPIO

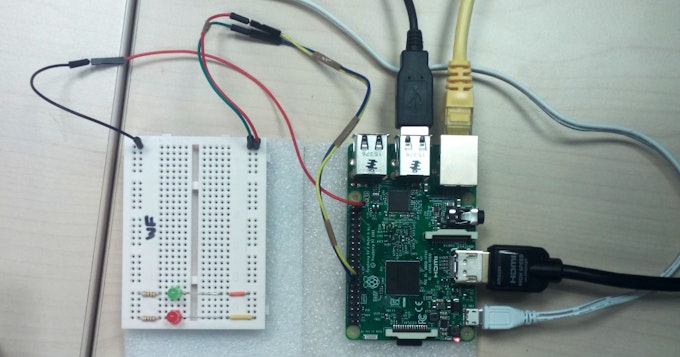
We start by assembling our LEDs on a breadboard as shown in schematic below:

Schematic
Schematic


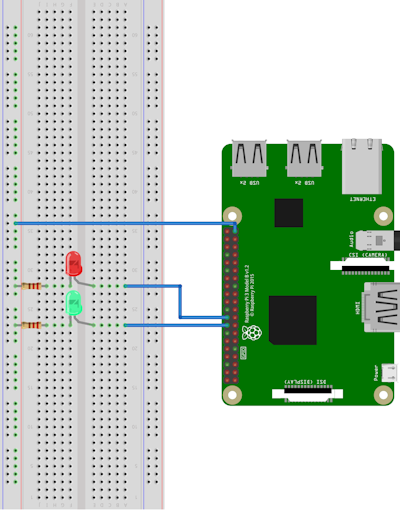
Note that in this example we have chosen to connect our LEDs to pins 16 and 18 on the Raspberry Pi.

LEDs on the breadboard connected to GPIO pins.


You can verify that LEDs are working by running the python script below:

#!/usr/bin/python 
import RPi.GPIO as GPIO
import time

#Set GPIO pins as outputs
GPIO.setmode(GPIO.BOARD)
GPIO.setup(16, GPIO.OUT)
GPIO.setup(18, GPIO.OUT)

#Switch GPIO pins ON
GPIO.output(16, True)
GPIO.output(18, True)

#Wait 5 seconds
time.sleep(5)

#Switch GPIO pins OFF
GPIO.output(16, False)
GPIO.output(18, False)

#Reset GPIO pins to their default state
GPIO.cleanup()

Get a Remote Shell

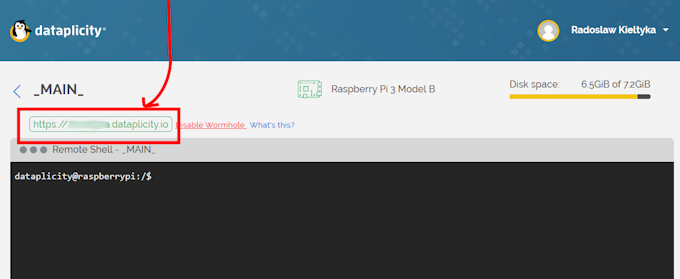
To get remote access to your Raspberry Pi please visit www.dataplicity.com(free sign up) and follow the installation instructions to get remote terminal access to your Pi. When done, locate your device in your dataplicity account and click "Enable wormhole". You'll then need the wormhole address which can be found just above the remote shell (see below).

Wormhole address
Wormhole address


Run the Project

Step 1 : Click the link below to download all the code necessary for this project.

PROJECT CODE

Step 2 : Run the server.

If you don't have tornado framework installed for python please type in the command below.

sudo pip install tornado 

Open the "ws-webio" directory in terminal and run the command below.

sudo python server.py 

When done you should see a printout informing you that Tornado server has started.

In your browser type in:

https://<your_unique_number>.dataplicity.io 

example:

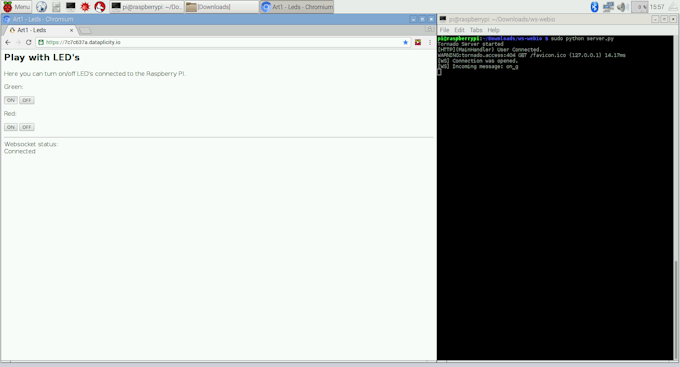
https://1234567a.dataplicity.io 

If the webpage loads correctly you should see it in your browser and get additional printouts in your terminal.

Click the buttons on the page to switch ON/OFF the LEDs !


Results
Results

Taking a closer look

Now that you've got the project set up and running if you would like to know a bit more on how it works "behind the scenes" please read further.

> Inside the web browser

On page load:

1. HTML and JavaScript files are delivered through the HTTP connection.

2. The browser renders HTML, then JavaScript.

3. The running JavaScript creates a WebSocket connection.

After all the files have loaded, the browser component looks like this.


Browser - Closer look


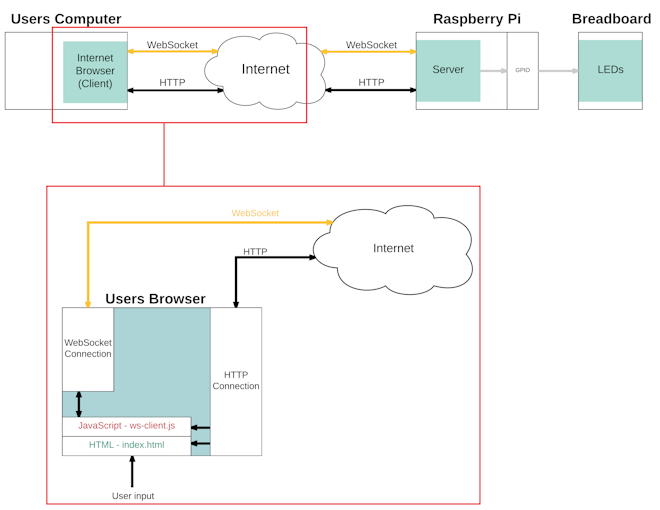
Note there are two communication channels with the Raspberry Pi - one for the static files and one for the long-running WebSocket command channel.

> Inside the application server (Tornado)

In this example, the web application server is running inside a Python web framework called "Tornado" (see http://www.tornadoweb.org/en/stable/). All of the files are prepared in the "ws-webio" folder, with "server.py" hosting the receiving end of the WebSocket.

The diagram below illustrates what is happening inside "ws-webio" folder when the "server.py" application is running, and how each piece of code interacts with each other.


Server - Closer look


"server.py" comprises:

  • An HTTP Server (part of the Tornado framework). This server listens for client connections and forwards them to the core application.
  • A Tornado application. This sits inside the HTTP Server and maps given routes to "handlers" for further processing.
  • Application settings which tell the application where to find resources, such as the static files we intend to present to the web browser.
  • Handlers. This is where the magic happens: when your browser sends a request or an event, handlers are where these requests or events will be processed. In this application, the handlers are responsible for both returning the static files to the web browser upon request, and also for operating the receiving end of the WebSocket and controlling the local GPIOs.
  • Sign in to reply
  • clem57
    clem57 over 5 years ago in reply to ianmxyz

    With this project written Aug 16, 2016 5:21:46 AM, I guess the AWS account has expired by now! You could use the python script and modify it to add web code hooks.

    • Cancel
    • Vote Up 0 Vote Down
    • Sign in to reply
    • More
    • Cancel
  • ianmxyz
    ianmxyz over 5 years ago

    Project code link is now showing 'access denied'.

    • Cancel
    • Vote Up 0 Vote Down
    • Sign in to reply
    • More
    • Cancel
  • clem57
    clem57 over 9 years ago

    A nicely written tutorial.

    Thanks,

    Clem

    • Cancel
    • Vote Up 0 Vote Down
    • Sign in to reply
    • More
    • Cancel
element14 Community

element14 is the first online community specifically for engineers. Connect with your peers and get expert answers to your questions.

  • Members
  • Learn
  • Technologies
  • Challenges & Projects
  • Products
  • Store
  • About Us
  • Feedback & Support
  • FAQs
  • Terms of Use
  • Privacy Policy
  • Legal and Copyright Notices
  • Sitemap
  • Cookies

An Avnet Company © 2025 Premier Farnell Limited. All Rights Reserved.

Premier Farnell Ltd, registered in England and Wales (no 00876412), registered office: Farnell House, Forge Lane, Leeds LS12 2NE.

ICP 备案号 10220084.

Follow element14

  • X
  • Facebook
  • linkedin
  • YouTube