element14 Community
element14 Community
    Register Log In
  • Site
  • Search
  • Log In Register
  • Community Hub
    Community Hub
    • What's New on element14
    • Feedback and Support
    • Benefits of Membership
    • Personal Blogs
    • Members Area
    • Achievement Levels
  • Learn
    Learn
    • Ask an Expert
    • eBooks
    • element14 presents
    • Learning Center
    • Tech Spotlight
    • STEM Academy
    • Webinars, Training and Events
    • Learning Groups
  • Technologies
    Technologies
    • 3D Printing
    • FPGA
    • Industrial Automation
    • Internet of Things
    • Power & Energy
    • Sensors
    • Technology Groups
  • Challenges & Projects
    Challenges & Projects
    • Design Challenges
    • element14 presents Projects
    • Project14
    • Arduino Projects
    • Raspberry Pi Projects
    • Project Groups
  • Products
    Products
    • Arduino
    • Avnet & Tria Boards Community
    • Dev Tools
    • Manufacturers
    • Multicomp Pro
    • Product Groups
    • Raspberry Pi
    • RoadTests & Reviews
  • About Us
  • Store
    Store
    • Visit Your Store
    • Choose another store...
      • Europe
      •  Austria (German)
      •  Belgium (Dutch, French)
      •  Bulgaria (Bulgarian)
      •  Czech Republic (Czech)
      •  Denmark (Danish)
      •  Estonia (Estonian)
      •  Finland (Finnish)
      •  France (French)
      •  Germany (German)
      •  Hungary (Hungarian)
      •  Ireland
      •  Israel
      •  Italy (Italian)
      •  Latvia (Latvian)
      •  
      •  Lithuania (Lithuanian)
      •  Netherlands (Dutch)
      •  Norway (Norwegian)
      •  Poland (Polish)
      •  Portugal (Portuguese)
      •  Romania (Romanian)
      •  Russia (Russian)
      •  Slovakia (Slovak)
      •  Slovenia (Slovenian)
      •  Spain (Spanish)
      •  Sweden (Swedish)
      •  Switzerland(German, French)
      •  Turkey (Turkish)
      •  United Kingdom
      • Asia Pacific
      •  Australia
      •  China
      •  Hong Kong
      •  India
      •  Korea (Korean)
      •  Malaysia
      •  New Zealand
      •  Philippines
      •  Singapore
      •  Taiwan
      •  Thailand (Thai)
      • Americas
      •  Brazil (Portuguese)
      •  Canada
      •  Mexico (Spanish)
      •  United States
      Can't find the country/region you're looking for? Visit our export site or find a local distributor.
  • Translate
  • Profile
  • Settings
Raspberry Pi
  • Products
  • More
Raspberry Pi
Blog Getting Started With Raspberry Pi - Part 2: Wiring it up
  • Blog
  • Forum
  • Documents
  • Quiz
  • Events
  • Polls
  • Files
  • Members
  • Mentions
  • Sub-Groups
  • Tags
  • More
  • Cancel
  • New
Join Raspberry Pi to participate - click to join for free!
Featured Articles
Announcing Pi
Technical Specifications
Raspberry Pi FAQs
Win a Pi
GPIO Pinout
Raspberry Pi Wishlist
Comparison Chart
Quiz
  • Share
  • More
  • Cancel
Group Actions
  • Group RSS
  • More
  • Cancel
Engagement
  • Author Author: patkelly
  • Date Created: 28 May 2013 7:57 AM Date Created
  • Views 324 views
  • Likes 0 likes
  • Comments 0 comments
Related
Recommended
  • raspberry
  • raspi
  • pi
  • video
  • raspberry_pi
  • raspberrypi
  • rpi

Getting Started With Raspberry Pi - Part 2: Wiring it up

patkelly
patkelly
28 May 2013

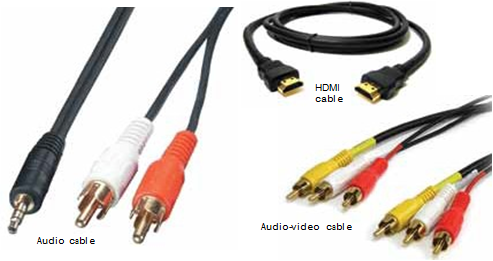
Video cable connection. image

Unfortunately, the normal PC monitor—a VGA monitor—does not support connectiv- ity with Raspberry Pi. The Raspberry Pi team, in fact, has thought beyond this and provided the latest and oldest connectivity for video.

The VGA technology is old and the last of its kind. It is fast being replaced with DVI or HDMI. However, almost every TV—old or new—has an audio/ video input socket at its back for con- nectivity with a VCP, VCR, gaming console, etc. Connect one end of an AV cable to this TV video input port and the other end to the yellow ‘TV video output’ on Raspberry Pi. The monitor is ready now. There is also a display serial interface (DSI) output for con- necting to a flat-panel display or tablet. The latest TVs (plasma, LCD and LED TVs) have an HDMI input slot at their back. Just insert an HDMI cable at both ends and your audio and video problems are solved as the HDMI cable can carry both audio and video. Also, Raspberry Pi can produce full- resolution HD pictures at 1920×1080 on the latest HDTV set.

However,  for  connecting  it  with a DVI monitor, just use one HDMI- to-DVI plug (available very cheap at electrical and computer stores).


Audio cable connections.

In case you are using a TV, the same TV can be used as audio amplifier for the weak audio signal from the Raspberry board. Get another pair of audio/ video cord, whose one end goes into the left and right audio input socket at the TV end and the other ends meet the Raspberry Pi board with a stereo pin jack. So you are all set with the cable connections.


image

Keyboard and mouse.

The computer market is replete with USB devices, so finding a USB keyboard and USB mouse is just a child’s play. Connect them to the two USB ports of Raspberry Pi. No order is required, just use any USB port for any device. For connecting additional USB devices, you will need a USB-powered hub. This kind of hub has a separate power supply of its own.


Power supply.

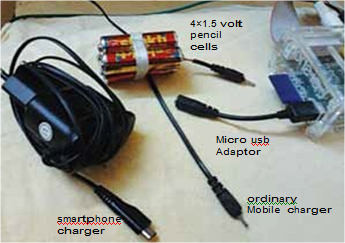
The Raspberry requires 5 volts and 1 ampere but it works fine at 5 volts, 0.7 ampere. You can even run it well on four dry pencil cells (4×1.5 = 6 volts). But more than 6 volts may damage the Raspberry Pi beyond repair.

The supply goes to the board through a mi- cro USB power connec- tor that normally comes with a smart phone charger from companies like Samsung and LG. However, if you are a Nokia user, don’t worry. Go to the local mobile store and get the adaptor shown in Fig. 3. That’s in fact good, as the chances of  damaging  the  on-board power socket are minimised. Besides, you can power the Rasp- berry  Pi  from  most  of the mobile chargers as majority are 5V, but do check the voltage rating before connecting them. Take caution, never try to  power  a  Raspberry Pi board from another USB port of a computer as this will result in mal- function of the board.

Storage device. Now you are ready with all the basic peripherals for the Raspberry Pi, except

the storage device. For storage, Raspberry Pi uses ordinary SD cards. These days SD cards come very cheap. If you have a microSD card, just get a micro-to-SD adaptor (from a mo- bile store or computer store) and insert the microSD card into the adaptor and you are done. A 2GB card is fine, but

4GB is recommended. However, you can buy as large as 32GB SD card for the Raspberry Pi board.

image


Visit the Raspberry Pi Group and Accessories Group for more activites and related products.


Original copy written by Somnath Bera for electronics for you April edition


  • Sign in to reply
element14 Community

element14 is the first online community specifically for engineers. Connect with your peers and get expert answers to your questions.

  • Members
  • Learn
  • Technologies
  • Challenges & Projects
  • Products
  • Store
  • About Us
  • Feedback & Support
  • FAQs
  • Terms of Use
  • Privacy Policy
  • Legal and Copyright Notices
  • Sitemap
  • Cookies

An Avnet Company © 2025 Premier Farnell Limited. All Rights Reserved.

Premier Farnell Ltd, registered in England and Wales (no 00876412), registered office: Farnell House, Forge Lane, Leeds LS12 2NE.

ICP 备案号 10220084.

Follow element14

  • X
  • Facebook
  • linkedin
  • YouTube