element14 Community
element14 Community
    Register Log In
  • Site
  • Search
  • Log In Register
  • Community Hub
    Community Hub
    • What's New on element14
    • Feedback and Support
    • Benefits of Membership
    • Personal Blogs
    • Members Area
    • Achievement Levels
  • Learn
    Learn
    • Ask an Expert
    • eBooks
    • element14 presents
    • Learning Center
    • Tech Spotlight
    • STEM Academy
    • Webinars, Training and Events
    • Learning Groups
  • Technologies
    Technologies
    • 3D Printing
    • FPGA
    • Industrial Automation
    • Internet of Things
    • Power & Energy
    • Sensors
    • Technology Groups
  • Challenges & Projects
    Challenges & Projects
    • Design Challenges
    • element14 presents Projects
    • Project14
    • Arduino Projects
    • Raspberry Pi Projects
    • Project Groups
  • Products
    Products
    • Arduino
    • Avnet & Tria Boards Community
    • Dev Tools
    • Manufacturers
    • Multicomp Pro
    • Product Groups
    • Raspberry Pi
    • RoadTests & Reviews
  • About Us
    About the element14 Community
  • Store
    Store
    • Visit Your Store
    • Choose another store...
      • Europe
      •  Austria (German)
      •  Belgium (Dutch, French)
      •  Bulgaria (Bulgarian)
      •  Czech Republic (Czech)
      •  Denmark (Danish)
      •  Estonia (Estonian)
      •  Finland (Finnish)
      •  France (French)
      •  Germany (German)
      •  Hungary (Hungarian)
      •  Ireland
      •  Israel
      •  Italy (Italian)
      •  Latvia (Latvian)
      •  
      •  Lithuania (Lithuanian)
      •  Netherlands (Dutch)
      •  Norway (Norwegian)
      •  Poland (Polish)
      •  Portugal (Portuguese)
      •  Romania (Romanian)
      •  Russia (Russian)
      •  Slovakia (Slovak)
      •  Slovenia (Slovenian)
      •  Spain (Spanish)
      •  Sweden (Swedish)
      •  Switzerland(German, French)
      •  Turkey (Turkish)
      •  United Kingdom
      • Asia Pacific
      •  Australia
      •  China
      •  Hong Kong
      •  India
      •  Japan
      •  Korea (Korean)
      •  Malaysia
      •  New Zealand
      •  Philippines
      •  Singapore
      •  Taiwan
      •  Thailand (Thai)
      •  Vietnam
      • Americas
      •  Brazil (Portuguese)
      •  Canada
      •  Mexico (Spanish)
      •  United States
      Can't find the country/region you're looking for? Visit our export site or find a local distributor.
  • Translate
  • Profile
  • Settings
Raspberry Pi
  • Products
  • More
Raspberry Pi
Blog Pimoroni Pico Plus 2: A First Look at an RP2350 Board
  • Blog
  • Forum
  • Documents
  • Quiz
  • Events
  • Polls
  • Files
  • Members
  • Mentions
  • Sub-Groups
  • Tags
  • More
  • Cancel
  • New
Join Raspberry Pi to participate - click to join for free!
Featured Articles
Announcing Pi
Technical Specifications
Raspberry Pi FAQs
Win a Pi
GPIO Pinout
Raspberry Pi Wishlist
Comparison Chart
Quiz
  • Share
  • More
  • Cancel
Group Actions
  • Group RSS
  • More
  • Cancel
Engagement
  • Author Author: shabaz
  • Date Created: 10 Aug 2024 3:21 PM Date Created
  • Views 8670 views
  • Likes 10 likes
  • Comments 23 comments
Related
Recommended
  • RP2350
  • pico2
  • pi pico

Pimoroni Pico Plus 2: A First Look at an RP2350 Board

shabaz
shabaz
10 Aug 2024

I wanted to try to use the new RP2530 microcontroller, but the 'normal' board, the Pi Pico 2, is out of stock for a week or two.

However, there are Pimoroni Pico Plus 2 (what an awkward name) boards, and they were available. I thought they were a drop-in replacement, but there are differences.

Main Improvements compared to Pi Pico 2

  • More storage (16 Mbyte versus 4 Mbyte)
  • More RAM (8 Mbyte vs 0.5 Mbyte),
  • More normal USB connector (USB-C versus micro USB),
  • Integrated reset button.
  • Decent silkscreen, readable from the top side, versus tiny and unreadable on the underside.
  • Five extra GPIO pins are exposed (total of 31 versus 26)

Issues / Annoyances:

  • More than twice the price (£12 vs $5)
  • Debug connector required (3-pin JST-SH, vs normal 2.54mm pin header), an extra £2.10 cost
  • Castellated pads are kind of useless, since there are parts on both sides of the board.
  • There are no 'testpads' on the underside of the board that bring out the USB connections, whereas the Pico 2 has them. It is quite a niche thing, but I mention it, because at least one person (i.e. me) makes use of those.

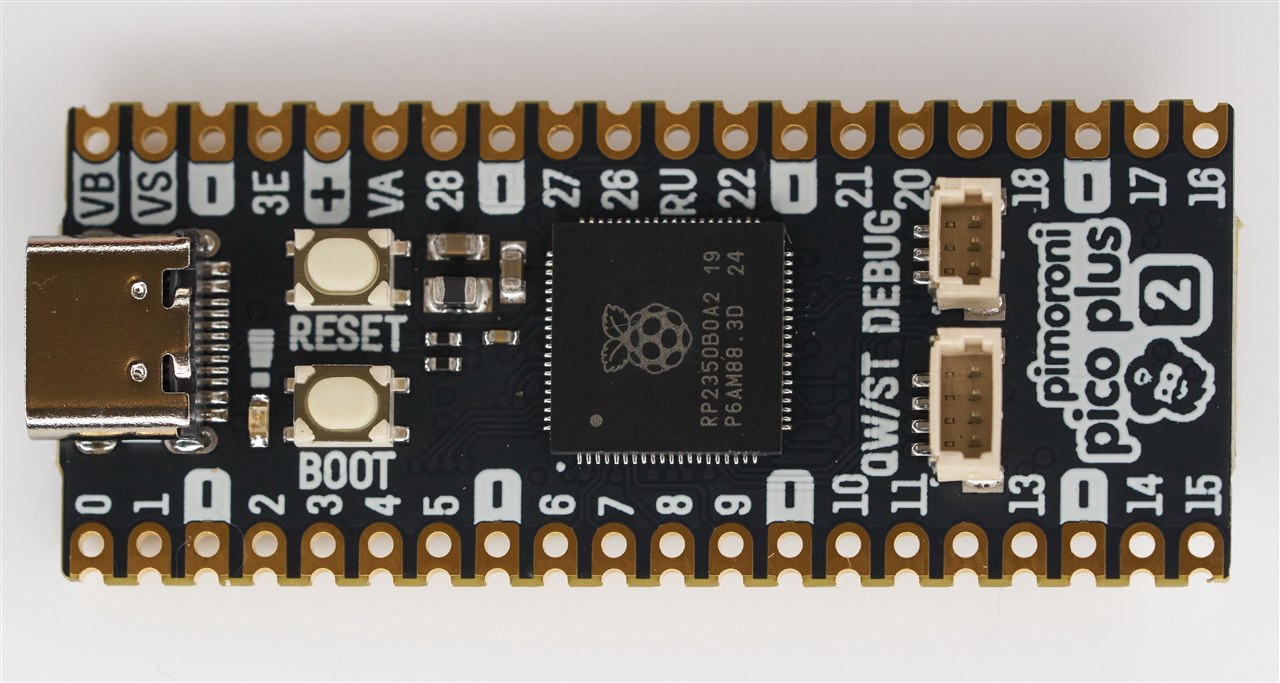
The photo below shows Pimoroni are using the 80-pin RP2350 chip for this board.

You can see the 3-pin debug connector (which connects to PicoProbe) on the top-right. Below it is a 4-pin connector that carries I2C, 3.3V and GND. The I2C connections are already exposed on a couple of the castellated pads, they are GPIO 4 and GPIO 5.

image

The underside contains the storage, RAM (a PSRAM chip), and an 8-pin JST-SH socket, which carries five extra GPIO (GPIO 32-36), 3.3V and the VSYS (e.g. 5V) and GND signals.

image

Here's the pinout, taken from the Pimoroni website:

image

Summary

The Pimoroni Pico Plus 2 board looks great, but it is not optimal for all projects. There are benefits and disadvantages.

I will definitely find uses for the Pimoroni Pico Plus 2 board, but some of its features will be overkill unless you've got a specific application in mind. If you need extra storage, you could solder a Flash memory chip onto a normal Pico or solder on a micro SD card, so there are workarounds. But it could be very convenient to have the storage and extra RAM all integrated if your project requires it. 

To make the most use out of the board, you'll need a 3-pin JST connector if you want to more easily use the C/C++ SDK or hardware debug features, and an 8-pin JST connector if you need the extra five GPIO connections.

Thanks for reading.

  • Sign in to reply

Top Comments

  • beacon_dave
    beacon_dave over 1 year ago +2
    "...Castellated pads are kind of useless, since there are parts on both sides of the board..." Perhaps design the carrier PCB with a rectangular slot slightly narrower than the width of the board at…
  • Jan Cumps
    Jan Cumps over 1 year ago +2
    castellations with bottom side parts... ... silence
  • Jan Cumps
    Jan Cumps over 1 year ago in reply to shabaz +2
    I'm trying out another option: - keep SDK 1.5x intact - fetch the v2 repos on another location. somewhere on your filesystem: 1: sdk git clone github.com/.../pico-sdk.git cd pico-sdk git checkout…
  • Jan Cumps
    Jan Cumps over 1 year ago in reply to Jan Cumps

    I forgot the --recursive switch for the sdk.

    can be resolved by running, from the pico-sdk directory:

    git submodule update --init
    • Cancel
    • Vote Up 0 Vote Down
    • Sign in to reply
    • More
    • Cancel
  • Jan Cumps
    Jan Cumps over 1 year ago in reply to shabaz

    I'm trying out another option:

    - keep SDK 1.5x intact

    - fetch the v2 repos on another location.

    somewhere on your filesystem:

    1: sdk

    git clone github.com/.../pico-sdk.git

    cd pico-sdk

    git checkout 2.0.0

    cd ..

    2: examples

    git clone https://github.com/raspberrypi/pico-examples.git

    cd pico-examples

    git checkout sdk-2.0.0

    cd ..

    - use environment setting PICO_SDK_PATH in your project / IDE / OS settings (your preference)

    image

    • Cancel
    • Vote Up +2 Vote Down
    • Sign in to reply
    • More
    • Cancel
  • Jan Cumps
    Jan Cumps over 1 year ago in reply to shabaz

    > I'm having trouble with my environment (CLion)

    Is it related to the GCC 13.3.1 install?

    • Cancel
    • Vote Up 0 Vote Down
    • Sign in to reply
    • More
    • Cancel
  • Jan Cumps
    Jan Cumps over 1 year ago in reply to shabaz

    a user could go to the pico-sdk directory, 

    git fetch

    git checkout master

    git pull

    and do the same in the pico-examples area

    it's reversible by running for the sdk

    git checkout 1.5.1

    and for the examples


    git checkout  sdk-1.5.1
    • Cancel
    • Vote Up +1 Vote Down
    • Sign in to reply
    • More
    • Cancel
  • shabaz
    shabaz over 1 year ago

    Incidentally for the Windows users, the "Pico Setup for Windows" is still at version 1.5.1, so for the latest v2.0, that would need to be manually installed using the pico-sdk GitHub repo.

    I'm having trouble with my environment (CLion) otherwise I would have tried to build some code. (I have raised a case with JetBrains).

    • Cancel
    • Vote Up 0 Vote Down
    • Sign in to reply
    • More
    • Cancel
<>
element14 Community

element14 is the first online community specifically for engineers. Connect with your peers and get expert answers to your questions.

  • Members
  • Learn
  • Technologies
  • Challenges & Projects
  • Products
  • Store
  • About Us
  • Feedback & Support
  • FAQs
  • Terms of Use
  • Privacy Policy
  • Legal and Copyright Notices
  • Sitemap
  • Cookies

An Avnet Company © 2026 Premier Farnell Limited. All Rights Reserved.

Premier Farnell Ltd, registered in England and Wales (no 00876412), registered office: Farnell House, Forge Lane, Leeds LS12 2NE.

ICP 备案号 10220084.

Follow element14

  • X
  • Facebook
  • linkedin
  • YouTube