element14 Community
element14 Community
    Register Log In
  • Site
  • Search
  • Log In Register
  • Community Hub
    Community Hub
    • What's New on element14
    • Feedback and Support
    • Benefits of Membership
    • Personal Blogs
    • Members Area
    • Achievement Levels
  • Learn
    Learn
    • Ask an Expert
    • eBooks
    • element14 presents
    • Learning Center
    • Tech Spotlight
    • STEM Academy
    • Webinars, Training and Events
    • Learning Groups
  • Technologies
    Technologies
    • 3D Printing
    • FPGA
    • Industrial Automation
    • Internet of Things
    • Power & Energy
    • Sensors
    • Technology Groups
  • Challenges & Projects
    Challenges & Projects
    • Design Challenges
    • element14 presents Projects
    • Project14
    • Arduino Projects
    • Raspberry Pi Projects
    • Project Groups
  • Products
    Products
    • Arduino
    • Avnet & Tria Boards Community
    • Dev Tools
    • Manufacturers
    • Multicomp Pro
    • Product Groups
    • Raspberry Pi
    • RoadTests & Reviews
  • About Us
  • Store
    Store
    • Visit Your Store
    • Choose another store...
      • Europe
      •  Austria (German)
      •  Belgium (Dutch, French)
      •  Bulgaria (Bulgarian)
      •  Czech Republic (Czech)
      •  Denmark (Danish)
      •  Estonia (Estonian)
      •  Finland (Finnish)
      •  France (French)
      •  Germany (German)
      •  Hungary (Hungarian)
      •  Ireland
      •  Israel
      •  Italy (Italian)
      •  Latvia (Latvian)
      •  
      •  Lithuania (Lithuanian)
      •  Netherlands (Dutch)
      •  Norway (Norwegian)
      •  Poland (Polish)
      •  Portugal (Portuguese)
      •  Romania (Romanian)
      •  Russia (Russian)
      •  Slovakia (Slovak)
      •  Slovenia (Slovenian)
      •  Spain (Spanish)
      •  Sweden (Swedish)
      •  Switzerland(German, French)
      •  Turkey (Turkish)
      •  United Kingdom
      • Asia Pacific
      •  Australia
      •  China
      •  Hong Kong
      •  India
      • Japan
      •  Korea (Korean)
      •  Malaysia
      •  New Zealand
      •  Philippines
      •  Singapore
      •  Taiwan
      •  Thailand (Thai)
      • Vietnam
      • Americas
      •  Brazil (Portuguese)
      •  Canada
      •  Mexico (Spanish)
      •  United States
      Can't find the country/region you're looking for? Visit our export site or find a local distributor.
  • Translate
  • Profile
  • Settings
Raspberry Pi
  • Products
  • More
Raspberry Pi
Blog Raspberry Pi 2: PiFace RTC Shim Testing
  • Blog
  • Forum
  • Documents
  • Quiz
  • Events
  • Polls
  • Files
  • Members
  • Mentions
  • Sub-Groups
  • Tags
  • More
  • Cancel
  • New
Join Raspberry Pi to participate - click to join for free!
Featured Articles
Announcing Pi
Technical Specifications
Raspberry Pi FAQs
Win a Pi
GPIO Pinout
Raspberry Pi Wishlist
Comparison Chart
Quiz
  • Share
  • More
  • Cancel
Group Actions
  • Group RSS
  • More
  • Cancel
Engagement
  • Author Author: mraureliusr
  • Date Created: 21 Apr 2015 8:56 PM Date Created
  • Views 2284 views
  • Likes 2 likes
  • Comments 4 comments
Related
Recommended
  • rtcshim
  • pi
  • rtc
  • raspberry_pi
  • raspberrypi
  • rtc_pi
  • rtc_shim
  • rtc_piarticle
  • pi2_features

Raspberry Pi 2: PiFace RTC Shim Testing

mraureliusr
mraureliusr
21 Apr 2015

Now that the hype is really building up around the Raspberry Pi 2 Model BRaspberry Pi 2 Model B, many of us are quickly

image

snapping up available stock. However, one of the most asked questions is whether or not peripherals are compatible with the new Pi. So I decided to test out the PiFace Real Time Clock ShimPiFace Real Time Clock Shim board with both my classic Piclassic Pi, and my brand spanking new Pi 2.


One of the complaints Pi users have is that there's no built-in hardware clock on the Pi. According to the Raspberry Pi foundation, there's a couple reasons why they didn't include one: first, the board was aimed at education first, and embedded applications second. This is why we didn't see something like the Pi Compute module on release. Second, the increase to the cost of the board would have been too much, and the amount of board space required to mount a CR2032 or similar battery would have been prohibitive. It's understandable, as accurate clocks are not a big deal most of the time, and most Pis are connected to the Internet and have the NTP (Network Time Protocol) running, so they automatically update on boot.


However, in many applications including cryptography, software development (using Git or another version control system), or running a web server, time accuracy is crucial. RTC (Real-Time Clock) modules are a great solution. They provide very accurate timekeeping – some models have parts per billion accuracy – at quite a small cost. The PiFace RTC Shim PiFace RTC Shim is a good example. At around $12 on Newark, it's a great peripheral to add if you need it!

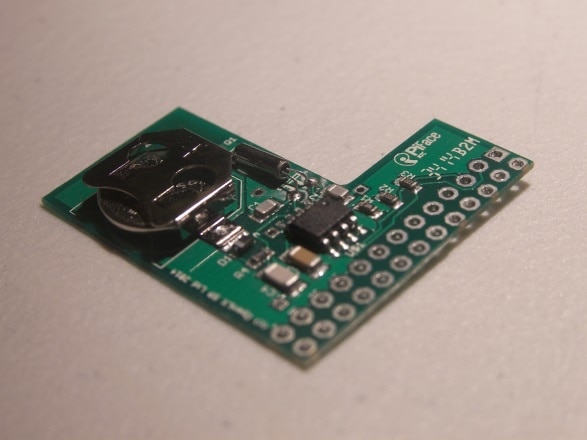
Originally designed for the Pi Model A and B, the header connector is not designed to be soldered to. Instead, four of the header pin holes are slightly offset, so when it is mounted on a header, the pressure created helps make good contact with the important pins. I've noticed that despite the pressure, it doesn't bend the pins at all – rather, it just hold the Shim in place. This allows a ribbon cable to be attached over the Pi, without interfering at all, hence the 'Shim' in the name. In my opinion, it's an excellent design, and an underrated product!


So, let's try it out. As mentioned, it fit snugly on the header pins without bending them. I was very impressed by how well it fits; it sits just high enough off of the board to not touch or short to anything, while also making the best use of space and still allowing a ribbon cable connector to go on top of the header. After attaching it to my original Pi, I at first had problems getting it set up. The website makes it look as simple as running one command:


sudo hwclock -r


However, for initial setup on Raspbian, you have to download a shell script and run it first. I highly recommend doing a quick update on Raspbian before installing -- just run sudo apt-get upgrade I believe this script activates the I2C module, and enables it on boot from then on. However, you can achieve the same effect by running


sudo raspi-config


and choosing I2C in the Advanced menu. Just tell it to load on boot automatically. I had done this before running the script, and I don't know if it made any difference. Even with the I2C module activated, it won't 'see' the RTC without running the script. After running the script, reboot your Pi and then use the following command format:


date -s "15 APR 2015 22:01"


This will set the time, and on reboot it writes this time into the RTC. After rebooting, running the date command will show you the system time has been restored. What an easy setup!


The beauty of this module is that it will keep time, even if you pull it off of the Pi, for up to two years. Remember that it requires a CR1220CR1220 battery, not the more common CR2032, which shouldn't be too hard to find. You can either order one with your Shim from Newark/element14order one with your Shim from Newark/element14, or find one at your local hardware store. Transferring between different Pis is easy – just be gentle when levering the Shim up off the header.


Now for the big test – will it fit onto and work with a new Pi 2? When I first looked at the images, I had doubts that it would, as the design was made to fit over the smaller, 26-pin header, not the new 40-pin one. However, when I had it in my hands I could see how close the board outline is to the header pin holes – thin enough to fit between two rows of the Raspberry Pi's header! So, I slid it onto my Pi 2 and voila! It worked like a charm. This is a huge plus for the Pi 2 – the increased performance, with an RTC added, makes it even more attractive as a basic desktop computer. With accurate timekeeping, it can be used more easily in embedded projects without needing internet connectivity, a huge plus when designing such projects. This is the type of accessory which can also help push the new Pi 2 into the small computer replacement market. Having accurate time, as I mentioned earlier, is very important in a lot of applications. Not to mention, being able to glance at the screen and have the correct time is not too shabby by itself!


True, if your Pi is always connected to the internet, it can use the NTP service to update the time on boot. However, many applications for the Pi use it without internet access, and in some projects I've seen the ethernet or wi-fi was only being used to set the time! This is an ideal application for this board, as it allows the Pi to stand alone offline.image


The Raspberry Pi Foundation has put a great emphasis on compatibility between versions of the Pi. The RPF 'Hat' standard is attempting to standardize the layout and size of add-on boards, similar to Arduino's R3 shield system. This is a great move, as demonstrated by this board. Even when they add or remove header pins in the future, compatibility should be maintained. If you're interested, you can view the entire specification here:


https://github.com/raspberrypi/hats and some notes about the hat standard here:


https://www.raspberrypi.org/introducing-raspberry-pi-hats/


One of the new features is the addition of an EEPROM identifier chip on Pi hats which meet the standard. The Pi can then use this information to essentially make the board plug and play – automatically loading the needed modules and self-configuring as needed. This is a great idea, as it will allow first-time users and those inexperienced in working with Linux the ease of use that the Pi deserves to have.


Stay tuned for more testing of the new Raspberry Pi 2! I'm going to go through a few more of these accessories, to see which are forward compatible with the new Pi. This should be very interesting – if manufacturers follow the RPF Hat standard, we can save a few bucks by re-using our existing accessories with the new Pi!


Have you tried out any of your old hardware with the new Pi 2? Did it work? Did you have problems? Let me know in the comments!


You don't have permission to edit metadata of this video.
Edit media
x
image
Upload Preview
image

  • Sign in to reply

Top Comments

  • markvenn
    markvenn over 10 years ago +1
    Now this is a sweet bit of kit! An excellent write up Alexander. Haven't watched the video yet, will do later. Looking forward to seeing other accessories on test.
  • bsgreen
    bsgreen over 10 years ago +1
    I concur with Mark - great write up! I'm curious - in you picture it looks as though the RTC shim is covering the processor with very little air gap between the two. Would you say that there is sufficient…
  • Former Member
    Former Member over 9 years ago

    Very interesting test!

    I bought a PiFace RTC and I'm trying it on a Raspberry Pi 2 Model B. I followed the many guides I found on the internet, but I'm still having problem with the date: when I reboot, the system time is always set to Jan 1, 1970! It seems to be in a reset condition.

    After the execution of the .sh script as written in the PiFace RTC user guide, I set the actual date with "sudo date -s "12 jan 2016 10:30:00",

    set the i2c module from raspi-config.

    The device is correctly seen at the right address 0x6F, and I really can't understand what I'm doing wrong!


    Any idea would be appreciated!
    Thanks,


    Andrea.

    • Cancel
    • Vote Up 0 Vote Down
    • Sign in to reply
    • More
    • Cancel
  • mraureliusr
    mraureliusr over 10 years ago in reply to bsgreen

    You certainly could put any size heatsink below the shim -- you just have to balance that with whether or not you need the ribbon cable also attached. You could get away with the whole assembly being higher up on the header pins, but there will be a point where the contacts inside the ribbon cable connector are no longer making good contact with the pins.

    Alternatively, you could use a sil pad or other insulator and have them basically touching -- the thermal effect on the RTC would be minimal unless you're doing very precision measurements of time.

    • Cancel
    • Vote Up 0 Vote Down
    • Sign in to reply
    • More
    • Cancel
  • bsgreen
    bsgreen over 10 years ago

    I concur with Mark - great write up! I'm curious - in you picture it looks as though the RTC shim is covering the processor with very little air gap between the two. Would you say that there is sufficient space for even a small heat sink to be placed on the processor and still have room for the RTC? Maybe you answer this in the video, but with metered internet connectivity I'm afraid 23 minute videos are not for me... But thanks for the info on this device!

    • Cancel
    • Vote Up +1 Vote Down
    • Sign in to reply
    • More
    • Cancel
  • markvenn
    markvenn over 10 years ago

    Now this is a sweet bit of kit!

    An excellent write up Alexander. Haven't watched the video yet, will do later. Looking forward to seeing other accessories on test.

    • Cancel
    • Vote Up +1 Vote Down
    • Sign in to reply
    • More
    • Cancel
element14 Community

element14 is the first online community specifically for engineers. Connect with your peers and get expert answers to your questions.

  • Members
  • Learn
  • Technologies
  • Challenges & Projects
  • Products
  • Store
  • About Us
  • Feedback & Support
  • FAQs
  • Terms of Use
  • Privacy Policy
  • Legal and Copyright Notices
  • Sitemap
  • Cookies

An Avnet Company © 2025 Premier Farnell Limited. All Rights Reserved.

Premier Farnell Ltd, registered in England and Wales (no 00876412), registered office: Farnell House, Forge Lane, Leeds LS12 2NE.

ICP 备案号 10220084.

Follow element14

  • X
  • Facebook
  • linkedin
  • YouTube