element14 Community
element14 Community
    Register Log In
  • Site
  • Search
  • Log In Register
  • About Us
  • Community Hub
    Community Hub
    • What's New on element14
    • Feedback and Support
    • Benefits of Membership
    • Personal Blogs
    • Members Area
    • Achievement Levels
  • Learn
    Learn
    • Ask an Expert
    • eBooks
    • element14 presents
    • Learning Center
    • Tech Spotlight
    • STEM Academy
    • Webinars, Training and Events
    • Learning Groups
  • Technologies
    Technologies
    • 3D Printing
    • FPGA
    • Industrial Automation
    • Internet of Things
    • Power & Energy
    • Sensors
    • Technology Groups
  • Challenges & Projects
    Challenges & Projects
    • Design Challenges
    • element14 presents Projects
    • Project14
    • Arduino Projects
    • Raspberry Pi Projects
    • Project Groups
  • Products
    Products
    • Arduino
    • Avnet Boards Community
    • Dev Tools
    • Manufacturers
    • Multicomp Pro
    • Product Groups
    • Raspberry Pi
    • RoadTests & Reviews
  • Store
    Store
    • Visit Your Store
    • Choose another store...
      • Europe
      •  Austria (German)
      •  Belgium (Dutch, French)
      •  Bulgaria (Bulgarian)
      •  Czech Republic (Czech)
      •  Denmark (Danish)
      •  Estonia (Estonian)
      •  Finland (Finnish)
      •  France (French)
      •  Germany (German)
      •  Hungary (Hungarian)
      •  Ireland
      •  Israel
      •  Italy (Italian)
      •  Latvia (Latvian)
      •  
      •  Lithuania (Lithuanian)
      •  Netherlands (Dutch)
      •  Norway (Norwegian)
      •  Poland (Polish)
      •  Portugal (Portuguese)
      •  Romania (Romanian)
      •  Russia (Russian)
      •  Slovakia (Slovak)
      •  Slovenia (Slovenian)
      •  Spain (Spanish)
      •  Sweden (Swedish)
      •  Switzerland(German, French)
      •  Turkey (Turkish)
      •  United Kingdom
      • Asia Pacific
      •  Australia
      •  China
      •  Hong Kong
      •  India
      •  Korea (Korean)
      •  Malaysia
      •  New Zealand
      •  Philippines
      •  Singapore
      •  Taiwan
      •  Thailand (Thai)
      • Americas
      •  Brazil (Portuguese)
      •  Canada
      •  Mexico (Spanish)
      •  United States
      Can't find the country/region you're looking for? Visit our export site or find a local distributor.
  • Translate
  • Profile
  • Settings
Raspberry Pi
  • Products
  • More
Raspberry Pi
Blog Raspberry Pi Clock & Weather Display on a TFT-3.5" Screen
  • Blog
  • Forum
  • Documents
  • Quiz
  • Events
  • Polls
  • Files
  • Members
  • Mentions
  • Sub-Groups
  • Tags
  • More
  • Cancel
  • New
Join Raspberry Pi to participate - click to join for free!
Featured Articles
Announcing Pi
Technical Specifications
Raspberry Pi FAQs
Win a Pi
GPIO Pinout
Raspberry Pi Wishlist
Comparison Chart
Quiz
  • Share
  • More
  • Cancel
Group Actions
  • Group RSS
  • More
  • Cancel
Engagement
  • Author Author: Former Member
  • Date Created: 10 Nov 2017 9:02 PM Date Created
  • Views 3555 views
  • Likes 3 likes
  • Comments 4 comments
Related
Recommended
  • pi 3
  • tft
  • tft display
  • raspberry pi3
  • rpi
  • 3.5inchdisplay
  • 3.5"
  • raspberry pi2
  • pi lcd

Raspberry Pi Clock & Weather Display on a TFT-3.5" Screen

Former Member
Former Member
10 Nov 2017

image

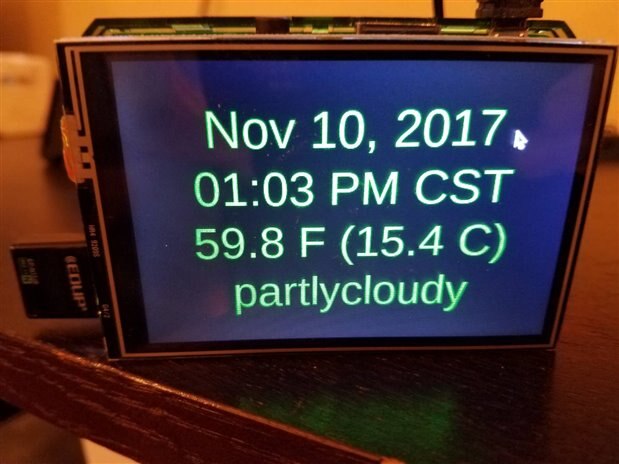
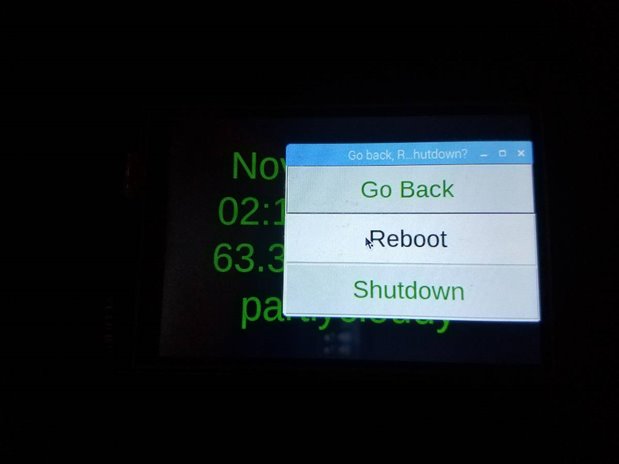
My complete github project (https://github.com/texadactyl/rpi_clock ) provides a Raspberry Pi Clock & Weather display (rpi_clock), based on the Quimat 3.5" TFT Touch Screen with a 320x480 resolution and their software housed at https://github.com/goodtft/LCD-show.  The primary Tk window displays date, time, and current weather conditions outside according to the Richardson Texas USA station of the Weather Underground.  If you touch the screen, it will bring up a secondary Tk window which offers the user to go back to the primary window, reboot, or shutdown.

image

You can see that I set up the primary window presentation for an American-formatted date & time presentation.  Modifying this is very simple by editing bin/rpi_clock.py constants FORMAT_DATE and FORMAT_TIME.  You can easily modify colors, fonts, widths, button sizes, etc. as you wish as they are also capitalized constants.  The weather data comes in a response from the Weather Underground using a JSON-oriented API for current weather conditions.  I chose to show temperature in both Celsius and Fahrenheit.  The conditions string ("partlycloudy" in the image above) was returned by the Weather Underground as part of its JSON response message, probably formatted for American English due to the station parameters (Richardson); I simply used it as is.

Had I purchased a larger screen (E.g. 7") I could have employed graphic images and other data which would have been more aesthetically-pleasing.

Sorry but I did not show the usual unboxing of the display hardware etc. as I only thought about sharing this experience after construction finished (oops).

Note that the directions from Quimat (TFT supplier) were quite sparse (being generous).  You can see my complete review at Amazon (https://www.amazon.com/gp/customer-reviews/RXAU7YNHXRTIP/ref=cm_cr_getr_d_rvw_ttl?ie=UTF8&ASIN=B06W55HBTX).  There are probably better hardware solutions although this worked fine for a persistent old hacker like me. (=:  In their defense, I'll say that the display hardware pushed onto the Pi's GPIO connectors without issues; no wiring required.  However, watch out for the supplied plastic case because it is very brittle - mine broke [image] so I slapped together a semi-protective solution (bottom of a clear case in my bottom desk drawer) that covers the bottom of the Pi.  If the TFT (protecting the front of the Pi) dies because there is nothing protecting it, I'll look for another hardware vendor product.  See? I went cheap (USD 28 for TFT, touch pen, DVD-docs, and brittle clear case) and got bitten.  Lol@myself!

I used my existing Raspberry Pi 2 and passed along its USB drive (previous blog subject) to my new Raspberry Pi 3.  It would not be terribly difficult to modify the rpi_clock.py Python 3 script to employ:

  • A different touch-screen display product which interfaces with the Raspberry Pi 2 or 3.
  • Run in another Linux distribution or under any O.S. which supports Python 3, JSON, and Tk.
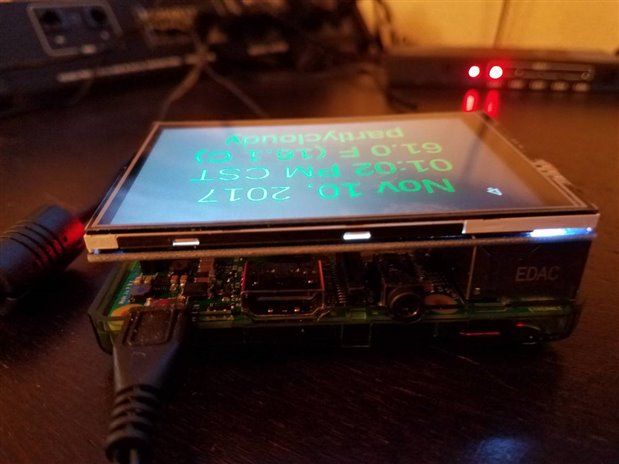
 

View from the top:

image

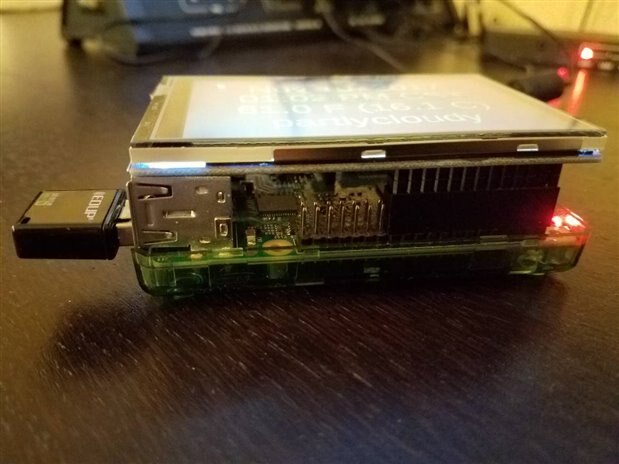
View from the bottom:

image

GITHUB CONTENTS

Subfolders:

  • bin - rpi_clock.py (Python 3 source code)
  • docs - preparation_notes.txt (how-to do everything required - really! - after following Quimat hardware installation instructions).


AFTERTHOUGHTS

Admittedly, there seems to be other 3.5" TFT display products which claim to NOT require special drivers as of the latest Raspbian during 2017 (more desirable IMO). In fact, the Quimat product might too. I just got caught in the middle! Some time in the future, I might try it without the Quimat-supplied driver software. If that effort is successful, I will update this blog and the github project.

Will this work on a Pi Zero? Pi A or B?

How well did I test preparation_notes.txt?

Find any bugs?

Suggestions for improvement?

The Weather Underground seems to be world-wide.  Alternate international weather data provider?

Richard Elkins Dallas, Texas, USA, 3rd Rock, Sol

  • Sign in to reply
  • Former Member
    Former Member over 2 years ago in reply to tehmessiah75

    The hard-coding of the home directory name was fixed 2022-12-06 in v4.3 of https://github.com/texadactyl/rpi_clock

    Yes, the other notes could use an update since this project is 5 years old.

    • Cancel
    • Vote Up 0 Vote Down
    • Sign in to reply
    • More
    • Cancel
  • tehmessiah75
    tehmessiah75 over 2 years ago

    Update:
    You cannot use the Lite (no GUI) OS.
    The new raspberry pi imager now creates a user that isn't pi 

    After some investigation I tracked it down to:
    Line 65 of /home/<USERNAME>/rpi_clock/bin/rpi_clock_parameters.py home = "/home/pi"
    I changed it to: home = "/home/<MyUserName>" 

    After this I received the error about using SSH which is when I realized I needed an OS with a desktop environment.
    After upgrading OS Lite to XFCE desktop (Cause its the lightest weight OS) it still doesn't work.

    • Cancel
    • Vote Up 0 Vote Down
    • Sign in to reply
    • More
    • Cancel
  • tehmessiah75
    tehmessiah75 over 2 years ago

    this looks great but the instructions are lacking.

    I've fumbled my way through it and it doesn't work, yet.

    its a RPi 2 and its running my Pi-Hole. I attached the screen ages ago but its pretty much headless (Lite OS terminal only)

    since most of it was already setup and configured all I had to do was edit the settings for the clock but after reboot it just displayed terminal.

    Please help because this is exactly what I wanted the display for.

    • Cancel
    • Vote Up 0 Vote Down
    • Sign in to reply
    • More
    • Cancel
  • DAB
    DAB over 7 years ago

    Nice post.


    DAB

    • Cancel
    • Vote Up 0 Vote Down
    • Sign in to reply
    • More
    • Cancel
element14 Community

element14 is the first online community specifically for engineers. Connect with your peers and get expert answers to your questions.

  • Members
  • Learn
  • Technologies
  • Challenges & Projects
  • Products
  • Store
  • About Us
  • Feedback & Support
  • FAQs
  • Terms of Use
  • Privacy Policy
  • Legal and Copyright Notices
  • Sitemap
  • Cookies

An Avnet Company © 2025 Premier Farnell Limited. All Rights Reserved.

Premier Farnell Ltd, registered in England and Wales (no 00876412), registered office: Farnell House, Forge Lane, Leeds LS12 2NE.

ICP 备案号 10220084.

Follow element14

  • X
  • Facebook
  • linkedin
  • YouTube