Introduction
This setup guide was created as an additional set of instructions to help set up a Raspberry Pi (aka RPI) for the first time, and it was a group decision to try to publish some easy-to-read instructions.
There are additional guides at http://elinux.org/RPi_Hub#Getting_Started and they should be consulted too.
Ideally the content here should be merged into the material at elinux.org, but today it is separate.
Once you purchase a Raspberry Pi, most likely you'll need to prepare an SD card with the Raspbian Operating System on it. To save effort, you may have purchased hardware with the SD card already programmed, and in that case some of the steps here could be skipped.
If you spot any errors or have any suggested changes, please let me know the suggested changes.
Consult this page to see compatible parts and the latest bundle offers (in particular, note that not all power supplies work, so it is best to buy one known to work with the Raspberry Pi). Also note that if you don't have a wired mouse or keyboard for initial setup, then it is needed. Also, pay attention to what interface is available on your TV/monitor and buy the correct cable - other vendor adapters are hit-and-miss, some just won't work.
Topics
1a. Installing the Operating System using a Windows PC
1b. Installing the Operating System using a Mac (Linux should be similar)
2. Connecting to the RPI
1a. Installing the Operating System using a Windows PC
If you are using a Mac, go to section 1b.
| Step | Description | Screenshot |
|---|---|---|
| 1 | Go to http://www.7-zip.org/ and download and install 7-zip (direct link for Windows is here) | |
| 2 | Go to https://www.sdcard.org/downloads/formatter_4/ and follow the links on the left side to download SD Formatter 4.0 (direct link for Windows is here. scroll to the bottom and click Accept). Then install it. | |
| 3 | Insert SD card into PC. Confirm the drive letter (e.g. E: drive) using Windows Explorer for example | |
| 4 | Run SD Formatter. Select the correct drive letter if it is not already selected. Then click “Option” and set “FORMAT SIZE ADJUSTMENT” to ON and then click OK. Then click “Format”, and OK once or twice if it asks. It will soon say “Memory Card Format complete”. You can now exit the program. Now remove and re-insert the SD card into your PC, so it is recognised again. | 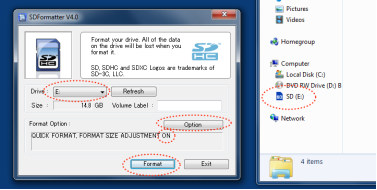 |
| 5 | Go to http://www.raspberrypi.org/downloads/ and download NOOBS Version: 1.3.x currently Approx 1.3Gbyte download (.zip file) currently | |
| 6 | Unzip the file (right-click and Extract if you’re using Windows) | 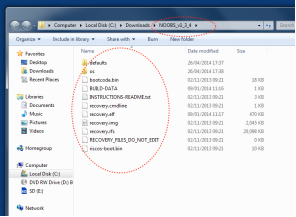 |
| 7 | Select all the contents (ctrl-A will do it) and then click and drag to the SD card (E: drive in this case). This will take about a minute to complete. | 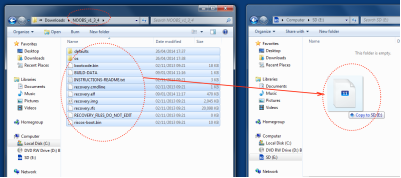 |
| 8 | Start plugging in stuff. Plug the SD card into the unpowered RPI. Plug in a USB keyboard and USB mouse into the RPI. (A keyboard or mouse is mandatory – both together may not be needed for initial config). Make sure they are wired, not wireless just to be sure it will work. If you don't have a wired mouse or keyboard, wait until you have access to one. Now make a choice. Either use an A/V (aka RCA or Composite) port connector on your TV (it is circular, usually yellow marking, around 12mm diameter), or alternatively use a HDMI connector (rectangular, approx. 20mmx5mm, with two shaped corners). Adapter boxes/cables may not work for various technical reasons, so avoid them and use a different TV for now if needed. Plug in the video cable. DO NOT power up the RPI, but find your best RPI power supply and USB cable for it. If you don’t have one from Farnell that was intended and tested with the RPI, then use one from a smartphone (not dumbphone). The smartphone one will offer a higher load capability which is what you need. Ensure you use a brand-name USB cable (e.g. if you have a Samsung smartphone then use the Samsung USB cable that came with the power supply – don’t use any unbranded USB cable. The RPI is overly picky about voltage level, and some USB cables use thin wires internally, which cause a voltage drop). Keep the RPI unpowered still. | |
| 9 | Still keeping the RPI unpowered, turn on the TV only, and set the TV to the correct mode input | |
| 10 | If you are using HDMI, skip this step. Determine if your country uses PAL or NTSC TV systems. As a general rule, assume you are using PAL unless you are in Japan or USA. If you are using PAL, press the number ‘3’ on the keyboard, and keep it pressed while plugging in and powering up the RPI. If you are using NTSC, press the number ‘4’ on the keyboard and keep it pressed as you plug in and power up the RPI. If you don’t do either, then the RPI will output via HDMI and you will see nothing on the TV. Don’t release the number until you see the NOOBs information on the screen. Then you can release it. | |
| 11 | Power up the RPI | |
| 12 | If you are not using HDMI, skip this step too. You will see a message on the screen asking if you want to make the display mode permanent. Select ‘Yes’ if this is the case*. To select it, you can use the mouse or press Tab on your keyboard until it is highlighted, and then press Enter. * Note – if you select ‘No’ you run into a slight problem later, because you won’t be able to shutdown the RPI without a remote connection from a PC (explained after a couple of steps below, in step 16). | 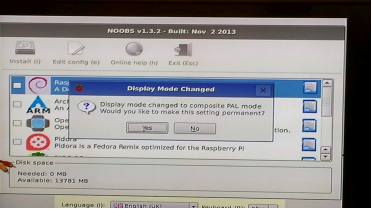 |
| 13 | Select the Raspbian option (it is the first option here). If you don’t have a mouse, you can use the arrow keys and press spacebar. Make any language/keyboard changes if needed. Then press ‘i’ or click on “Install”. Notice the NOOBs version number may be displayed incorrectly – this is a bug that you can ignore. |  |
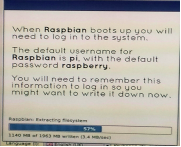
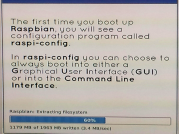
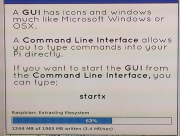
| 14 | This will take a while (maybe 5 minutes). Various screens will display some information. Some is worth reading, but the less-useful items appears first. The information worth observing is shown here --> |
|
| 15 | When complete, the RPI will indicate that the operating system has been installed successfully. If you are using HDMI, you can go ahead and click ‘OK’, and the system will automatically reboot. Go to the next step. If you are using a composite (aka AV or RCA connector) instead of HDMI, then if you selected ‘Yes’ earlier when asked if you wanted your display mode to be permanent, you can click ‘OK’ and the system will reboot. If you selected ‘No’, then the system will reboot but you will get no display (because the display has switched to HDMI). You cannot just power-off the RPI while it is running. A controlled power-off is needed. To do this involves a few steps which are better explained in the next section but in brief: plug in an Ethernet cable (NOT a WiFi adapter) into the RPI and into a spare switch port on your home router, and connect to the RPI using SSH. Log in, and type ‘sudo poweroff’. These steps are described in more detail in the next section “Connecting to the RPI”. |  |
| 16 | You can log into the RPI using the username ‘pi’ and password ‘raspberry’. If you want to safely power-off the RPI, type ‘sudo poweroff’. |
Now go to Section 2 "Connecting to the RPI"
1b. Installing the Operating System using a Mac
(Thanks for fvan for these instructions!)
| Step | Description | Screenshot / Example Output |
|---|---|---|
| 1 | Go to http://www.raspberrypi.org/downloads/ and scroll down until you see 'Operating System Images' and download Raspbian ZIP file. After it is downloaded, extract until you see a .img file. Version: 1.3.x currently Approx 1.3Gbyte download (.zip file) currently | |
| 2 | Insert the SD card into the Mac, and then list the disks available on your machine, so you don't accidentally flash the wrong one. | diskutil list /dev/disk0 #: TYPE NAME SIZE IDENTIFIER 0: GUID_partition_scheme *251.0 GB disk0 1: EFI EFI 209.7 MB disk0s1 2: Apple_HFS Macintosh HD 250.1 GB disk0s2 3: Apple_Boot Recovery HD 650.0 MB disk0s3 /dev/disk1 #: TYPE NAME SIZE IDENTIFIER 0: Apple_partition_scheme *16.1 MB disk1 1: Apple_partition_map 32.3 KB disk1s1 2: Apple_HFS Flash Player 16.1 MB disk1s2 /dev/disk2 #: TYPE NAME SIZE IDENTIFIER 0: FDisk_partition_scheme *7.9 GB disk2 1: DOS_FAT_32 NO NAME 7.9 GB disk2s1 |
| 3 | Once you have identified the SD card disk, unmount it. | diskutil unmountDisk /dev/disk2 Unmount of all volumes on disk2 was successful |
| 4 | Use "dd" to write the image on to the SD card. | sudo dd if=myfilename.img of=/dev/disk2 bs=1m Password: dd: /dev/disk2: end of device 7498+0 records in 7497+1 records out 7861178368 bytes transferred in 4681.741917 secs (1679114 bytes/sec) |
| 5 | Now go to the top of this post, and proceed from step 8 in section 1 (i.e. the Windows section). | |
2. Connecting to the RPI
| Step | Description | Screenshot |
|---|---|---|
| 1 | For now, plug an Ethernet cable into the RPI and the other end into a spare switch port on your home router (most home routers have 4 switch ports, and a single port that is not a switch port and is sometimes labelled DSL or WAN. You need to plug into a switch port). Once you do that, usually two green and one yellow light should appear on the RPI (previously only the red light appeared). These are marked FDX, LNK and 100. With some routers, not all will be lit. A further light marked ‘ACT’ may briefly flicker on. The router will automatically give the RPI an IP address. | |
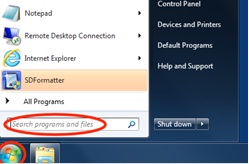
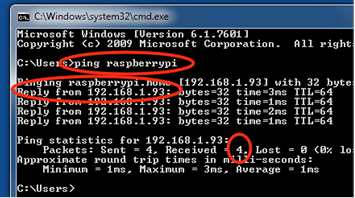
| 2 | You need to find the IP address. There are a few ways. One way is to go to a PC, and type ‘ping raspberrypi’ in a command window. To open a command window on Windows, go to The Windows start menu and type ‘cmd’ in the “Search programs and files” box as indicated in the screenshot here. On Mac or Linux, you can open a Terminal window. When you type ‘ping raspberrypi’ you should see a reply, and the ping statistics should say 3 or 4 packets were received. If you see some lost, reattempt ‘ping raspberrypi’ a second time. Make a note of the IP address that you see. This is the IP address that the RPI acquired from the router. |
|
| 3 | Find SSH software. A free example is called PuTTY. Install it. | |
| 4 | Using your SSH software, set it up for an SSH connection to the IP address that you discovered, and username ‘pi’ and password ‘raspberry’. Select ‘Connect’. You should see the text shown on the right, or something very similar. | 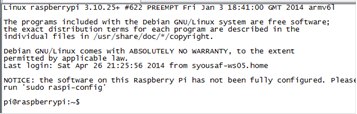 |
| 5 | There are some config options such as changing hostname, or changing audio path, if you type ‘sudo raspi-config’. In many cases you may chose not to make any adjustments. | |
| 6 | Change your password by typing ‘passwd’. Type a new password. It won’t let you select a simple password. | |
| 7 | Once you have finished using the Raspberry Pi, power down the RPI in a safe manner (type sudo poweroff) and then after a minute disconnect power (the red light will remain lit, so it is worth waiting a whole minute before powering off - if you don't wait long enough, there is a possibility that SD card corruption could occur). | |