


Why secure your DNS?
Since the beginning of Internet, DNS has remained the primary service to resolve well known web service names into IP addresses. Overtime it has evolved into being faster and more reliable, however the security aspect of it hasn't changed much.
It is one of the critical services that ensures a speedy functioning internet, albeit it is a major source for security vulnerability and privacy invasion.
Some of us maybe aware of the famous DNS related exploits which are still common in the out,
1. Linux/Moose: Moose malware exploited Linux-based routers with default passwords to create social media fraud by tricking users into changing device's DNS settings.
2. DnsChanger Trojan: Redirecting users accessing popular websites like Google, Yahoo to other malicious websites
3. Internet Service Providers: Mistyped domains are redirected by ISPs or some free DNS providers (OpenDNS) to alternate search engines to display ads.
4. Typosquatting: Registering domains which look similar to existing popular domains
The aim of this blog post is to educate users into taking control over this simple yet important service in their home environment and,
- Protect their devices against malware/ransomware/adware
- Taking control over your privacy by securely encrypting each DNS query, blocking telemetric and tracking data without your explicit consent.
What do you require?
1. Basic knowledge of Linux systems
2. RaspberryPi (any model)
3. SD Card to install your Raspbian.
4. Active internet connection
5. A router with administrative access
Setup RaspberryPi
Before setting up RaspberryPi, download and install Etcher for flashing pre-built images to a SDCard. Go to the downloads section of RaspberryPi and familiarise yourself with the different distributions for it.
I will choose Raspbian and download Raspbian Stretch lite because we do not need a graphical interface for it. Please follow the installation guide and the headless setup guide at the Raspbian page for more information on how to install and setup Raspbian. Do not forget to secure your RaspberryPi by following the instructions here.
Once done with the setup of Pi, connect it with ethernet cable to your router and remote login over ssh. In order to find the IP address of the RaspberryPi, you can login to your Router Interface and look into the section of connected devices.
For Fritzbox, you can have a look at the Heimnetz section
Click on raspberrypi to get the current IP address of Pi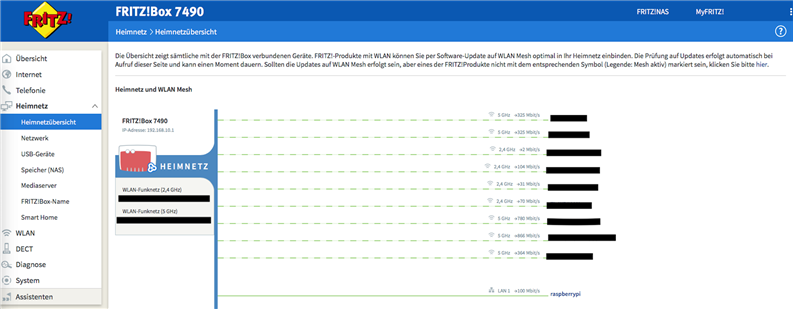
Setting up Pi-Hole
The first step towards taking control over your DNS service, is to setup your own. Fortunately, the guys at Pi-Hole have done an incredible job to simplify the setup of your DNS server. If you have an active internet connection, just type this one liner from Pi-Hole to have a complete setup of your DNS server.
curl -sSL https://install.pi-hole.net | bash
Once your are done with Pi-Hole setup, you must create a password for secure login using,
pihole -a -p
Reboot the Pi and open the following page in your browser
http://raspberrypi
You should see something like the following
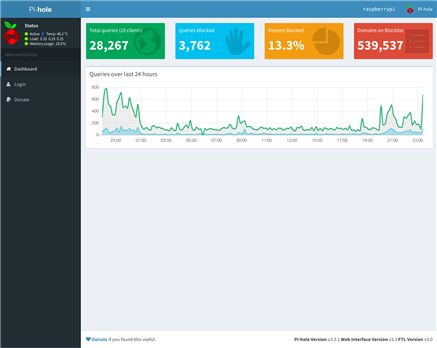
Login with the password you setup above,
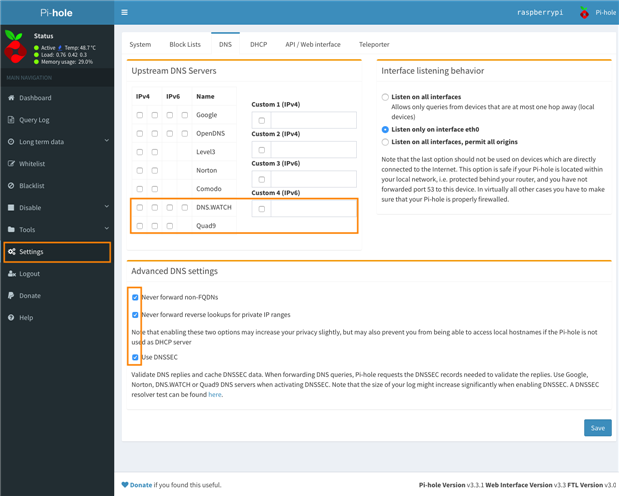
One of the important points to take from the marked field are the IPv4 and IPv6 DNS servers and what to choose from them? Since, we are aiming for privacy centric secure DNS I have highlighted a couple of them.
From the DNS.WATCH privacy policy
We have no interest in logging DNS queries. That's why all our resolvers are setup to not log any queries. Many DNS providers will log requests. Some anonymize that logs after a while, some don't. And many don't even let you know if they're logging or not anonymized data which is not associated with users is used for statistics and security research
After you are done with basic setup, let's configure our router to use Pi-Hole as our desired DNS server.
Using Pi-Hole as the default DNS server
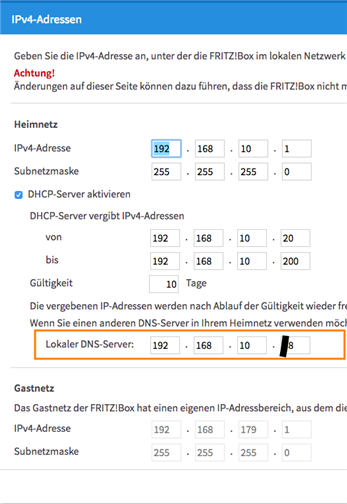
Login to your router admin page in order to configure the DNS setting for both IPv4 and IPv6 addresses. For Fritzbox, the setting lies in Heimnetz (Home network) -> Netzwerk (Network) -> Netzwerk Einstellungen (Network Settings)
Click on IPv4 address and configure your local DNS as shown below,
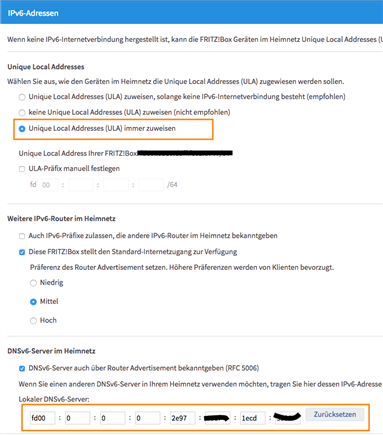
Similarly, for IPv6 settings
So far, we have done only the first step towards having raspberrypi as your own DNS server.
You might have to reboot your router, disconnect and reconnect to your WiFi network in order to get the changes to DNS settings. You should be able to see the IP address of your raspberry pi in the DNS settings of your computer.
In our next step, we configure block list to block adwares, malwares, tracking domains and telemetric domains
Configuring block list in your Pi-Hole
Login to your Pi-Hole admin page and go to Settings -> Blocklists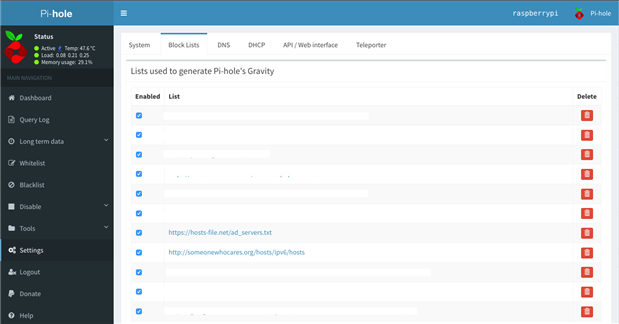
There are various websites which curate a list of different blacklists with categories. Few of the ones I used are below
1. https://blog.cryptoaustralia.org.au/2017/11/15/favourite-block-lists-cryptoaustralia/
Select the block lists carefully and add them via the Pi-Hole admin page. The PiHole should now automatically download the blocklists and configure them. If you wish to update the lists automatically, you can configure a cron job as below.
Updating blocklists automatically
Login to raspberry pi over SSH and open the following file
/etc/cron.d/pihole
The file should look like below,
# Pi-hole: Update the ad sources once a week on Sunday at a random time in the
# early morning. Download any updates from the adlists
29 3 * * 7 root PATH="$PATH:/usr/local/bin/" pihole updateGravity
# Pi-hole: Flush the log daily at 00:00
# The flush script will use logrotate if available
# parameter "once": logrotate only once (default is twice)
# parameter "quiet": don't print messages
00 06 * * * root PATH="$PATH:/usr/local/bin/" pihole flush once quiet
@reboot root /usr/sbin/logrotate /etc/pihole/logrotate
# Pi-hole: Grab local version and branch every 10 minutes
*/10 * * * * root PATH="$PATH:/usr/local/bin/" pihole updatechecker local
# Pi-hole: Grab remote version every 24 hours
25 13 * * * root PATH="$PATH:/usr/local/bin/" pihole updatechecker remote
@reboot root PATH="$PATH:/usr/local/bin/" pihole updatechecker remote reboot
We will comment out the previous entry and update the cron tab for daily updates,
# Pi-hole: Update the ad sources once a week on Sunday at a random time in the
# early morning. Download any updates from the adlists
#29 3 * * 7 root PATH="$PATH:/usr/local/bin/" pihole updateGravity
00 05 * * * root PATH="$PATH:/usr/local/bin/" pihole updateGravity
Now, you are done with the setup of a DNS server which blocks ads.
Upcoming...
1. Comparison of DNSSec/DNSCrypt and DNS over TLS
2. How to configure DNSCrypt with Pi-Hole?
3. How to configure DNS over TLS with Pi-Hole?
4. Which DNS servers to choose?
References
1. Kaminky DNS Vulnerability: An Illustrated Guide to the Kaminsky DNS Vulnerability
2. Moose Vulnerability: https://www.zyxel.com/support/announcement_csrf_pharming_vulnerability_and_moose_malware.shtml
3. DNS Changer Trojan: Trojan.Multi.DNSChanger.a Virus Removal | Updated
4. Raspbian Documentation: http://raspbian.org/RaspbianDocumentation
5. Quad DNS: https://www.quad9.net/privacy/
6. DNS.WATCH: https://dns.watch/
7. DNSSec http://www.dnssec.net/
8. DNSCrypt https://dnscrypt.info/
9. DNS over TLS https://tools.ietf.org/html/rfc7858