


Table of Contents
- Introduction
- What Is Docker?
- How Does It Work?
- What’s Required?
- Commands Overview
- Installing Docker
- Installing and Running the Pi Pico Ready Container
- Start-Up and Access the Container
- Download Pi Pico Project Source Code to the Container
- Build the Code
- Obtaining the Binary UF2 File
- Transferring the UF2 File to the Pi Pico
- Summary
Introduction
Ever seen a Pi Pico project that you’ve wanted to try out, but then you noticed the software is not using the Arduino environment, nor is it using MicroPython or CircuitPython, but instead is using the “Pico C SDK”? If so, it might have put you off, because it’s non-trivial to set up the C SDK environment from scratch. It’s not difficult to do, but there are more steps than there should be!
In an ideal world, raspberrypi.com would have it pre-installed in their Raspberry Pi OS, so that anyone with a Pi could immediately use it.
There are plenty of online tutorials to install the C SDK environment on a PC, and some of the tutorials are targeted at Windows users, some are targeted at Linux, and some expect the user to install Visual Code (an excellent tool, by the way) or CLion (another excellent tool; install both!). These ‘full fat’ installations are great.
However, for the casual user who doesn’t want to go through a lot of steps, there is another method, known as the Docker Container route. For those curious about what Docker is all about, please read the next two sections. For those not interested and just want to get to it, either skip the next two sections!, or, just watch the 8-minute video and you won't need to read a further word.
If you're a Windows or Mac user, then there's a slightly easier process, which relies on Docker Desktop instead of having to install a Linux virtual machine. It is shown in the 3-minute video here:
What Is Docker?
Often, it is desirable to be able to segregate a PC or server into many virtual machines (VM is short for Virtual Machine). Each virtual machine or VM broadly behaves as a ‘ship in the night’, operating independently, and only communicating through the network, if connections between the VMs are needed. In other words, you can make your PC behave as if it is actually several independent PCs.
Some forms of virtual machines need a lot of resources on your real physical computer, such as RAM and disk space, because that RAM and disk space needs to split somehow virtually, amongst as many virtual machines as you are running or plan to run respectively. What if you don’t have a lot of RAM and disk space, or what if you want to have hundreds of VMs on your single PC? In that case, there’s a VM-like technology known as Containers, which can be very high performance, with less resource usage. Containers may share the underlying operating system (OS) on a PC but otherwise operate fairly independently, just like full VMs. As a user, you don’t really need to usually concern yourself with the difference between a VM and a Container.
Docker is a particular container technology, and it’s quite a popular one. In Docker terminology, a running VM-like machine is known as a Docker Container, and it is launched from what is known as a Docker Image.
How Does It Work?
All Docker Images are composed of ‘layers.’ A sales app could have (say) a Ubuntu layer, a web server layer for the sales staff to be able to access, and a layer that contains any glue code to connect to the factory inventory system. A production department app could have a Ubuntu layer, and a web server layer for configuration, and a programmer/debugger layer for burning the Flash memory in the product in the factory. Since both the sales app and the production department app happen to have a Ubuntu layer and a Web Server layer, these common layers are only stored once, thus saving disk space, compared to normal VMs.
Why is this relevant at all to building code for a Pi Pico? Let's get to that : ) The real relevance is that Docker happens to allow you to create Docker Images with a very concise description (known as a Dockerfile). This means that if you want someone to have a computer with the Pi Pico SDK installed, then you can provide them with a short Dockerfile, and their computer will go off and assemble the Docker Image by finding on the Internet all the bits and pieces, using the Dockerfile as a kind of recipe, and will deliver you with a fully-functioning virtual computer (actually known a Container as mentioned before) as if someone has set it all up for you, pre-installed with all the software you need. This means that in one simple step, you have a computer (a container) all ready for building code for the Pi Pico.
What’s Required?
The workflow either requires a Linux computer, or an installation of Docker Desktop. If you're using Windows or Mac, the quickest way is to install Docker Desktop. Once you have Docker Desktop installed, run it from the Windows Start Menu (or Mac equivalent), and then skip the Installing Docker section below.
If you're going the Linux route, then Ubuntu will work, but but other distributions will be fine too. If you don’t have a Linux machine, you could pick up a used small Linux PC or instance, old Intel NUCs, they take up hardly any space) for £100 and use it like a little Linux server; no need to plug keyboard/monitor/mouse to it, thus saving a lot of cost, and you can remotely log into it from your normal desktop or laptop machine. Otherwise, a zero-cost option is to use a Linux virtual machine. This blog won’t go into that, but if you have recommendations for people, please mention them in the comments.
Other than that, all that is needed is the Pi Pico itself, and a USB cable.
Commands Overview
The commands that will be used are shown below. You can download the commands as a text file.
Installing Docker
The following commands will install Docker on your Linux machine (if you're using Docker Desktop, skip this section!). Replace my_username in the fourth line with yours. Note that on Linux distributions other than Ubuntu, you’ll need to change the sudo apt lines. Google will help here (e.g. google for 'docker install red hat’), and please mention it in the comments what commands were successful for you.
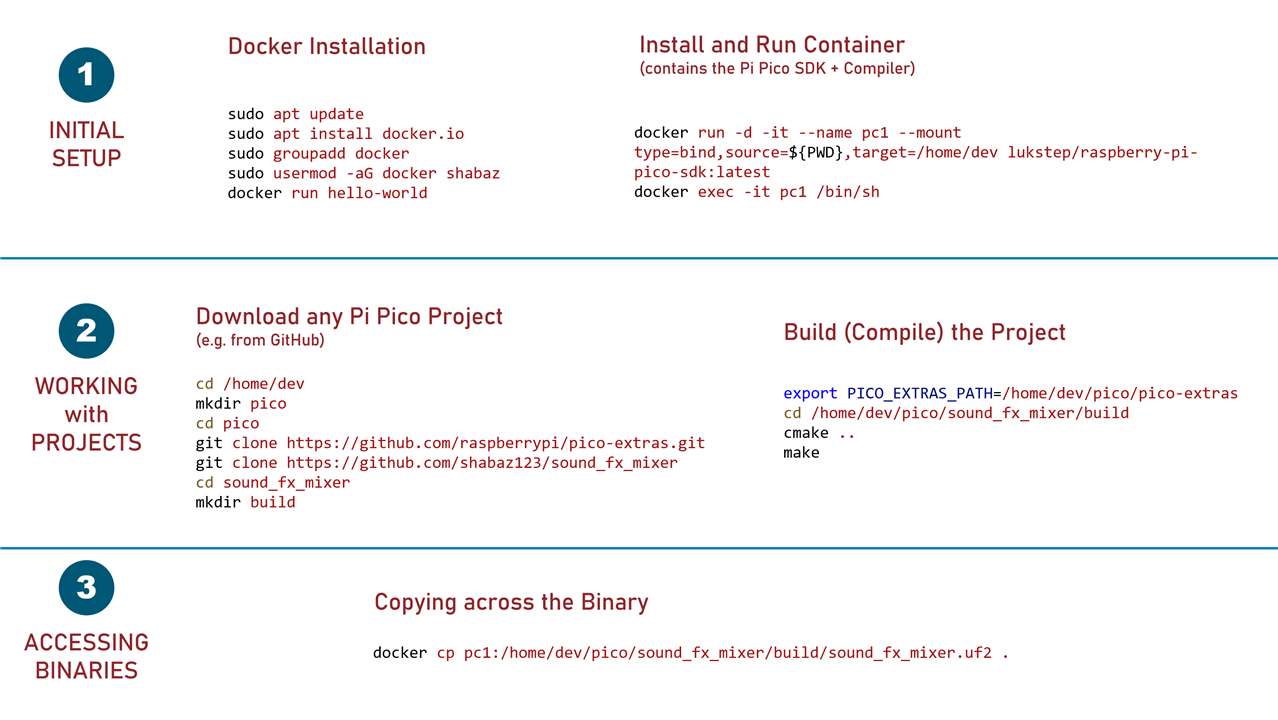
sudo apt updatesudo apt install docker.iosudo groupadd dockersudo usermod -aG docker my_username
You can test if Docker is functioning by typing the following:
docker run hello-world
If all goes well, you’ll see a Hello from Docker message appear among a load of other text. If that last command does not work, try typing the following, and then reattempt that last command:
sudo chmod 666 /var/run/docker.sock
Installing and Running the Pi Pico Ready Container
Assuming you got the Docker message displayed successfully, or if you're using Docker Desktop, then you are now ready to install a virtual computer (Docker Container) that is all ready for Pi Pico builds. The virtual computer will be called pc1.
Type the following (in either a Linux command shell, or, if you're using Docker Desktop, in a Windows PowerShell, or Mac terminal) to install it:
docker run -d -it --name pc1 --mount type=bind,source=${PWD},target=/home/dev lukstep/raspberry-pi-pico-sdk:latest
Note: If you're using Docker Desktop, if you get an error "error during connect" or "This error may indicate that the docker daemon is not running" then that means you need to start up Docker Desktop from the Windows Start Menu (or Mac equivalent menu).
After it completes (it may take a few minutes), the virtual computer is now residing on your computer, and is running actually, but you need to type one more command to access it.
Start-Up and Access the Container
You can access the container by typing:
docker exec -it pc1 /bin/sh
When you type that, all you’ll see is a command prompt / # and that is a success! You are now in the root directory (/) of the virtual computer.
Note that if you ever shut down your PC, then you need to start up the container in a different way (the command in the section above both installed and started up the container, but after a reboot, you only need to start the container, without re-installing it). If you ever restart your PC, if you're using Linux, then type the following to start up and access the container:
docker start pc1docker exec -it pc1 /bin/sh
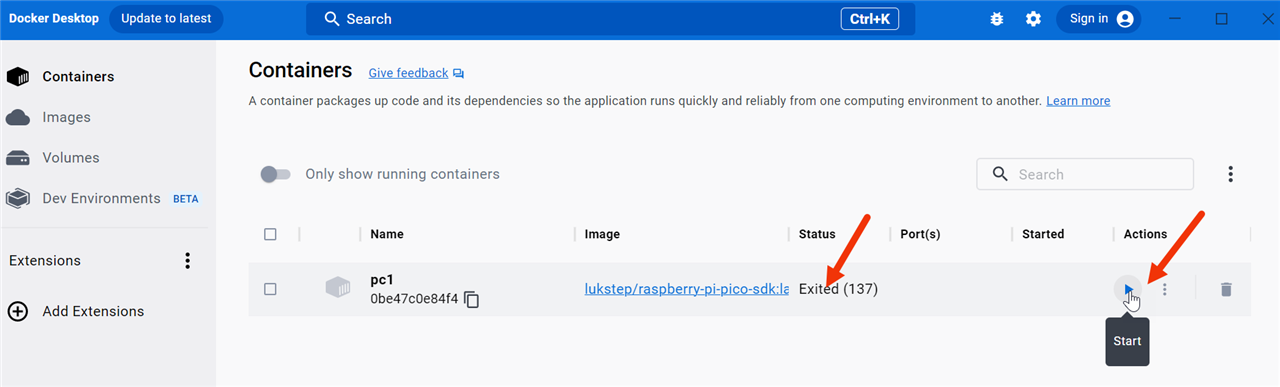
If you're using Docker Desktop, then ensure Docker Desktop is running (from the Windows Start Menu or Mac equivalent menu), and you can start up the container by clicking on the triangular play icon next to the container, as shown in the screenshot below, and then the Status will change to Running. Then, you can type docker exec -it pc1 /bin/sh in a PowerShell to get inside a shell in the container.
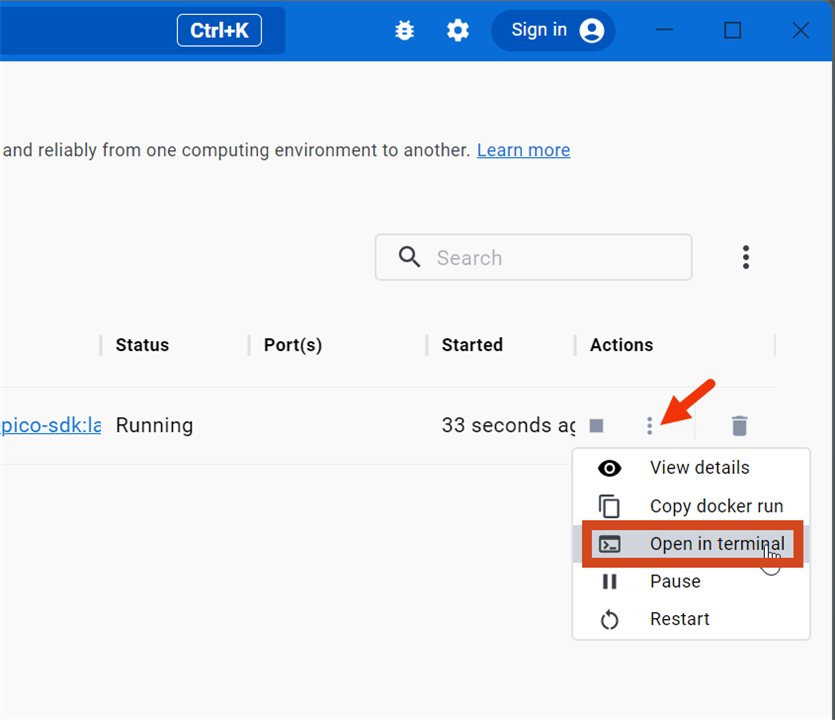
Incidentally, if desired, Docker Desktop users can directly enter the container (without using PowerShell) by clicking as shown in the screenshot below:
For Docker Connect users, if you ever see a message "error during connect" or "This error may indicate that the docker daemon is not running" then that means that Docker Desktop is not running, and you will need to run it from the Windows Start Menu. If you see the message "Error response from daemon: Container xxxxxxxxxxxxxxx is not running" then that means you need to click on the triangular play icon.
Download Pi Pico Project Source Code to the Container
From the / # prompt, type the following:
cd /home/devmkdir picocd pico
You now have a pico folder to house any desired projects. A lot of projects are on GitHub and can be downloaded using git clone commands.
The example project here will be one called sound_fx_mixer. This particular one requires two git clone commands (most will require just one):
git clone https://github.com/raspberrypi/pico-extras.gitgit clone https://github.com/shabaz123/sound_fx_mixer
Now you can go to the project folder, and create a build folder within that, where the final binary .uf2 file will be built.
cd sound_fx_mixermkdir build
You are now ready to build the code!
Build the Code
The sound_fx_mixer project happens to require a particular environment variable to be set, but many other projects won’t require this step; the project page would normally advise if the project needed any extra steps like this:
export PICO_EXTRAS_PATH=/home/dev/pico/pico-extras
Now type the following to build the project:
cd /home/dev/pico/sound_fx_mixer/buildcmake ..make
Note that if you ever subsequently need to rebuild the code, you can usually just type make but if that doesn’t work, and if it’s not a code bug, then repeat everything in this section.
If all goes well, you’ll see the output Built target sound_fx_mixer as shown in the screenshot below, indicated by the arrow. To see the output, type ls and you should see a sound_fx_mixer.uf2 file. That’s the file that needs to be transferred to the Pi Pico!

Obtaining the Binary UF2 File
The binary file, called sound_fx_mixer.uf2 in the example above, will reside in the pc1 container. To get it onto your normal computer environment, open up a command prompt (shell), or a new PowerShell window if you're using Docker Desktop, and from your normal home user folder, type the following (the dot at the end signifies that you want to copy to your current folder):
docker cp pc1:/home/dev/pico/sound_fx_mixer/build/sound_fx_mixer.uf2 .
You should now have the .uf2 file in your home folder, all ready for transferring to the Pi Pico!
Transferring the UF2 File to the Pi Pico
Note: This is far easier to do with Windows! If you’re using Linux, it’s an awkward procedure.
Let’s assume for the purpose of this blog post you have access to a Windows machine. In that case, get the .uf2 file copied onto the Windows PC, and then get the Pi Pico (unpowered), and hold down the BOOTSEL button on it (it is the only button on the Pi Pico), and plug in the USB connection to your Windows PC. Now release the BOOTSEL button.
You’ll see a new drive letter appear on your PC, because the Pi Pico will behave like a USB memory stick. You can now drag-and-drop the .uf2 file onto that drive letter, and it will get uploaded to the Pico! It will automatically run.
Summary
The steps described in this blog post should hopefully allow people to try out Pi Pico C/C++ projects quickly, within about 15 minutes if all goes well. All the steps in this blog post are downloadable in a pico-docker-steps text file.
If you try it out and have issues, or have any feedback, please let me know.
Thanks for reading.

