element14 Community
element14 Community
    Register Log In
  • Site
  • Search
  • Log In Register
  • About Us
  • Community Hub
    Community Hub
    • What's New on element14
    • Feedback and Support
    • Benefits of Membership
    • Personal Blogs
    • Members Area
    • Achievement Levels
  • Learn
    Learn
    • Ask an Expert
    • eBooks
    • element14 presents
    • Learning Center
    • Tech Spotlight
    • STEM Academy
    • Webinars, Training and Events
    • Learning Groups
  • Technologies
    Technologies
    • 3D Printing
    • FPGA
    • Industrial Automation
    • Internet of Things
    • Power & Energy
    • Sensors
    • Technology Groups
  • Challenges & Projects
    Challenges & Projects
    • Design Challenges
    • element14 presents Projects
    • Project14
    • Arduino Projects
    • Raspberry Pi Projects
    • Project Groups
  • Products
    Products
    • Arduino
    • Avnet Boards Community
    • Dev Tools
    • Manufacturers
    • Multicomp Pro
    • Product Groups
    • Raspberry Pi
    • RoadTests & Reviews
  • Store
    Store
    • Visit Your Store
    • Choose another store...
      • Europe
      •  Austria (German)
      •  Belgium (Dutch, French)
      •  Bulgaria (Bulgarian)
      •  Czech Republic (Czech)
      •  Denmark (Danish)
      •  Estonia (Estonian)
      •  Finland (Finnish)
      •  France (French)
      •  Germany (German)
      •  Hungary (Hungarian)
      •  Ireland
      •  Israel
      •  Italy (Italian)
      •  Latvia (Latvian)
      •  
      •  Lithuania (Lithuanian)
      •  Netherlands (Dutch)
      •  Norway (Norwegian)
      •  Poland (Polish)
      •  Portugal (Portuguese)
      •  Romania (Romanian)
      •  Russia (Russian)
      •  Slovakia (Slovak)
      •  Slovenia (Slovenian)
      •  Spain (Spanish)
      •  Sweden (Swedish)
      •  Switzerland(German, French)
      •  Turkey (Turkish)
      •  United Kingdom
      • Asia Pacific
      •  Australia
      •  China
      •  Hong Kong
      •  India
      •  Korea (Korean)
      •  Malaysia
      •  New Zealand
      •  Philippines
      •  Singapore
      •  Taiwan
      •  Thailand (Thai)
      • Americas
      •  Brazil (Portuguese)
      •  Canada
      •  Mexico (Spanish)
      •  United States
      Can't find the country/region you're looking for? Visit our export site or find a local distributor.
  • Translate
  • Profile
  • Settings
Raspberry Pi
  • Products
  • More
Raspberry Pi
Raspberry Pi Forum Helicopter animation using a Raspberry Pi
  • Blog
  • Forum
  • Documents
  • Quiz
  • Events
  • Polls
  • Files
  • Members
  • Mentions
  • Sub-Groups
  • Tags
  • More
  • Cancel
  • New
Join Raspberry Pi to participate - click to join for free!
Featured Articles
Announcing Pi
Technical Specifications
Raspberry Pi FAQs
Win a Pi
Raspberry Pi Wishlist
Actions
  • Share
  • More
  • Cancel
Forum Thread Details
  • Replies 32 replies
  • Subscribers 665 subscribers
  • Views 5435 views
  • Users 0 members are here
  • raspberry_pi
  • pi animation
  • programming in python
Related

Helicopter animation using a Raspberry Pi

colporteur
colporteur over 5 years ago

We are being encouraged by our leaders to practice social distancing and/or isolate ourselves where possible during this COVID19 crisis. To avoid going stir crazy while isolated in my home, I dug up an old project I have mulled over many times.


I would like to use a Pi to construct an helicopter animation. The best way to understand the goal of the project is let you take a look at the video. https://www.youtube.com/watch?v=Hl5--7g3jO0&t=112s


My first task is to build the light sequence. My light sequence is slightly different because it matches aviation specifications. There will be cabin lighting, landing lighting(front), position lighting (left/right/rear) and strobe lighting (top/bottom). All lights are either on or off with the strobes flashing when on. The lighting is being done with LEDs. Once I master the lights, I will integrate the audio and then tackle motor control. The Pi is responsible for running the whole show. I am looking to use python to accomplish the task. No, I am not interested in doing the project with an Arduino or in another programming language. Pi and python are my toolset. Hopefully I don't discover it is not possible.


What I am hoping for is some direction to developing the solution. I have no doubt this is programming 101 for many of you. I have much experience in programming. I have met and worked with people that have the skills to call themselves a programming. I am not a programmer.


The series of LED’s repeats the following sequence:

turn LED1 on solid

turn LED2 on flashing

turn LED3 on solid

turn LED4 on solid

turn LED4 off

turn LED3 off

turn LED2 off

turn LED1 off

cycle starts again.


My difficultly is creating the flashing LED within the sequence. I can turn all the LED's on and off. I can flash LED2 on its own. When I add flashing to the sequence LED2 flashes once and then the sequence continues with no more flashes. I require LED2 to flash continuous until it is turned off. I’m thinking I need to have a LED flashing routine (? another script) that is called in the parent script and continues to run (flash) until it is called to stop. I want to call it a fire and forget routine but that is my lack of programming terminology understanding.


I had this thought, write a code for a python module that flashes an led. Call the module in another python script giving it the pin number. The module should have a start and stop. Well that simple understanding of writing a module exceeds my knowledge. Since I'm not sure if what I am looking for is actually a solution, my research is proving difficult. If a module is what I need and you have a resource to assist in writing it, please let me know.


I'm not looking for someone to write the code but rather guide me to developing the code myself. Care to provide some insight into my helicopter animation COVID19 Isolation Project. There is no badge or points awarded, just a brain share. I look forward to your responses.

  • Sign in to reply
  • Cancel
  • glennvanderveer
    glennvanderveer over 5 years ago in reply to colporteur

    That is weird.  I used the method that was suggested by the Python Library Reference:
    https://docs.python.org/2.4/lib/timer-objects.html

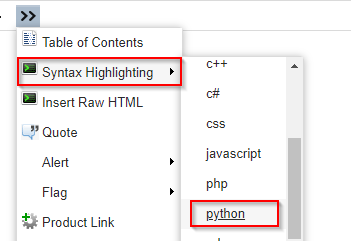
    As for the code formatting, at the top of you reply window, there is a double arrow(>>) at the end of the line.  Press this will bring up a menu.  Pick the second option for Syntax Highlighting and then pick the language.  I usually paste all my code in the edit window, the select it again, then set the Syntax Highlighting.

    • Cancel
    • Vote Up +1 Vote Down
    • Sign in to reply
    • Cancel
  • luislabmo
    luislabmo over 5 years ago in reply to colporteur

    Hi Sean,


    The granularity of the strobe as you describe will work but it has a flaw. While flashHZ is being executed the rest of the code will be on hold. If you want the program to do something else at the same time it won't work as you expect it (you'll need threading for that). The problem with threading is, it may help you accomplish what you need but eventually the threads may be out of sync as threading is asynchronous (the Pi will be executing other tasks at the same time) so they won't execute precisely on a given amount of time, also threading may be more complex to manage.

    Going back to your example, the idea is to find a common factor to all the actions that will easily help you calculate intervals for all your actions. From your example, the shortest action requires 1/20 seconds (0.05), that may be your delay for each iteration, and every other action will be a factor of thas number, see below:


    #Initialization  
    cycleCounter = 0  
    totalCycles = 16 # A factor of 16 (16, 32, 48, 64, etc) so the cycle starts over
    GPIO.output(GPIO1, GPIO.LOW)  
      
    while True:  
      if cycleCounter % 16 == 0:
        GPIO.output(GPIO1, GPIO.HIGH)
      else:  # 0.05 * 16 = 0.8 (the delay required while off)
        GPIO.output(GPIO1, GPIO.LOW)
    
      cycleCounter = (cycleCounter + 1) % totalCycles  
      time.sleep(.05)


    And, to display the code I used the Syntax Highlight and used Tab to align it (spaces work too)
    image


    Luis

    • Cancel
    • Vote Up +2 Vote Down
    • Sign in to reply
    • Cancel
  • colporteur
    colporteur over 5 years ago in reply to glennvanderveer

    There are comments in this link  https://www.geeksforgeeks.org/start-and-stop-a-thread-in-python/  on the difficulties with threads and being able to stop them.


    I have been trying to work through Code #6 creating a class to be able to terminate the thread. I am not familiar with class. I'm getting RunTimeWarnings: No channels have been set up. I'm missing something with the environment and RPi.GPIO I think?


    I'm trying to piece together an understanding of the puzzle with no picture on the box to know what the puzzle is.

    • Cancel
    • Vote Up 0 Vote Down
    • Sign in to reply
    • Cancel
  • colporteur
    colporteur over 5 years ago in reply to luislabmo

    G'Day,

    I have been concentrating on the threading option following some of glennvanderveer suggestions. I speculating this is not a complicated program so have a thread run for 30secs and then stopping it might be doable. Now if I could just get the thread to stop:)


    Thanks for the cut and paste on inserting code. I will definitely use the feature. Making it easy for readers to view code is one step to improving the chances of getting an answer.

    • Cancel
    • Vote Up 0 Vote Down
    • Sign in to reply
    • Cancel
  • colporteur
    colporteur over 5 years ago in reply to beacon_dave

    I looked at GPIOZero when it first came into existence. I can't recall now but, there was some limitation I didn't like and continued to use import RPi.GPIO as GPIO.


    I'm caught in an orbit right now that is not producing results. Maybe tomorrow I will take a fresh approach to using the module to solve my problem.

    • Cancel
    • Vote Up 0 Vote Down
    • Sign in to reply
    • Cancel
  • colporteur
    colporteur over 5 years ago

    I'm posting the code produced so far. It produces the following error message on run.


    pi@piheli:~/scripts $ python light_sequence.py

    cabin lights on

    strobe lights on

    light_sequence.py:114: RuntimeWarning: No channels have been set up yet - nothing to clean up!  Try cleaning up at the end of your program instead!

      GPIO.cleanup()


    The intent of the code is to thread the strobe light in a class that would provide a start and terminate method. I have spent a good six hours today, reading and trying different iterations of code to resolve the issue with no success. I indicated in my original post, I wasn't looking for someone to provide the answer. I'm wondering if I am close to a solution or I may be way off the mark.


    I lack not only the programming skills but the experience to troubleshoot. Can anyone see what this is missing or is the approach not sound and I will consider starting over.


    #!/usr/bin/python
    #
    ###########
    #
    #Description:light_sequence.py-script to start and stop four series of lights
    # on helicopter simulation
    #Date: Mar.18,2020
    #Revision:1.0
    #
    ###########
    
    
    import time # provides various time-related functions
    import RPi.GPIO as GPIO # provides interface to input/output pins of the Pi
    import random
    import os
    import threading            # provide concurrency between static and flashing LED


    # setup GPIO
    #GPIO.setwarnings(False)
    GPIO.setmode(GPIO.BOARD)           # set option to reference physical pins
    
    
    # GPIO pin definitions
    lnd_lit = 3  # Define GPIO pin
    cab_lit = 5  # Define GPIO pin
    pos_lit = 7  # Define GPIO pin
    IO_5 = 29 # Define GPIO pin
    IO_6 = 31  # Define GPIO pin
    IO_7 = 26  # Define GPIO pin
    IO_8 = 24  # Define GPIO pin
    IO_9 = 21  # Define GPIO pin
    IO_10 = 19  # Define GPIO pin
    IO_11 = 23  # Define GPIO pin
    IO_12 = 32  # Define GPIO pin
    IO_13 = 33  # Define GPIO pin
    IO_14 = 8  # Define GPIO pin
    IO_15 = 10  # Define GPIO pin
    IO_16 = 36  # Define GPIO pin
    IO_17 = 11  # Define GPIO pin
    IO_18 = 12  # Define GPIO pin
    IO_19 = 35  # Define GPIO pin
    IO_20 = 38  # Define GPIO pin
    IO_21 = 40  # Define GPIO pin
    IO_22 = 15  # Define GPIO pin
    IO_23 = 16  # Define GPIO pin
    IO_24 = 18  # Define GPIO pin
    IO_25 = 22  # Define GPIO pin
    IO_26 = 37  # Define GPIO pin
    stb_lit = 13  # Define GPIO pin
    
    
    #GPIO pins in use for lights
    Heli_lit_array =(
        cab_lit, pos_lit, lnd_lit
    )
    
    
    # Set GPIO function to output
    for light in Heli_lit_array:
        GPIO.setup(light, GPIO.OUT)  # set GPIO pins for lighting output
    
    
    class StrobeOnOffTask:
        def __init__(strobe, pin):
            strobe._running = True
            strobe.pin = pin
            print(strobe.pin)
            GPIO.setmode(GPIO.BOARD)
            GPIO.setup(strobe.pin, GPIO.OUT)
    
    
    def terminate(strobe):
        strobe._running = False
    
    
    def run(strobe):
        while strobe._running:
            GPIO.output(strobe.pin, GPIO.HIGH)  ## set HIGH (LED ON)
            time.sleep(.05)  ## wait
            GPIO.output(strobe.pin, GPIO.LOW)  ## set LOW (LED OFF)
            time.sleep(.8)  ## wait
    
    
    try:
            while True:
                #helicopter lights on sequence,cab_lit,stb_lit,pos_lit,lnd_lit
                print("cabin lights on")
                GPIO.setup(cab_lit, GPIO.HIGH)
                time.sleep(3)
                print("strobe lights on")
                c = StrobeOnOffTask()
                t = threading.Thread(target = c.run, args = [stb_lit])
                t.start()
                time.sleep(3)
                print("position lights on")
                GPIO.setup(pos_lit, GPIO.HIGH)
                time.sleep(3)
                print("landing lights on")
                GPIO.setup(lnd_lit, GPIO.HIGH)
                time.sleep(3)
                # helicopter lights off sequence,lnd_lit,pos_lit,stb_lit,cab_lit
                print("landing lights off")
                GPIO.setup(lnd_lit, GPIO.LOW)
                time.sleep(3)
                print("position lights off")
                GPIO.setup(pos_lit, GPIO.LOW)
                time.sleep(3)
                print("strobe lights off")
                c.terminate()
                t.join()
                print("cabin lights off")
                GPIO.setup(cab_lit, GPIO.LOW)
                time.sleep(3)
    
    
    except KeyboardInterrupt:  # if ctrl+c pressed exit cleanly
        GPIO.cleanup()
    except:  # this catches ALL other exceptions including errors.
        GPIO.cleanup()
    finally:  # cleanup GPIO on normal exit
        GPIO.cleanup()

    • Cancel
    • Vote Up 0 Vote Down
    • Sign in to reply
    • Cancel
  • colporteur
    colporteur over 5 years ago in reply to glennvanderveer

    The method suggested has a little caveat that bites you in the ***.


    All the stuff I have read on threading implies that managing (i.e. stopping as well as other tasks) of threads can prove difficult. I used your solution in the code and the light flashes independent of the other events. Since the thread is not stopped every time the code cycles, the LED gets flashed by another thread that is started. Eventually the strobe LED is on constantly.


    One of the suggestions to manage a thread is to use python class. This is way in the deep end of python knowledge for me. I worked with an exceptional programmer later in my career that did wonderful stuff in object oriented programming. I envied his skills. It seems I go back every now and then to try and develop an understand but it feel the same as it did when OOP first came into being. I have a small part of a programmers mind. Not the part to understand OOP:(

    • Cancel
    • Vote Up 0 Vote Down
    • Sign in to reply
    • Cancel
  • colporteur
    colporteur over 5 years ago in reply to beacon_dave

    I took a few hours today and tried gpiozero. It works, the way I had intended it to for the LEDs.


    How familiar are you with the gpiozero?


    If I use import gpiozero, the method LED is not available. I get an error message.

    pi@piheli:~/scripts $ python light_sequence.py

    Traceback (most recent call last):

      File "light_sequence.py", line 24, in <module>

        landing_light = LED(2)

    NameError: name 'LED' is not defined


    I have to use from gpiozero import LED to get the LED module. With that line in place the script functions. The documentation suggests the import gpiozero will provide all the modules. I did a google search and didn't find anything immediately on the issue. I'm going off to work on my project and not focus on this anomaly.


    Much thanks. I'm going to investigate this module to see if it can do what I need. Maybe I'm do for a change.

    • Cancel
    • Vote Up 0 Vote Down
    • Sign in to reply
    • Cancel
  • glennvanderveer
    glennvanderveer over 5 years ago in reply to colporteur

    Okay here we go with alpha .02 of my code.  Again, this works gloriously in my head, but I have not tested it or even compiled it...


    import threading  
    import RPi.GPIO as GPIO  
        
    def LED2_Blinker(): 
    if BlinkFlag:
         if GPIO.input (LED2_PIN): #read teh led2 pin and if it is high, set it low  
            GPIO.output (LED2_PIN, GPIO.LOW)  
        else: #was not high, set it so...  
        GPIO.output (LED2_PIN,GPIO.HIGH)  
      
    LED1_PIN = XX #change XX to be proper pin number on PI  
    LED2_PIN = XX #change XX to be proper pin number on PI  
    LED3_PIN = XX #change XX to be proper pin number on PI  
    LED4_PIN = XX #change XX to be proper pin number on PI  
    
    BlinkFlag=0    #make sure when timer starts, the led doesn't start blinking before it should  
      
    GPIO.setup (LED1_PIN, GPIO.OUT)  
    GPIO.setup (LED2_PIN, GPIO.OUT)  
    GPIO.setup (LED3_PIN, GPIO.OUT)  
    GPIO.setup (LED4_PIN, GPIO.OUT)  
        
    #set all pins low to start....  
    GPIO.output (LED1_PIN,GPIO.LOW)  
    GPIO.output (LED2_PIN,GPIO.LOW)  
    GPIO.output (LED3_PIN,GPIO.LOW)  
    GPIO.output (LED4_PIN,GPIO.LOW)  
        
    #setup the timer.  Number is for amount of time between timer activating...  
    timer = threading.Timer(0.25,LED2_Blinker)  
        
    # and now the looping sequence...  
    while True:  
    GPIO.output (LED1_PIN,GPIO.HIGH)  
    time.sleep(3)  
    #timer.start() #starts the timer so that LED 2 will blink automagically  
    BlinkFlag=1
    GPIO.output (LED3_PIN,GPIO.HIGH)  
    time.sleep(3)  
    GPIO.output (LED4_PIN,GPIO.HIGH)  
    time.sleep(3)  
    #done startup sequence...  
    GPIO.output (LED4_PIN,GPIO.LOW)  
    time.sleep(3)  
    GPIO.output (LED3_PIN,GPIO.LOW)  
    time.sleep(3)  
    #timer.cancel() #stops the tiemr from firing until restarted...  
    BlinkFlag = 0
    GPIO.output (LED2_PIN,GPIO.LOW) #ensure that LED2 is off (just in case)  
    GPIO.output (LED1_PIN,GPIO.LOW)  
    time.sleep(3)


    Not much of a change from alpha .01, but this eliminates the timer from biting you in the *** because it never needs to be canceled.  All that needs to be done when you want to start LED2 blinking, just set BlinkFlag to 1.  When you don't want the LED to blink, set BlinkFlag to 0.  When the timer fires and it runs Led2_Blinker, it first checks to see if BlinkFlag is set to non zero.  If true, toggle the LED.  Other wise just exit and wait for next timer firing.

    • Cancel
    • Vote Up +1 Vote Down
    • Sign in to reply
    • Cancel
  • colporteur
    colporteur over 5 years ago in reply to glennvanderveer

    Thanks V2 for generating some code. After some tweaks to get it running the following.


    No blink on start, reguired a timer.join() to get it back at cancel. Second pass the following error.


    Traceback (most recent call last):

      File "light_sequence.py", line 39, in <module>

        timer.start() #starts the timer so that LED 2 will blink automagically

      File "/usr/lib/python2.7/threading.py", line 730, in start

        raise RuntimeError("threads can only be started once")

    RuntimeError: threads can only be started once

    • Cancel
    • Vote Up 0 Vote Down
    • Sign in to reply
    • Cancel
<>
element14 Community

element14 is the first online community specifically for engineers. Connect with your peers and get expert answers to your questions.

  • Members
  • Learn
  • Technologies
  • Challenges & Projects
  • Products
  • Store
  • About Us
  • Feedback & Support
  • FAQs
  • Terms of Use
  • Privacy Policy
  • Legal and Copyright Notices
  • Sitemap
  • Cookies

An Avnet Company © 2025 Premier Farnell Limited. All Rights Reserved.

Premier Farnell Ltd, registered in England and Wales (no 00876412), registered office: Farnell House, Forge Lane, Leeds LS12 2NE.

ICP 备案号 10220084.

Follow element14

  • X
  • Facebook
  • linkedin
  • YouTube