element14 Community
element14 Community
    Register Log In
  • Site
  • Search
  • Log In Register
  • Community Hub
    Community Hub
    • What's New on element14
    • Feedback and Support
    • Benefits of Membership
    • Personal Blogs
    • Members Area
    • Achievement Levels
  • Learn
    Learn
    • Ask an Expert
    • eBooks
    • element14 presents
    • Learning Center
    • Tech Spotlight
    • STEM Academy
    • Webinars, Training and Events
    • Learning Groups
  • Technologies
    Technologies
    • 3D Printing
    • FPGA
    • Industrial Automation
    • Internet of Things
    • Power & Energy
    • Sensors
    • Technology Groups
  • Challenges & Projects
    Challenges & Projects
    • Design Challenges
    • element14 presents Projects
    • Project14
    • Arduino Projects
    • Raspberry Pi Projects
    • Project Groups
  • Products
    Products
    • Arduino
    • Avnet & Tria Boards Community
    • Dev Tools
    • Manufacturers
    • Multicomp Pro
    • Product Groups
    • Raspberry Pi
    • RoadTests & Reviews
  • About Us
    About the element14 Community
  • Store
    Store
    • Visit Your Store
    • Choose another store...
      • Europe
      •  Austria (German)
      •  Belgium (Dutch, French)
      •  Bulgaria (Bulgarian)
      •  Czech Republic (Czech)
      •  Denmark (Danish)
      •  Estonia (Estonian)
      •  Finland (Finnish)
      •  France (French)
      •  Germany (German)
      •  Hungary (Hungarian)
      •  Ireland
      •  Israel
      •  Italy (Italian)
      •  Latvia (Latvian)
      •  
      •  Lithuania (Lithuanian)
      •  Netherlands (Dutch)
      •  Norway (Norwegian)
      •  Poland (Polish)
      •  Portugal (Portuguese)
      •  Romania (Romanian)
      •  Russia (Russian)
      •  Slovakia (Slovak)
      •  Slovenia (Slovenian)
      •  Spain (Spanish)
      •  Sweden (Swedish)
      •  Switzerland(German, French)
      •  Turkey (Turkish)
      •  United Kingdom
      • Asia Pacific
      •  Australia
      •  China
      •  Hong Kong
      •  India
      •  Japan
      •  Korea (Korean)
      •  Malaysia
      •  New Zealand
      •  Philippines
      •  Singapore
      •  Taiwan
      •  Thailand (Thai)
      •  Vietnam
      • Americas
      •  Brazil (Portuguese)
      •  Canada
      •  Mexico (Spanish)
      •  United States
      Can't find the country/region you're looking for? Visit our export site or find a local distributor.
  • Translate
  • Profile
  • Settings
Raspberry Pi
  • Products
  • More
Raspberry Pi
Raspberry Pi Forum Raspberry Pi and Existing Accenta Gen 4 Alarm
  • Blog
  • Forum
  • Documents
  • Quiz
  • Events
  • Polls
  • Files
  • Members
  • Mentions
  • Sub-Groups
  • Tags
  • More
  • Cancel
  • New
Join Raspberry Pi to participate - click to join for free!
Featured Articles
Announcing Pi
Technical Specifications
Raspberry Pi FAQs
Win a Pi
Raspberry Pi Wishlist
Actions
  • Share
  • More
  • Cancel
Forum Thread Details
  • Replies 39 replies
  • Subscribers 710 subscribers
  • Views 7241 views
  • Users 0 members are here
  • pi
  • raspberry_pi
  • accenta
  • alarm
Related

Raspberry Pi and Existing Accenta Gen 4 Alarm

e14 Contributor
e14 Contributor over 11 years ago

Hi All,


I'd like to connect my existing alarm (HONEYWELL ADE ACCENTA MINI LCD BURGLAR ALARM PANEL: Amazon.co.uk: Kitchen & Home) to my pi, so that I can monitor the alarm remotely.  The panel has a connection for a "dialler" so im thinking of connecting the pi via that.


As well as the status of the alarm, I'd like to make use of the PIRs so that I can integrate them with my home automation. 


Thanks in advanced.

  • Sign in to reply
  • Cancel
Parents
  • shabaz
    shabaz over 11 years ago

    Hi Shyam,


    Just bear in mind the alarm will probably go off when you take the panel off : ) A pain to deal with unless you're ready with the procedure to reset (will be in the manual, and if you remember the codes!).

    • Cancel
    • Vote Up +1 Vote Down
    • Sign in to reply
    • Cancel
  • Problemchild
    Problemchild over 11 years ago in reply to shabaz

    Also if he interfaces to the sensors in such a way that breaks the contact at any point will also set it off.

    Not that he needs to as he should be able to pick up the PIR input from the alarm directly...Probably;y best to use an optoisolator as to give very little chance that anything will come across from one circuit to the other even if misconfigured.

    • Cancel
    • Vote Up +1 Vote Down
    • Sign in to reply
    • Cancel
  • gadget.iom
    gadget.iom over 11 years ago in reply to e14 Contributor

    My apologies, I should've checked stock levels image


    You could buy that kit, though it doesn't include 330Ω resistors. You could substitute for a similar value.

    Farnell do have some 2k2 in stock here: MF25 2K2 - MULTICOMP - RESISTOR, 2.2K, 0.25W, 1% | Farnell element14

    • Cancel
    • Vote Up 0 Vote Down
    • Sign in to reply
    • Cancel
  • e14 Contributor
    e14 Contributor over 11 years ago in reply to gadget.iom

    Thanks Paul

    • Cancel
    • Vote Up 0 Vote Down
    • Sign in to reply
    • Cancel
  • e14 Contributor
    e14 Contributor over 11 years ago in reply to e14 Contributor

    Hi Guys,


    I had a few more questions before I attempted this.


    1. On the breadboard, do i connect the positive to the 13v terminal on the alarm panel?  and nothing to the 0v one?
    2. what pins do i connect the +/- to on the pi?
    3. while looking at the connections on this example : https://raw.githubusercontent.com/sidb/PiAlarm/master/breadboard.png

         2A connects to a GPIO Pin

         3A connects to a - on the breadboard

        4A connects to a + on the breadboard

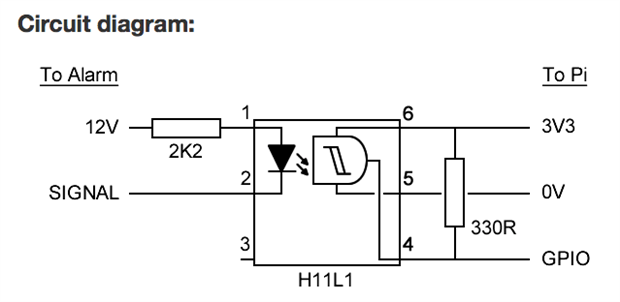
        2C and 4C are linked by a 330R

        J3 connections to a connector on the alarm

        4I is linked to the + from the alarm via a 2k2


       My question is, how comes the connection to the alarm is on J3? and not J2?  Is it because the alarm connection needs to link with the -?


    Could I use a tester to see what the output is on the PI side before connecting the PI to it?


    Thanks

    Shyam

    • Cancel
    • Vote Up 0 Vote Down
    • Sign in to reply
    • Cancel
  • gadget.iom
    gadget.iom over 11 years ago in reply to e14 Contributor

    1) 13V to red wire '+'

    2)  - to GND, + to 3.3v

    3) J2 is connected to pin 3 (an unconnected pin) on the opto-isolator.


    As shown on this diagram from the github page:


    image

    • Cancel
    • Vote Up 0 Vote Down
    • Sign in to reply
    • Cancel
  • gadget.iom
    gadget.iom over 11 years ago in reply to e14 Contributor

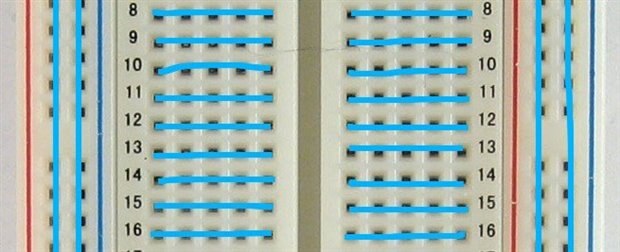
    I'm not sure if you're aware of how the board is wired, it is similar to many plug-in breadboard layouts as indicated in the image below:

    image

    • Cancel
    • Vote Up 0 Vote Down
    • Sign in to reply
    • Cancel
  • e14 Contributor
    e14 Contributor over 11 years ago in reply to gadget.iom

    Thanks gadget.iom 


    I took your earlier advise and rotated the breadboard image and compared it to the diagram...it all makes sense now!!

    • Cancel
    • Vote Up 0 Vote Down
    • Sign in to reply
    • Cancel
  • gadget.iom
    gadget.iom over 11 years ago in reply to e14 Contributor

    Good to know image

    It had me guessing for a few minutes.

    • Cancel
    • Vote Up 0 Vote Down
    • Sign in to reply
    • Cancel
  • e14 Contributor
    e14 Contributor over 11 years ago in reply to gadget.iom

    Could I use a voltage meter on the PI side to check the voltage before connecting it to the PI?  If so, I assume the positive end of the meter would be placed where the 3v3 is, and the negative on the GPIO....  What would I connect in place of the 0v?

    • Cancel
    • Vote Up 0 Vote Down
    • Sign in to reply
    • Cancel
  • e14 Contributor
    e14 Contributor over 11 years ago in reply to e14 Contributor

    Scrap the above question...I got my answer from here: https://learn.sparkfun.com/tutorials/how-to-use-a-multimeter

    • Cancel
    • Vote Up 0 Vote Down
    • Sign in to reply
    • Cancel
  • Robert Peter Oakes
    Robert Peter Oakes over 11 years ago in reply to e14 Contributor

    Positive of the meter on the GPIO pin, Negative end of the meter on the 0V


    That’s it for the output, if you want to measure the 3V3 output then the positive of the meter would go to the 3V3 pin but the negative of the meter still goes to 0V pin


    Hope this helps


    Peter

    • Cancel
    • Vote Up 0 Vote Down
    • Sign in to reply
    • Cancel
Reply
  • Robert Peter Oakes
    Robert Peter Oakes over 11 years ago in reply to e14 Contributor

    Positive of the meter on the GPIO pin, Negative end of the meter on the 0V


    That’s it for the output, if you want to measure the 3V3 output then the positive of the meter would go to the 3V3 pin but the negative of the meter still goes to 0V pin


    Hope this helps


    Peter

    • Cancel
    • Vote Up 0 Vote Down
    • Sign in to reply
    • Cancel
Children
  • e14 Contributor
    e14 Contributor over 11 years ago in reply to Robert Peter Oakes

    Hi Guys,


    I've ran in to an issue, so I've connected the above exactly the way you guys helped, but cannot get the GPIO pins to work..... 

    I'm running Raspbmc on my PI and installed wiringPi and the Raspberry Pi Model B+ | Wiring Pi .  This installed successfully and I'm able to set the Pins to in or out, but everytime I read the pin I get 0.  Everytime I try to write 1 to a pin, then do a read I still get 0.


    WiringPi has a built in test for the GPIO pins, that says all the pins failed....


    Is there something that I'm missing? I've tried with the root user and the PI user, I've also tried RPi.GPIO and the python script on the above link, still no luck image

    • Cancel
    • Vote Up 0 Vote Down
    • Sign in to reply
    • Cancel
  • LenReinhart
    LenReinhart over 11 years ago in reply to e14 Contributor

    I skimmed through the posts and don't see where you mention which pi you have. If it is the RPi2 the base address is shifted. I would work on getting the pins working with some known good circuits, simple resistor pull up and pull downs, before attempting to hook it up to the alarm. I would use something like a 10k to ground for the pull down and a 10k to 3.3 for the pull up, not at the same time.

    • Cancel
    • Vote Up 0 Vote Down
    • Sign in to reply
    • Cancel
  • e14 Contributor
    e14 Contributor over 11 years ago in reply to LenReinhart

    Thanks LenReinhart, I've got a b+.  I tried to hook it up to a simple led circuit, but that didnt work either.  If I connected the LED to ground and 3.3 pin the light lit up, when i connected it to the ground and another pin and tried to assign a value of true or one to the pin, it didnt light up

    • Cancel
    • Vote Up 0 Vote Down
    • Sign in to reply
    • Cancel
  • LenReinhart
    LenReinhart over 11 years ago in reply to e14 Contributor

    The Led will draw too much current from the pi, there needs to be a resistor connected to one leg of the led, something like a 4.7k, but I use 10k for a not so bright one. Do you know about the MagPi magazine? It is free and some of the back issues will take you step by step through what you need to do to use the I/O pins. The web site is: http://www.themagpi.com/


    Once you are ready to try again, I would use some pins you haven't used before.

    • Cancel
    • Vote Up 0 Vote Down
    • Sign in to reply
    • Cancel
  • e14 Contributor
    e14 Contributor over 11 years ago in reply to LenReinhart

    I used a 3k3 resistor, as thats the only one i had to hand.  I'll check out the magazine. image

    • Cancel
    • Vote Up 0 Vote Down
    • Sign in to reply
    • Cancel
  • LenReinhart
    LenReinhart over 11 years ago in reply to e14 Contributor

    Do you know about the V=IR formula? It is a way to calculate the relationship between voltage (V), current (I) and resistance (R). In this case it would be 3.3Volts = I X 3000 ohms or 3.3/3000 or 0.0011 amps or 1.1milliamps. So assuming I got the decimal in the right place it says your resistor should be ok. If I remember correctly the RPi can source over that ok. When too big a load is put on a pin it will try to source more current that it is capable of doing. The pins can sink current better so often an Led will be connected to 3.3 volts on one side and to one side of a resister with the other side of the resistor connected to the pin. Then to turn on the Led the pin is taken to 0 instead of 1.

    • Cancel
    • Vote Up +1 Vote Down
    • Sign in to reply
    • Cancel
  • e14 Contributor
    e14 Contributor over 11 years ago in reply to LenReinhart

    I wasn't aware of that formula, but it does make sense now image


    I just measured the volts on each of the pins using a multimeter and only one pin (GPIO.26) measures up to 3.3v, but the WiringPI read is saying 0 for that pin....

    • Cancel
    • Vote Up 0 Vote Down
    • Sign in to reply
    • Cancel
  • rew
    rew over 11 years ago in reply to e14 Contributor

    There must be something going on like "you're using the wrong pin numbering". Wiring pi has two ways of specifying pin numbers. Double check you're using the right one.


    That V=I*R formula holds for resistors. To calculate the current through your led+resistor, you need to take the voltage for the led into account So it becomes: I = (3.3 - Vled)/R = (3.3-1.8) / 3k = 0.5mA. That said: I usually use a 1k resistor, about 3 times more current and that's nicely visible, not too bright, not too weak.


    The "sink better" is something "from the past". With CMOS that is no longer a real issue. There is a small difference, but especially for a led, that can be ignored. If you tie your led between 3.3V and the pin, your software will need to write a 0 to turn it on and a 1 to turn it off. That  costs brain-power, so it is better to just wire the led between the pin and GND.


    Wiringpi comes with a program called "GPIO". Start with "gpio readall". It prints a nice overview. Now, look up on File:RPi P1 header.png - eLinux.org where you expect phys pin 11 and 12. Run "gpio mode 0 out ; gpio mode 1  out". Now pins 11 and 12 of the connector should be outputs. Next gpio write 0 1; gpio write 1 1 will set them both high.


    I'm telling you to try two pins at once, just because you might mess up and get the one next to it. Now you should be able to see something change on the connector. while true ; do  gpio toggle 0;sleep 1 ; done is then a little program that will blink the pin (good for with the multimeter or with a led!).

    • Cancel
    • Vote Up 0 Vote Down
    • Sign in to reply
    • Cancel
  • royleith
    royleith over 11 years ago in reply to e14 Contributor

    I think I can see what's wrong, here. Measuring the GPIO pin voltages shows what the Raspi is writing to that pin (assuming it is configurable as an input/output pin). If you then ask the Raspi to read what's on that same pin, it will stop writing a voltage and start reading whatever voltage is coming from the outside world.


    There is a danger of blowing up the Raspi because if you are shorting out one of the pins to 0v (say, emulating a switch) when you ask the Raspi to write 3.3V then there is nothing to stop the Raspi writing excessively high currents. Leonard pointed out Ohm's Law of Volts equal Amps times resistance and if there is minimal resistance then Amps goes very high (in theory). Just to be safe, I suggest that you use your 3k3 resistor in series with any push-buttons used between pin and 0v to see if that will work more safely than a full short circuit.


    Have a look at these two official Raspberry Pi.org website pages which ignore my advice! However, it shows you how to use Python to read the input push-buttons and light (write to the connected pin)  a LED. There is an internal Raspi resistance that pulls up the voltage to 3.3v when reading and the push-buttons pull the pin voltage back down to 0V when operated. Using Python means that it will work safely on any Raspberry Pi model and also gives you an excellent way of writing your alarm program.


    Here's the principle,


    Raspberry Pi Documentation


    Here's a reaction time program written in Python which reads the two push-buttons and writes to a LED.


    Worksheet - Quick Reaction Game | Raspberry Pi Learning Resources


    They suggest a 270 Ohm or 330 Ohm resistor in series with the LED. In my experience, your 3k3 resistor will be too high for the LED to light up.

    • Cancel
    • Vote Up 0 Vote Down
    • Sign in to reply
    • Cancel
  • e14 Contributor
    e14 Contributor over 11 years ago in reply to royleith

    Thanks for the replies!


    The thing I don't really understand is that with the software I'm not able to set the pin to 1 (using gpio mode 0 out then gpio write 0 1), I can see that i'm using the correct pin as i can see it being toggled between IN and OUT(via "gpio readall").  So it seems its either a config/setup issue or something wrong with the PI as when I run the PinTest it shows all pins failed (expected 1 got 0 error).

    • Cancel
    • Vote Up 0 Vote Down
    • Sign in to reply
    • Cancel
element14 Community

element14 is the first online community specifically for engineers. Connect with your peers and get expert answers to your questions.

  • Members
  • Learn
  • Technologies
  • Challenges & Projects
  • Products
  • Store
  • About Us
  • Feedback & Support
  • FAQs
  • Terms of Use
  • Privacy Policy
  • Legal and Copyright Notices
  • Sitemap
  • Cookies

An Avnet Company © 2026 Premier Farnell Limited. All Rights Reserved.

Premier Farnell Ltd, registered in England and Wales (no 00876412), registered office: Farnell House, Forge Lane, Leeds LS12 2NE.

Follow element14

  • X
  • Facebook
  • linkedin
  • YouTube