element14 Community
element14 Community
    Register Log In
  • Site
  • Search
  • Log In Register
  • Community Hub
    Community Hub
    • What's New on element14
    • Feedback and Support
    • Benefits of Membership
    • Personal Blogs
    • Members Area
    • Achievement Levels
  • Learn
    Learn
    • Ask an Expert
    • eBooks
    • element14 presents
    • Learning Center
    • Tech Spotlight
    • STEM Academy
    • Webinars, Training and Events
    • Learning Groups
  • Technologies
    Technologies
    • 3D Printing
    • FPGA
    • Industrial Automation
    • Internet of Things
    • Power & Energy
    • Sensors
    • Technology Groups
  • Challenges & Projects
    Challenges & Projects
    • Design Challenges
    • element14 presents Projects
    • Project14
    • Arduino Projects
    • Raspberry Pi Projects
    • Project Groups
  • Products
    Products
    • Arduino
    • Avnet Boards Community
    • Dev Tools
    • Manufacturers
    • Multicomp Pro
    • Product Groups
    • Raspberry Pi
    • RoadTests & Reviews
  • Store
    Store
    • Visit Your Store
    • Choose another store...
      • Europe
      •  Austria (German)
      •  Belgium (Dutch, French)
      •  Bulgaria (Bulgarian)
      •  Czech Republic (Czech)
      •  Denmark (Danish)
      •  Estonia (Estonian)
      •  Finland (Finnish)
      •  France (French)
      •  Germany (German)
      •  Hungary (Hungarian)
      •  Ireland
      •  Israel
      •  Italy (Italian)
      •  Latvia (Latvian)
      •  
      •  Lithuania (Lithuanian)
      •  Netherlands (Dutch)
      •  Norway (Norwegian)
      •  Poland (Polish)
      •  Portugal (Portuguese)
      •  Romania (Romanian)
      •  Russia (Russian)
      •  Slovakia (Slovak)
      •  Slovenia (Slovenian)
      •  Spain (Spanish)
      •  Sweden (Swedish)
      •  Switzerland(German, French)
      •  Turkey (Turkish)
      •  United Kingdom
      • Asia Pacific
      •  Australia
      •  China
      •  Hong Kong
      •  India
      •  Korea (Korean)
      •  Malaysia
      •  New Zealand
      •  Philippines
      •  Singapore
      •  Taiwan
      •  Thailand (Thai)
      • Americas
      •  Brazil (Portuguese)
      •  Canada
      •  Mexico (Spanish)
      •  United States
      Can't find the country/region you're looking for? Visit our export site or find a local distributor.
  • Translate
  • Profile
  • Settings
Raspberry Pi
  • Products
  • More
Raspberry Pi
Raspberry Pi Forum First experience with a Raspberry Pico - Setup toolchain, IDE, debug and FreeRTOS
  • Blog
  • Forum
  • Documents
  • Quiz
  • Events
  • Polls
  • Files
  • Members
  • Mentions
  • Sub-Groups
  • Tags
  • More
  • Cancel
  • New
Raspberry Pi requires membership for participation - click to join
Featured Articles
Announcing Pi
Technical Specifications
Raspberry Pi FAQs
Win a Pi
Raspberry Pi Wishlist
Actions
  • Share
  • More
  • Cancel
Forum Thread Details
  • Replies 21 replies
  • Subscribers 661 subscribers
  • Views 12177 views
  • Users 0 members are here
  • raspberry
  • pico_freertos_smp
  • pico
  • freertos
Related

First experience with a Raspberry Pico - Setup toolchain, IDE, debug and FreeRTOS

Jan Cumps
Jan Cumps over 2 years ago

I got a set of Raspberry Pico boards. This weekend I've worked on getting a C++ development environment set up, IDE (VSCode) and debugger working, and FreeRTOS running.

image

I'm using a Windows 11 laptop.

First activity was to get the toolchain running. I used the Getting Started guide.
To install, I used this automated install. The only thing I would do different than the automated version, is the openOCD build. I believe that the option in Fred27's blog is easier.

When I got the overall toolchain working, I continued with the next part: debug

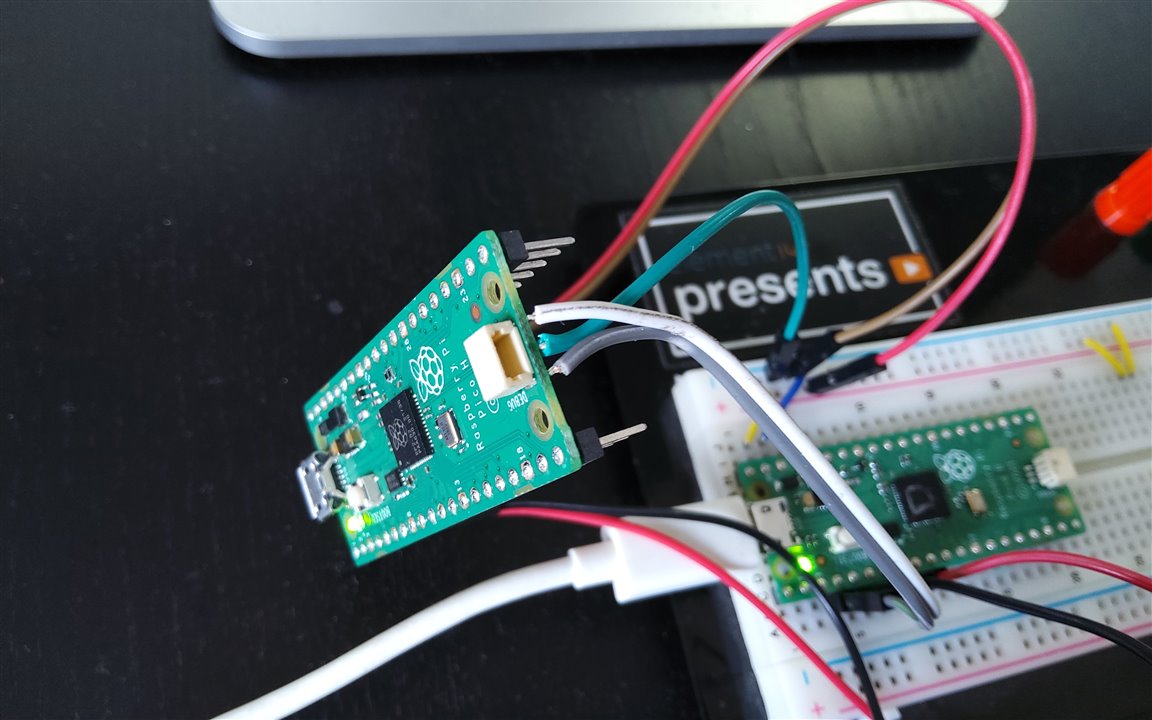
You can use a second Pico as debug probe. Fred27's blog is again invaluable.

image

As soon as I was comfortable with that - being able to build SDK examples, run and debug them, I started the last part of the path: FreeRTOS.

The Pico has dual cores, and it's one of the Genoa pigs for the new FreeRTOS  Symmetric Multiprocessing (SMP) project. 

I downloaded it, added to VSCode, built, and started the first debug session - on a single core FreeRTOS example. That's where this weekend stops:

image

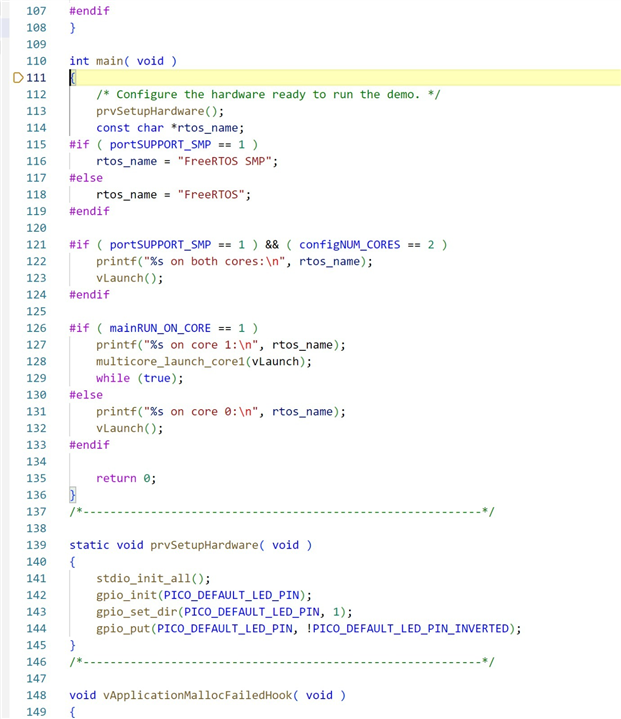
The future steps will deserve a real blog. How to run RTOS on core A or B. And to interact with the other core in the meantime.

Show All Blog Posts

  • Sign in to reply
  • Cancel
  • shabaz
    shabaz over 2 years ago

    Hi Jan,

    Looking forward to the blog! It will be great to get up-to-speed with FreeRTOS on Pico.

    Also, great to see that the PicoProbe worked well. It's encouraged me to try it again (I only had limited results when I tried it with the particular IDE I was using at the time).

    • Cancel
    • Vote Up +4 Vote Down
    • Sign in to reply
    • Cancel
  • scottiebabe
    scottiebabe over 2 years ago

    After discovering the Arduino framework for the pico doesn't use the hardware divider or the optimized floating point library, this is now on my to do list. A bare pico-sdk installation on windows. Thanks for posting, I will eagerly follow along!

    Thanks for posting!  

    • Cancel
    • Vote Up +3 Vote Down
    • Sign in to reply
    • Cancel
  • BigG
    BigG over 2 years ago in reply to scottiebabe

    Oooh hardware divider. I had to search online to learn more about that. Very interesting. I had a quick look on my computer and I found the relevant files. So if you're using the Arduino mbed_rp2040 board manager files then divider.h is included in the ./TARGET_RASPBERRYPI/TARGET_RP2040/pico-sdk/common/pico_divider/include/pico folder.

    Similarly the pico sdk float.h header file can be found ./TARGET_RP2040/pico-sdk/rp2_common/pico_float/include/pico folder.

    Likewise, if using the earlephilhower/arduino-pico package, both files are included.

    What I like about the Arduino IDE, especially with Earle Philhower's package as it includes WiFi, is that you can use the Pico SDK directly inside the IDE as if you are coding in Visual Studio Code, for example. This makes flashing your firmware easier as it can be done via USB, and you also avoid having to manually set up the toolchain beforehand. The only downside is lack of debugging, but the release of the Arduino 2.0 IDE may change all that... haven't checked.

    • Cancel
    • Vote Up +3 Vote Down
    • Sign in to reply
    • Cancel
  • Andrew J
    Andrew J over 2 years ago

    These types of blogs are really useful for those of us with very little embedded experience.  Looking forward to further posts.

    • Cancel
    • Vote Up +1 Vote Down
    • Sign in to reply
    • Cancel
  • Jan Cumps
    Jan Cumps over 2 years ago in reply to BigG

    great!

    one remark:

    BigG said:
    This makes flashing your firmware easier as it can be done via USB, and you also avoid having to manually set up the toolchain beforehand.

    #1 works in VS Code too. I'm flashing the examples from within the IDE over USB.

    #2 there is a windows installer made for it, includes toolchain, SDK, examples, probe, VSCode, extensions, git, zadig and openOCD (although I prefer the Fred27 approach for that).. 

    • Cancel
    • Vote Up 0 Vote Down
    • Sign in to reply
    • Cancel
  • BigG
    BigG over 2 years ago in reply to Jan Cumps
    Jan Cumps said:
    #1 works in VS Code too. I'm flashing the examples from within the IDE over USB.

    Wow! Did not know that. Will this work in Eclipse too as looking into using this (I'm not a fan of VS Code due to too much automation by default).

    • Cancel
    • Vote Up 0 Vote Down
    • Sign in to reply
    • Cancel
  • Jan Cumps
    Jan Cumps over 2 years ago in reply to BigG

    I expect it will. There's a howto for Eclipse in the Getting Started. And I have not seen anything in my setup that would prohibit typical Eclipse use.

    I usually work in Eclipse. I chose VSCode this time, just to learn and get better at it. 

    • Cancel
    • Vote Up +1 Vote Down
    • Sign in to reply
    • Cancel
  • scottiebabe
    scottiebabe over 2 years ago in reply to BigG

    Don't get me wrong, I am indebted to all the great hard work Arduino has done. If I knew more about gcc and linker scripts of the top of my head I probably could get it to work. Though platformio add another layer of mystery. Just including the header file wasn't enough for me with platformio, perhaps the ardunio IDE does link to the floating point rom routines.

    All of my floating point operations get performed by gcc aeabi library:

    image

    • Cancel
    • Vote Up 0 Vote Down
    • Sign in to reply
    • Cancel
  • BigG
    BigG over 2 years ago in reply to scottiebabe

    Ah ok, I hadn't quite considered that issue. I have not tested but I suspect you would need to amend the linker_script.ld file to change things, and probably a few other files found in the same location.

    This is found in the core Arduino folder: .arduino15/packages/arduino/hardware/mbed_rp2040/3.3.0/variants/RASPBERRY_PI_PICO

    • Cancel
    • Vote Up +1 Vote Down
    • Sign in to reply
    • Cancel
  • scottiebabe
    scottiebabe over 2 years ago in reply to BigG

    Thanks for the advise. Once I get it working with the bare SDK I can see what magic is required to make it happen. Then I can try to add that to my platformio.ini Some more details are here: /challenges-projects/design-challenges/experimenting-with-thermistors/f/forum/51736/thermistor-fixed-point-math 

    • Cancel
    • Vote Up 0 Vote Down
    • Sign in to reply
    • Cancel
>
element14 Community

element14 is the first online community specifically for engineers. Connect with your peers and get expert answers to your questions.

  • Members
  • Learn
  • Technologies
  • Challenges & Projects
  • Products
  • Store
  • About Us
  • Feedback & Support
  • FAQs
  • Terms of Use
  • Privacy Policy
  • Legal and Copyright Notices
  • Sitemap
  • Cookies

An Avnet Company © 2025 Premier Farnell Limited. All Rights Reserved.

Premier Farnell Ltd, registered in England and Wales (no 00876412), registered office: Farnell House, Forge Lane, Leeds LS12 2NE.

ICP 备案号 10220084.

Follow element14

  • X
  • Facebook
  • linkedin
  • YouTube