element14 Community
element14 Community
    Register Log In
  • Site
  • Search
  • Log In Register
  • About Us
  • Community Hub
    Community Hub
    • What's New on element14
    • Feedback and Support
    • Benefits of Membership
    • Personal Blogs
    • Members Area
    • Achievement Levels
  • Learn
    Learn
    • Ask an Expert
    • eBooks
    • element14 presents
    • Learning Center
    • Tech Spotlight
    • STEM Academy
    • Webinars, Training and Events
    • Learning Groups
  • Technologies
    Technologies
    • 3D Printing
    • FPGA
    • Industrial Automation
    • Internet of Things
    • Power & Energy
    • Sensors
    • Technology Groups
  • Challenges & Projects
    Challenges & Projects
    • Design Challenges
    • element14 presents Projects
    • Project14
    • Arduino Projects
    • Raspberry Pi Projects
    • Project Groups
  • Products
    Products
    • Arduino
    • Avnet Boards Community
    • Dev Tools
    • Manufacturers
    • Multicomp Pro
    • Product Groups
    • Raspberry Pi
    • RoadTests & Reviews
  • Store
    Store
    • Visit Your Store
    • Choose another store...
      • Europe
      •  Austria (German)
      •  Belgium (Dutch, French)
      •  Bulgaria (Bulgarian)
      •  Czech Republic (Czech)
      •  Denmark (Danish)
      •  Estonia (Estonian)
      •  Finland (Finnish)
      •  France (French)
      •  Germany (German)
      •  Hungary (Hungarian)
      •  Ireland
      •  Israel
      •  Italy (Italian)
      •  Latvia (Latvian)
      •  
      •  Lithuania (Lithuanian)
      •  Netherlands (Dutch)
      •  Norway (Norwegian)
      •  Poland (Polish)
      •  Portugal (Portuguese)
      •  Romania (Romanian)
      •  Russia (Russian)
      •  Slovakia (Slovak)
      •  Slovenia (Slovenian)
      •  Spain (Spanish)
      •  Sweden (Swedish)
      •  Switzerland(German, French)
      •  Turkey (Turkish)
      •  United Kingdom
      • Asia Pacific
      •  Australia
      •  China
      •  Hong Kong
      •  India
      •  Korea (Korean)
      •  Malaysia
      •  New Zealand
      •  Philippines
      •  Singapore
      •  Taiwan
      •  Thailand (Thai)
      • Americas
      •  Brazil (Portuguese)
      •  Canada
      •  Mexico (Spanish)
      •  United States
      Can't find the country/region you're looking for? Visit our export site or find a local distributor.
  • Translate
  • Profile
  • Settings
Raspberry Pi
  • Products
  • More
Raspberry Pi
Raspberry Pi Forum solved - Pico C/C++ SDK: have you tried setting the UART baud?
  • Blog
  • Forum
  • Documents
  • Quiz
  • Events
  • Polls
  • Files
  • Members
  • Mentions
  • Sub-Groups
  • Tags
  • More
  • Cancel
  • New
Join Raspberry Pi to participate - click to join for free!
Featured Articles
Announcing Pi
Technical Specifications
Raspberry Pi FAQs
Win a Pi
Raspberry Pi Wishlist
Actions
  • Share
  • More
  • Cancel
Forum Thread Details
  • State Not Answered
  • Replies 7 replies
  • Subscribers 656 subscribers
  • Views 2466 views
  • Users 0 members are here
  • raspberry
  • pico
  • sdk
Related

solved - Pico C/C++ SDK: have you tried setting the UART baud?

Jan Cumps
Jan Cumps over 1 year ago

I tried the last Pico SDK, and tried to make it run the blinky (hello world" example.

In that example, the speed is set to 9600 baud. But it seems to spanw 115.200 nonetheless, over the UART pins. I created the project with the new VSCode plugin.

Build file (generated by the plugin):

# Generated Cmake Pico project file

cmake_minimum_required(VERSION 3.13)

set(CMAKE_C_STANDARD 11)
set(CMAKE_CXX_STANDARD 17)
set(CMAKE_EXPORT_COMPILE_COMMANDS ON)

# Initialise pico_sdk from installed location
# (note this can come from environment, CMake cache etc)

# == DO NEVER EDIT THE NEXT LINES for Raspberry Pi Pico VS Code Extension to work ==
if(WIN32)
    set(USERHOME $ENV{USERPROFILE})
else()
    set(USERHOME $ENV{HOME})
endif()
set(sdkVersion 2.0.0)
set(toolchainVersion 13_2_Rel1)
set(picotoolVersion 2.0.0)
include(${USERHOME}/.pico-sdk/cmake/pico-vscode.cmake)
# ====================================================================================
set(PICO_BOARD pico CACHE STRING "Board type")

# Pull in Raspberry Pi Pico SDK (must be before project)
include(pico_sdk_import.cmake)

project(blinky C CXX ASM)

# Initialise the Raspberry Pi Pico SDK
pico_sdk_init()

# Add executable. Default name is the project name, version 0.1

add_executable(blinky blinky.c )

pico_set_program_name(blinky "blinky")
pico_set_program_version(blinky "0.1")

# Modify the below lines to enable/disable output over UART/USB
pico_enable_stdio_uart(blinky 1)
pico_enable_stdio_usb(blinky 0)

# Add the standard library to the build
target_link_libraries(blinky
        pico_stdlib)

# Add the standard include files to the build
target_include_directories(blinky PRIVATE
  ${CMAKE_CURRENT_LIST_DIR}
  ${CMAKE_CURRENT_LIST_DIR}/.. # for our common lwipopts or any other standard includes, if required
)

pico_add_extra_outputs(blinky)

Source file (also generated by the plugin):

#include <stdio.h>
#include "pico/stdlib.h"
#include "hardware/uart.h"
#include "hardware/gpio.h"
#include "hardware/divider.h"

// UART defines
// By default the stdout UART is `uart0`, so we will use the second one
#define UART_ID uart1
#define BAUD_RATE 9600

// Use pins 4 and 5 for UART1
// Pins can be changed, see the GPIO function select table in the datasheet for information on GPIO assignments
#define UART_TX_PIN 4
#define UART_RX_PIN 5

// GPIO defines
// Example uses GPIO 2
#define GPIO 2


int main()
{
    stdio_init_all();

    // Set up our UART
    uart_init(UART_ID, BAUD_RATE);
    // Set the TX and RX pins by using the function select on the GPIO
    // Set datasheet for more information on function select
    gpio_set_function(UART_TX_PIN, GPIO_FUNC_UART);
    gpio_set_function(UART_RX_PIN, GPIO_FUNC_UART);
    // For more examples of UART use see https://github.com/raspberrypi/pico-examples/tree/master/uart

    // GPIO initialisation.
    // We will make this GPIO an input, and pull it up by default
    gpio_init(GPIO);
    gpio_set_dir(GPIO, GPIO_IN);
    gpio_pull_up(GPIO);
    // See https://github.com/raspberrypi/pico-examples/tree/master/gpio for other gpio examples, including using interrupts

    // Example of using the HW divider. The pico_divider library provides a more user friendly set of APIs 
    // over the divider (and support for 64 bit divides), and of course by default regular C language integer
    // divisions are redirected thru that library, meaning you can just use C level `/` and `%` operators and
    // gain the benefits of the fast hardware divider.
    int32_t dividend = 123456;
    int32_t divisor = -321;
    // This is the recommended signed fast divider for general use.
    divmod_result_t result = hw_divider_divmod_s32(dividend, divisor);
    printf("%d/%d = %d remainder %d\n", dividend, divisor, to_quotient_s32(result), to_remainder_s32(result));
    // This is the recommended unsigned fast divider for general use.
    int32_t udividend = 123456;
    int32_t udivisor = 321;
    divmod_result_t uresult = hw_divider_divmod_u32(udividend, udivisor);
    printf("%d/%d = %d remainder %d\n", udividend, udivisor, to_quotient_u32(uresult), to_remainder_u32(uresult));
    // See https://github.com/raspberrypi/pico-examples/tree/master/divider for more complex use

    while (true) {
        printf("Hello, world!\n");
        sleep_ms(1000);
    }
}

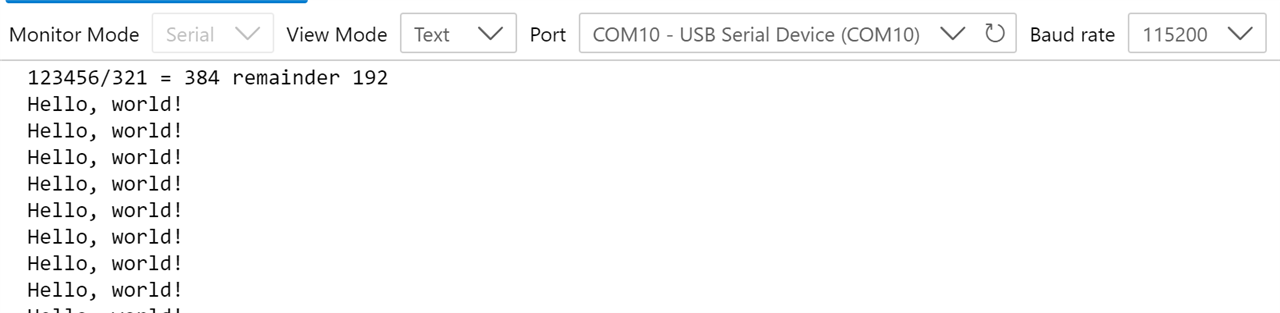
If I use a TTL-to-USB bridge, it generates garble at 9600, readable data at 115200...

115200 baud:

image

9600 baud:

image

I'm using a Pico RP2040, SDK 2.0.0, GCC 13.2.1

  • Sign in to reply
  • Cancel
Parents
  • Jan Cumps
    0 Jan Cumps over 1 year ago

    solved.

    the example code is using UART1,  gpio 4 and 5, while my TTL-UART bridge was connected to gpio 0 and 1.

    If I change the code to UART0, pin 0 and 1, it works.

    (not sure though, why I did get data - at 115200 - on pin 0 ....)

    • Cancel
    • Vote Up +1 Vote Down
    • Sign in to reply
    • Verify Answer
    • Cancel
  • shabaz
    0 shabaz over 1 year ago in reply to Jan Cumps

    Wow, interesting. That seems like undocumented behavior! It is a bit annoying having to select the UART name. I suppose one could write a function that takes a GPIO number and returns the UART name. But that should be in the Pico SDK as a nice helper function to reduce the chance of such errors.

    • Cancel
    • Vote Up 0 Vote Down
    • Sign in to reply
    • Verify Answer
    • Cancel
  • Jan Cumps
    0 Jan Cumps over 1 year ago in reply to shabaz

    It's not a SDK bug. If I connect the right pins, they works as expected, at the expected speed.

    Still, strange that GPIO0 (related to UART0) behaves as it does, when printf is configured to use UART1 ....

    • Cancel
    • Vote Up 0 Vote Down
    • Sign in to reply
    • Verify Answer
    • Cancel
  • Jan Cumps
    0 Jan Cumps over 1 year ago in reply to shabaz

    I raised https://github.com/raspberrypi/pico-sdk/issues/1896 : stdio: when using UART1 with GPIO4 and 5, printf also sends data to GPIO0

    • Cancel
    • Vote Up +2 Vote Down
    • Sign in to reply
    • Verify Answer
    • Cancel
Reply
  • Jan Cumps
    0 Jan Cumps over 1 year ago in reply to shabaz

    I raised https://github.com/raspberrypi/pico-sdk/issues/1896 : stdio: when using UART1 with GPIO4 and 5, printf also sends data to GPIO0

    • Cancel
    • Vote Up +2 Vote Down
    • Sign in to reply
    • Verify Answer
    • Cancel
Children
No Data
element14 Community

element14 is the first online community specifically for engineers. Connect with your peers and get expert answers to your questions.

  • Members
  • Learn
  • Technologies
  • Challenges & Projects
  • Products
  • Store
  • About Us
  • Feedback & Support
  • FAQs
  • Terms of Use
  • Privacy Policy
  • Legal and Copyright Notices
  • Sitemap
  • Cookies

An Avnet Company © 2025 Premier Farnell Limited. All Rights Reserved.

Premier Farnell Ltd, registered in England and Wales (no 00876412), registered office: Farnell House, Forge Lane, Leeds LS12 2NE.

ICP 备案号 10220084.

Follow element14

  • X
  • Facebook
  • linkedin
  • YouTube