


With this benchmark I want to show you how the different versions of the Raspberry Pi perform with deep neural networks and how much power they consume. I am runing the network with OpenCV. The tested Raspberry Pi models are Raspberry Pi 2, Raspberry Pi 3 and Raspberry Pi 3 Model B+.
OpenCV installation
Reasonable support for neural networks in OpenCV began with version 3.3.0. Unfortunately the latest OpenCV version in the Raspbian repositories is 2.4.9.1. So you have to install it manually and compile it from the sources. You can find a good installation guide here: https://www.pyimagesearch.com/2016/04/18/install-guide-raspberry-pi-3-raspbian-jessie-opencv-3/
You can leave out the python stuff since we don't need it here. I installed the latest OpenCV version which is now 3.4.1. On my Raspberry Pi 3 Model B+ I encountered a lot of problems when I used all 4 cores for compiling. So I had to compile it using only a single core. Thus it took about 5 hours to compile.
Running deep neural networks
There exist different framworks for neural networks but most of them are supported by OpenCV. I am using the caffe framework because there already exists a nice example in the OpenCV documentation: https://docs.opencv.org/3.4.0/d5/de7/tutorial_dnn_googlenet.html
It uses the pre trainend GoogLeNet for image classification. You can find information on the network on this website: Caffe | Model Zoo So, no training is necessary, just download the network and let it run. Furthermore training deep neural networks on the Raspberry Pi is no fun because you need way more computing power to do this in reasonable time.
I adjusted the example a little bit since using the same image like thousands have done before is a little bit lame. I will use images from the Raspberry Pi camera and find out what the network sees in them. This is a little bit more realistic because there are a lot of use cases for this in, for example, robotics where small computers with real time capabilities like the Raspberry Pi are needed at the edge.
Here is my code:
#include <iostream>
#include <string>
#include <opencv2/dnn.hpp>
#include <opencv2/core/utils/trace.hpp>
#include <opencv2/opencv.hpp>
#include <thread>


// global variables for exchange between threads
cv::VideoCapture cap;    // create camera input
cv::Mat cameraImage;  // create opencv mat for camera

void cameraThread(void)    // function for the camera thread
{
    while(1)    // loop forever
    {
        cap >> cameraImage;    // copy camera input to opencv mat
    }
}

/* Find best class for the blob (i. e. class with maximal probability) */
static void getMaxClass(const cv::Mat &probBlob, int *classId, double *classProb)
{
    cv::Mat probMat = probBlob.reshape(1, 1); //reshape the blob to 1x1000 matrix
    cv::Point classNumber;
    minMaxLoc(probMat, NULL, classProb, NULL, &classNumber);
    *classId = classNumber.x;
}
static std::vector readClassNames(const char *filename = "synset_words.txt")
{
    std::vector classNames;
    std::ifstream fp(filename);
    if (!fp.is_open())
    {
        std::cerr << "File with classes labels not found: " << filename << std::endl;
        exit(-1);
    }
    std::string name;
    while (!fp.eof())
    {
        std::getline(fp, name);
        if (name.length())
            classNames.push_back( name.substr(name.find(' ')+1) );
    }
    fp.close();
    return classNames;
}

int main( int argc, char** argv )
{
    int ende=0;
    std::thread tcam;    // create thread pointer

    std::cout << "OpenCV version : " << CV_VERSION << std::endl;    // print opencv version for debug

    std::string model = "bvlc_googlenet.caffemodel";    // define filenames for neural network
    std::string proto = "bvlc_googlenet.prototxt";

    cv::dnn::Net net = cv::dnn::readNetFromCaffe(proto, model); // open net

    if (net.empty())
    {
        std::cerr << "Can't load network by using the following files: " << std::endl;
        std::cerr << "proto: " << proto << std::endl;
        std::cerr << "model: " << model << std::endl;
        return -1;
    }

    cap.open(0);        // open camera
    if(!cap.isOpened())
    {
        std::cout << "no camera found!" << std::endl;
        return -1;
    }
    cap >> cameraImage;    // copy camera input to opencv mat to get data to startup
    tcam=std::thread(cameraThread);    // start extra thread to get camera input
    std::cout << "starting ..." << std::endl;

    while(ende==0)
    {
//GoogLeNet accepts only 224x224 BGR-images
        cv::Mat image;
        cameraImage.copyTo(image);    // copy camera image to have local copy for modifications
        cv::Mat inputBlob = cv::dnn::blobFromImage(image, 1.0f, cv::Size(224, 224),cv::Scalar(104, 117, 123), false);   //Convert Mat to batch of images

        cv::TickMeter t;
        net.setInput(inputBlob, "data"); //set the network input
        t.start();  // start timer
        cv::Mat prob=net.forward("prob");    // computer output
        t.stop();  // stop timer

        int classId;
        double classProb;
        getMaxClass(prob, &classId, &classProb);//find the best class
        std::vector classNames = readClassNames();
        std::cout << "Best class: #" << classId << " '" << classNames.at(classId) << "'" << std::endl;    // print best class
        std::cout << "Probability: " << classProb * 100 << "%" << std::endl;    // print propability
        std::ostringstream buf;
        buf << "Best class: #" << classId << " '" << classNames.at(classId) << "' - ";
        buf << "Probability: " << classProb * 100 << "%";
        cv::putText(image,buf.str(),cv::Point2f(10,20),0,0.5,cv::Scalar(255,255,255),1,1);  // print buf to image

        std::cout << "Time: " << (double)t.getTimeMilli() / t.getCounter() << " ms" << std::endl;  // print result of timer


        cv::imshow("image",image);    // show image
        char key=cv::waitKey(1);    // check if end
        if(key=='e') ende=1;
    }
    return 0;
}
The program uses a second thread to read the data of the camera so that there is no delay in the stream.
Power measurements
To power the Raspberry Pi I made a little PCB with a Texas Instruments TPS54335 buck regulator on it. It takes 12 V as an input and generates 5 V for the Raspberry Pi. Additionally there is a Texas Instruments INA226 power monitor on the 12 V rail to measure input voltage and current. The INA226 is also connected to the I2C bus of the Raspberry Pi. So the Raspberry Pi can read out its current power consumption (Actually there are some losses in the voltage regulator but when I use the same regulator for all tests it should be comparable)
Test setup
I did all test with the same camera and SD card. I just exchanged the Raspbery Pi. The system is running Raspbian Stretch with Destop, Version March 2018, but the boot option is set to console only. Ethernet is connected, WiFi is off. Nothing is connected to USB, no monitor attached.
The system was installed and setup on the Raspberry Pi 3 Model B+ and then the same SD-Card was transferred to the other models.
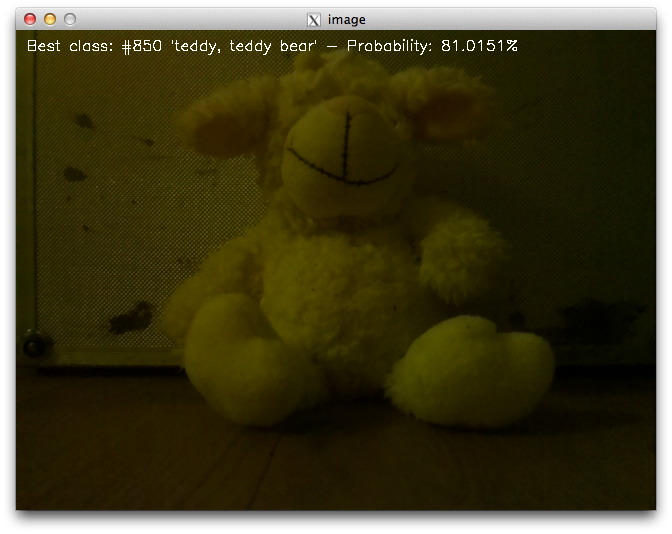
During all tests the camera will see the scene on the screenshot below and identify it as teddy bear.
Results
power in idle
Since I already had the test setup I also made some measurements in the idle mode. I was logged in via ssh and was at the bash prompt.
| Model | Current (A) | Power (W) |
|---|---|---|
| Raspberry Pi 2 | 0.128 | 1.53 |
| Raspberry Pi 3 | 0.147 | 1.76 |
| Raspberry Pi 3 Model B+ | 0.203 | 2.43 |
power during calculation of neural network
| Model | Current (A) | Power (W) |
|---|---|---|
| Raspberry Pi 2 | 0.278 | 3.32 |
| Raspberry Pi 3 | 0.421 | 5.05 |
| Raspberry Pi 3 Model B+ | 0.563 | 6.76 |
execution time of neural network
| Model | time (ms) |
|---|---|
| Raspberry Pi 2 | 2635 |
| Raspberry Pi 3 | 1804 |
| Raspberry Pi 3 Model B+ | 1548 |
energy consumption for each cycle of the neural network
Given the execution time and power consumption one can calculate how much energy each cycle of the neural network consumes.
| Model | Energy (Ws) |
|---|---|
| Raspberry Pi 2 | 8.75 |
| Raspberry Pi 3 | 9.11 |
| Raspberry Pi 3 Model B+ | 10.46 |
Conclusion
The new Raspberry Pi 3 Model B+ calculates the neural network nearly twice as fast as the Raspberry Pi 2. On the other hand it also needs twice as much power. When you compare Raspberry Pi 2 and 3 the newer is a lot faster and consumes more power but the energy efficiency of these two models is nearly the same. The new Raspberry Pi 3 Model B+ has a worse efficiency than its predecessors. It has to be cleared why it is so bad. Maybe it is because of the Gigabit-Ethernet-IC or the new Wifi module.
But for now I have to state: The new model B+ should only be taken if you really need the processing power und your results fast. Projects where energy efficiency is important should stick to the old Raspberry Pi 3 or even the Raspberry Pi 2.
Do you have any ideas or comments on my measurements?


