element14 Community
element14 Community
    Register Log In
  • Site
  • Search
  • Log In Register
  • About Us
  • Community Hub
    Community Hub
    • What's New on element14
    • Feedback and Support
    • Benefits of Membership
    • Personal Blogs
    • Members Area
    • Achievement Levels
  • Learn
    Learn
    • Ask an Expert
    • eBooks
    • element14 presents
    • Learning Center
    • Tech Spotlight
    • STEM Academy
    • Webinars, Training and Events
    • Learning Groups
  • Technologies
    Technologies
    • 3D Printing
    • FPGA
    • Industrial Automation
    • Internet of Things
    • Power & Energy
    • Sensors
    • Technology Groups
  • Challenges & Projects
    Challenges & Projects
    • Design Challenges
    • element14 presents Projects
    • Project14
    • Arduino Projects
    • Raspberry Pi Projects
    • Project Groups
  • Products
    Products
    • Arduino
    • Avnet Boards Community
    • Dev Tools
    • Manufacturers
    • Multicomp Pro
    • Product Groups
    • Raspberry Pi
    • RoadTests & Reviews
  • Store
    Store
    • Visit Your Store
    • Choose another store...
      • Europe
      •  Austria (German)
      •  Belgium (Dutch, French)
      •  Bulgaria (Bulgarian)
      •  Czech Republic (Czech)
      •  Denmark (Danish)
      •  Estonia (Estonian)
      •  Finland (Finnish)
      •  France (French)
      •  Germany (German)
      •  Hungary (Hungarian)
      •  Ireland
      •  Israel
      •  Italy (Italian)
      •  Latvia (Latvian)
      •  
      •  Lithuania (Lithuanian)
      •  Netherlands (Dutch)
      •  Norway (Norwegian)
      •  Poland (Polish)
      •  Portugal (Portuguese)
      •  Romania (Romanian)
      •  Russia (Russian)
      •  Slovakia (Slovak)
      •  Slovenia (Slovenian)
      •  Spain (Spanish)
      •  Sweden (Swedish)
      •  Switzerland(German, French)
      •  Turkey (Turkish)
      •  United Kingdom
      • Asia Pacific
      •  Australia
      •  China
      •  Hong Kong
      •  India
      •  Korea (Korean)
      •  Malaysia
      •  New Zealand
      •  Philippines
      •  Singapore
      •  Taiwan
      •  Thailand (Thai)
      • Americas
      •  Brazil (Portuguese)
      •  Canada
      •  Mexico (Spanish)
      •  United States
      Can't find the country/region you're looking for? Visit our export site or find a local distributor.
  • Translate
  • Profile
  • Settings
Raspberry Pi
  • Products
  • More
Raspberry Pi
Raspberry Pi Forum Raspberry Pi, creepy Zoltar Like Fortune Teller help
  • Blog
  • Forum
  • Documents
  • Quiz
  • Events
  • Polls
  • Files
  • Members
  • Mentions
  • Sub-Groups
  • Tags
  • More
  • Cancel
  • New
Join Raspberry Pi to participate - click to join for free!
Featured Articles
Announcing Pi
Technical Specifications
Raspberry Pi FAQs
Win a Pi
Raspberry Pi Wishlist
Actions
  • Share
  • More
  • Cancel
Forum Thread Details
  • Replies 4 replies
  • Subscribers 665 subscribers
  • Views 2105 views
  • Users 0 members are here
  • mystic seer
  • coin acceptor
  • thermal_printer
  • raspberry_pi_3_b_plus
  • zoltar machine
Related

Raspberry Pi, creepy Zoltar Like Fortune Teller help

realgeneralgrunt
realgeneralgrunt over 6 years ago

Hey everyone!


I'm a puppet builder/composer/ jack of all trades working on my next project: My own original fortune teller machine.


To get it out of the way right off the bat: I'm NOT a programmer. I can figure SOME stuff out but 99% of coding I'm not good at at all.


Now onto my project:


image


You don't have permission to edit metadata of this video.
Edit media
x
image
Upload Preview
image


So thus far, I have gotten the entire automation done (not shown are the LED lights)


I used a Mini Meastro 12 Servo Controller, 1 servo, and 3 LEDs (Monk RGB LEDs with built in resisters)


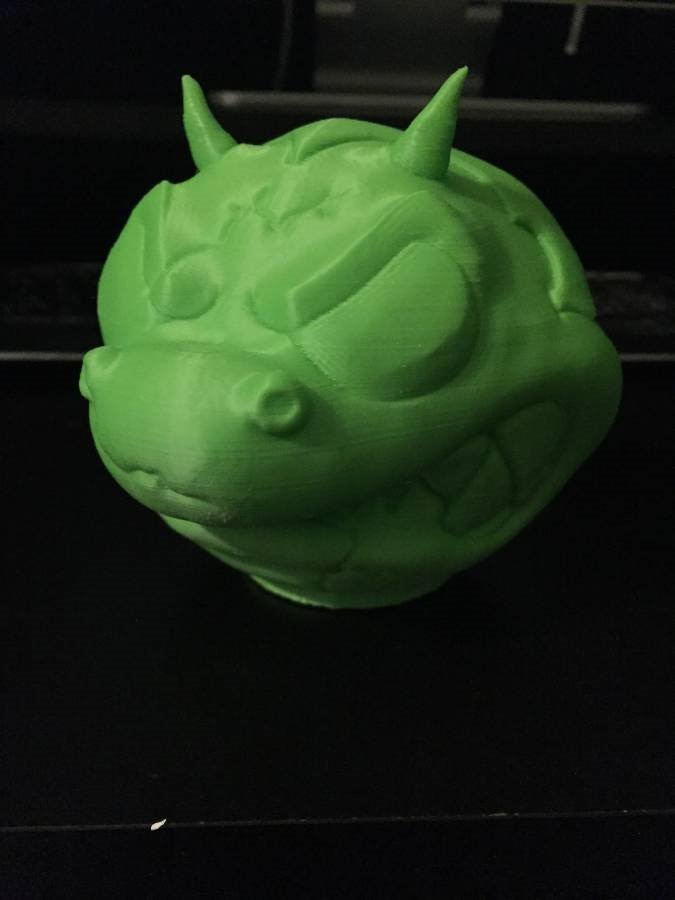
The head is 3d printed from a model I did in Sculptris, and the music I composed myself.


Now here are the remaining steps:


Using a coin acceptor:


https://www.adafruit.com/product/787?gclid=CjwKCAiAsoviBRAoEiwATm8OYB6kjzT62LsyP2nW9KEgcXrX4rUOxXm75hvwpg-ig9-FBbzy2ptia…


to activate the sequence.


To have the audio track play at the exact moment the sequence starts (the audio in the video is from my PC Speaker that I hit play to sync with the sequence)


After the sequence plays, a random fortune is printed using a Thermal Printer:


https://www.adafruit.com/product/597


I'm using a Raspberry Pi 3 for this, but I also have an arduino uno.


I was inspred by Matt's Mystic Seer build:


Episode 365: Twilight Zone Fortune Telling Machine


I'm hoping you all can help me finish the internals so I can start the build on the actual machine!

Like I said, I'm NOT a programmer, so all help would be appreciated.


Thanks!

  • Sign in to reply
  • Cancel
Parents
  • airbornesurfer
    airbornesurfer over 6 years ago

    One quick note that you should be aware of: Unless they've updated them recently, the Adafruit drivers for this model printer DO NOT work with a PiB3, so you'll need a B2.


    Coin acceptor should just send a logic "HIGH" to a GPIO pin when activated. Use that as an interrupt on the Arduino to trigger your activation function.


    My best advice to get the electronics working is to make sure you're absolutely familiar with the code structures for each of the components that you're going to add. Get one thing (for example, the motor movement and synching it to the music) done first, then add the coin slot, the lights, etc. If you make the build an iterative process, it'll be that much easier to string everything together later!

    • Cancel
    • Vote Up +1 Vote Down
    • Sign in to reply
    • Cancel
Reply
  • airbornesurfer
    airbornesurfer over 6 years ago

    One quick note that you should be aware of: Unless they've updated them recently, the Adafruit drivers for this model printer DO NOT work with a PiB3, so you'll need a B2.


    Coin acceptor should just send a logic "HIGH" to a GPIO pin when activated. Use that as an interrupt on the Arduino to trigger your activation function.


    My best advice to get the electronics working is to make sure you're absolutely familiar with the code structures for each of the components that you're going to add. Get one thing (for example, the motor movement and synching it to the music) done first, then add the coin slot, the lights, etc. If you make the build an iterative process, it'll be that much easier to string everything together later!

    • Cancel
    • Vote Up +1 Vote Down
    • Sign in to reply
    • Cancel
Children
No Data
element14 Community

element14 is the first online community specifically for engineers. Connect with your peers and get expert answers to your questions.

  • Members
  • Learn
  • Technologies
  • Challenges & Projects
  • Products
  • Store
  • About Us
  • Feedback & Support
  • FAQs
  • Terms of Use
  • Privacy Policy
  • Legal and Copyright Notices
  • Sitemap
  • Cookies

An Avnet Company © 2025 Premier Farnell Limited. All Rights Reserved.

Premier Farnell Ltd, registered in England and Wales (no 00876412), registered office: Farnell House, Forge Lane, Leeds LS12 2NE.

ICP 备案号 10220084.

Follow element14

  • X
  • Facebook
  • linkedin
  • YouTube