element14 Community
element14 Community
    Register Log In
  • Site
  • Search
  • Log In Register
  • About Us
  • Community Hub
    Community Hub
    • What's New on element14
    • Feedback and Support
    • Benefits of Membership
    • Personal Blogs
    • Members Area
    • Achievement Levels
  • Learn
    Learn
    • Ask an Expert
    • eBooks
    • element14 presents
    • Learning Center
    • Tech Spotlight
    • STEM Academy
    • Webinars, Training and Events
    • Learning Groups
  • Technologies
    Technologies
    • 3D Printing
    • FPGA
    • Industrial Automation
    • Internet of Things
    • Power & Energy
    • Sensors
    • Technology Groups
  • Challenges & Projects
    Challenges & Projects
    • Design Challenges
    • element14 presents Projects
    • Project14
    • Arduino Projects
    • Raspberry Pi Projects
    • Project Groups
  • Products
    Products
    • Arduino
    • Avnet Boards Community
    • Dev Tools
    • Manufacturers
    • Multicomp Pro
    • Product Groups
    • Raspberry Pi
    • RoadTests & Reviews
  • Store
    Store
    • Visit Your Store
    • Choose another store...
      • Europe
      •  Austria (German)
      •  Belgium (Dutch, French)
      •  Bulgaria (Bulgarian)
      •  Czech Republic (Czech)
      •  Denmark (Danish)
      •  Estonia (Estonian)
      •  Finland (Finnish)
      •  France (French)
      •  Germany (German)
      •  Hungary (Hungarian)
      •  Ireland
      •  Israel
      •  Italy (Italian)
      •  Latvia (Latvian)
      •  
      •  Lithuania (Lithuanian)
      •  Netherlands (Dutch)
      •  Norway (Norwegian)
      •  Poland (Polish)
      •  Portugal (Portuguese)
      •  Romania (Romanian)
      •  Russia (Russian)
      •  Slovakia (Slovak)
      •  Slovenia (Slovenian)
      •  Spain (Spanish)
      •  Sweden (Swedish)
      •  Switzerland(German, French)
      •  Turkey (Turkish)
      •  United Kingdom
      • Asia Pacific
      •  Australia
      •  China
      •  Hong Kong
      •  India
      •  Korea (Korean)
      •  Malaysia
      •  New Zealand
      •  Philippines
      •  Singapore
      •  Taiwan
      •  Thailand (Thai)
      • Americas
      •  Brazil (Portuguese)
      •  Canada
      •  Mexico (Spanish)
      •  United States
      Can't find the country/region you're looking for? Visit our export site or find a local distributor.
  • Translate
  • Profile
  • Settings
Raspberry Pi Projects
  • Products
  • Raspberry Pi
  • Raspberry Pi Projects
  • More
  • Cancel
Raspberry Pi Projects
Blog Using the IO on a Raspberry Pi 3 B+
  • Blog
  • Documents
  • Events
  • Polls
  • Members
  • Mentions
  • Sub-Groups
  • Tags
  • More
  • Cancel
  • New
Join Raspberry Pi Projects to participate - click to join for free!
  • Share
  • More
  • Cancel
Group Actions
  • Group RSS
  • More
  • Cancel
Engagement
  • Author Author: jc2048
  • Date Created: 16 Mar 2019 11:43 PM Date Created
  • Views 4480 views
  • Likes 7 likes
  • Comments 8 comments
  • raspberry pi 3 b+
  • raspberry_pi_projects
Related
Recommended

Using the IO on a Raspberry Pi 3 B+

jc2048
jc2048
16 Mar 2019

In my quest to use a Raspberry Pi 3B+ for creating art, I need to be able to control the GPIO pins. So next step

was to look for some information on doing just that.


A quick search of element14 uncovered this blog by shabaz where he illustrates controlling the GPIO lines with

Python. That should get me off to a quick start and Python should be ok to work with, at least for the simpler

art pieces [I haven't done very much with Python and, to be honest, I didn't entirely like it when I did, but it

will do for the moment].


Raspberry Pi GPIO Explained


To enter the script I'm going to need a text editor that I can run without the desktop. It seems that GNU Nano

is part of the distribution, so I'll start with that. For it to work with PuTTY, I found that local editing

needed to be turned off.


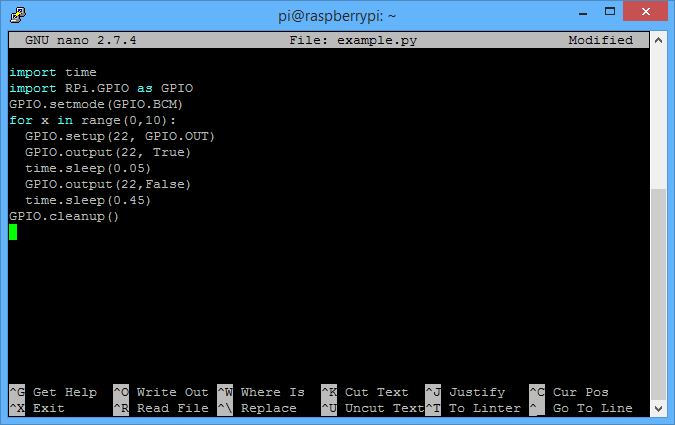
Here's the Python code I'm using, as seen in the Nano editor's text-terminal-style 'window', framed in PuTTY's

Windows GUI-style window. The code is one of Shabaz's examples.


image


If I give it to the Python interpreter to run and look at the IO pin, it does this on the 'scope
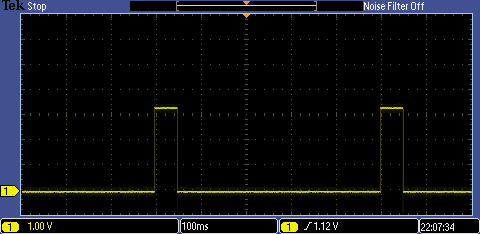
 

image


Success!


So, I now have the means to control I/O lines under the control of a Python script and that probably gives me

enough to get me going and produce the first simple piece of art (which I've got to come up with by the end of next

week to stay on schedule). Next blog will be the first proper challenge one and will be in the Picasso Challenge

area.

  • Sign in to reply

Top Comments

  • fmilburn
    fmilburn over 6 years ago +4
    Hi Jon, I have been using Geany as the IDE for Python on the Raspberry Pi. It has the advantage of highlighting key words, start the code running with a button click, etc. I have been using it long enough…
  • shabaz
    shabaz over 6 years ago +4
    Hi Jon, That's awesome, glad the blog was helpful! In recent times, another Python API has become available, called "gpiozero". The one in that blog still works, but just in case you want to examine that…
  • beacon_dave
    beacon_dave over 6 years ago in reply to jc2048 +4
    "GPIO Zero is installed by default in the Raspbian image, and the Raspberry Pi Desktop image for PC/Mac, both available from raspberrypi.org . Follow these guides to installing on Raspbian Lite and other…
  • mp2100
    mp2100 over 6 years ago in reply to jc2048

    I think you could use a text editor with some python syntax help. I like nano, I use it for python on rPi all the time. But it’s a straight text editor. Googling a bit it looks like you could use vim with python syntax checking. https://www.vim.org/scripts/script.php?script_id=790

    vi has been around since before DOS so you should feel comfortable.

    • Cancel
    • Vote Up +2 Vote Down
    • Sign in to reply
    • More
    • Cancel
  • Jan Cumps
    Jan Cumps over 6 years ago in reply to Jan Cumps

    Both are explaining it for a BeagleBone, but it works 100% identical for Pi. As long as you are using a Linux distro.

    Cross compile on windows, using ARM DS-5 IDE (eclipse): BeagleBone - Cross Compile c++ on Windows

    Debug from windows, also using DS-5: https://www.element14.com/community/message/211969/l/re-debug-bbb-from-windows-eclipseds-5-ccs-ide#211969

    • Cancel
    • Vote Up +3 Vote Down
    • Sign in to reply
    • More
    • Cancel
  • beacon_dave
    beacon_dave over 6 years ago in reply to jc2048

    "GPIO Zero is installed by default in the Raspbian image, and the Raspberry Pi Desktop image for PC/Mac, both available from raspberrypi.org. Follow these guides to installing on Raspbian Lite and other operating systems, including for PCs using the remote GPIO feature."

    https://gpiozero.readthedocs.io/en/stable/installing.html


    There is a MagPi Essentials eBook on using GPIO Zero here:

    https://www.raspberrypi.org/magpi-issues/Essentials_GPIOZero_v1.pdf

    • Cancel
    • Vote Up +4 Vote Down
    • Sign in to reply
    • More
    • Cancel
  • Jan Cumps
    Jan Cumps over 6 years ago

    I’ve a few GPIO examples and blogs for C / C++ on a headless Pi with remote development on a Windows Eclipse environment and debugging from that same environment.

    It’s cross compilation. All work to build the linux executable happens on the Windows PC.

    When compilation is done, the file is moved to the Pi, executable flag set, and then debugged over your network. you can step through source code and see variable contents very similar to a local debug session.

    I’ll try to find them back ...

    • Cancel
    • Vote Up +3 Vote Down
    • Sign in to reply
    • More
    • Cancel
  • jc2048
    jc2048 over 6 years ago in reply to shabaz

    That's awesome, glad the blog was helpful!

    It was very useful - much quicker than trying to find all the info myself and sort it all out.


    In recent times, another Python API has become available, called "gpiozero".

    I saw the gpiozero stuff on the Raspberry Pi website but got the impression that it wasn't available in the Lite version of Rasbian (I might not have interpreted that correctly), so I thought I'd try your code and just see what happened. I'm much happier with it like this - I've done a lot more assembler programming in my time than anything high level, so this level of control feels quite natural (that's the reason I'm uncomfortable, generally, with a language like Python).

    • Cancel
    • Vote Up +2 Vote Down
    • Sign in to reply
    • More
    • Cancel
>
element14 Community

element14 is the first online community specifically for engineers. Connect with your peers and get expert answers to your questions.

  • Members
  • Learn
  • Technologies
  • Challenges & Projects
  • Products
  • Store
  • About Us
  • Feedback & Support
  • FAQs
  • Terms of Use
  • Privacy Policy
  • Legal and Copyright Notices
  • Sitemap
  • Cookies

An Avnet Company © 2025 Premier Farnell Limited. All Rights Reserved.

Premier Farnell Ltd, registered in England and Wales (no 00876412), registered office: Farnell House, Forge Lane, Leeds LS12 2NE.

ICP 备案号 10220084.

Follow element14

  • X
  • Facebook
  • linkedin
  • YouTube