


Table of Contents
Introduction
This is a simple, quick-to-build project that mainly consists of a keypad and loudspeaker under the control of a Pi Pico. It could have multiple uses, for instance, basic automation, sending instructions to test equipment, building an audio timer, or making games, so I've kept the design fairly generic, and spare pins are available on a connector for attaching additional circuitry.
I'm going to use this project to control motors in a sequence that can be entered on the keypad by the user. For my use case, the cable at the top will directly connect to a motor control board. The motor control board will automatically accept instructions from the keypad as soon as it is plugged in, and the speaker will announce speech confirmation of each instruction.

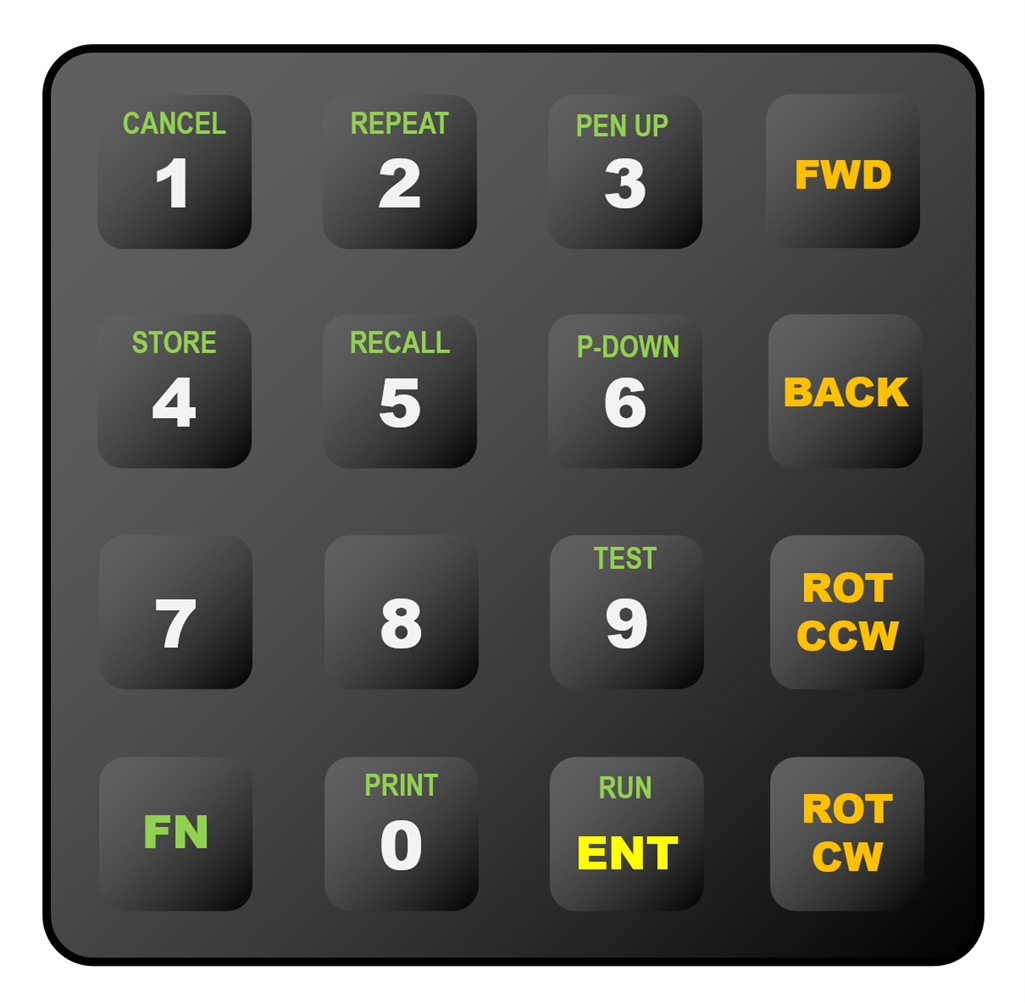
The current developed Python software allows the user to punch in instructions in a COMMAND+PARAMETER language. The orange command buttons are on the right side of the numeric buttons, and the parameter can be any integer quantity (for instance centimeters or millimeters or degrees), and then the user can press the yellow Enter key.
Additional commands are available via a green function key. 'For' loops are also supported. For instance, by using the RPT (Repeat) function key, you can make the board replay any portion of instructions any number of times, by pressing RPT at the beginning and end of the portion of instructions and then pressing the number of times you want it to repeat. Not all the functions are coded yet, but most of them are, enough to make the board usable for robot control.
Once the instructions are entered, the Pico can send out the instructions one by one over a serial (UART) connection. The Pico expects to see an OK response string back from the remote side before it issues the next instruction. As a result, everything is throttled just right to ensure the remote end can handle the instructions.
There is a short video demonstration here:
Here is an example set of instructions that a user may wish to enter, to travel in a square shape:
repeat section start
fwd 100
rotate right 90
repeat section end, 4 times
To program this from the keypad is easy – each command consists of an instruction (orange button) along with a numerical parameter, such as 100. You press the buttons for the instruction and the parameter, in any order, followed by the Enter key. Then you do the same thing for subsequent commands.
The Function key can be pressed first to select one of the green functions.
For the above square shape scenario, the user would press these buttons one at a time:
FN, REPEAT // mark the start of the loop
FWD, 1, 0, 0, ENT, // go forward 100 units
CW, 9, 0, ENT, // turn clockwise 90 degrees
FN, REPEAT, 4, ENT // end of loop, repeat 4 times
The above instructions will be stored in internal RAM, by pressing the Enter key after each instruction. To run them, the user would press these buttons one at a time:
FN, RUN
The Python code also implements the capability to erase the previous steps, one at a time, in the event that the user makes a mistake while pressing the buttons. There is also a Print function button, to write the current sequence for review, over the USB UART, if the Pi Pico is also connected to a PC.
The TST (Test) function is very useful because it allows each instruction to be run on-the-fly just to test the instruction out, before pressing the ENT (Enter) button to commit it to RAM.
In the future, it would be possible to store and recall the commands even after a power cycle, using the FN-STORE and FN-RECALL button presses.
Although this project is intended to be used with the XR-1000 Motion Control Board, it could easily be adapted to provide keypad input to any project, robotics-related or otherwise. I deliberately used Python for this project for that reason; to be easily adaptable.

There is no display in this project; all button-presses are announced through a loudspeaker. I recorded about 40 speech messages that a robot application might find handy, and they are played in high quality (MP3 recordings). Again, it is easy to adapt this, for instance replacing the speech with different languages or sound effects.
Circuit Diagram
There's not much to the circuit, it uses ready-made modules where possible. The Pi Pico scans a 4x4 keypad matrix and uses I2S connections to a small DAC board with an integrated audio amplifier. The project can be powered from a single LiPo battery, or from a 5V DC supply. The power can come from most of the connectors on the board, they nearly all have GND, BATT, and 5V pins.
Two of the connectors accept 1mm pitch flat flex cables to eliminate cable soldering effort. However, there is also a 0.1" pitch connector for normal jumper cables. All of the connectors have some GPIO pins exposed, so it is all reasonably flexible.

Building It
The project is trivial to build, it should be possible to assemble it within an hour. The PCB CAD files are at the project GitHub link, ready for sending to any PCB manufacturer. I have not tested the PCB CAD files, I have only built the prototype on perf board so far.
Unlike the perf board prototype, the PCB version allows the keypad to be soldered almost flat against the board if desired, there are no components underneath it (the exception is that if the 0.1" connector is used, then a few millimeters of clearance is needed for the soldered pins. The Pi Pico is soldered flush to the other side of the board. The speaker is at the top of the board, unlike the perf board prototype which has the speaker at the bottom.
Refer to the Github link for a bill of materials. Some parts are from AliExpress, and the relevant search terms are listed in the bill of materials. The 4x4 keypad is available in black and white, from both Farnell and AliExpress, however, the holes are positioned differently. The PCB has elongated keypad mounting holes so that either keypad should fit.

Programming It
Once the board has been assembled, hold down the button on the Pi Pico and plug in the unpowered board USB cable into the PC. Release the button after a few seconds. You should see a drive letter appear on the PC, and the board will look like a USB memory drive.
From the CircuitPython website, download the CircuitPython firmware file and drag it to the drive letter. This will make the Pi Pico run the CircuitPython environment.
Next, from the bundle downloaded from the project's Github site, select everything in the python_code folder and drag it to the drive letter. That's it, the board is now programmed and the USB cable can be disconnected.
Customizing It
If you ever wish to make code changes, the code.py file can be edited and dragged to the drive letter (you don't need to drag all files each time you edit, just the code.py file is fine). The speech recordings were made using the Narrator function in Windows 11. The recordings are standard MP3 format files, so they can easily be changed to any other announcements or sounds.
Using It
Connect a 5V supply to the board, or a single LiPo cell. You could use jumper wires to do that. The LED on the corner of the board should light up.
Then, press any button on the keypad and you should hear an announcement. If you do, then the board is running!
If you want to see the commands sent from the UART, then connector J7 can be wired to a USB UART board and connected to the PC; the baud rate is 115200 but that can be changed if desired by editing the code.py file.
If you want to use it with the motion control subsystem, then all that is required is to connect a 10-way flat flex cable between the connectors labeled EXPANSION on the boards. The power is then obtained directly from the motion control board, there is no need for any additional supply.
Summary
A fairly general-purpose user interface board was developed for this project. It accepts keypad input and plays announcements using MP3 files stored on the Pi Pico. The Python software accepts a Command+Parameter syntax, and outputs the instructions over a serial UART connection. All files and code are at the Keypad Controller Github link. This project can be used for custom or standalone projects, or if desired it can be used with the Motor Controller board project.
Thanks for reading!


