


![]()
Hi all. Hope everyone is safe.
First of all, thank you Element14 and rscasny for choosing me as a finalist for the Road Test. Hope not to disappoint.
I'm going to divide this into several posts to be able to tackle everything and explain with some detail.
This is this first of a series of blog posts detailing the AMD Xilinx Kria KV260 Vision AI Starter Kit.
On the second post I dive into the preparation of the KV260 Vision Kit
On the third post I train a custom object detection model to detect Car's license plates
(please insert unboxing video here)
The KIT
The KIT for the RoadTest comes in two boxes.
- Kria KV260 Vision AI Starter Kit
- Kria KV260 Basic Accessory Pack

Kria KV260 Vision AI Starter Kit
Inside the KV260 box, you guessed it, comes the KV260 kit. It comes very well packaged.
It includes:
- Starter Kit SOM with fansink thermal solution
- Startket carrier card
- Getting started pamphlet
- Developer stickers ( nice
 - who doesn't love stickers ? )

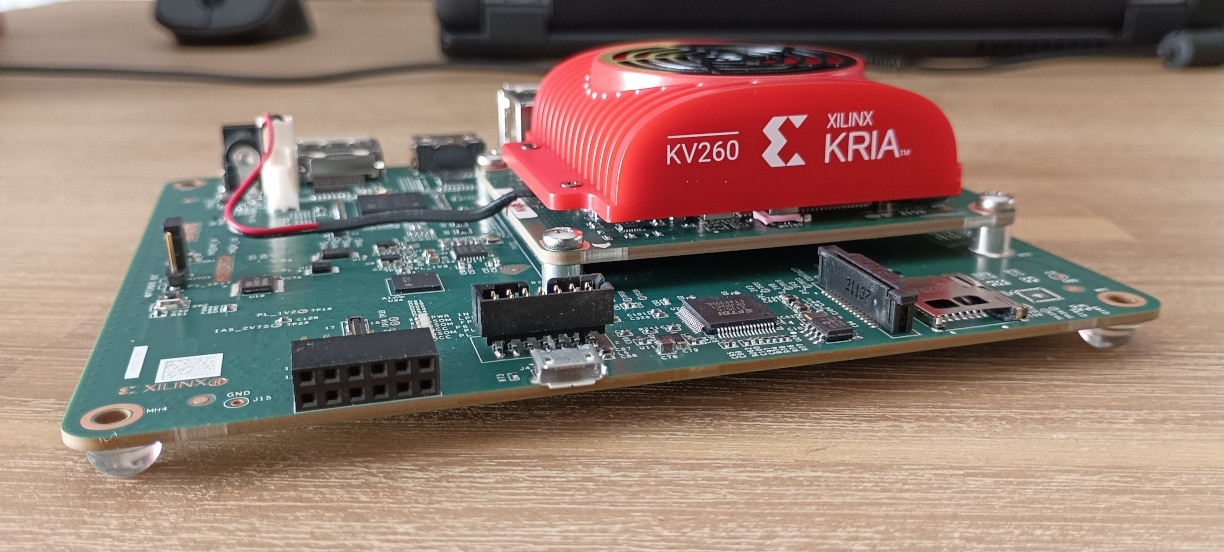
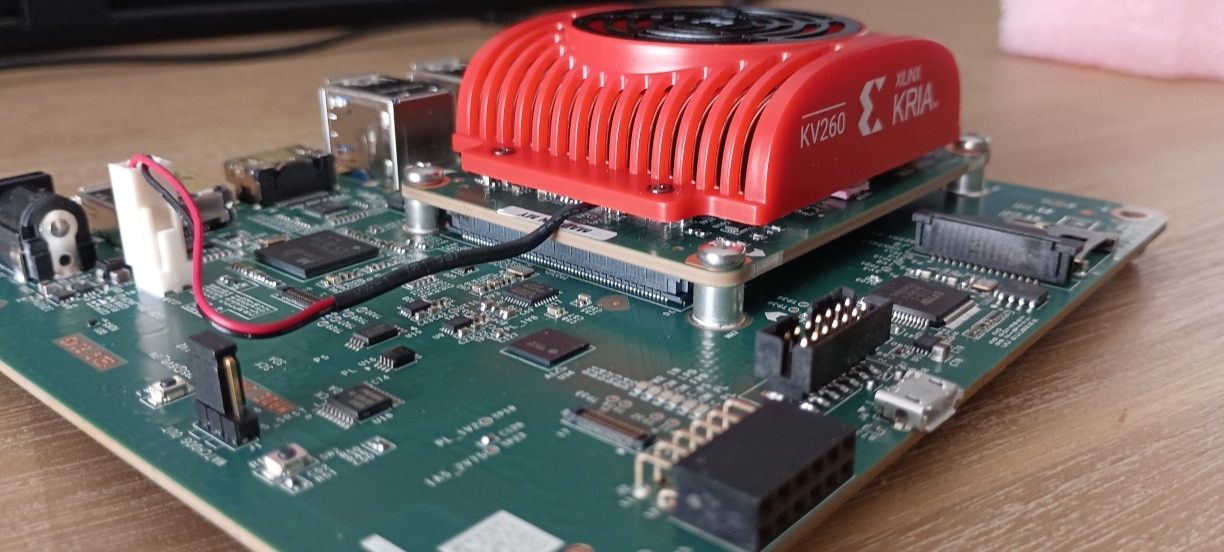
The KV260 SOM and carrier card are beneath the pink foam. It comes inside an anti-static bag. We'll get to it in a moment.


KV260 SOM and Carrier Card

What's is this ?
The Xilinx Kria KV260 Vision is a system-on-module (SoM) that is designed for embedded vision applications.
This Kit is comprised of the K26 SOM (System on Module) and the Carrier Board where it fits.
It features a Xilinx Zynq UltraScale+ MPSoC with a quad-core ARM Cortex-A53 processor and a programmable FPGA fabric, as well as a variety of interfaces and peripherals for camera and display connectivity.
The Kria KV260 is intended to be used as a building block for developing edge devices that require real-time processing and AI inferencing capabilities.
It also comes with support for the Vitis AI development environment and a range of software and hardware tools to facilitate application development.
Some characteristics and strengths:
- Versatile and flexible: The Kria KV260 features a combination of a quad-core ARM Cortex-A53 processor and a programmable FPGA fabric, which can be used to implement custom accelerators or hardware interfaces.
- High-performance: The Kria KV260 is designed to deliver high-performance computing and low-latency inferencing, making it suitable for demanding edge applications that require real-time processing.
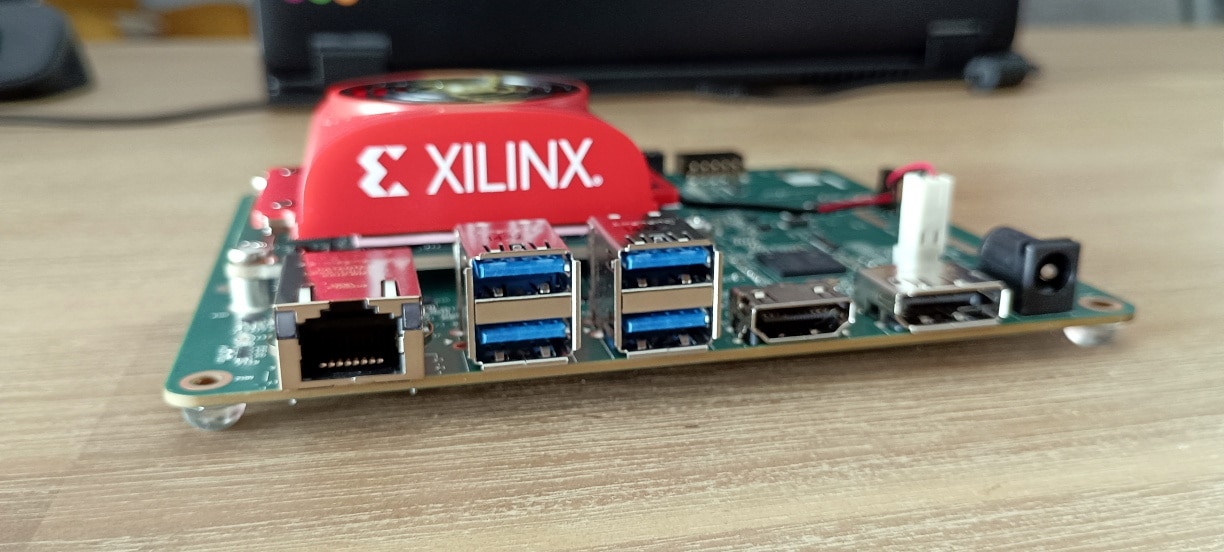
- Rich set of interfaces: The Kria KV260 comes with a variety of interfaces and peripherals, including Gigabit Ethernet, USB, HDMI, MIPI CSI-2, and more, which makes it easy to connect cameras, displays, and other peripherals.
- Easy to use: The Kria KV260 is supported by the Vitis AI development environment, which provides a range of software and hardware tools to simplify the application development process.
It also has some weaknesses:
- Cost: The Kria KV260 is relatively expensive compared to other embedded vision platforms, which may be a barrier for some users.
- Power consumption: The Kria KV260 has a relatively high power consumption, which may be a concern for battery-powered edge devices.
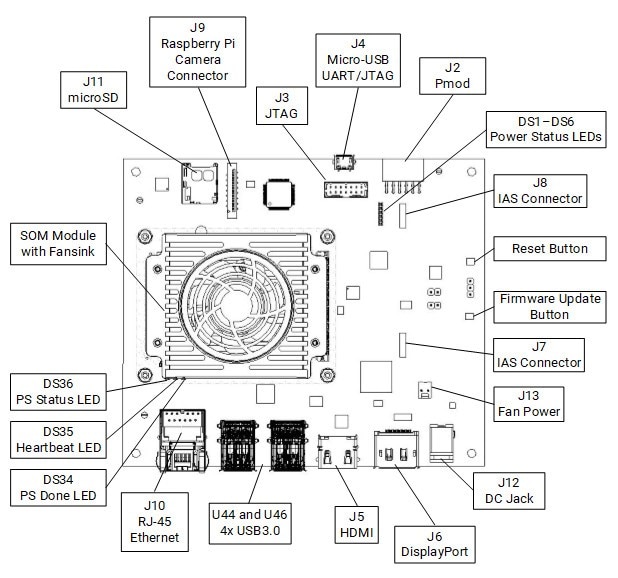
The interfaces present on the carrier board

Here's another view with descriptions (from the documentation):
CC - Carrier Board
SOM - Device or interface located on the SOM

| {gallery}KV260 Vision KIT |
|---|
|
KV260: Interfaces #1 |
 KV260: Interfaces #2 |
 KV260: Carrier board view |
|
SOM: A view of the SOM |
|
KV260: Carrier board without the SOM |
|
KV260: SOM |
|
KV260: Carrier board back |


Kria KV260 Basic Accessory Pack
Inside the accessories box comes what's necessary to get started.

- 1x HDMI cable (it supports HDMI and DisplayPort)
- 1x Power adapter with adapters for sockets all over the world (I'm guessing)
- 1x Ethernet cable
- 1x 13MP Auto focus camera with IAS (Imaget Access System) interface
- 1x 16GB micro SD Card (that I almost missed - It's inside a small bag stapled to the power adapter bag)
- 1x micro USB-B cable
| {gallery}Accessories KIT |
|---|
|
HDMI Cable |
|
Ethernet cable |
 Getting started pamphlet |
 Power adapter: Power adapter with adapters for all over the world |
| SD Card |
|
Micro USB Cable |


Camera
Because this is a Vision Kit, the accessories kit includes a camera. This is one of the things that got me excited and made me wanna do this project.
The camera that comes with the Vision Kit is a 13MP camera, specifically OnSemi AP1302 13MP ISP for the image sensor.

But I have an issue with it: it's really, really small.
Here's a comparison of it with a SD CARD...
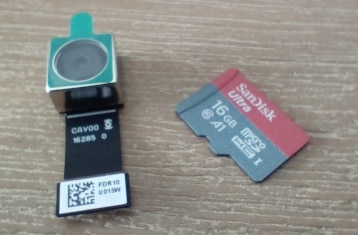
For my application, it's not good. A general view of the camera within the KV260

The camera uses an IAS connector to connect to the carrier board.

Because the KV260 is compatible with the Raspberry PI camera module - up to v2 - I probably will be using it since it can have a longer flat cable. The downside is that it only has 8MP We will see how testing will go. I'll show examples of both.
Software
The Xilinx Kria KV260 Vision SoM has a flexible boot process that can be customized to meet specific requirements.
The KV260 has a primary and secondary boot device that provides isolation of platform-specific boot firmware from the run-time operating system and application.
This allows for the user to focus on developing and updating its application code within the application image without having to rebuild and flash boot firmware.
The primary boot device is a QSPI memory located on the SOM and the secondary boot device is an SD card interface on the carrier card. By default, the KV260 Starter Kit carrier card sets the XCK26 boot mode to QSPI32. The SOM boots up to U-Boot using the QSPI contents and then U-Boot does a hand-off to the secondary boot device.
From the documentation, here's a representation of the boot devices

Primary boot device
The primary boot device is a QSPI device located on the SOM. The necessary elements are packaged in a specific format and file captured as BOOT.BIN. The BOOT.BIN file contains the board-specific boot firmware that consists of the following elements:
- FSBL: First-stage boot-loader firmware
- PMU: Platform management unit firmware
- ATF: Arm® trusted firmware
- U-Boot: Second-stage boot loader
U-Boot provides the functionality for the hand-off between the primary boot device and the secondary boot device. It will search for both the SD card and eMMC secondary boot devices; if
both are detected it will provide a menu interface to you to select the desired Linux boot target.
The primary boot device provides a redundant copy of boot firmware arranged in an A/B configuration. The A/B configuration provides a dynamic primary and secondary image operation
with corresponding update mechanisms.
On boot, the system automatically boots from the defined primary image, and, if boot fails, it falls back to the previously known good boot image
Secundary boot device
The secondary boot device on the KV260 Starter Kit is the SD card. It contains the operating system image and associated application files. The KV260 Starter Kit accelerated application references are built on the Linux operating system. The Getting Started web page provides a pre-built reference image that can be written to a microSD card for out-of-the-box functionality.
Here's the boot process in a nutshell:
-
Power-on/reset: The Kria KV260 powers on and initializes the on-board power and clock management circuits.
-
Boot ROM: The Kria KV260 contains a boot ROM that performs an initial boot process, which includes configuring basic system settings and loading the primary boot loader.
-
Primary boot loader: The primary boot loader is responsible for loading the Linux kernel and device tree.
-
Linux kernel: The Linux kernel is the core of the operating system and is responsible for managing system resources and providing device drivers.
-
Root file system: The root file system contains the Linux operating system and software applications.
Operating Systems
Regarding operating systems, the Kria KV260 can run a variety of operating systems, including Linux and other real-time operating systems (RTOS). The Kria KV260 supports Linux distributions such as PetaLinux and Yocto, which can be customized to include specific features and packages. Additionally, the Kria KV260 also supports other operating systems that are compatible with the Zynq UltraScale+ MPSoC, such as FreeRTOS and VxWorks.
With Linux, it supports, besides PetaLinux, Ubuntu. The Ubuntu 22.04 is the primary OS targeted by the Xilinx pre-built applications and out of box workflows. PetaLinux images and Yocto integrations are available to support users intending to target a custom embedded Linux during evaluation and production..
The latest Ubuntu version supported is the 22.04 LTS and the PetaLinux is 2022.1 .
I still don't know what diferences there are, but will find out and a new blog post will emerge detailing the boot process. I already know that a boot firmware update is necessary for both Linuxes, so I'll be detailing that too.
Because this is a development kit targeted at edge computing and Machine Learning, of course there are some libraries for that too.
Xilinx Tools Integration
The K26LTD SOM and KV260 Starter Kit are integrated with the Vitis software development platform and Vivado Design Suite. One can developt AI applications with the Vitis platform using, let's say, TensorFlow and then quantize/compile the model using the Vitis libraries and deploy it on the KV260 kit.
This is for another post.
Kria Accelerated Applications
There are already some demonstration applications - pre-built and ready to deploy in a Kria Starter Kit. These accelerated application examples or “AAs” are available and updated asynchronous to the main Xilinx tools releases, but do have dependencies on a corresponding OS.
For the KV260 kit (this one), these are the AAs available in the correspondent S.O version (I'm only posting the latest version available of the S.O.)
| Starter Kit Linux Version | KV260 Pre-built Apps Available |
| Kria Starter Kit Linux 2022.2.2 (PetaLinux) | Smart Camera, AI-Box ReID, Defect-defect (Limited Function), NLP-SmartVision |
| Kria Ubuntu 22.04 | Smart Camera, AI-Box ReID, Defect-defect, NLP-SmartVision |
I'm also going to show some examples of the AAs running.
Project
For demonstrating the Kria KV260 Vision Kit, the project that I'm going to develop is a Machine Vision one.
I'm going to make my garage door smart. Let's assume that it's a pain to press the garage door remote command everytime I arrive at home (specially when using gloves - it is cold in the Winter.
I want for it to recognize my license plate (both my cars) and open the door without having to press the button. For it to close is another matter - still trying to figure if I can also automate that task or If I need to press the button.
Let's assume that no one is going to come and with a fake license plate with the same numbers and letters and open the garage door. Some security will have to be placed in the code. But let's not focus on pedantics just now.
Possible problems with the task
Each car has two license plates - one on the front, another one in the back .
I don't wan't for it to recognize the back license plate and open the door when I'm leaving the garage. Some sort of condtion will have to be in place .
Openning the garage: My garage door motor uses encripted frequencies - I don't have much experience with this sort of automations - regards the hardware - but I'm sure that someone already has some project with an arduino or simillar that does this. Will have to search futher
Ultimately will have some sort of useless machine to press the remote button.
Steps for the project
- Develop the Tensorflow model to recognize the license plate
- Recognize a license plate
- know that's mine
- Learn to work with the Vitis platform
- If tensorflow works out of the box in the KV260 with Ubuntu this step will not be necessary
- quantize/compile the model in the Vitis development platform or Vivado design suite
- Learn to open/close the garage door without pressing the button
- An Arduino or similar board could help here to make this more autonomous
- some kind of contraption to press the button if the above does not work
- Testing, testing, testing
All these steps will be acompanied with posts and, when possible, video.
All that I can do with the KV260 or Vitis/Vivado software will be priority, since this is a road test using the platform.
Stay tunned and sorry for the long post.
References
https://www.xilinx.com/content/dam/xilinx/publications/product-briefs/xilinx-kv260-product-brief.pdf
https://docs.xilinx.com/r/en-US/ug1089-kv260-starter-kit/Summary
https://xilinx.github.io/kria-apps-docs/home/build/html/index.html


