


This blog post forms part of my road test review for the Panasonic PAN 1780 Bluetooth LE Eval Kit

its a little self contained section, and also a bit of fun.
What are we doing here?
for the RoadTest, I wanted to try to replicate a real-world situation, such as I might find in my work place. The focus of the road test is the usability of the kits, documentation and development environment, because that's one of the most important and often overlooked things when choosing a part to put on a board. of course, price, performance, availability etc are also crucial, but a 10p part without a good datasheet can end up costing you more in development time & re-spins than a well documented equivalent at twice the price!
a well documented and supported part and evaluation kit will help me as a design engineer get up and running quickly, spot flaws in the design idea by actually trying it out, give me something to show off to the boss within a short lead time, and give me confidence that there's at least a chance that my own eventual PCB will work. (even though it never fully does first time). Conversely, a poorly documented or supported kit will cause me stress - especially if i've promised the higher ups to have it ready by the end of the week.
the easier and quicker it is to get going, the more likely I am to want to use the product in a design. what better way then, than to time exactly how long it takes to get going?
I've got a simple project in mind, but I'll go over that in another blog post. for now, we should focus on the first thing that everybody does when they receive a new toy - sit down and carefully read through all the instructions! ... right?
so, in this part, I will time how long it takes (me) to get an application running from receiving the box. I want to include everything you might be normally expected to do as part of your job. that means if it takes me 3 hours install software, that's included. can't find the right document? that's included. manual so boring that you need to take a break every ten minutes? definitely included. I'll leave out any time I spend writing or preparing for this blog post, and since I'll be doing this in short chunks, I'll try not to count any time spent reminding myself what I was doing.
Who Evaluates the Evaluation kits?
So clearly, this activity is going to be heavily influenced by my own experience. We are basically testing how easy it is to pick up the thing and run with it, but if I’m already holding the module, or already running, then I’m at an (unfair?) advantage. Its important then, to understand what I already know before I criticise the documentation for not telling me something.
Fortunately, I think that I'm in a pretty good place to start here, since I know next to nothing about any of this.
- I’ve never used Bluetooth in a product before.
- I’ve never used a Nordic or Panasonic* product in a design before.
I have used (I think) a module which had Bluetooth capability, but I only enabled the WIFI. And anyway, that product got canned before it hit the assembly line...
On the other hand, I have designed WIFI modules, GPS modules and GSM modems into products, and spent a lot of time getting familiar with the documentation from several of those vendors, and seeing just how much of a difference it can make when its poor. Though I’m a hardware guy, I’ve done a reasonable amount of programming, including PICs, AVRs, STR and STM32F series, Renesas and others. I’ve also worked with larger SOCs like TI Davinci and others running embedded Linux etc. I've written code / designed circuits / done layouts for most comms protocols, and helped many different products go from initial conception to the production line to overseas contract manufacturing to EOL.
By the way, I’ve almost no experience with Arduinos, emBed, other Maker-hobbyist type boards. So its possible I’ll be scratching my head about something really obvious related to that. if so, please shout out in the comments! I can definitely be a bit thick sometimes with this stuff!
Therefore, an almost complete cold start. I didn't even do much research in preparation for this road test. I applied almost entirely based on the info in the road test front page for this product. so lets see how I get on!
*ok, that’s a lie. I’ve used plenty of Panasonic resistors and capacitors in designs, also some MOVs / Varistors maybe fuses and possible a common mode choke. But nothing that requires more than a page of datasheet.
Ready Steady Go! - Unboxing.
![]()
so the first bit, obviously, is opening the box. Inside the small but sturdy Farnell cardboard carrier is a thin, un-assuming book shaped box. somewhat reminiscent of a DVD case.

inside, the no-frills theme is continued. we get 2 re-sealable antistatic bags (Zip-lock! nice) and a small slip of paper that warns us about Disposal of old equipment. Apparently disposal of old equipment is only for the European union and countries with recycling systems.

The rear cover of the box promises "Fast prototyping, Quick start guides, Demo applications, and easy access to module pins", so I'm feeling confident! that's exactly what I'm looking for in this section.

before diving in, lets have a closer look at the boards.
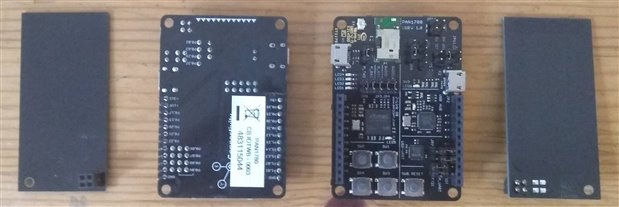
first up, we get 2 almost blank boards (far left, far right) which turn out to be antennas. I can tell that because they say "compensated 13.56 MHz antenna" on them. I had thought that Bluetooth was ISM band 2.4GHz stuff, so was a bit confused until I saw a mating connector on the main board which is marked NFC.
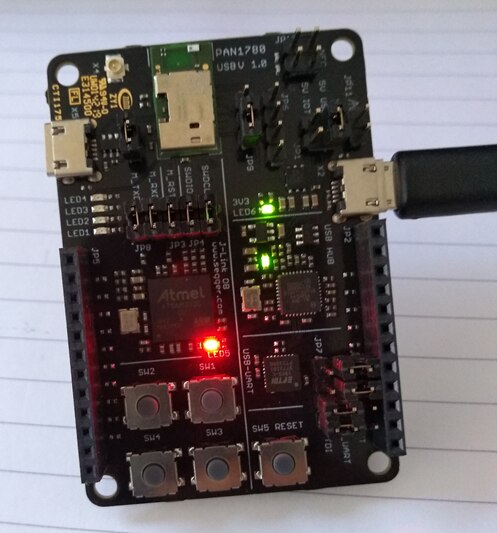
the main board is pretty basic, and quite small, time to get the magnifier out...
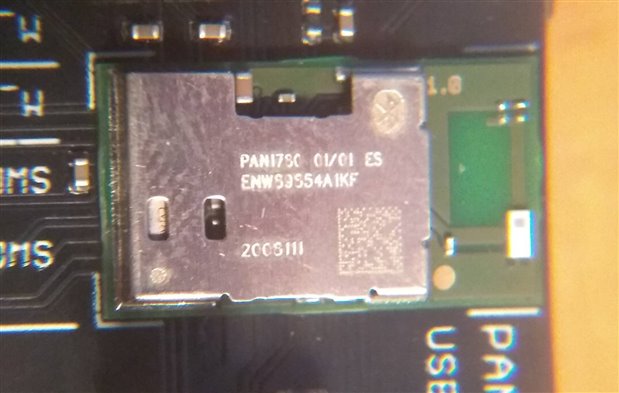
the components on the board look like 0402, so the parts on the module itself are silly-small. the "large" white block on the right is a chip antenna I think, and most other things are hidden under the stamped metal can.
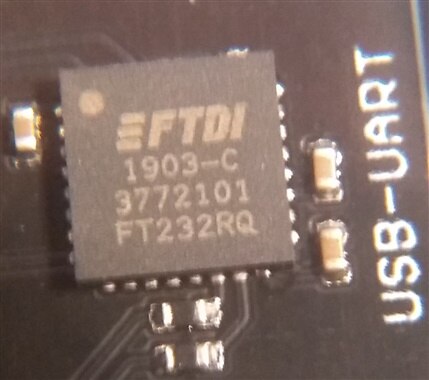
there are 3 other interesting ICs on the board, an FT232 uart to USB interface, an SMSC usb hub, and an Atmel SAM3U2C serving as a J-link debugging probe
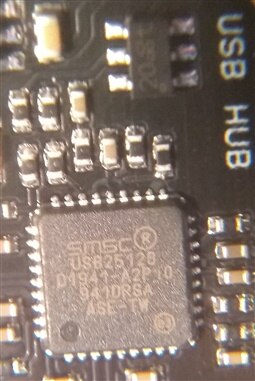
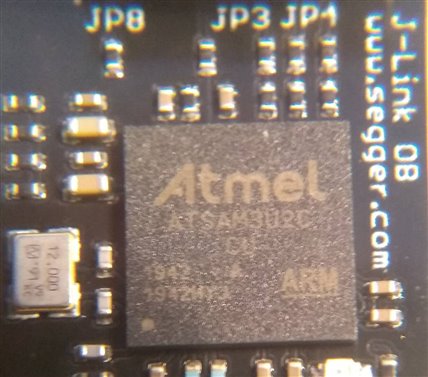
the hub is a 2 port USB2.0 chip. I guess the Hub feeds 1 to the J-link and 1 to the FTDI chip. curiously, SMSC were bought by Microchip in ~2012, so its a bit odd to see that branding on a product as new as this. of course, Atmel were also bought by microchip in 2016. I don't know when Microchip will buy FTDI.
The board is nicely partitioned so that even if I didn’t know what these chips were, I could work it out from the silk screen.

there are also 5 buttons, many jumpers, and an antenna socket (uf.l possibly?) though we don't get an antenna cable in the pack.
that's interesting enough, but we can't do much more without the docs. lets see what we get online...
online documentation
when looking into the module in preparation for applying to the RoadTest, I found it quite frustrating to navigate the online information. I was probably just looking in the wrong place right? Normally, eval kits come with either CDROMs, printed datasheets, or links to websites with all of the information. the box has a big QR code on it, so lets start there!
the QR code, and also the printed text link below it, lead you to
https://pideu.panasonic.de/products/wireless-modules.html

which appears to be the basic Panasonic "industry" landing page. This is one of the dullest websites I have ever seen! I actually typed the address in twice because I mistakenly thought this was a "404 page not found" error when the browser first loaded it up.
after a while, I eventually realise that I'm supposed to click on "eu.industrial.panasonic.com". maybe I'm a bit slow?
4 clicks later, and I arrive at the product page for the module:
http://https://industry.panasonic.eu/devices/wireless-connectivity/bluetooth-low-energy-modules/pan1780-high-performance-and-long-range
I could have got here quicker by googling. oh well.
this page is mostly about the module rather than the eval kit, and there are a number of tech specs and a list of pdf downloads.
I've summarised what they are in the table below:
Name? | What is it? | Relevance / usefulness |
36 page data sheet | Module / pinouts, electrical characteristics not much else. | |
2 page product range brochure | Module range / headlines | |
8 page white paper | BLE in general / will read it later. Maybe. | |
2 page product brochure | Module / just headline info really | |
1 page poster | Module / marketing | |
44 page everything you need to know document! | Module / but actually includes the evaluation kit – labelled “reference design” | |
2 page Rosh compliance certificate | Range of PNs including eval kit | |
Same document as RoHS |
| |
20 page reference for the sdk / sw setup | Module specific. / more software orientated seems to explain how to get the Nordic environment. | |
23 page white paper | Wireless technology modules / explanation of wireless technologies looks okay | |
|
|
|
TIME CHECK:
since starting, I've spent 45 minutes. that's not too bad, but we're just getting started. I've skimmed over each of the documents above, but now its time to get to grips with them.

Module Integration guide
I'll start here, since it seems to be the most useful.
the first few chapters are really just re-hashing through what we already know in a bit more detail.
Module is based on the Nordic nRF52840 single chip controller. it has 8dBm output power, and is high sensitivity which make it great for long range! excellent. apparently its also the ideal choice for battery powered applications.
we get a nice module block diagram:

and there's a bit of stuff about antenna layout. nice to see the eval kit follows this advice - you'd be surprised how many don't follow the datasheets layout recommendations.
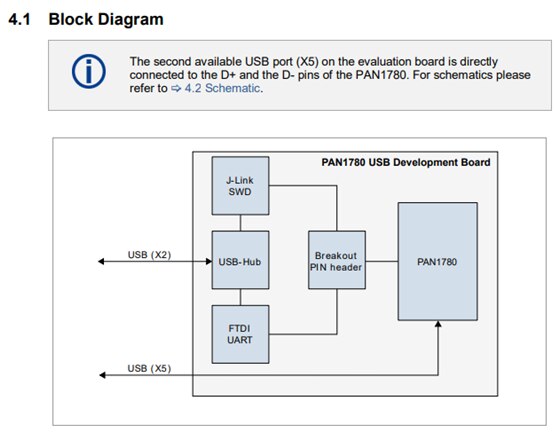
The real goodies are in chapter 4 though. its called "reference design", but its actually about the eval kit. (a subtle distinction, but sometimes the nomenclature matters)
we get a block diagram with some explanatory note about USB:
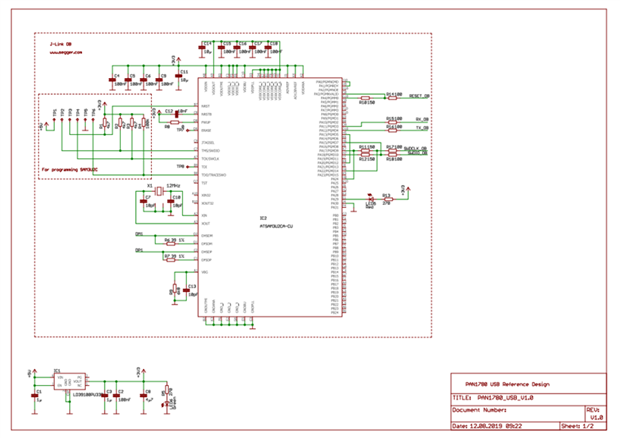
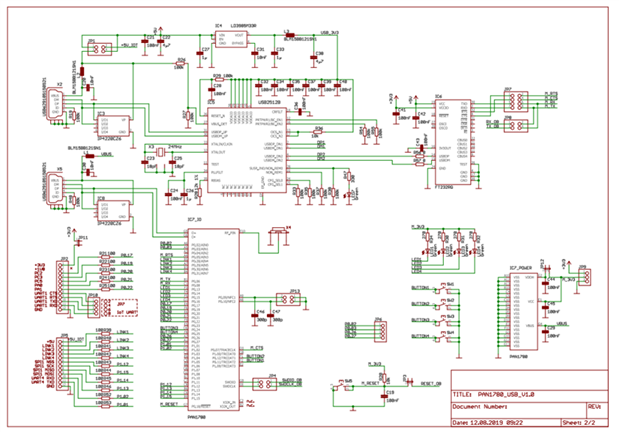
we get a schematic:

a very nice map of the board with significant parts labelled:
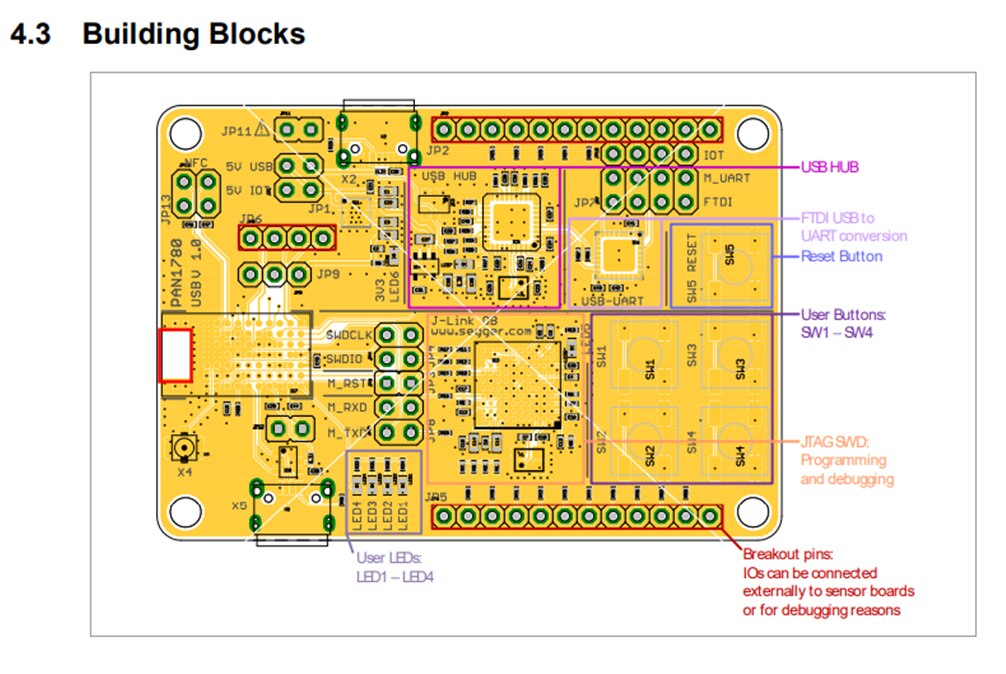
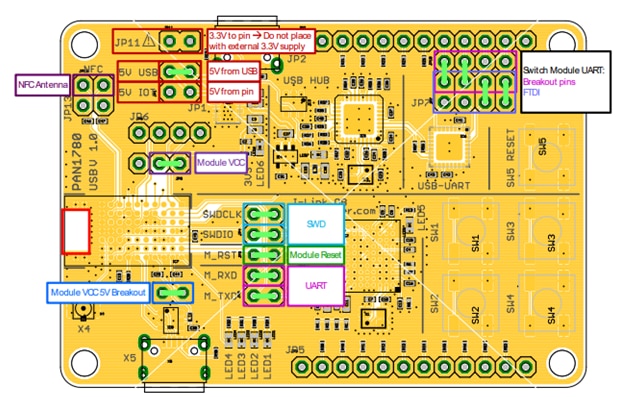
and the jumpers / pins functions:
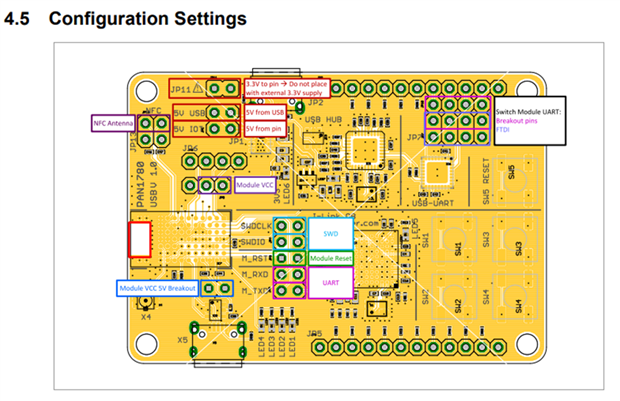
they also show you how to connect the NFC antenna:
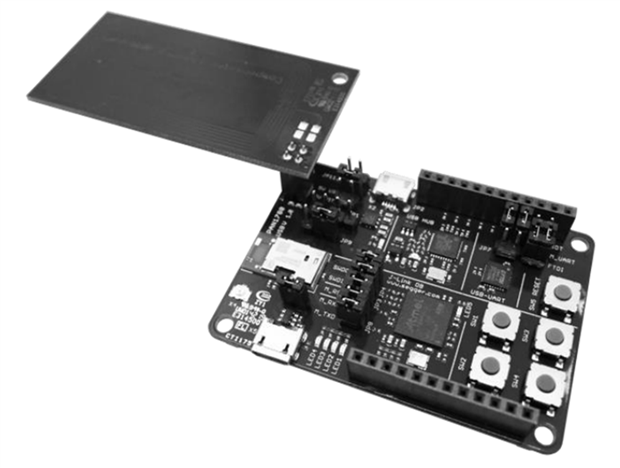
(which really is a bit awkward)
and a print out of the gerber layers.
pretty nIce stuff!
but I would have liked to have better copies of this - actual gerber files? separate schematics rather than pictures in a long pdf manual? project files? I haven't seen any evidence that its available yet...
Chapter 5 - Quick start guide
chapter 5 of the "module integration guide" is a "getting started" tutorial for the evaluation kit. I have mixed emotions about this:
happy, because this is what I've been looking for.
confused, because I did not expect to find this in a document about integrating the module.
anyway, lets follow the guide and see where it takes us.
first, check all the jumpers are in the correct location. a handy visual aid is provided:
very nice. this is also really useful if you forget which jumpers you've changed and need to get back to the start. next, connect the device via USB to socket X2 to power it on.
 No USB Cable included No USB Cable included |
|---|
| there are no USB cables included in the kit. that's pretty cheap I think, but not the end of the world. Luckily I have a few of these lying around, but its worth pointing out that you can’t take that as a given. A few years ago I worked in a place where we just didn’t have many of these cables. Most eval kits and things came with mini USB as opposed to micro USB, and we avoided micro USB in our own products because it’s a bit delicate. Result? In cases like this I had to use my phone charger cable. inevitably I would order one through the proper channels, but I'm not going to sit around for 3 to 4 days waiting for a cable when I've got one in my coat pocket. by the next time I came across a need for one, the company funded cable had been lent out and lost, so I had to go through the same thing all over again. just add it in to the box! I promise to re-use-recycle them! |
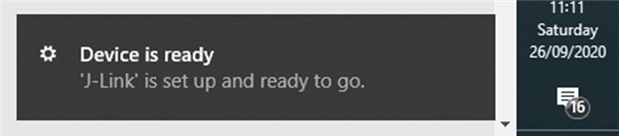
so, power it up - the manual says I may need to install drivers, but its all plain sailing for me (windows 10) . in case I did need to, the guide has links to FTDI and Segger.
TIME CHECK:
ooooh flashing red and green lights! 1hr 45 mins in.
the device comes unprogrammed out of the box, so to get any further i need to set up the tool chain - the Nordic SDK, starting with "Segger Embedded Studio"
when the guide was written, the latest version of embedded studio was 4.30b, released on the 19th of November 2019. 10 months later, and we've had a further 12 updates! the most recent was less than 10 days ago. by the time I've finished writing this it will be out of date!
[*Note - its taken a long while to write this up, but sure enough at the time of posting we've had 2 further updates on V5.10d 2020-10-19 and then V5.20 2 days later!]
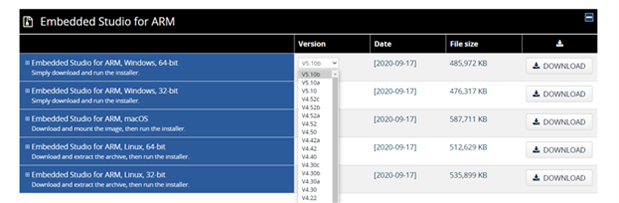
download, install, bish bash bosh.

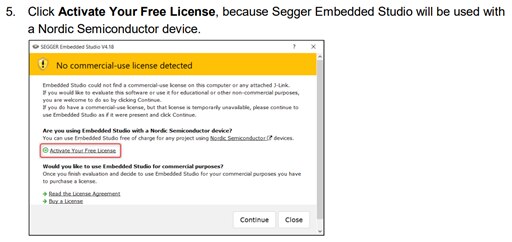
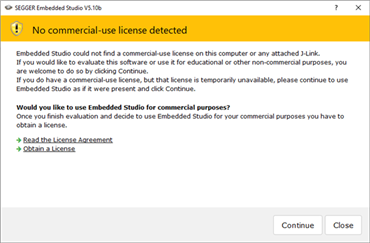
 OUT OF DATE OUT OF DATE |
|---|
the guide says I should get offered a free license during the install, but I don't. the option on the left (screen shot from the manual) was never available, instead i got the one on the right!
turned out in the end I had to wade through the Segger website and find the link another way - I still got the free license, but i had to jump through a hoop or 2 to find it. if you need one too, the link is here: |
if it turns out that Segger Embedded studio isn't to your taste, you can also opt to use
- IAR
- Keil
- or GCC
its nice to have the flexibility, but the only reason to go for IAR or Keil is if your company already has it ($$$), and the only reason to go for GCC is if you are a masochist.
Segger embedded studio is actually pretty nice!
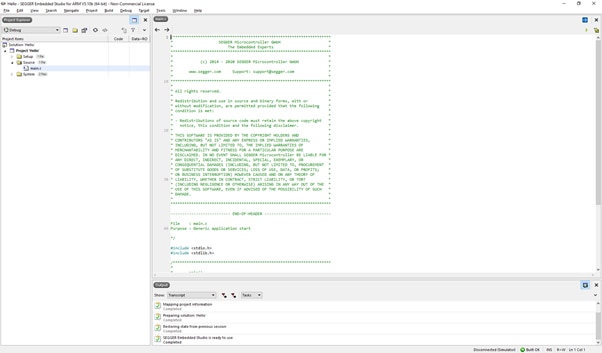
straight into main.c! it feels like a nice light weight fast and functional program.
some modern IDEs are incredibly bloated and slow to start up for what is effectively a glorified notepad application. not this one.
the "module integration guide" (do the quotes convey enough sarcasm?) helpfully says we could go and watch some you tube tutorials if we want to learn how to use the IDE.
so what next? I thought we might get to start using the IDE, but instead it turns out we need...
Nordic nRF Connect
i took a load of screen shots and made a load of notes during the install, but they are pretty boring. let me know if you really want to see them - if there's enough interest ill make a separate blog. the most interesting part required that I update the J-link dll that came with embedded studio from V6.84a to V6.80a this seems backwards (down-date?), but I'll trust Nordic to know what drivers they want me to use for their products.
nRF Connect looks like an install portal for other things:

we dont get asked to do anything more with nRF Connect, so we'll have to wait and see what its for.
incidentally, the Nordic site looks like it has a load of interesting free embedded software tools - a hex merging utility, device-firmware-update package builder and so on.Nice!
Next up, or rather, next download...
Nordic SDK
the Nordic SDK is a zipped file, so I can't show you a screenshot.
again, the Nordic website looks slightly different that the pictures in the manual, but its easy enough to find the links. this download needs to be unzipped into a folder, and the manual directs you towards an index.html file, which contains a load of links to online documentation.
the link to the SDK documentation is :
https://infocenter.nordicsemi.com/index.jsp?topic=%2Fsdk_nrf5_v17.0.2%2Findex.html
also in the download is a load of examples, tools, and an awful lot of c code and header files. but the integration guide just points us to the Nordic Information centre to learn more.
there is also a number of "soft-devices" which are pre-compiled binaries which function as the software protocol stack for the various Bluetooth low energy operation modes.
That's it! now we actually start doing things!
TIME CHECK:
we're about 3hrs 45 minutes in, and I've installed a load of stuff but not actually done anything yet. the highlight was plugging it in and seeing a flashing light, but that was 2 hours ago now (in project time).
lets hope the next bit moves a bit quicker. I think we still get a thumbs up, because I feel like I'm making progress.

nRF connect for Desktop
so, this next bit appears to just be how to flash a precompiled hex file to the board. this is pretty straight forward and a bit of a waste of time, so I'm going to skip over it. I'm sure its very useful to some people in some circumstances, and when I have made a product and require to update the firmware this will be useful, but right now I want to see and customise the code. pre-compiled hex binaries are a bit boring.
moving swiftly on...
Segger Embedded studio
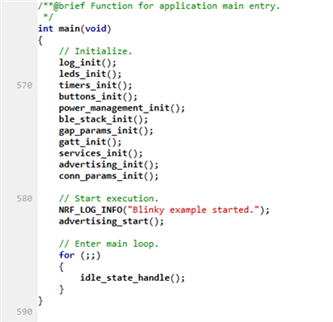
we're told to open a basic blinky project, and mess with the delay timing in the code, before pressing the green "build and run" arrow.
the code is very simple
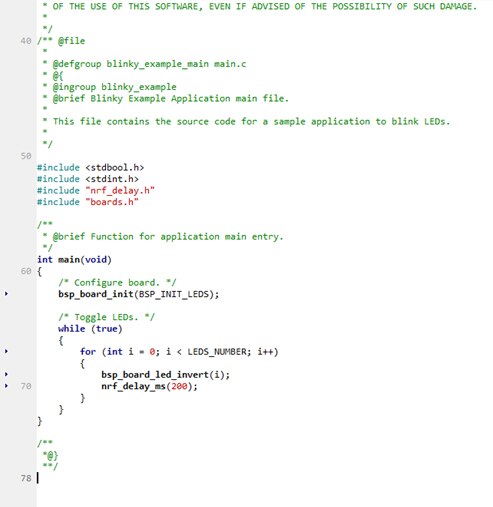
lets have a look in the bsp_board_init(BSP_INIT_LEDS); function
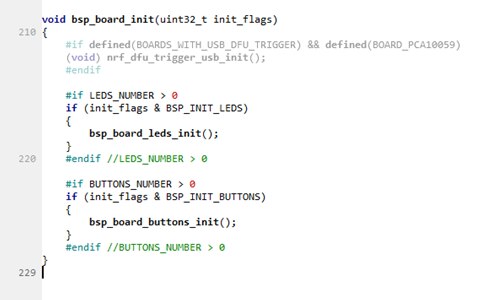
if you follow the rabbit hole down, all it does is sets up the pins and turns them to the LED_OFF state
this is a remarkably small piece of code for an ARM Cortex M4 initialisation. I can't see anything related to clock trees / prescalers, power modes, or enabling the GPIO peripheral buses as you must do on the STM32s that I'm familiar with.
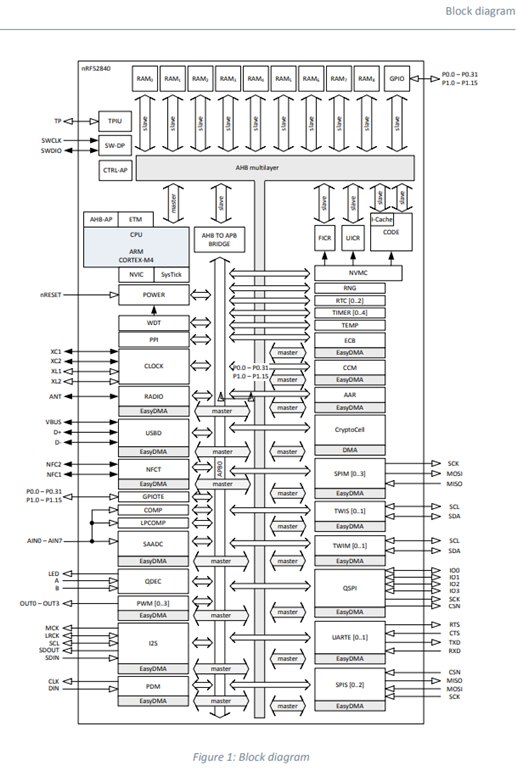
the block diagram for the microcontroller doesn't look so simple, I suppose most of the detail is hidden somewhere else? flicking through the source code there seems to be a lot of SDK related defines, so maybe its all in there somewhere.
there's the assembly start-up code, but even that is minimal by the looks of it. I'm not going to complain though, it works!
Brilliant!
but we're not done yet...
blinky v2 - Bluetooth Low Energy version
the next step in the integration guide is to flash a precompiled hex which will demo the Bluetooth low energy part of the chip.
again though, I want to be able to customise it, so instead I'm going to open and compile the project instead.
aha! this is significantly more complicated! here's main:
here is the protocol stack initialisation:
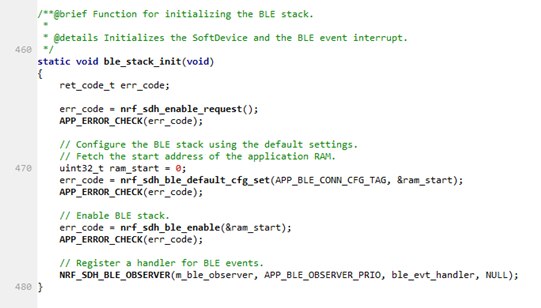
the BLE event handler is a pretty big state machine. compilation seems to work!
downloading the app is pretty simple, ... And STOP THE CLOCK!
We have achieved 2 way communication with the Bluetooth phone app. Very nice


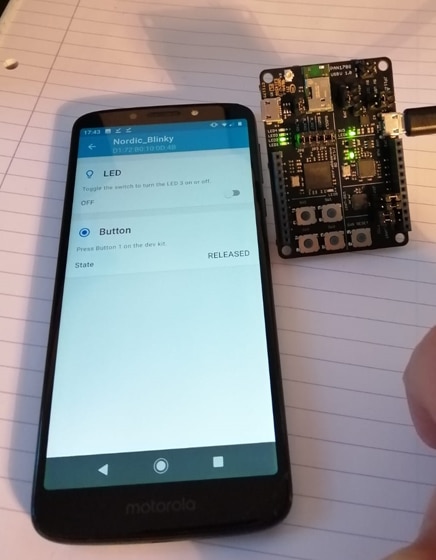
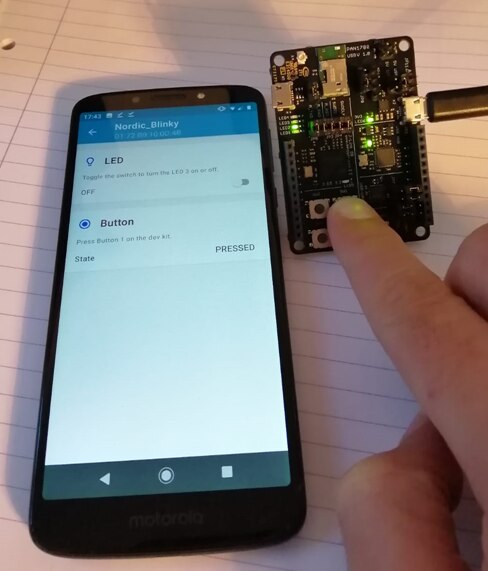
its not shown incredibly clearly, but in the first picture the LED3 is lit (just below the USB socket on the LHS). The LED state, and the button press is listed in the app.
so, in total, that took 4 and 1/2 hours to get this going. its not all plain sailing, and I didn't exactly follow the guide word for word, but I feel pleased with the result. I could have easily achieved this in a typical work day even if you through in a long lunch and a couple of pointless meetings.
I've not been hugely frustrated or confused yet, so that's got to be good, however looking at the code for the last example was a bit daunting.
I've also noticed a bit of a hole when it comes to the available documentation, which I will hopefully explore in another blog post. for now I'll just say that its not particularly helpful to have to go to Nordic for somethings and Panasonic for others.
also, Panasonics document naming conventions could use some work. I would expect "module integration guide" to be instructions on how to integrate the module into an OEM design! who knows what I will find in the "product specification" or the "Application note"
Anyway, overall positive - I've achieved what I set out to do, and in a pretty reasonable time I think. this has all been paint by numbers tutorial instructions though, next time we will find out how I get on when I go off-piste a bit!

Top Comments