RoadTest: Keithley 2110-120 Digital Multimeter
Author: Gough Lui
Creation date:
Evaluation Type: Independent Products
Did you receive all parts the manufacturer stated would be included in the package?: True
What other parts do you consider comparable to this product?: See review.
What were the biggest problems encountered?: Settings stored in volatile memory would be lost, necessitating re-setting on each power-up. KI-Tools software interface could be improved.
Detailed Review:
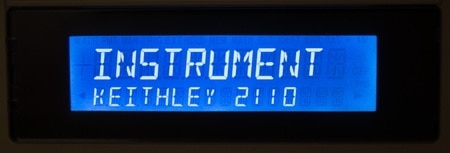
Keithley Model 2110 5.5 digit USB and GPIB Digital Multimeter Roadtest Review
by Gough Lui
Preface
I would like to begin, as usual, with a big thank you to element14/Newark/Farnell and Keithley Instruments for providing this review sample and your support of the community. I would also like to thank Dr. DeFeo for choosing me to be the one to review this product.
As usual - I aim to provide an unbiased and comprehensive review which (I hope) would benefit the community. As such, if you did find it interesting or useful, I would appreciate a "like" or a rating on this review. Also, feel free to visit me at http://goughlui.com.
Introduction
Keithley Instruments is a long-standing name in the measurement arena, having been founded in 1946 by Joseph F. Keithley. In 2010, they were sold to Danaher Corporation which also owns Tektronix - another very well established brand in the test and measurement industry. Many of their operations have been merged, resulting in Keithley being "a Tektronix Company".
Today, we are looking at the Keithley Model 2110-120-GPIB, a 5.5-digit USB and GPIB Digital Multimeter (DMM). This is a broad-purpose, bench-top meter which is listed at $725 on Keithley's website. It is also available with only USB (no GPIB) for a list price of $595.
The instrument headlines a 5.5 digit resolution with 0.012% basic DCV accuracy, at up to 50,000 readings/second, external BNC trigger and measurement complete lines, 2,000 reading memory, KI-Tool and KI-Link data collection software. It is safety rated CAT II to 600v, and CAT I to 1000v.
The market for low-cost digital instrumentation has been warming up, with the likes of Rigol entering the market. Digital Storage Oscilloscopes which were exotic items costing a couple of thousand dollars can now be had starting from around $400, which is great news for students, hobbyists and the education market. It has to be said that the budget end of the market isn't without its caveats - noticeably, removed features and limited resolution/bandwidth are often the trade-offs for low prices.
The same thing seems to be happening with DMMs. I decided to do some shopping just to see how this meter compares with its 5.5 digit bench-top contemporaries "on paper" - hopefully I haven't missed anything too important.
Rigol - their current models include the DM3058 (5.5 digits, $695) and DM3058E (5.5 digits, $449). Monochrome graphics LCD front panel display. Wider capacitance range to 10,000µF. A 2,000 reading memory is standard. Additional math operations of Standard Deviation and Histogram. The DM3058 offers GPIB, USB, RS-232 and LXI-C (Ethernet) connectivity, whereas the DM3058E offers USB and RS-232 only. 123 readings/second maximum reading rate. SCPI, Agilent 34401A and Fluke 45 command compatible. 0.015% DC Voltage Accuracy. Has front USB port for configuration saves (and for data logging?). Logging software (Ultraview) is a $200 additional cost extra.
Agilent - the model 34450A is listed at a base price of $787, with a typically configured price of $1205. It offers 190 readings/sec with an OLED dual-display with histogram and statistical math functions. Basic DCV accuracy is 0.015%. Wider capacitance range to 10,000µF. USB and RS-232 connectivity is standard, GPIB is a software-licensed extra. Command set is SCPI, Fluke 45 and Fluke 8808A compatible. There is a trigger-in and trigger-out by screw terminal on the rear. It also has a Kensington lock slot. Temperature monitoring only by thermistor - no thermocouple features. The 50,000 point datalogging capability is also a software-licensed extra. No logging-software is included. Option prices are not listed on their website.
Tektronix - their model DMM4020 is listed at $808 with a basic DCV accuracy of 0.015%. VFD segment type dual-display. No capacitance measurements. RS-232 connectivity, with USB to RS-232 adapter included. External trigger input available. Also bundles NI LabVIEW SignalExpress TE Limited Edition software. Could not find a maximum reading rate.
Of the three (relatively) big-name vendors, the products on offer do "vaguely" the same thing. All are CAT II 600v and CAT I 1000v rated, with four wire measurement of resistance, dual measure, SCPI command support (and IVI drivers) and connectivity to the computer of some sort. For basic measurements of AC/DC voltage/current, resistance, continuity, diode voltage drop, and basic math functions it looks like they are all almost as good as each other.
The Keithley has a few stand-out qualities. It's basic DCV accuracy is a hair better than the other vendors, and it has a low price once you factor in the package with the KI-Link/KI-Tools software (although, the other vendor's software may be much more functional - it's hard to tell). It also has the highest maximum read-rate of all meters, but that might be moot depending on how you intend to use it. It also has a comprehensive temperature measurement ability with fully customizable RTD profiles and support for thermocouples. It also has dedicated BNC terminals for trigger and voltmeter complete output, which allow for remote triggering and connection of multiplexers/scanners.
On the other hand, the capacitance measurement of the Keithley has a limited range, but at least it is there, and there is no command compatibility on the interfaces for other than SCPI (and a Keithley "extended" mode for KI-Link) which would really only matter to those in an industrial setting where they were already running code for an older (pre-SCPI) meter and wanted a drop-in replacement. The display is a segment type display, meaning that it wouldn't be possible to display arbitrary graphics and perform histogram displays on the device itself.
All in all, it is well positioned in the market alongside its contemporaries, and it offers a comprehensive set of capabilities for the price.
Product Out-of-Box Experience
If there was one word I would choose for my out-of-box experience, that might be "educational". As usual, Newark did an excellent job of getting the product to me safely and swiftly. I unpacked it to find the following:
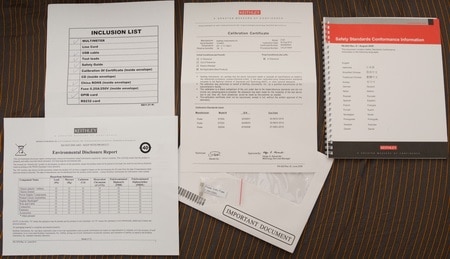
An inclusions list which has multimeter, USB cable, test leads, safety guide, certificate of calibration, China ROHS, Fuse 0.25A/250V and GPIB card ticked. Unticked were Line Cord, CD, and RS232 card. As far as I know, there is no RS232 option for this meter. There is no CD nor a printed manual, but this isn't a problem as all of the software is available from Keithley's website after a quick registration process.

There is also a one-page leaflet which tells us about the Unicable probes which are included - a generous 1.2m lead length to allow you to reach from one side of the bench to the other. The USB lead included is about that long as well, an acknowledgement that we don't always have our computers close to our test instruments, and a very welcome inclusion. Well done!
A power lead was also included, but it was a US-grounded 125v style lead, so I used my own IEC lead (being in a 230v country).

Here is the rear of the meter - you can see the two BNC connectors, the left being for voltmeter complete output, and the right for the external trigger input. The USB port sits right of that. There is a grounding screw near the centre, and above that is the GPIB interface. This is where I stopped for a second and panicked.
See the yellow stopper in the IEC plug? It says 220v +/-10%. But the fuse holder says 120! And the model number on the box (2110-120-GPIB) implies a 120v model. So which is it? I didn't want to blow it up, so I promptly e-mailed Dr. DeFeo about it and he got a reply to me very quickly.
In short, it was a case of read the f*cking manual. Educational? Yes! The yellow stopper should not have 220v marked on it - but the fuse receptacle is removable and the voltage adjustable to any of the selections shown on the side. D'oh!


Success, in a few short steps. In hindsight, I should have read that manual earlier - it was the fact that it wasn't staring me in the face, and my complacency thinking "this is a DMM, how hard can it be?" As an aside, the spare fuse provided in the package is for the line side - although in my own experience, I have never seen one of these blow unless something really bad has happened.
The manual itself is brilliant. A great piece of work - easy to read and highly educational. It not only covers how to use the meter, and how to program it via SCPI commands - it also goes through the theory behind the measurements and gives you pointers as to how to improve your measurements. It's definitely an essential read - especially for people like me who have never owned a "precision" instrument.

The meter itself isn't very heavy but is cased in steel with some rubber ends, so it is definitely sturdy. There is a handle/stand for it that is made of plastic and feels a little bit on the light-side - but it's perfectly adequate for the job. The front panel is adorned with the display, a pair of main inputs, a pair of secondary inputs for four-wire, ratio and reference measurements and two current terminals - one for 3A range or less, and the other for 10A range. There is a dedicated jack for the thermocouple input as well.

The fuses for the current ranges are easily removable by twisting the front panel socket. Each of the fuses is a (3A or 15A) M205 type slow blow glass-fuse, although no spares are included in the box, they should be easy to obtain. It might be wise to do so, as a few careless current connections (e.g. forgetting to connect the leads to the voltage terminals) could see the 3A fuse blown.

The front panel is arrayed with soft rubber-style buttons, each button controlling two features through the use of the blue shift key. The meter itself is menu driven - the directional pad selects the item and changes the value, whereas outside of the menus, the up-and-down keys control the range (if in manual range mode).
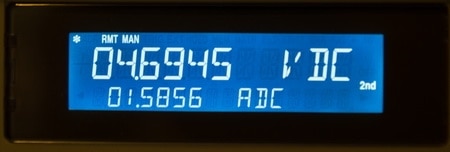
The front panel display is lined with indicators in the top row and right hand column, with two rows (large for main, smaller for 2nd function or for information display) of 14 segment display elements making the main display area. The display is stated to be a VFD in the manual, but I believe it to be a blue-backlit inversed LCD. It has some LCD-like delay characteristics, but is fairly bright and easy to read across the room. The brightness and contrast is not adjustable.
Once the voltage problem was sorted, connecting it up and getting it running was easy. The software seamlessly installed onto the computer, allowing us to proceed to the next step of setting it up.
A Firmware Update
Because I had visited Keithley's site for downloads, I had also noticed a firmware update was available with resolves a problem with repeat trigger average filtered ACV/ACI sampling. It's a sign that the meters are more like computers than ever before - the software on these devices are field upgradable, allowing bugs to be resolved. It's also a sign of Keithley's dedication to support it users by providing updates (whereas prior, you may have had to ship the device in and get the ROM replaced or firmware update applied there, often at some cost to you).
The instructions provided were clear, and the firmware was updated quite quickly - no hassle at all.


What's the difference?
Having made it this far, you might think "it's a multimeter, what's there to be excited about?" A meter, is a meter, is a meter, right?
Well, sort of.
It really takes experiencing quality equipment to understand what you are missing out on. I've been a fairly regular user of those $4 DT-830B 19-range handheld 3.5 digit DMMs which everyone has lying around somewhere. They're very inexpensive, but they are fairly limiting. Then, I also use a more expensive, but equally just as nasty, $50 Jaycar CAT III 2000 count DMM - the QM1548.
You might not think it's fair to compare a bench-top meter with a handheld meter, especially one that costs 10 to 100 times more, and I'd be inclined to agree. Expecting the same level of performance would be ridiculous.
Just it really begs the question of - what is the performance difference? and does it matter? Increasingly, I think it does.
First of all, the handheld meters are very convenient and cheap - you can use them on site, lose them and throw them around. No hassles. If what you want is to know whether the battery has any charge in it, I suppose it can be just fine. But for anything more sophisticated than this, it's a bit problematic.
Lets first tackle the accuracy aspect of the meters. It's no secret that anyone who is using their meters for hobby purposes is slack on the calibration. But even with that in mind, the DT-830B has a DCV accuracy of just 0.5% +/- 5 count on most ranges. Let's say we've measured a 3v cell and it's 3.27v displayed - you really only know it's between 3.20v and 3.34v. Paying a little bit more for the QM1548 gets you to 0.5% +/- 1 count - between 3.24v and 3.30v. How many digits did you say your meter was again?
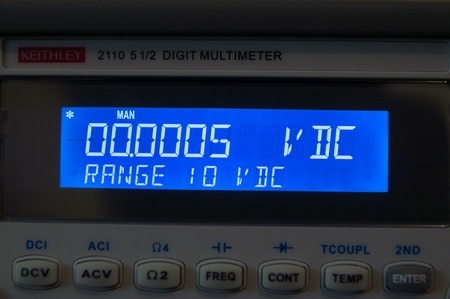
On the other hand, measuring 3.270v in the 10v range on the Keithley 2110 would give us certainty that the voltage is 3.270v +/- 0.012% reading + 0.002% range which works out to be 3.270v +/- 0.0005924v. We're pretty darn sure it's 3.270v.
Don't be fooled by the fact the meter gives you readings in digital form - it often has no relation to how intrinsically accurate the meter is. This can be important when it comes to aligning devices for particular current or voltage levels - say if you build your own current to voltage converters for other measurements or logging activities. In fact, although you shouldn't do this, you could even use this meter to just check whether your other meters are calibrated properly.
Aside from that, most low-cost hand-held meters only offer about three readings per second - not enough to show ripple and noise. Making repeated measurements can be a chore as you wait for the reading to settle on the screen. Even at the most accurate 10 PLC rate, the Keithley delivers about 5 readings per second - noticeably faster.
None of the meters I had prior to this one had any computer connectivity. Data logging was solely a pen-and-paper affair. Data logging meters easily costed $150, operated on their own proprietary RS-232 protocol and retained the same 3.5 digit accuracy. I would say, now that I have used this, that your money would be better saved for a proper piece of test equipment.
The primary reason is that this meter is a USB TMC class compliant SCPI-command-set compatible device. This opens the door for the meter to be used in many interesting computer-controlled ways. It is fully flexible and computer programmable - ready to integrate with other pieces of equipment when you are ready to grow. It's more like a high-accuracy slow data acquisition card. In essence, you won't outgrow it - and if you do, it's easy to upgrade to another device without breaking your programs. Better yet, it is compatible with the industry standard software - LabVIEW and Simulink.
When it comes to data logging - accuracy can be very important. Doing computations on the data often causes any errors to accumulate (e.g. product of voltage and amperage to get power), so you really need better resolution to get a higher level of confidence in your results.
Sometimes, you do come across things you'd like to investigate, but your meter just won't net you a sensible answer. Maybe you've wondered why charging your tablet with a particular microUSB cable takes longer than with another - and you're wondering what level of resistance is acceptable in the cable. If you grab one of the two former meters, I can guarantee, you will end up with readings below the level of noise for the meter. I've been there, done that. Nothing short of a four wire measurement will give you sensible results.
Not to mention that neither handheld meter offers true RMS AC (so measuring AC voltage is often a frustrating exercise), and the DT-830B has no way to directly measure capacitance. Add to that, the questionable safety (impulse voltage) wise of using the DT-830B with mains voltage (say, servicing mains-powered equipment) and it's really just not sensible.
I'll admit, a bench-top meter isn't for everyone. You need a source of mains power, you need some room on your bench, and you'll need your test leads to reach. It's not exactly cheap, especially on a limited budget with other priorities (maybe you'd like a DSO). On the other hand, you'll probably never lose it under a pile of stuff, and it would probably last forever. It is the most basic tool, and one of the most used tools in electronics.
One thing I do miss on the 2110 is the ability to do transistor gain measurements, and to measure inductance as per the QM1548. Increasingly, I am finding the 2110 is the "go to" meter in my room - I have no time to waste on inaccurate measurements. Now that I know the difference, would I go out and willingly buy a meter just like it? In a heartbeat.
You know, they say "when all you have is a hammer, everything looks like a nail." I can attest to this greatly as the 2110 made complicated measurements much easier, I felt compelled to measure. No longer was measurement a "chore". I literally enjoyed the process of measuring, confident of my results.
I guess that's why Keithley's motto is so fitting - "A greater measure of confidence."
But alas, taking good, safe measurements does need some care. For one, you need to read the manual and familiarise yourself with setting the NPLC (for DC) or Filter/Aperture (for AC). This essentially sets the integration time (number of power-line-cycles) and directly trades off measurement speed for accuracy. While generally, larger NPLC results in better measurement stability (1 or greater means mains interference is essentially nulled out, any less will give you some noise impact, plus a reduction in digits due to conversion time), large NPLCs (100) may be affected by drift, so often 10PLC is a good compromise.
But this also means that you will miss transients and fast-moving signals as the reading is averaged over 1/5th of a second at 10PLC. So not only do you need to know what you are measuring, but how to measure it!
Another example of this is the auto-ranging functionality which allows you to basically "hook it up and read the answer". While it's a good feature to have, it also costs time in range changes and bogs down the sample rate. If you want to have a higher sampling rate, you need to set your ranges manually.
The DMM in action - Standalone Usage
General Measurements - Making general measurements with the DMM is fairly easy. The included Unicable 1.2m leads make it easy to reach across the bench, and the CAT II 600v rating allows for safe use with mains powered electronics. The screen is easy to read, from a distance as well.
Many of the configuration settings are stored in volatile memory and are cleared on turning the meter off. This means that one has to go through the full configuration of NPLC and 2nd measurement modes (if needed) upon power-up.
The front panel buttons are two-featured through the use of a shift-modifier key. This isn't too difficult to master, and the most accessed features are accessible without the use of the shift key. The range is alterable through the use of the up-down keys. Pressing each of the keys results in an auditory feedback beep which cannot be disabled and can become annoying after a while.
Additionally, I tested capacitance measurement - it works well.


Continuity and Diode measurements also have auditory feedback. When disconnected, the screen displays OPEN, and when an appropriate resistance or voltage drop appears (configurable), the beeper is sounded.


4-wire Measurements - Four wire measurements are available for resistance and RTD temperature. Four wire measurements of ratio or reference to a reference voltage are also easily enabled, however, require an additional set of probe leads which is not included in the package.

For a test, a measurement of the resistance over an F-terminator (nominally 75 Ω) was made with 2-wire mode ...

... and four wire mode with measurement hold (to free my hands to take the photo) ...
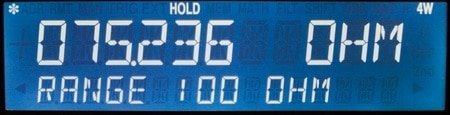
... the slight difference in reading is use to the lead resistance, which is effectively negated through the use of four-wire mode.
Dual Measurements - It is possible to use this DMM in dual measure mode for certain measurements. For example, it is possible to combine DCV with ACV, DCI, Frequency (Voltage), Period (Voltage) and Thermocouple measurements. The full limitations are documented in the manual under 3-26.
It is important to note that while two variables are being measured, there may be some accuracy tradeoffs, also detailed under 3-26 due to current flow in the test leads. The measurements are also taken in sequence and not simultaneously. Choosing certain range combinations results in an annoying (and potentially lifetime-shortening) toggling of a range relay inside the meter - resulting in a steady stream of tick-tick-tick-tick-tick ... That being said, there are several quite useful range combinations that do not result in this (e.g. DCV 10v + DCI 1A/3A) which is nice.
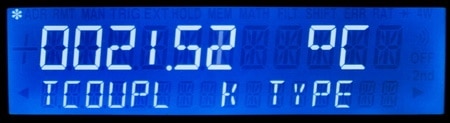
Thermocouple Measurements - The DMM is capable of high accuracy thermocouple temperature measurements with a dedicated thermocouple port on the front panel. Unfortunately, with the "low cost" K-type thermocouples I had on hand, the blade of the +ve terminal was too wide to fit into the socket (which may be designed for their own termocouples) and require some butchering to fit. It does work though! Note that you cannot just stick a few wires into the socket and extend/adapt the thermocouple wire as dissimilar metal junctions can produce a voltage which would introduce error or completely ruin the measurement of the voltage formed at the sensing junction of the thermocouple!

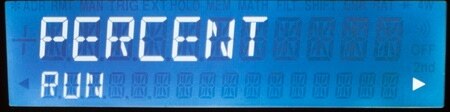
Math and Memory Functions - the math functions are easily measured through the display. Each function has a Run option which invokes the mathematical function, and optionally, a configuration set. For example, this is how one might invoke the percent feature -


The memory function is also easy to use. By pressing store, the DMM records each reading in its 2,000 reading buffer. Pressing store again stops the record. Pressing shift+store for recall allows you to step through each of the readings. Alternatively, pressing store again clears and re-starts recording into the memory buffer.
The trigger button can be used to initiate single measurements, and auto/hold feature can be used to freeze the reading once a stabilized value is achieved.
The DMM in action - Standalone Comparison
Just the other day, I managed to obtain 100 (yes, that's one hundred) CR2032 lithium coin cells from a vendor in China. The price was good - and it offered me an opportunity to check just how well made the cells were.
I reasoned that a well configured manufacturing process should have very tight tolerances - so each battery should have a very similar open circuit voltage. But just how similar? Lets find out.
But before just finding out, why don't we compare it with my faithful DT-830B and QM1548 meters?

It's almost a simulation of process/quality control - with the exception that I'm not running a battery manufacturing plant. Instead of using the computer control - I decided to do this one "stand alone". You can imagine how much fun taking and manually recording 300 measurements separately would have been ...

With my handheld meters, I really can't tell anything apart. More than half of the cells measured the same voltage. With the Model 2110, we can finally see some clumpiness and vaguely see the distribution. Only four cells measured the same voltage with the Model 2110, a vast difference. We can see the two hand-held meters are slightly off for calibration too - but are still within their +/- 1 count or +/- 5 count specs.
When it comes to process control - even small deviations in measured results can be informative of something going wrong up-stream. This level of accuracy is pretty much mandatory in most cases.
The DMM in action - Use with KI-Tool
The meter itself is supplied with KI-Tool/KI-Link package which helps establish communication and perform data logging with an attached computer through USB or GPIB. The system includes NI VISA, and requires the NI VISA layer to operate correctly.
You may be wondering "What's the difference between USB and GPIB?" For the hobbyist, not much really. This device is USB TMC compliant which essentially emulates GPIB over a USB connection. Using the VISA layer, an application doesn't really care what physical layer connection is being used. The trade-off is that USB TMC has slightly more latency which may affect the highest read rates.
The GPIB is an older, specialized interface for connection of test equipment. In industrial environments where a GPIB bus is already established, and a drop-in replacement is required, it makes sense to purchase a GPIB capable device. But to a hobbyist, the high cost of a GPIB interface (around $800) doesn't make it an attractive option.
As I don't use or possess a GPIB interface, all of my use was over USB.
The KI-Tool software detected and accessed the Model 2110 without any necessary configuration, the software offering a "virtual" front panel to the instrument with a chart recorder. There is settings for trigger interval, scale, and readings plotted on the chart.
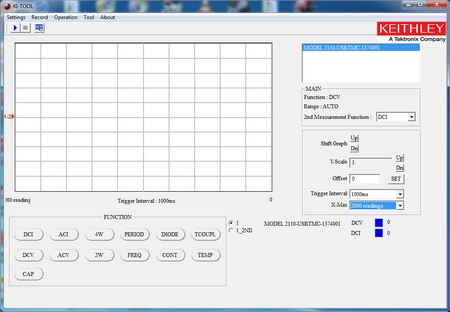
In this case, I was setting up for one of my later experiments. The design of KI-Tool is a bit lacking, as other important features are buried under the Settings menu.

These settings can be changed, and are applied once Submit is clicked, but the settings are not remembered. I somehow wish these were also visible on the main interface, and profiles could be set up for quick access.

Like-wise, this little gem under Reading Settings allows you to save all measurements to a data-logging record. Forgetting to tick this and starting a measurement will leave you with only the graph visualization - it's a mistake I've done before, so I would have much preferred to have it also on the front page, and maybe accompanied by a big record button.
The software itself has ten recording slots, beyond which, you must delete your data or append to an existing record. Listing the data does take a few seconds - where you can export to CSV for further processing.

The KI-Tool package also includes KI-Link plug-ins for use with Excel and Word, but I did not try them, instead opting to record into KI-Tool and exporting to CSV for further data processing. It also includes Keithley Communicator which can be used to send and receive SCPI commands from instruments.
As it is SCPI compliant, those with access to National Instruments LabVIEW SignalExpress can easily access more sophisticated data logging functionality, although, the full LabVIEW package is not exactly "inexpensive". A Limited Edition (LE) version is available free of charge, although the features are restricted.
The DMM in action - Exploring the Power Line Voltage and Frequency
Remember when I set the voltage on the back of the multimeter? Some people in Australia might probably scream loudly and say "but hey, we're a harmonized 230v country!" In light of that, I should have set the voltage selector to 220. But I think I know better, so let's find out.
I plugged the test leads into the open end of a second IEC lead which I plugged into a surge-protected, fused and overload-protected outlet and left it recording with the medium filter for a period of 24 hours starting from midnight. Readings were returned once every 3 seconds (approximately, trigger was set to 2s). ACV and FREQ were selected in a dual-measure situation.

The answer? Well it's definitely 240v. The power here is allowed to go up to 253v, and in this recording, it hovered between 237v and 248v. A bit out of spec if I selected 220/230v, but well within the AS standard. The frequency also had minor excursions, although centred around 50Hz, as expected. Good to know, but definitely not on the same cycle-to-cycle logging ability of the specialist power-quality monitors.
The DMM in action - Exploring the Real Capacity of Rechargeable USB Power Banks
This part is a little bit of a bonus - in fact, it's fairly involved and of interest to many smart-device users that I have posted a more thorough posting on my blog here: http://goughlui.com/?p=4321
I configured KI-Tool to sample DCV and DCI in dual measure mode, with a configurable ceramic resistor load (5 ohms and 2.5 ohm load). I was going to build and align an active load, but if I can measure both variables at once, it's not as critical. Short alligator to banana clip leads with thick copper wire were used to keep the resistance low.
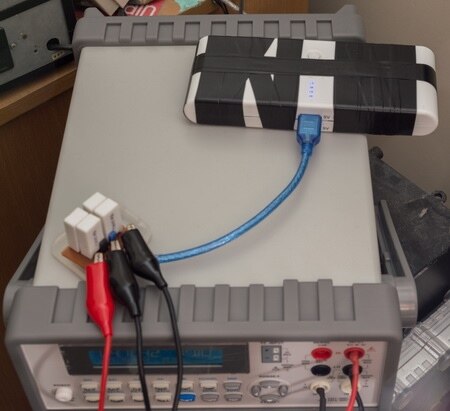
After many many hours of testing, I was able to come to the conclusion that the 30,000mAh brand-less cheap power banks I have come across on eBay are very fraudulent to the point that I rebuilt a pack. You will have to visit my blog for the full details.
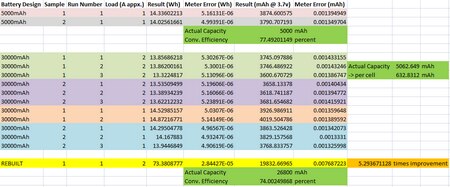
The capacities were calculated using 1.015s per sample (15msec latency) to calculate the watt-seconds per sample, which were summed and divided by 3600 to find Watt-hours, divided by voltage and multiplied by 1000 to find mAh. A figure for meter error based on the x% reading + y% range was calculated for each sample and summed to find the total contribution of error from meter error (naively, it's unlikely to be this much).
The result? The errors from the meter are so small even after multiple hour runs that the lead resistance is probably several magnitudes greater in terms of error contribution. I definitely have confidence in these results.
Conclusion
I would just like to reiterate my thanks to element14/Newark/Farnell and Keithley Instruments for providing this review sample. The Model 2110 is a well-placed instrument in the market and offers a wide-array of measurement possibilities for a very attractive price. It features a market-leading basic DCV accuracy, and features which match or exceed most of their competitors while undercutting the majority of them.
The provided documentation on their web-site is class-leading, easy to read and complete, offering coverage of the device, remote operation commands, measurement theory and techniques to improve your measurements. A fully-specified datasheet is also provided.
Standalone usage was easily accomplished, with a bright easy-to-read dual-line display. On-board 2,000 data point memory, along with menu-driven acquisition options makes it easy to ensure that transient signals are captured without the assistance of a computer. A full suite of self-tests is included to ensure the meter is properly functioning, inspiring confidence in your readings.
Its accuracy, flexibility and reliability were easy to harness thanks to the bundled KI-Tool, even to hobbyists not familiar with LabVIEW. Its USB TMC compliance with SCPI command set allows for easy upgrade and use with LabVIEW and Simulink with IVI and LabVIEW drivers provided (although, I was not able to test this due to time constraint). Generous support had been demonstrated with the provision of an easy-to-apply bug-fixing firmware update.
Using the Model 2110 was easy after reading the manual, although in practice, it would be nice if more of the options were stored in non-volatile memory so as not to have to remember to re-configure the meter upon every power-up. The KI-Tool software is easy to install and reliable, albeit a little clumsy in its interface and suffers from the need to remember to re-configure all settings on each run - some improvements would make data logging easier to use, however, in its present state, it is perfectly adequate.
That being said, none of the caveats mentioned above really "break" the allure of the Model 2110 as a package. I would definitely recommend it as a good option for those looking for a more serious meter for servicing, process control or bench-work.
I hope this has been a useful, eye-opening, reassuring review and tour of the capabilities of the Model 2110. Measurements are no longer the chore they once were!


