Infineon OPTIGA TPM SLM 8670 Iridium Add-on Board for the Raspberry PI

Table of contents

RoadTest: Infineon Trust Platform Module + Raspberry Pi 3 B

Author: skruglewicz

Creation date:

Evaluation Type: Evaluation Boards

Did you receive all parts the manufacturer stated would be included in the package?: True

What other parts do you consider comparable to this product?: First time experience with a TPM, so no comment on this question.

What were the biggest problems encountered?: Getting the Encryption/Decryption Tools and programming to work. This is not a problem with this review TPM, but with the Open source software configuration

Detailed Review:

 This RoadTest review will evaluate the Infineon OPTIGA TPM SLM 8670 Iridium Add-on Board for the Raspberry PI
UPDATE TSS Programming Section 6 March 15 2022

The board is fully compliant with the Trusted Platform Module (TPM)standards issued by the Trusted Computing Group (TCG) 

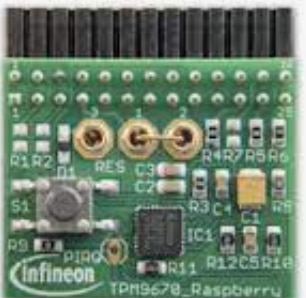
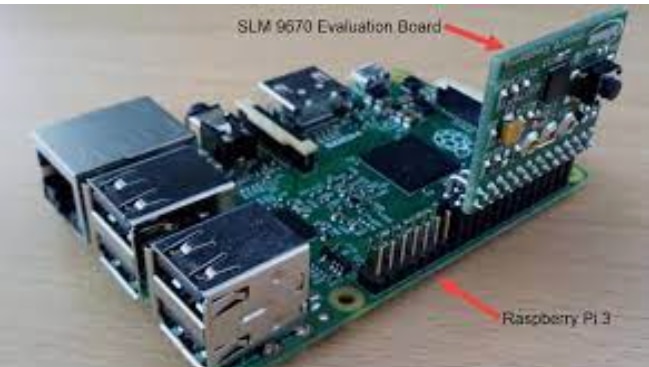
The module contains a female header that supports SPI which connects to the GPIO on a raspberry PI 3. The TSG spec defines the pin connections over an SPI interface.

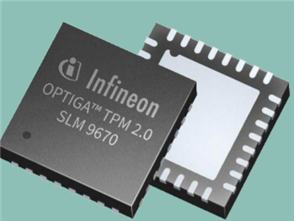
The evaluation board contains the Infineon  OPTIGA SLM 9670AQ2.0 security chip.

The module is used to evaluate compliance with the Open SourceTSS2 Stack.
An Raspberry PI 3 Model B, is supplied with the kit reviewed. The RPI needs to be configured and flashed with a Linux operating system to a supplied MicroSDHC class 10 card. An micro USB cable is also supplied in the kit.

The RPI uses the Linux operating system as a host to the Open Source TSS and Tools.

An extensive108 page guide by Infineon is used to show the  integration of the open source TPM Stack 2.0 on a Raspberry Pi Linux environment with the OPTIGA TPM SLM 9670 board. The Document is called "OPTIGA TPM Application Notes" Revision 1.2 2020-8-10. This document contains step-by-step instructions on How-To setup the Open Source TPM software stack 2.0 (tss2.0) and related software on a raspberry PI 3 Linux environment to communicate with the Trusted Platform Module (TPM) OPTIGA TPM SLM 9670 TPM Iridium board.
image

WarningNOTE :  As of this review writing,  an updated Raspberry PI OS has been release for all models of  the PI's. The new version is Debian 11 (code name BULLSEYE.)..The  RPI OS  is based on the Linux Debian distro, which is upgrade to a major release every 2 Years.. The PI organization like to code name the OS version with TOY STORY characters... cute.

  1. DO NOT FLASH this version to the SD card
  2. DO NOT UPGRADE the OS when the proper OS is installed.(this will update to the Bullseye)

This guide was tested on a Raspberry Pi (RPI) 3 Model B with Raspberry Pi OS (32-bit) Lite, a minimal image based on Debian 10 (Buster), and kernel version 4.19 is used  The full version of BUSTER OS will also work, on a bigger SD card. this is what I'm using for this review.

More on installing the OS latter.

My goals for this review are:

  • Getting the Open Source TSS2.0 software installed, configured and run on the Raspberry PI 3 Model B.
  • Running the examples command line tools
  • Programming with the API (FAPI)
  • If time permits, getting on AWS Greengrass.

I will be evaluating the use and helpfulness of customer support on the OPTIGA TPM SLM 9670 TPM Iridium board. kit. I will also be discovering and evaluating the available User Forums and Knowledge Base available on the Infineon Web Site, that hopefully will aid me in my experiments. I will also be using the Resources (Documentation, Video's, Tutorials ) available on the Website. I will be including links throughout my review and in the "references" section at the end of this review.

UnBoxing of the Dev Board

The TPM board is contained in a box along  with a Raspberry PI 3 Model B, 8GB microSDHC card, Micro USB cable and a Quick Start Guide. The box was contained in a well padded shipping box from Newark. This section describes the contents in photo and describes the " Quick Start Guide"

Unboxing Photos 

image image image
image image
image The OPTIGA TPM module contains a female header that supports SPI which connects to the GPIO on a raspberry PI 3 as Described here.
OPTIGA TPM SLM 9870 PACKAGE
image image
QUICK START GUIDE
image image
FRONT

BACk

image image
PAGE 1 PAGE 2

Describe the Quick Start Guide

  • This section will describe  the 5 steps given in the guide.
  • if your already familiar with the PI you can skip to step 5 option 1.

Steps 1, 2 and 3 .- Setup on the supplied RPI 3 Model B

  • These 3 steps will get the Raspberry PI OS on the RPI 3 so we can attach and communicate with the OPTIGA TPM.
  • The following 3 steps, will describe :
    • What you will need
    • Set up your SD card
    • Connect your Raspberry Pi
    • Start up your Raspberry Pi
    • Where to find help
    • What 's next?
  • WarningNOTE :  As of this review writing,  an updated Raspberry PI OS has been released for all models of  the PI's. These 3 links describe the setup of this OS version on the newest Raspberry PI 4 .Model B.

    • This version is brand new and is known not to work with the TSS.

    • The new version is Debian 11 (code name BULLSEYE.)..

    • This RPI OS  is based on the Linux Debian distro, which is upgrade to a major release every 2 Years..

    • DO NOT FLASH this version to the SD card
      • INSTEAD when You get to the "Setup of the SD card instruction"
        • Follow the Video instructions I've included in Appendix A to flash the Debian 10 OS version code named BUSTER to SD card
    • DO NOT UPGRADE the OS when the proper OS is installed.(this will update to the Bullseye version)
      • .Skip that Step  in the OS setup. 

Step 1 Download -- get the  Raspberry PI OS 

  • This link will describe HOW-TO Get the Raspberry PI OS from: 
    https://www.raspberrypi.org/downloads/raspbian
  • Once you have the PI Imager installed on your machine, to downlead and flash the OS, refer to Appendix A, to get the Buster version. 

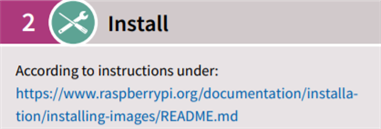
Step 2 Install - Be sure to install  Debian10 buster onto the PI 3

image

Step 3 Setup - 

image

  • Connect the Iridium board to your Raspberry Pi as
    illustrated to the right and follow the instructions under:
    https://projects.raspberrypi.org/en/projects/raspberry-pi-setting-up
  • Link takes you to the rasberrypi.org setup page
  • It is very similar in content, to the previous step link.
  • It is presented in a wizard like navigation scheme, that follows a series of steps to get your PI up and running.

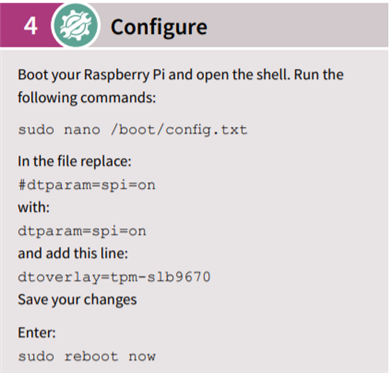
Step 4 Configure. - 

image

  • These steps can be done at this time, but when you get into the next step of option1, these same configurations to the OS are also done in the Applications notes Document

Step 5- Now you are ready to go

image

  • This step contains 3 options that you can use to work on the
  1. TPM2 Software Stack  TSS
  2. OPTIGATm TPM on AWS Greengrass
  3. OPTIGATm TPM on Microsoft Azure
  • These Options will be described in the Next 3 sections

Option1 - TPM2 Software stack (TSS)

image

  • the Link will download a zip file containing: 
    • An extensive108 page guide by Infineon, which is used to show the  integration of the open source TPM Stack 2.0 on a Raspberry Pi Linux environment with the OPTIGA TPM SLM 9670 board.
      • The Document is called "OPTIGA TPM Application Notes" Revision 1.2 2020-8-10.
      • This document contains step-by-step instructions on How-To setup the Open Source TPM software stack 2.0 (tss2.0) and related software on a raspberry PI 3 Linux environment to communicate with the Trusted Platform Module (TPM) OPTIGA TPM SLM 9670 TPM Iridium board.
      • The zip file also contains source code for the C programming examples in section 6 "TSS Programming" of the Application Notes

OPTIGA TPM Application Notes" Revision 1.2 2020-8-10

  • This document contains step-by-step instructions on how to setup the Open Source TPM Software Stack 2.0 (TSS 2.0) and related Software on a Raspberry Pi® 3 Linux environment to communicate with the Trusted Platform Module OPTIGATm TPM SLx 9670 TPM2.0 from Infineon Technologies. In addition, software usage and programming examples are shown. 
  • This guide was tested on a Raspberry Pi (RPi) 3 Model B with Raspberry Pi OS (32-bit) Lite, a minimal image based on Debian 10 (Buster)+Desktop, and kernel version 4.19 with an Infineon OPTIGA(TM) TPM 2.0 attached to the RPi’s GPIOs
  • This document is where I spent most of my time for this review.
  • It is excellently written and I was able to understand more of what TPM and TSS are all about.
  • There are 6 major section that cover the details of the OPTIGATm TPM SLM 9670 TPM2.0  in combination with the Open Source TPM Software Stack 2.0 (TSS 2.0) to evaluate how to implement TPM software integration fusing the Raspberry PI 3 model B. I'll give a summary of the document in the next section.
    • 1. The TPM Software Stack (TSS)
      • Explains what the TSS is.
    • 2. Setup and Usage Environment
      • Explains the Setup of the TPM board and its connection to the Raspberry PI
    • 3. Installed Software Overview
      • describes the software components of the the TSS.
    • 4. TSS Setup
      • 12 pages of Step by Step instructions to install the TSS and the components & Tools. 
    • 5. TSS Usage 
      • 16 pages of describing the usage of the tools and components of the TSS.
    • 6. TSS Programming
      • 64 pages of programming examples, that will use the installed FAPI Library. The  Feature API (FAPI),  provides a generic method to implement security functionality with little overhead. Lower layers ( Enhanced System API (ESAPI) & System API (SAPI) )  are available to call, but not described in this Document
  • I'll give some highlights of the document in the following section and point some pro and cones about the document. 
  • If you are going to experiment with the OPTIGA Module with the Raspberry Pi 3, I recommend reading this cover to cover.

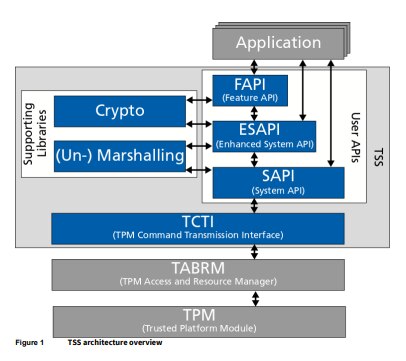
1 The TPM Software Stack (TSS)

  • The TSS is is described as "middleware software to support, improve and simplify TPM usage for developers and system integrators."
  • The layers provide 3 different  "User API's " that can be called from an Application.
  • The figure below is from page 9 and describes the TSS architecture.
  • As mentioned earlier, only the FAPI interface examples are  described in this document.

2 Setup and Usage Environment

  • For this review I used the recommended Buster version of the OS to flash to the SD card.
  • I was able to get the buster image from the PI image index at http://downloads.raspberrypi.org/raspbian/images/raspbian-2020-02-14/
  • I did not use the recommended Lite version and I flashed  BUSTER + Desktop 32 BIT to a 32GB card that I had and did not use the supplied 8GB card.
  • NOTE: DO NOT execute the Update command described on Page 11 step 1
    • There is no need to, Since we want to use the version of Buster and not upgrade to the latest OS. 
    • These appnotes have been tested on the Buster OS

3 Installed Software Overview


This guide focuses on installing five software components for use with the TPM. These are
1. TPM Software Stack 2.0 (tpm2-tss)
2. TPM2 Access Broker & Resource Manager (tpm2-abrmd)
3. TPM2 Tools (tpm2-tools)
4. TPM2 TSS Engine (tpm2-tss-engine)
5. Cryptsetup (cryptsetup)
6. PKCS#11 (tpm2-pkcs11)

The Chspter  goes on to explain what these components are.

  • The TPM Software Stack 2.0 (TSS 2.0) is an implementation of the Trusted Computing Group’s (TCG)
    specification and consists of various Application Programming Interfaces (APIs) to communicate with the TPM
    on different abstraction layers.
  • The TPM2 Access Broker and Resource Manager (tpm2-tabrmd) implements the TCG’s specification
    that manages the TPM context in a manner similar to a virtual memory manager. It swaps objects, sessions and
    sequences in and out of the limited TPM memory as needed. In general, it is an optional component.
  • The TPM2 Tools are command-line tools that, if installed, will use the Feature API (FAPI) and Enhanced System
    API (ESAPI) of the TSS to communicate with the TPM or Resource Manager. The tools for both APIs are installed
    in parallel with different program names.
  • The TPM2 TSS Engine implements a cryptographic engine for OpenSSL for the TPM2.0 using the TPM2.0 TSS. As
    soon as the engine is loaded, the OpenSSL operations are executed using native TPM functionalities.
  • The Cyptsetup extension described in this Application Note adds TPM2.0 support for disk encryption.
  • The PKCS#11 software uses the TPM2.0 device as cryptographic token according to the Public-Key
    Cryptography Standard PKCS#11. Thereby, PKCS#11 defines a standard method to access cryptographic
    services from tokens or devices, e.g., hardware security modules (HSM) or smart cards

image

4 TSS Setup

  • This chapter shows step-by-step how to setup the TSS Stack
  • NOTE: you will need to do the optional section in 4.2.4 FAPI Configuration on page 18 to build with RSA, since ECC is not supported yet. I discoverd this the hard way ,because I had problems with the Encrypt/Decrypt command in the next section.
  • Up to three basic steps are needed to install each project.
    • The first step sets up the build environment,
    • in the second step the project is installed
    • and the third step may involve some post-installation measures.
  • The installation step consists of five sub-steps.
    • First, the repository containing the software will be downloaded.
    • Second, a bootstrapping process is executed which will bring the downloaded source tree into a state for further processing.
    • In a third step, various parameters for the build process can be set with the configure script.
    • in the fourth step, the make command is used to compile the project with the previously defined parameters
    • Finally, the program is installed via the “make install” command.

5 TSS Usage

  • This chapter expalins examples of some command line programs that use the TSS to communicate with
    the TPM.
  • This chapter shows some examples on how to use the TPM2 Tools (tpm2-tools), which are command line tools
    to execute basic TPM functionalities. In the examples in this document, only the most relevant parameters of
    the tools will be explained. More detailed information about the tools and the parameters can be found in the
    respective man pages [3], e.g., “man tpm2_getrandom”. For convenience, the used commands are listed in
    addition as text for easier copy & paste.
  • This section describes the usage of the TPM2 Tools for FAPI, which provide generic methods to create keys and
    perform cryptographic operations with the TPM using the keys stored in the FAPI metadata store.
  • Most of the tools worked fine for me
    • The only ones I had problems with, was section 5.1 and 5.3
      • 5.1.3 Encryption and decryption on page 30
        • this turned out to be because I did not do the optional section in 4.2.4 FAPI Configuration on page 18
          • Optionally, certain parameters (e.g., cryptographic parameters, used TCTI or keystore and log directories) can be customized by the user. 
            Note: The following steps are optional and needed to customize FAPI initialization.
          • ECCis the default, but not supported yet and you will need to modify the configuration file to use RSA, which is supported as of this review
          • I'm not sure why this was optional in this Appnote document?
      • 5.3.1 and 5..3.2 on CryptSetup (disk encryption)
        • 5.3.1 NVRAM key slot.on page 35
        • 5.3.2 Additional key slot.on Page 37
          • Still haven't figured this  one out.

6 TSS Programming

    • This section shows how to create and compile programs using the installed TSS FAPI library.
    • The FAPI provides a generic method to implement use cases with a low programming overhead and is recommended for typical scenarios
    • UPDATE TSS Programming Section 6

      • I just finished  going thru a Blog Post by  on "How to Write and Build TPM enabled applications on your laptop. Then automatically deploy them to your Raspberry Pi and remotely debug."
      • I highly recommend going thru this exercise if your interested in in cross-compile and remote debugging PI code from the PC.
      • Jan takes you thru the following steps and in the end you will be able to build the TSS FAPI programming examples from section 6 of the AppNotes on your windows PC and debug them remotely all from the Eclipse IDE.
        • install a C toolchain for ARM on your (Windows) development PC
        • collect the TSS include files and libraries that we built earlier on the Pi
        • install and configure a debug server on the Pi
        • create an Eclipse C project, compile the code and build a Linux / ARM native executable
        • create a Debug target that uploads the executable to the Pi, starts a debug server on that Pi, and then lets Eclipse on your dev PC connect to it
        • Test all of this
      • I finished every step and when I came to the end of the post, it worked the first time! Thanks for posting this. Great job....
      • I ended up debugging all the PI code in this section with my new cross-compile environment. 
        • image

Summary and Conclusions

  • I read and followed every page of this Appnote

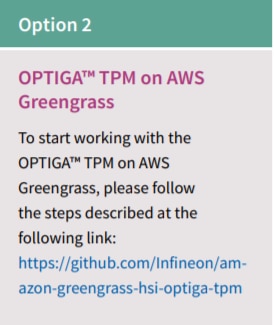
Option 2 - OPTIGATm TPM on AWS Greengrass

image

  • II plan on experimenting with this option soon

Option 3 - OPTIGATm TPM on Microsoft Azure

image

Infineon WEBSITE

  • I was able to get some questions answered
  • At the time of this review There was no portal available
  • The Forum which is in leiu of the portl is very usefull

Summary & Conclusions

  • Very well written Appnotes on the usage of the open source software.

Possible Future Experiments

  • DONE --- Finish section 6 TSS Programming
  • Do option 3 using jcrumps notes in his review.
  • Do option 2 experimenting with AWS and the TPM.
  • Some more experimenting with all the knowledge gained in the AppNotes.

Appendices

Appendix A - Flashing BUSTER with Raspberry PI Imager

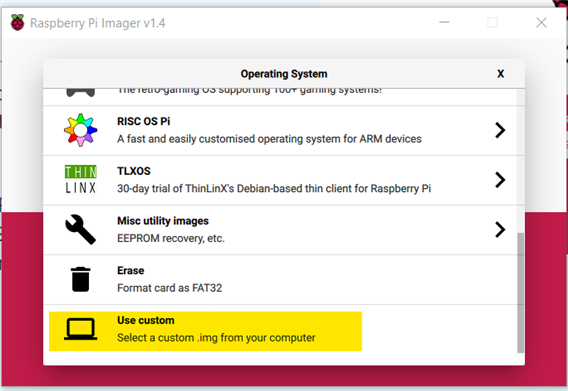
  • I used the  Pi Imager to load the ZIP file using the Custom Image option 
  • I downloaded this version of BUSTER from the Index.
  • image 2020-02-13-raspbian-buster.zip 2020-02-13 16:21 1.1G  

Since the Buster OS is not Available on the PI Imager this video will demonstrate how to get the image and flash it to an SD card. 

The complete video is available on YouTube here 

References

  1. TPM2 software stack (TSS) To start working with the TPM2 software stack (TSS), I used the Apnotes document to Instal,and experiment witht the open source TSS to communicate with the Optiga TPM.
    1. The following link with downlad a zip file containing the Appnote documenet along with source code for the programming examples:
      1.  https://www.infineon.com/TPM-TSS-AppNote
  2. Iridium - SPI TPM Evaluation Board for OPTIGATm Trusted Platform Module:
    1. https://www.infineon.com/dgdl/Infineon-Iridium_1-0_9670_HD-AdditionalTechnicalInformation-v01_01-EN.pdf?fileId=5546d46271bf4f920171ef70667e51b4
Anonymous