


How to Write and Build TPM enabled applications on your laptop.
Then automatically deploy them to your Raspberry Pi and remotely debug.

Goal: Develop on a PC with Eclipse, execute on the Pi
Activities:
- install a C toolchain for ARM on your (Windows) development PC
- collect the TSS include files and libraries that we built earlier on the Pi
- install and configure a debug server on the Pi
- create an Eclipse C project, compile the code and build a Linux / ARM native executable
- create a Debug target that uploads the executable to the Pi, starts a debug server on that Pi, and then lets Eclipse on your dev PC connect to it
- Test all of this
Complexity level: All steps are easy.
The TPM Trusted Software Stack comes witch command line tools. But in essence they are a set of APIs.
These let you talk to TPM providers on Linux platforms.
The Infinion TSS application note for the SLx6970 comes with a set of C examples.
You can build them on the Raspberry Pi, execute them and see the output.

image: part of the application note TSS Programming section
I'd like to be able to do my development and build on a development PC. And debug my work from that same PC.
That's not difficult. Setting up cross-compile and remote debug toolchains for a Pi is a documented exercise.
I'm checking what's needed to get everything working, compile, link and debug.
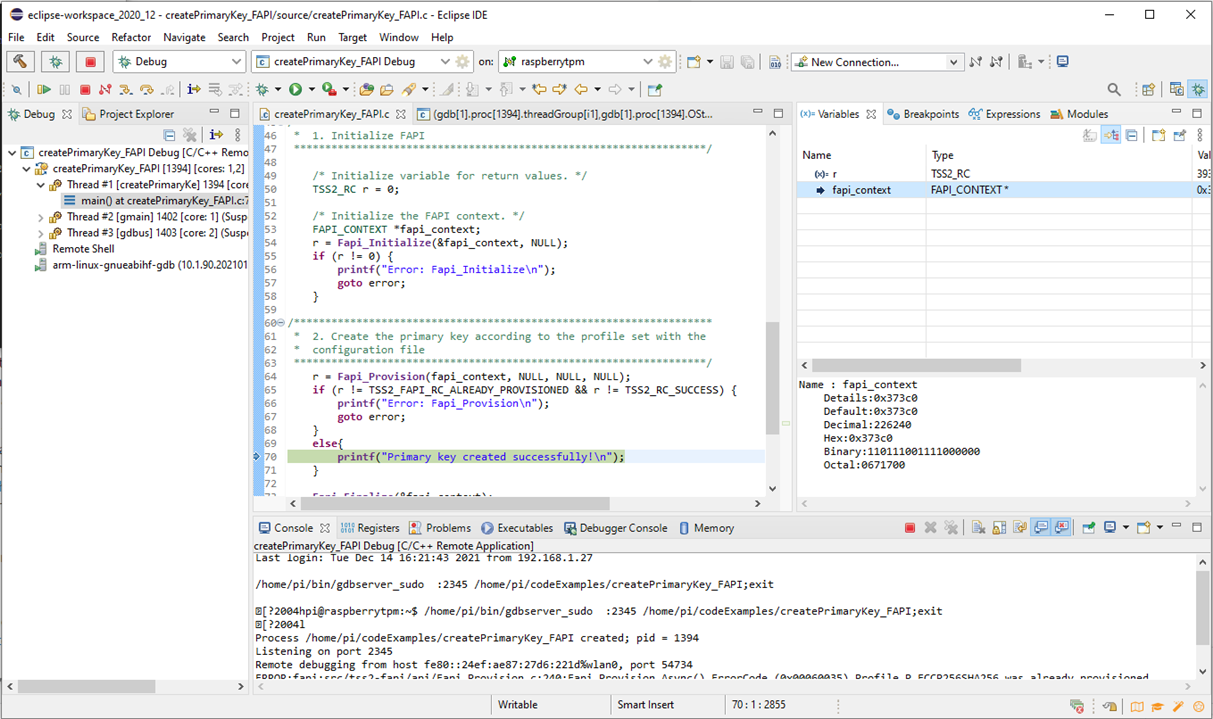
image: end goal, a Linux C program compiled and linked on a Windows PC and Eclipse, with an active debug session
Cross Compile toolchain
You only have to do this once.
Install the Prebuilt Windows Toolchain for Raspberry Pi. Take the one that matches your Raspberry OS. In my case raspios-bullseye.
Remember where you install it. The location is needed in Eclipse in the next step.
I didn't let the installer add the binary directories to my path. It's not required. And my development PC is full of toolchains; adding some of them to the path gives unpredictable effects.
So I selected All Users (feel free to select current user), Hard Links and Do not add to Path.
What you've achieved is that you have a toolchain now with sysroot. The prebuilt Pi toolchain includes the necessary dependencies for your program, out of box.
Download TSS libraries and include files
You only have to do this once.
When you follow Infineon's app note, you'll download a number of source files from GitHub. And a set of libraries is generated on your Pi.
They are needed on your Pi to execute programs that use TSS.
On your development PC, you need the include files, because your program needs to know the TSS APIs and structures.
And you need a copy of the TSS libraries, so that the linker knows how to generate an executable program.
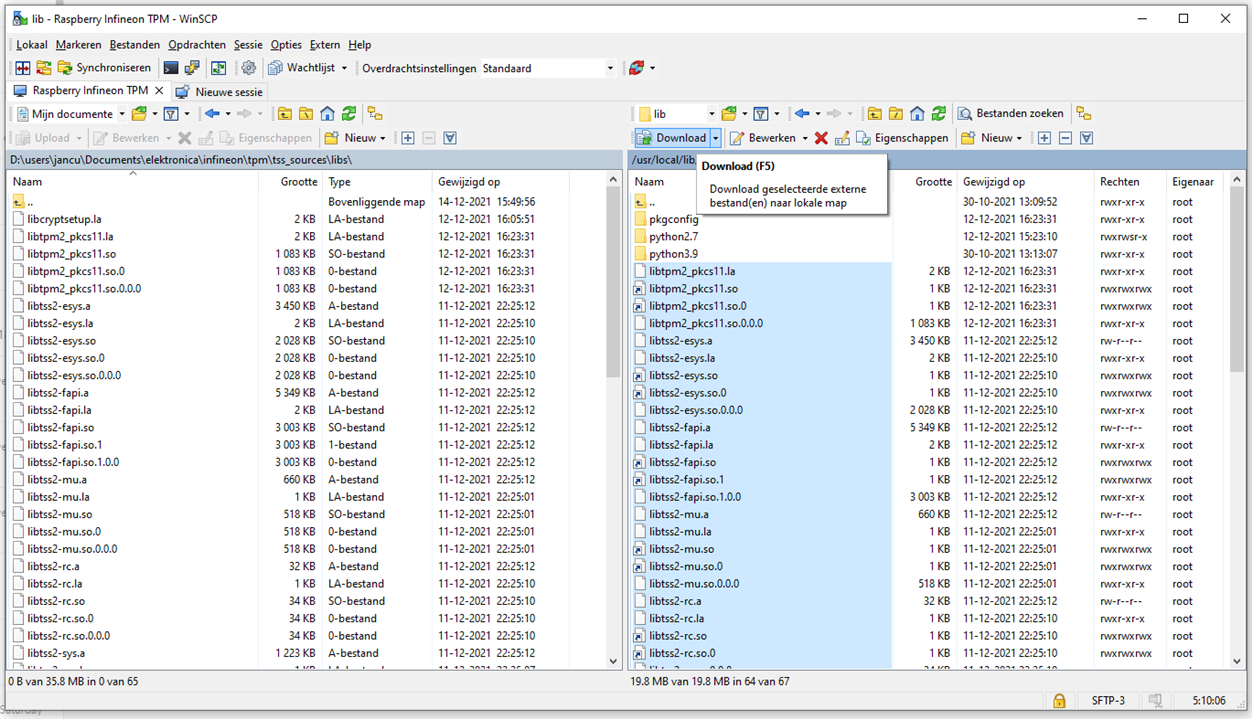
You'll need access to the Pi's file system. I'm using WinSCP for that.
On your development PC, you create two folders. One to contain the libraries and one for the headers.
Libraries
Navigate to /usr/local/lib. This is the location where your TSS libraries are generated, when you follow the instructions in Chapter 4 of Infineon's app note.
Copy all files in that directory to the local lib folder you created on your PC.
Here's a way to find libraries on the Pi - if you ever need to locate a different one (I used cryptsetup as example):sudo find / | grep libcryptsetup
Header files
Navigate to /home/pi/tssSetup/tpm2-tss/include.
Copy the tss folder and its subfolders to the include folder you created on your PC.

Remember the locations. We'll use them in our Eclipse projects.
Install and configure GDBSERVER on the Pi
You only have to do this once.
On most RaspiOS's, GDBSERVER isn't installed by default. Install it.
sudo apt-get install gdbserver
slight security warning: perform the following steps only on a development Pi.
This script has no place on a device that's accessible by someone else.
In essence, it does not add additional risks on a default Pi install, because only accounts that can execute sudo and connect to your pi, can execute this script.
Still, don't .
If you don't like this script, you can always start the gdbserver session manually on the Pi with sudo powers.
Our debug server needs to run with elevated rights. The pi user can't access the TPM driver.
It's started remotely from your development PC, each time you start a debug session.
We'll create a wrapper shell script that runs the gdbserver as sudo, with all parameters just passed through.
mkdir ~/binnano ~/bin/gdbserver_sudo
Enter these 2 lines of code:
#!/bin/bash
sudo gdbserver "$@"
Then Exit and save: CTRL-X -> Y -> ENTER.
Make the script executable:
chmod +x ~/bin/gdbserver_sudo
That's it. On a Pi, this will now run your debug session as root.
Create an Eclipse project for the first example createPrimaryKey_FAPI.c
You do this once per project / executable. You can later copy this if you create new programs.
New Project
Open Eclipse on your development PC, create a new project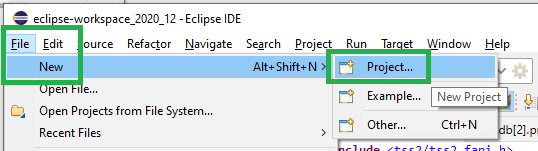
Select C project. Give it a name.
Select Empty Project, Cross GCC
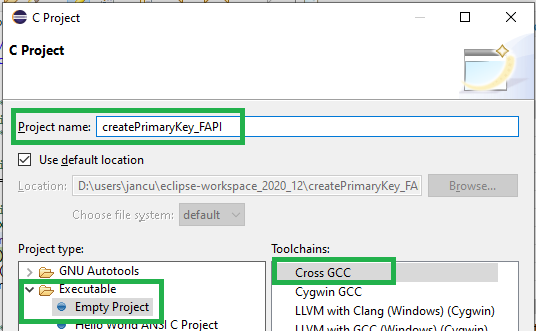
Click next until the wizard asks for the toolchain.

Prefix: arm-none-linux-gnueabihf-
Path: the bin folder of the location where you installed the Cross Compile toolchain.
See comment of skruglewicz below. The Prefix can be different for each version of the toolchain.
Confirm. Eclipse opens your project.
Add example source
Create a new source folder in your project.
Copy the Infineon example createPrimaryKey_FAPI.c (the examples are part of the application note archive), and paste it in the source folder.

Configure includes
Right click on the project, select Properties.
Navigate to C/C++ Build -> Settings -> Tools Settings -> Cross GCC Compiler -> Includes
Add the path to the includes subdirectory of the location where you copied the tss includes.
You can use the File system... button to browse and select the folder. Eclipse will automatically turn that into a valid path for Make
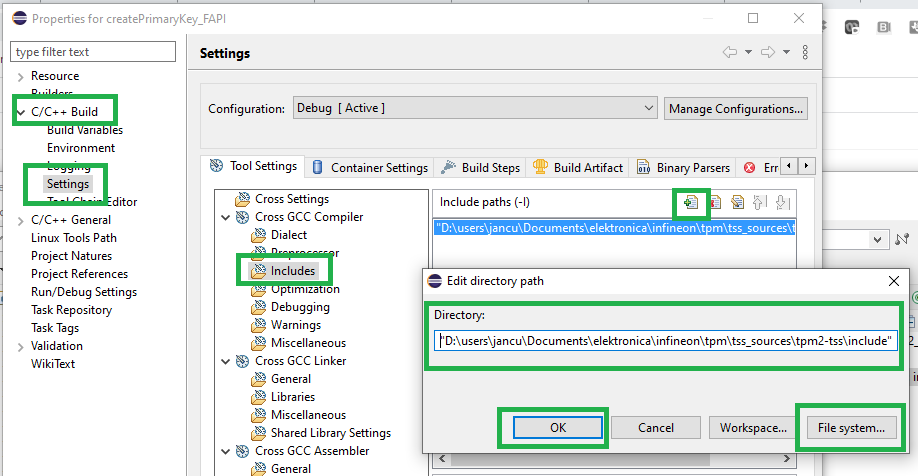
Configure libraries
In the same dialog, navigate to Cross GCC Linker -> Libraries.
Add the path to the location where you copied the tss libraries.
You can use the File system... button again.

Then add the following libraries:
tss2-fapitss2-mutss2-esystss2-tctildrtss2-sys
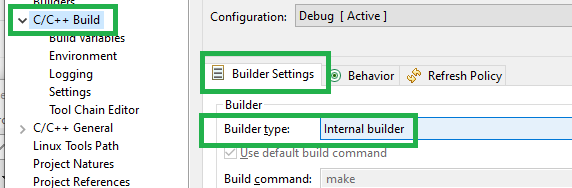
Configure Make
Navigate to C/C++ Build -> Builder Settings and select the internal builder.
OK all changes now, until the dialog closes.
Build the Linux Executable
You do this every time you make a change to your sources
If all steps were done correctly, you should now be able to compile the source and let Eclipse build the Linux executable.
Right-click the project, select Build Project.
Check the console:

You'll find the binary in the Debug subfolder of your project.
Remote Debug the Executable on the Pi
You only have to do this once per project. For next projects, if you prefer, you can duplicate and adapt.
This is showtime. We can ask Eclipse to deploy the executable on the Pi, then start the debug service on the Pi for it.
The Raspberry Pi has to run at this point, because we'll connect to it.
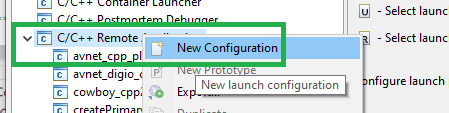
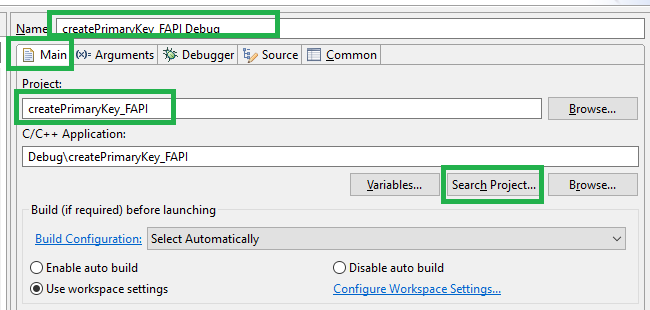
Right click on the project, select Debug As -> Debug configurations ...
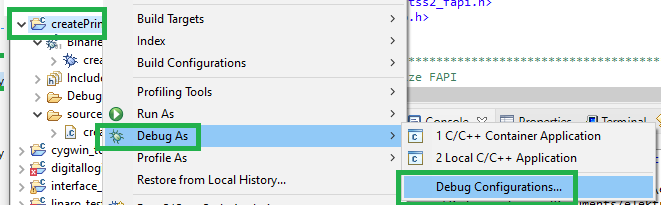
Create new C/C++ Remote Application configuration
Main settings:
Create a New Connection
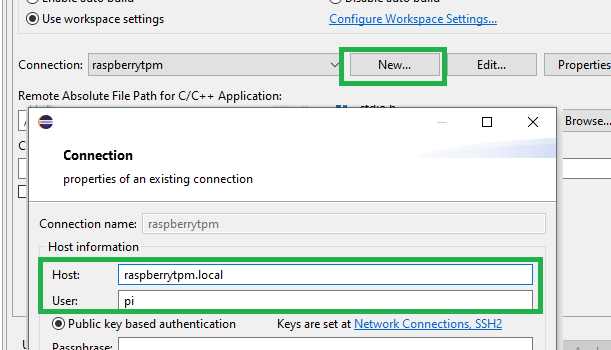
Enter your Pi's host name and your user name. Configure either your pi user password or your public key. Whatever authentication, you prefer.
Confirm.
Select the working directory on the Pi, where Eclipse will upload your binary.
I used the folder that's created as part of the Infineon app note.
You can use the Browse button in Eclipse to navigate to there. That's a good first test to see if the connection works.

Debug settings:
Navigate to Debugger -> Main, and select the name of the gdb executable of your Cross Compile toolchain
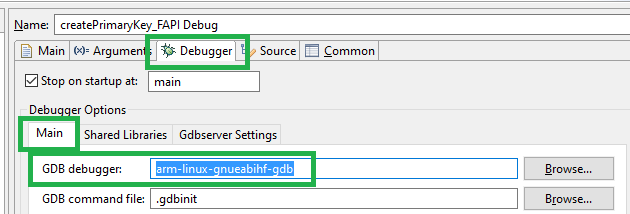
GDB debugger: arm-linux-gnueabihf-gdb
See comment of skruglewicz below. The Prefix can be different for each version of the toolchain.
Then we tell eclipse to call our gdbserver wrapper on the Pi, instead of the gdbserver itself.
(refresher: this is because the debugger needs to run as sudo, and our wrapper does that)
Navigate to Debugger -> Gdbserver Settings
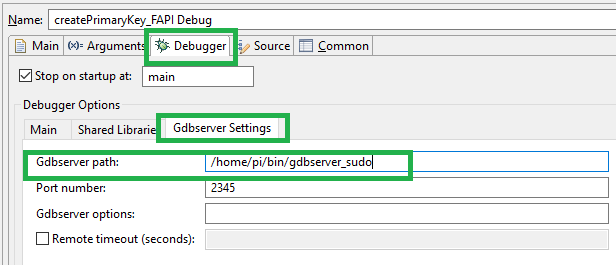
Gdbserver path: /home/pi/bin/gdbserver_sudo
That's it. If you now click the Debug button, the magic should happen:
Eclipse uploads your binary and makes it executable
Then it starts the remote debug session for your program.
It stops on the first source line of the program's main().
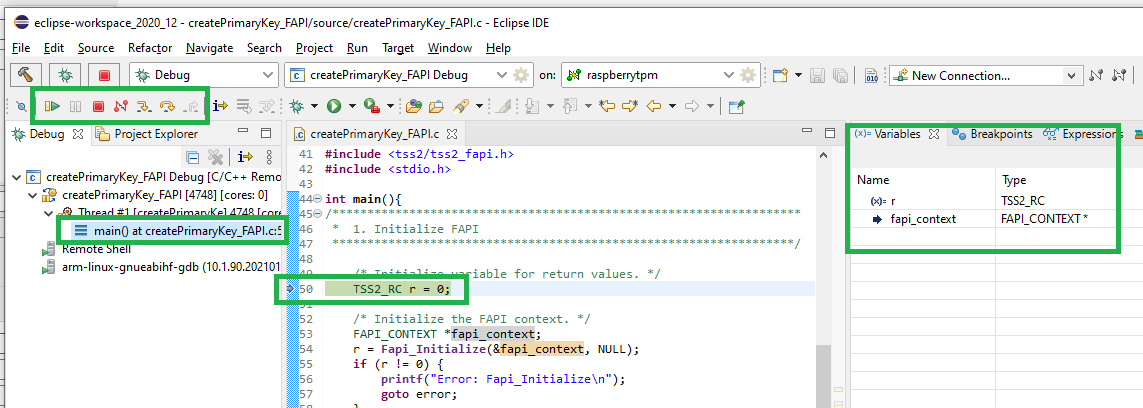
At this point, your development cycle is identical to debugging a local application.
You can build and debug applications with TPM functionality on your resource-rich development PC, in an IDE.
You test everything on the real target hardware.
Next time you want to debug this project, you can just reuse this configuration to start a new debug session.
Enjoy.
Top Comments