RoadTest: Cool Tools - Molex Hand Crimper
Author: shabaz
Creation date:
Evaluation Type: Workshop Tools
Did you receive all parts the manufacturer stated would be included in the package?: True
What other parts do you consider comparable to this product?: The pull test revealed that cheaper generic crimp tools are _not_ comparable. For a lower-cost crimp tool, the ServiceGrade tool model 64016-0200 is half the price, but it is only rated for 1000 operations. So, overall in price-performance, I think the tool reviewed here cannot be beaten.
What were the biggest problems encountered?: I do not think the tool is as ergonomic as it could be, it is just OK. The required force means that the tool would benefit from softer plastic inset grips, and perhaps slightly longer handles. On the plus side, it's excellent that the tool was adaptable for left-hand operation, which I did and really appreciated.
Detailed Review:
Contents
Introduction
Mini-Fit Jr Crimp Basics
Advanced Crimps
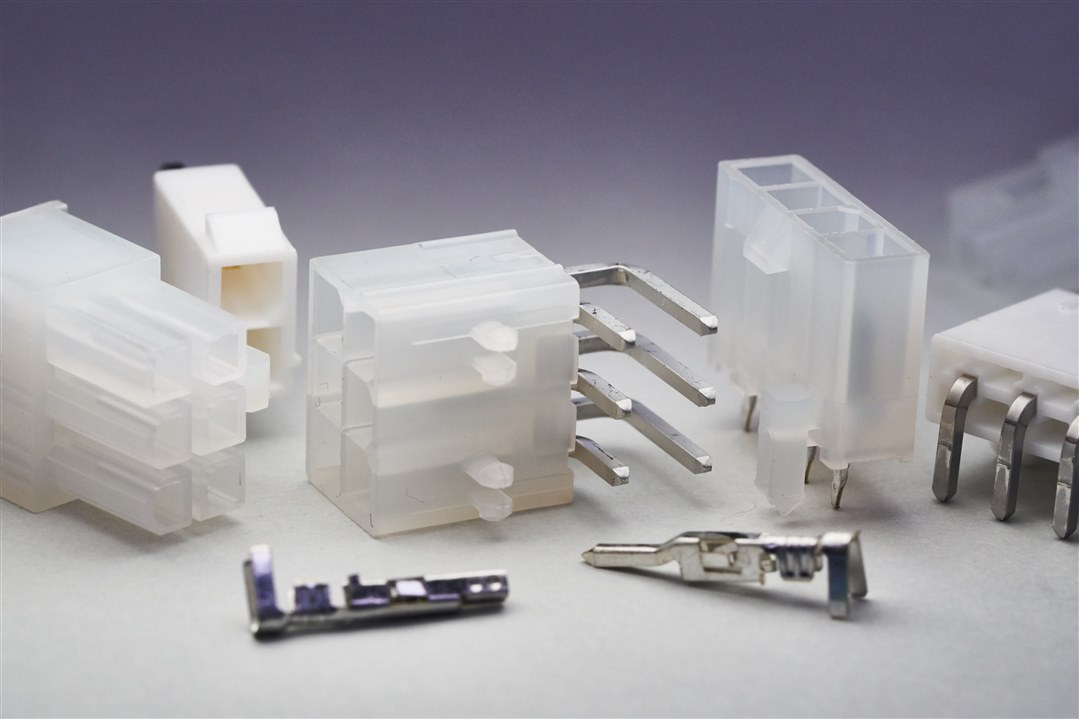
Mini-Fit Jr Connectors
Molex Crimp Tool
What Happens with a Bad Crimp?
Generic Crimp Tools OK?
Motorized Crimping
Ergonomics
Pull Force Test
Creating Designs with Mini-Fit Jr
Summary
Introduction
This review is about a Mini-Fit Jr crimp tool. Mini-Fit Jr connectors and their crimp terminals have been available for perhaps 30 years or so, and the range has evolved over time to include options with higher current capability, higher insertion/removal cycles, flame retardancy, and so on; the variants go by names such as Mini-Fit Max and Mini-Fit Plus, but they are all compatible.
Here is a 20-minute video (direct link) that should help get up-to-speed on these connectors and the crimp tool.
You don't have permission to edit metadata of this video.
Mini-Fit Jr connectors are most commonly seen inside computers.

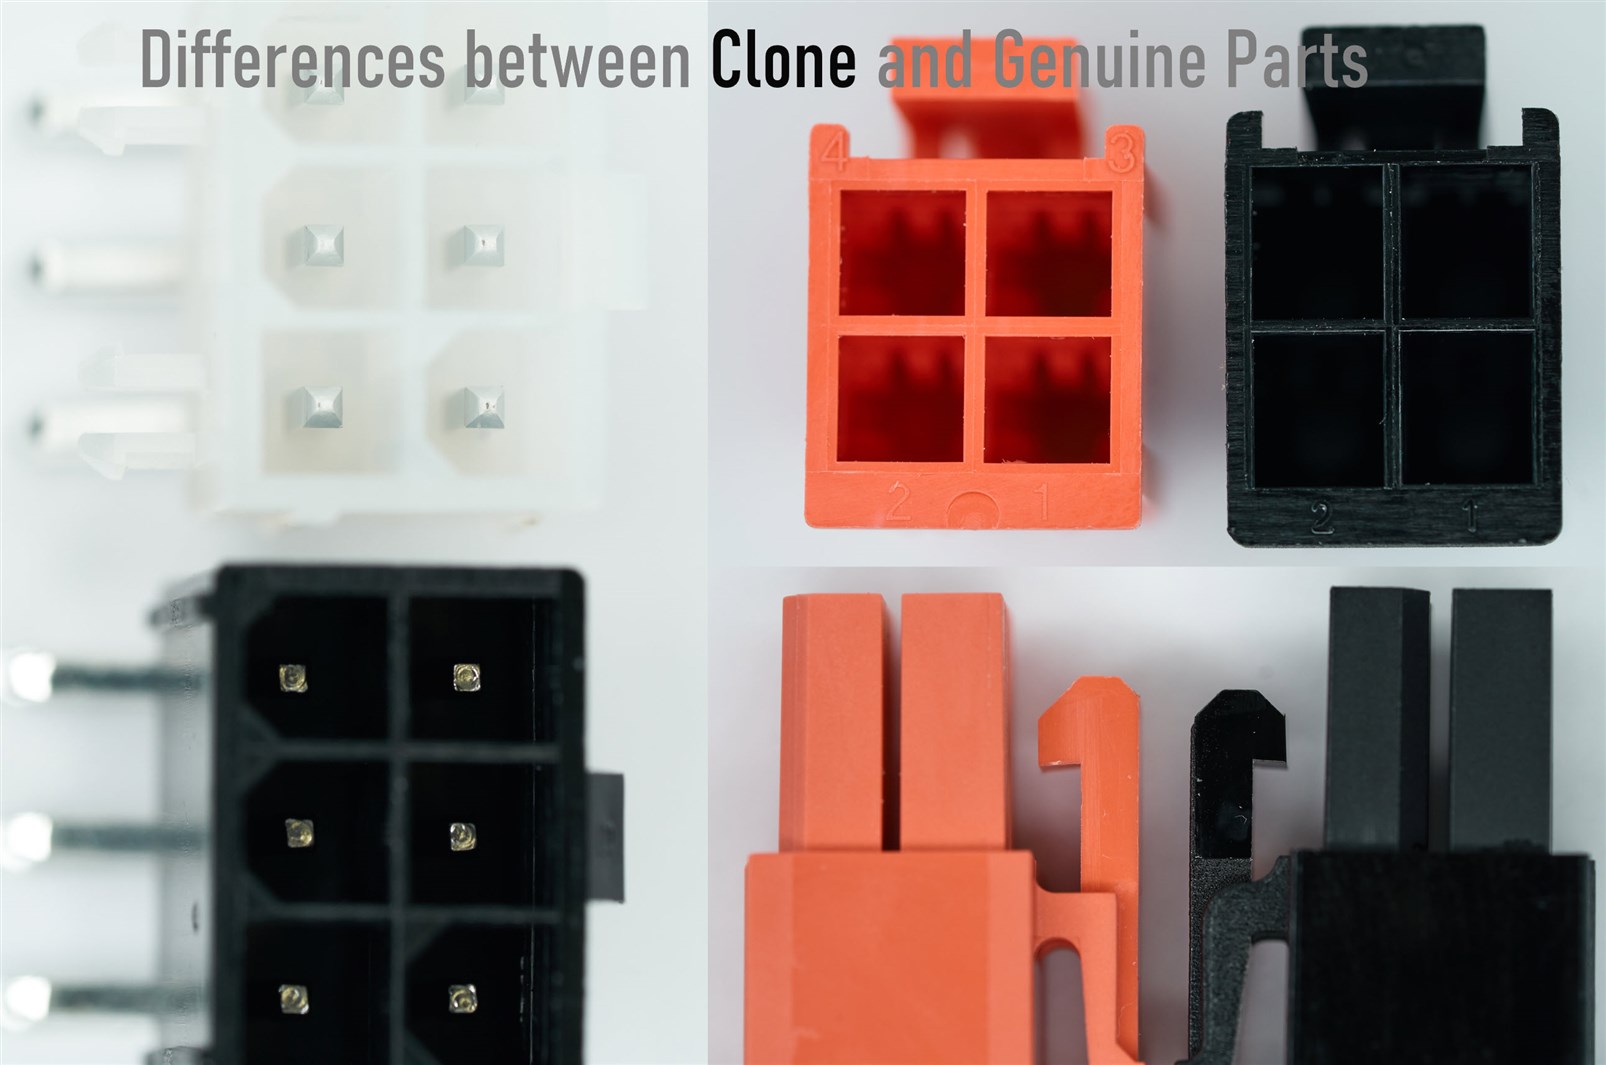
Dozens of PC and server standards define Mini-Fit Jr to be the connector for providing mainboard or processor board power; often multiple pins will be used in parallel to increase the maximum current capability. For instance, the 20-way or 24-way connector for ATX power connections is a Mini-Fit Jr connector. Mini-Fit Jr can be found within laundry machines. It's such a popular product range that other manufacturers such as Tyco Electronics (TE) have compatible products (known as TE VAL-U-LOK) – note that the compatibility doesn't mean that the crimps, connector housings, and crimp tools can be separately interchanged! – there are slight dimensional differences. There are also tons of no-name clones of unknown quality (it’s visually possible to spot the differences between genuine and clones; the simpler tooling results in slightly different dimensions of parts of the plastic on clone housings, and the pins are missing machining operations like plating, and bevels that are needed for more reliable socket insertions) since there is a market of millions of users who like hacking their PCs with nice-looking cables and connectors and transparent PC cases and so on.
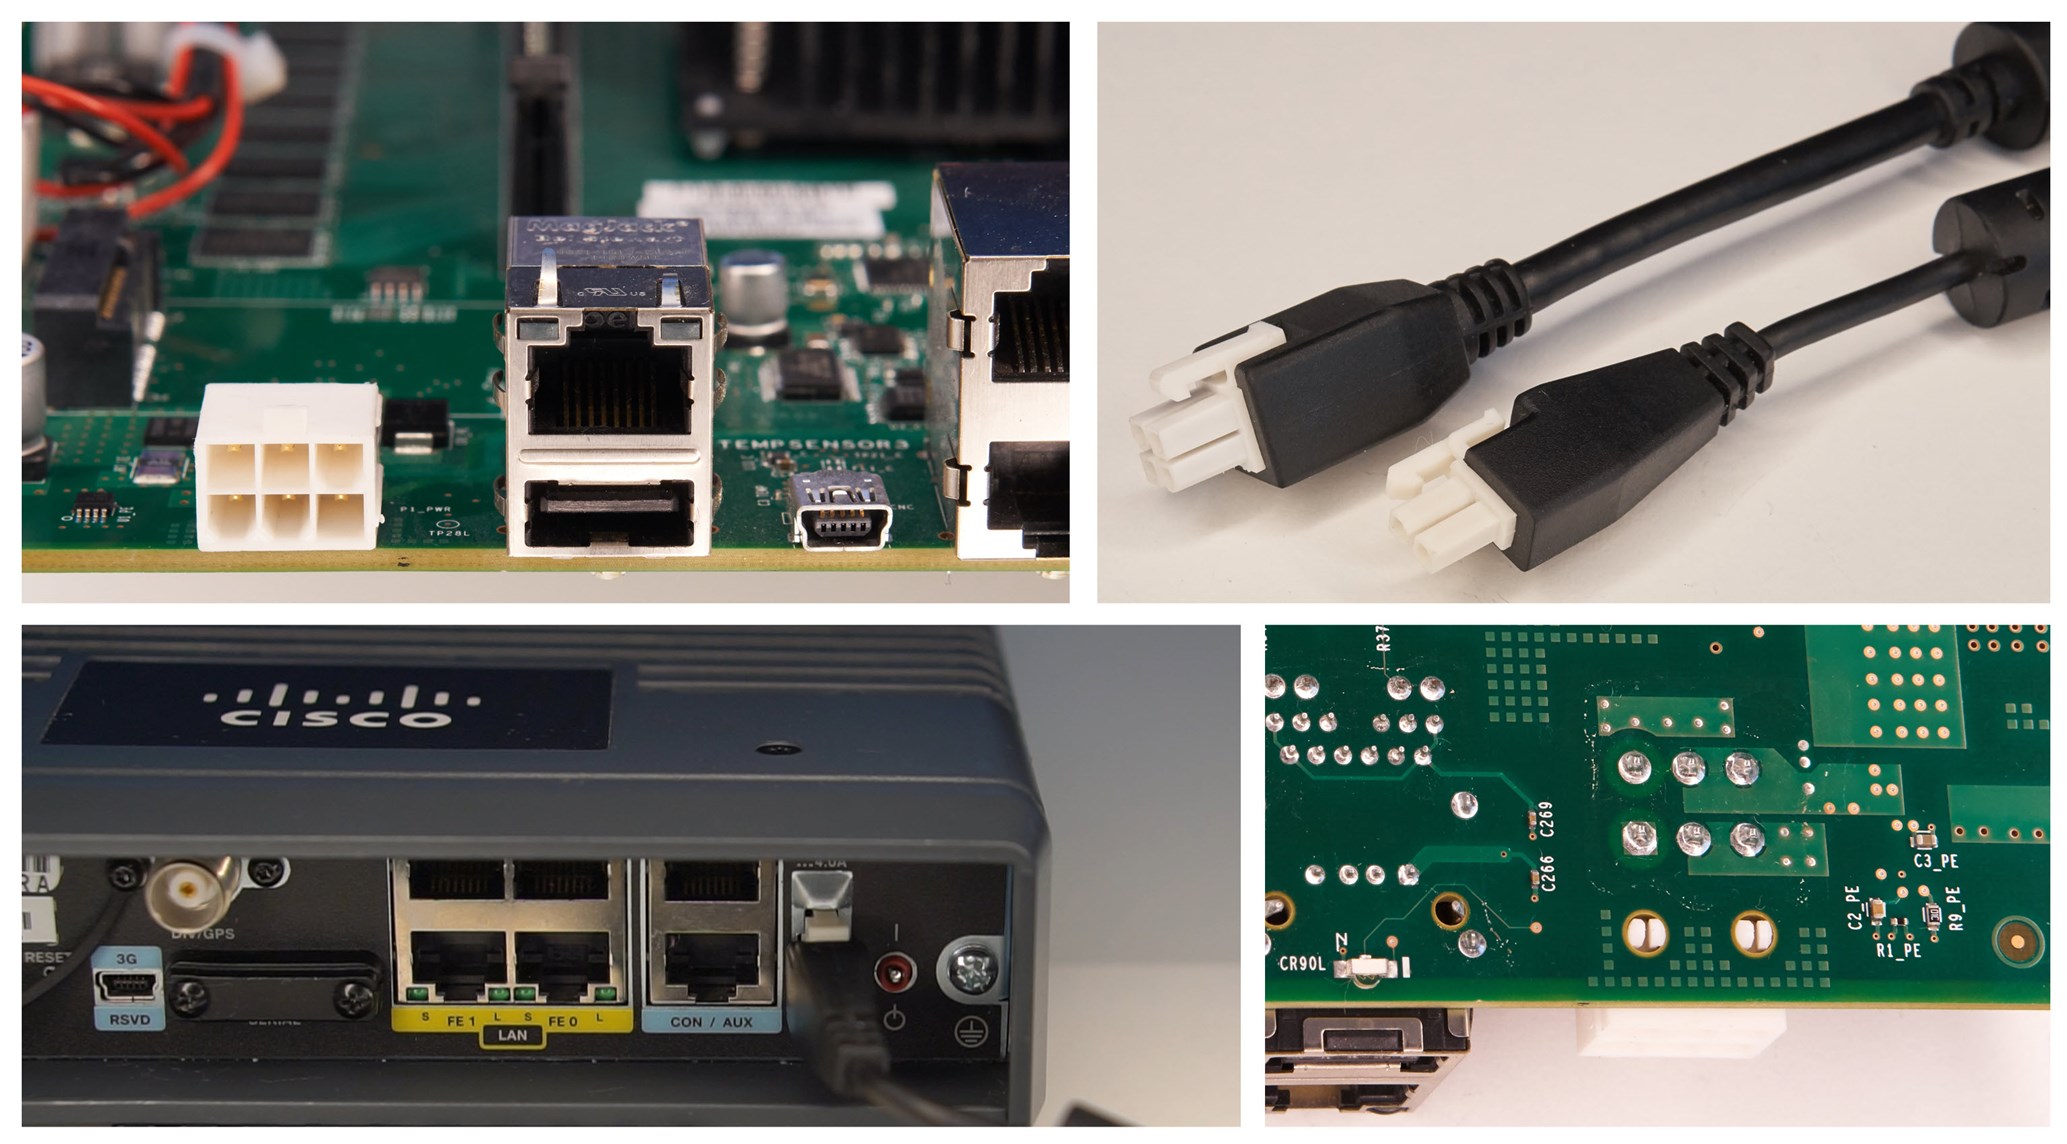
Mini-Fit Jr connectors can also be found externally, present on network infrastructure equipment that require a plug-in DC power source; often high current or multiple voltages are required with a connector that cannot be accidentally pulled out, and so DC barrel connectors would be unsuitable. Molex, and other manufacturers, offer molded cable/connector assemblies for Mini-Fit Jr.
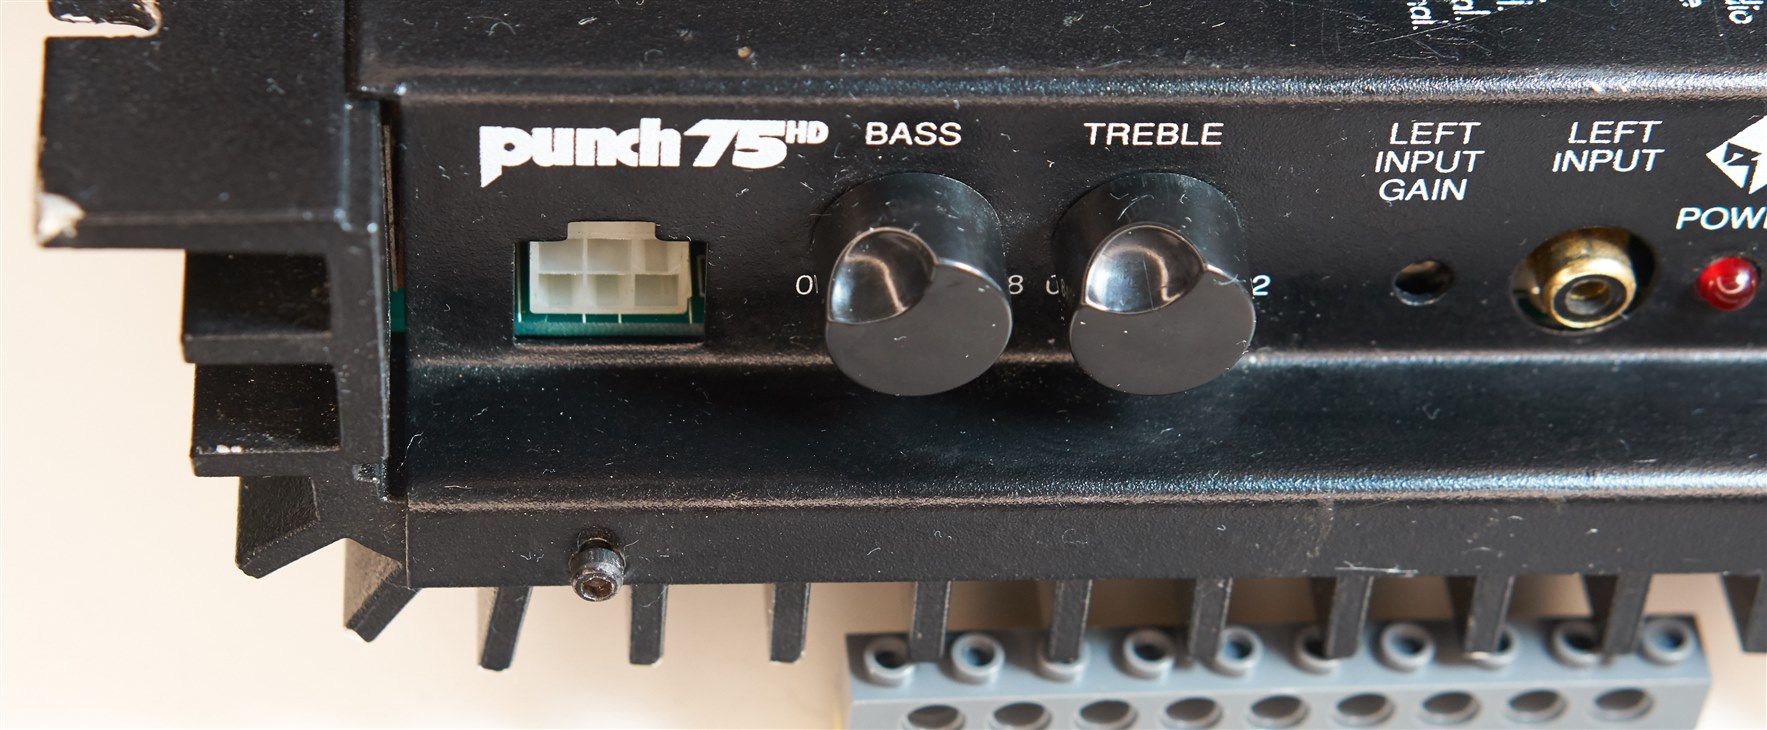
Car stereo products are another example of where the connector may be externally exposed, for instance for speaker connections.
Industrial PLCs and vehicle connectors are further examples of where the connector is used.
There are Mini-Fit options that are useful for wire-to-board and for wire-to-wire connections, so the same tool can be used for both of these tasks, reducing costs. There are options for panel mounting too, plus sealed connections. Direct board-to-board connections are also supported. There is also a Blind Mate Interface which is intended for module-to-module connections, (say) expansion module insertion.
Since Mini-Fit Jr has widespread use in commercial, business, and automotive products, the prices are quite low. The basic crimps can cost as little as 3 pence in small quantities. I purchased a pack of Molex crimp sockets from Farnell for just over £3 + tax.
This review will examine the connectors a bit further and will compare the Molex crimp tool operation versus generic crimp tools. The Molex tool is not cheap, but not over-the-top; it costs £203 plus tax currently (this is cheaper than the US price, which is extremely unusual).
Mini-Fit Jr Crimp Basics
The Mini-Fit Jr connectors have 4.2mm (0.165") pitch, with a latch (this is known as positive locking, meaning it cannot work itself loose).
The supported wire range is from 16 AWG thick down to 24 AWG, which is a good span. 16 AWG requires a different crimp tool however; the tool being reviewed only supports 18-24 AWG.
(Note that it's also possible to use wires down to 28 AWG thickness, which seems extremely thin for these connectors! It requires a different tool, however, and appropriate crimps. I can't see myself using such thin wires with Mini-Fit Jr connectors, so that is a more niche tool).
Mini-Fit Jr works well in situations where more than one wire is inserted into a crimp; this is handy for making wiring looms for a chassis. The insulation crimp is long enough to wrap around more than one wire.
To get going with Mini-Fit Jr, crimp-wise, all that is required is a pack of the female basic crimps , series 5556. These crimps are used for wire-to-board scenarios.
If you ever want to do wire-to-wire connections, then a pack of male crimps are also needed; the male basic crimp series is type 5558. They are actually cheaper than the sockets, they are £2+tax for 100.
Both of these series are available with normal tin-plating, but gold is also available which is handy for some corrosion/oxidisation resistance for (say) automotive use.
Incidentally there is also a type 30490 male crimp that is slightly longer, for grounding purposes. There is no female equivalent, and as a result this is only applicable for wire-to-wire connections.
A crimp extraction tool would also be a good idea if you ever need to remove a crimp from its plastic housing because it's near-impossible to do it non-destructively otherwise.
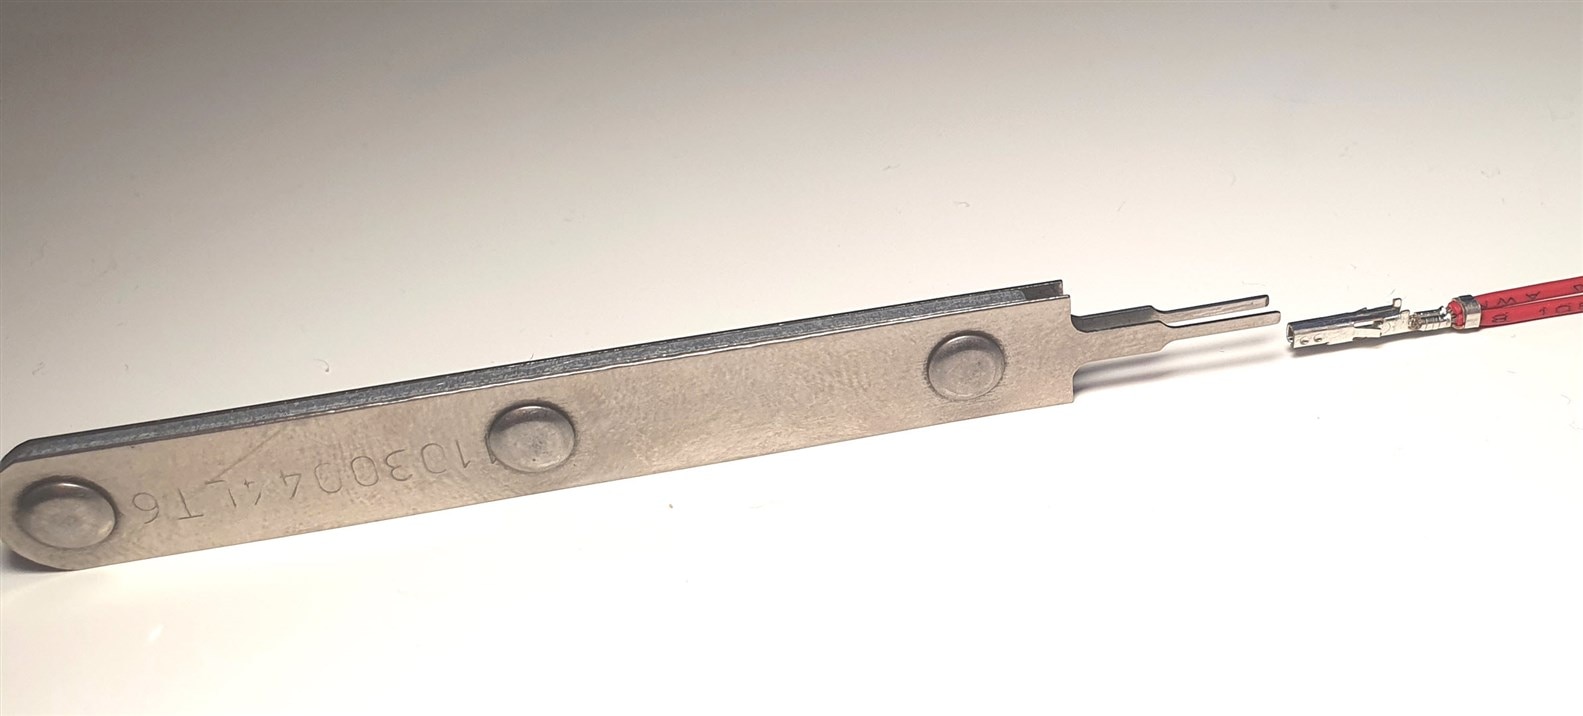
Advanced Crimps
As mentioned earlier there are more advanced crimps, that are useful if you need a lot more mating cycles (up to 250) or higher current (up to 9A, or up to 13A with 16 AWG wire). The crimps are known as Mini-Fit Plus and Mini-Fit HCS. They are all interchangeable with the basic crimps but similar male and female crimp families should be mated together for the highest current and cycle ratings.
Mini-Fit Jr Connectors
The connectors come in single and dual-row options with up to 24 pins. Some attention is required when purchasing 2-pin connectors since they are offered in both single row and dual-row (i.e. 1x2 and 2x1) versions. There are different flammability rating versions available, including UL 94V-2. Board header options cover horizontal and vertical insertion.
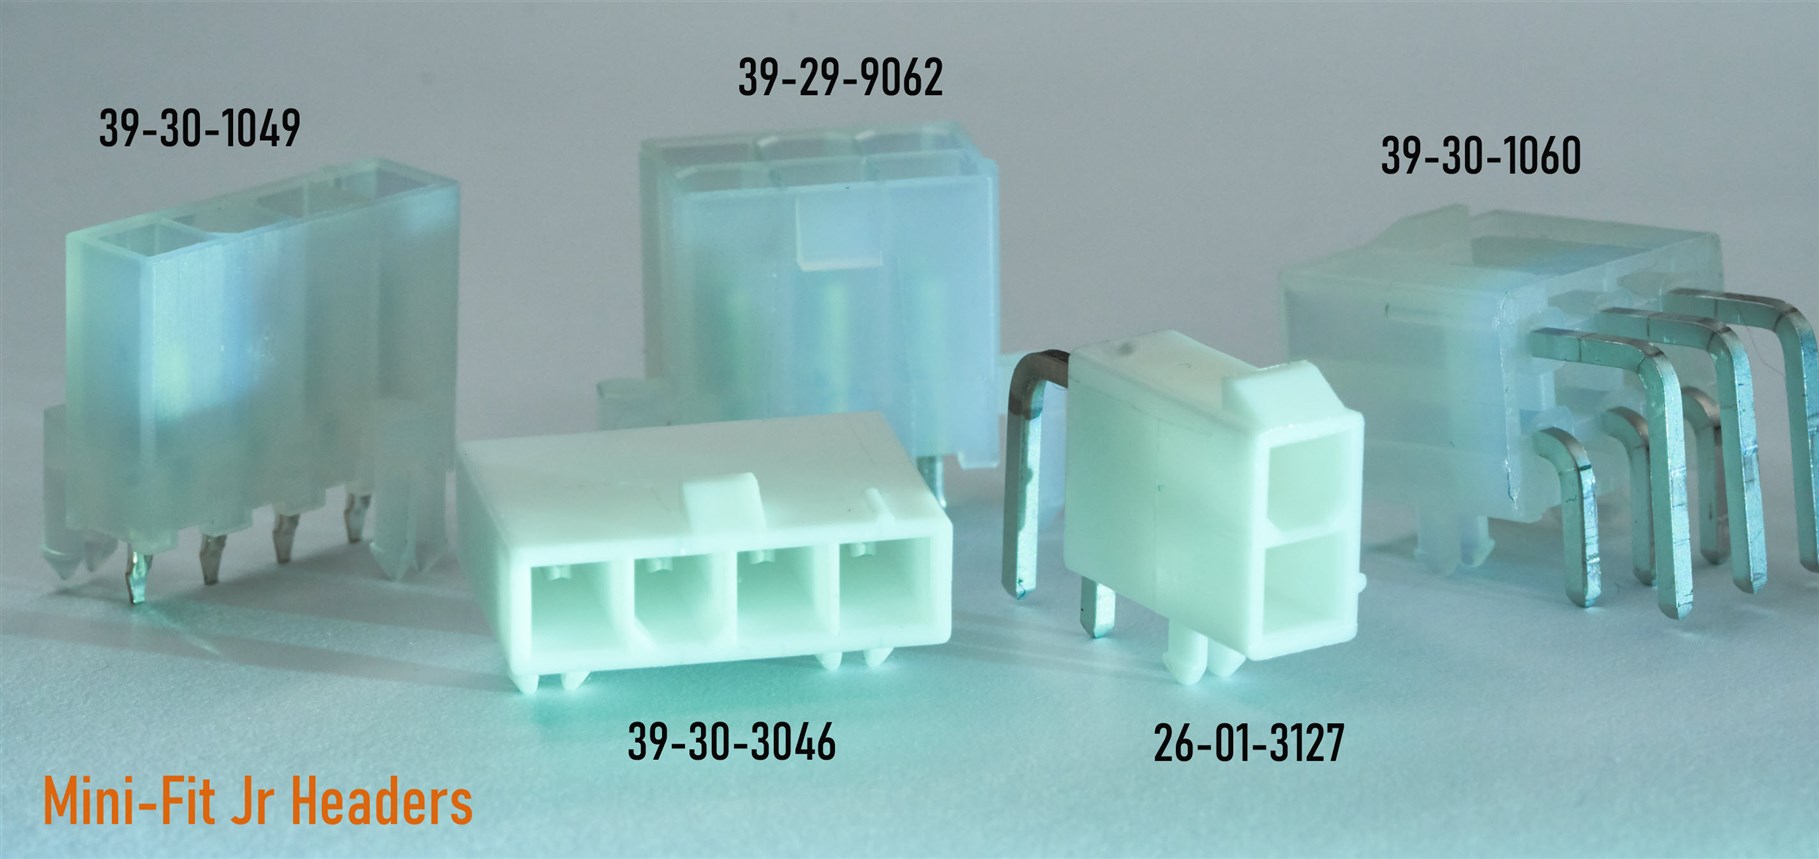
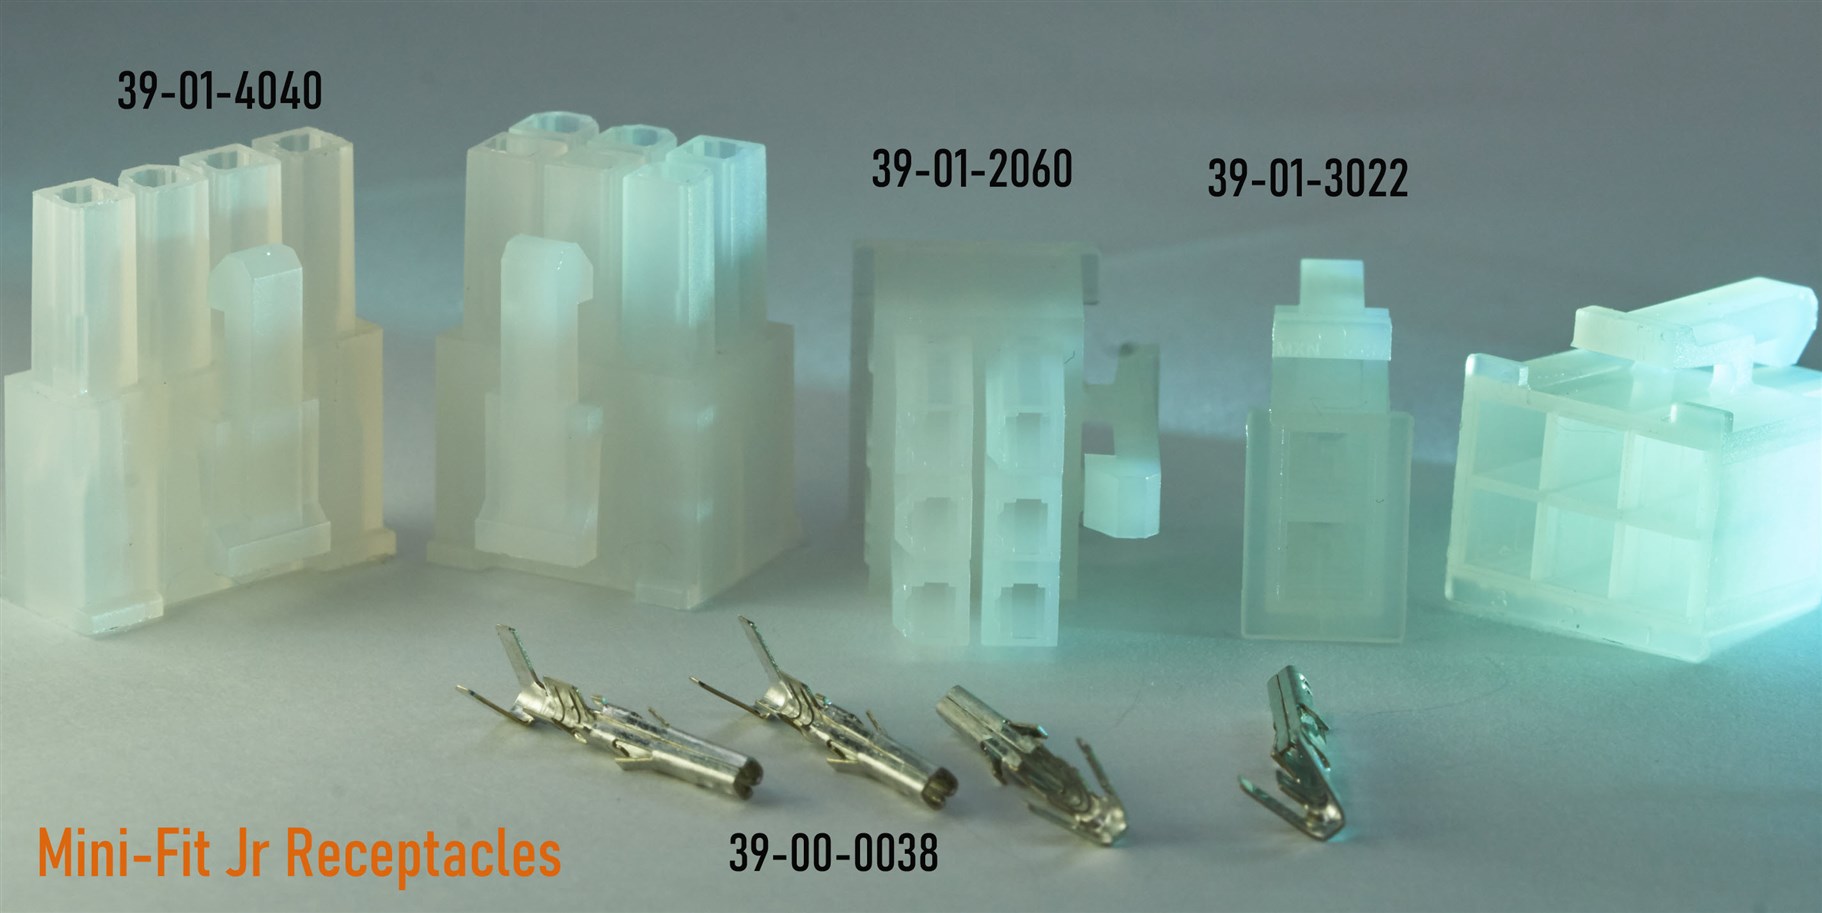
The housings that mate with the board headers are called receptacles, and they house the metal socket crimps.
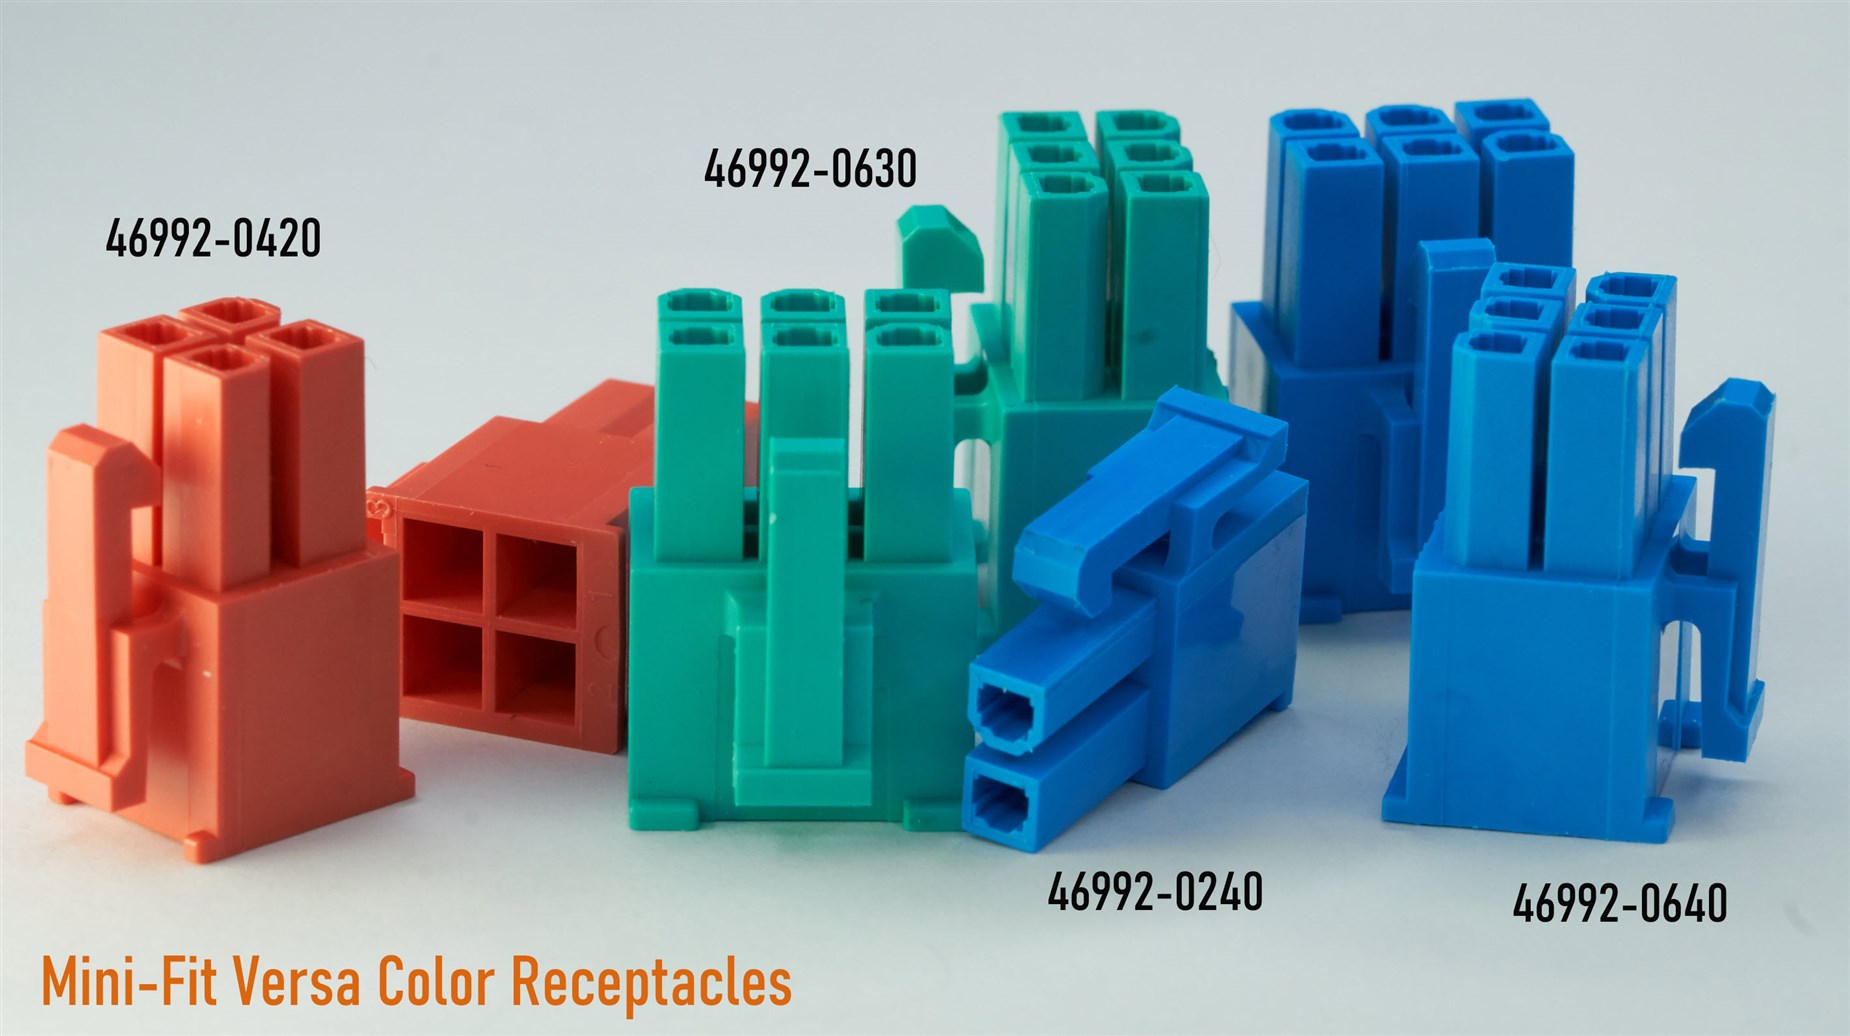
The receptacles are also available in different colors which could be handy for simplifying equipment installation where a non-technical user needs to make the connections; an example could be left and right speaker connections for a car stereo amplifier.
For wire-to-wire connections, instead of board headers, plugs are used.
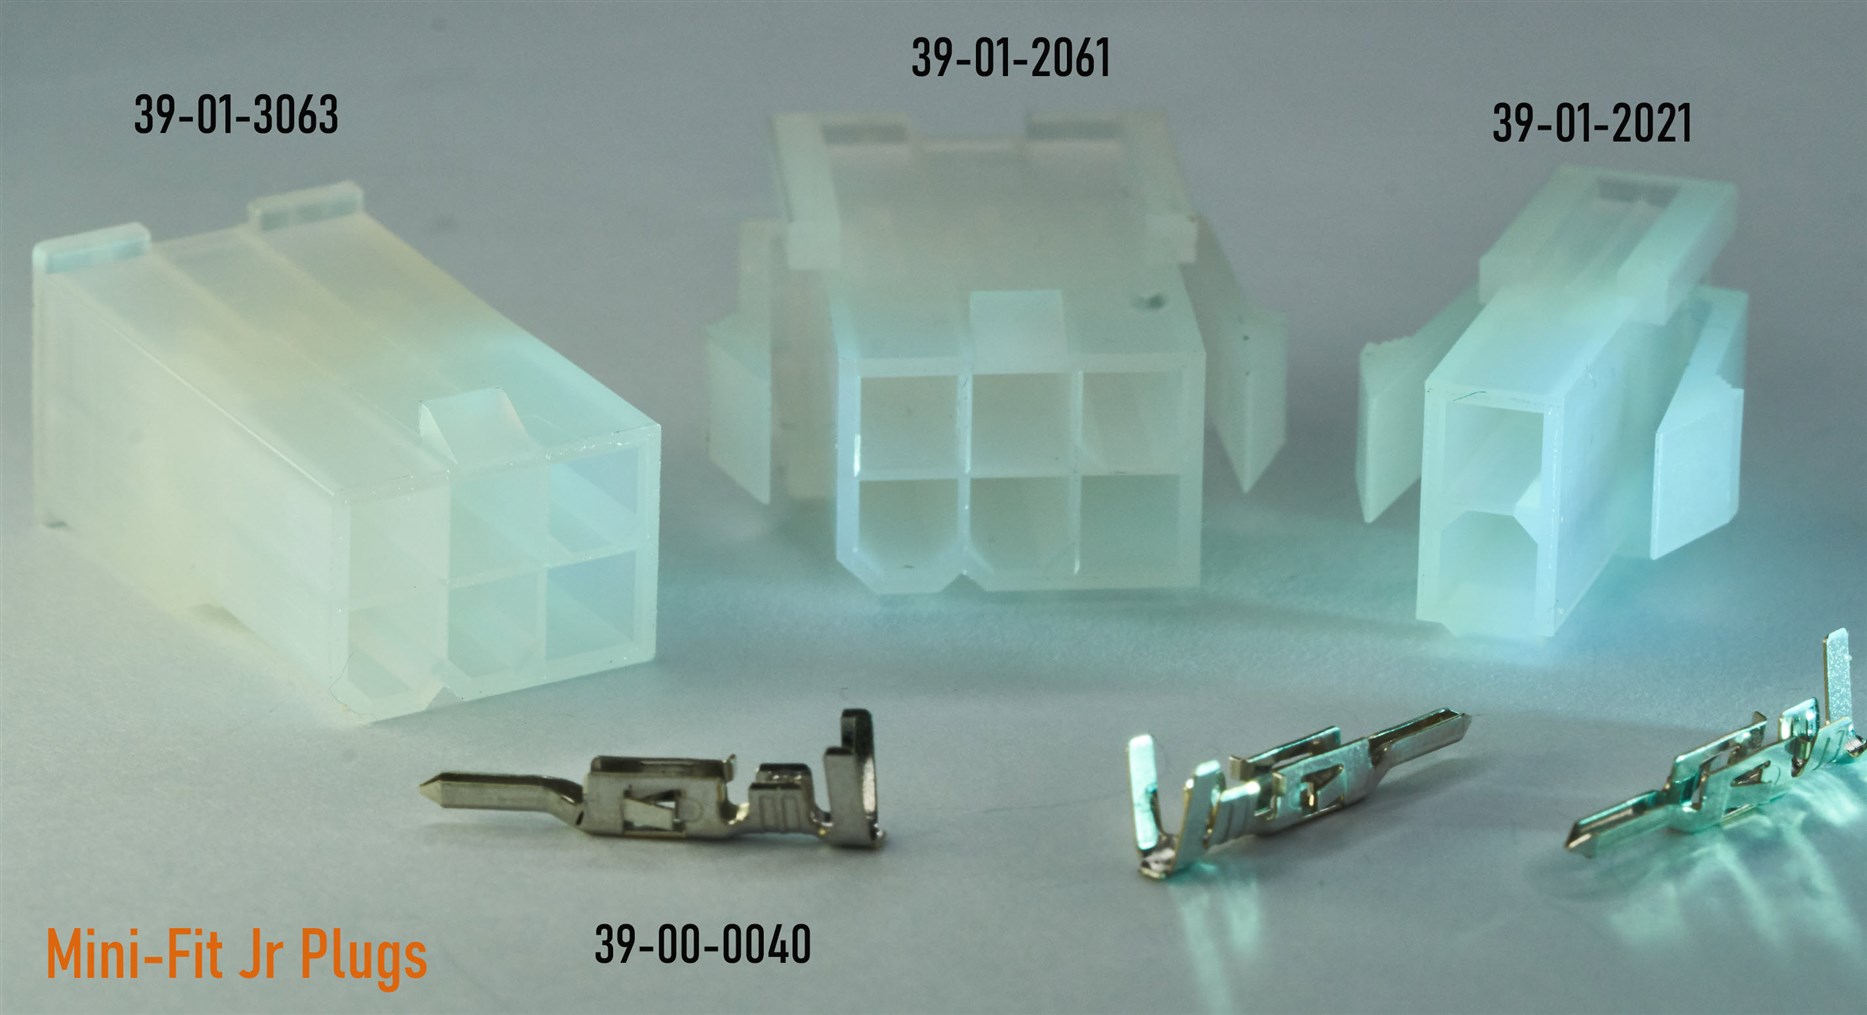
Some receptacles and plugs are available with Terminal Position Assurance (TPA) capability which provides some level of confidence that the crimps will not slide out of the plastic housing by accident or vibration; the TPA device is a plastic clip that attaches to the rear of the housing (insulation side), and it blocks the metal crimp from sliding out, and also makes sure that the crimp is fully seated, since the TPA device won't clip on until the crimp is seated.
There is a Blind Mate Interface (BMI) option that is very neat, for building plug-on expansion modules.
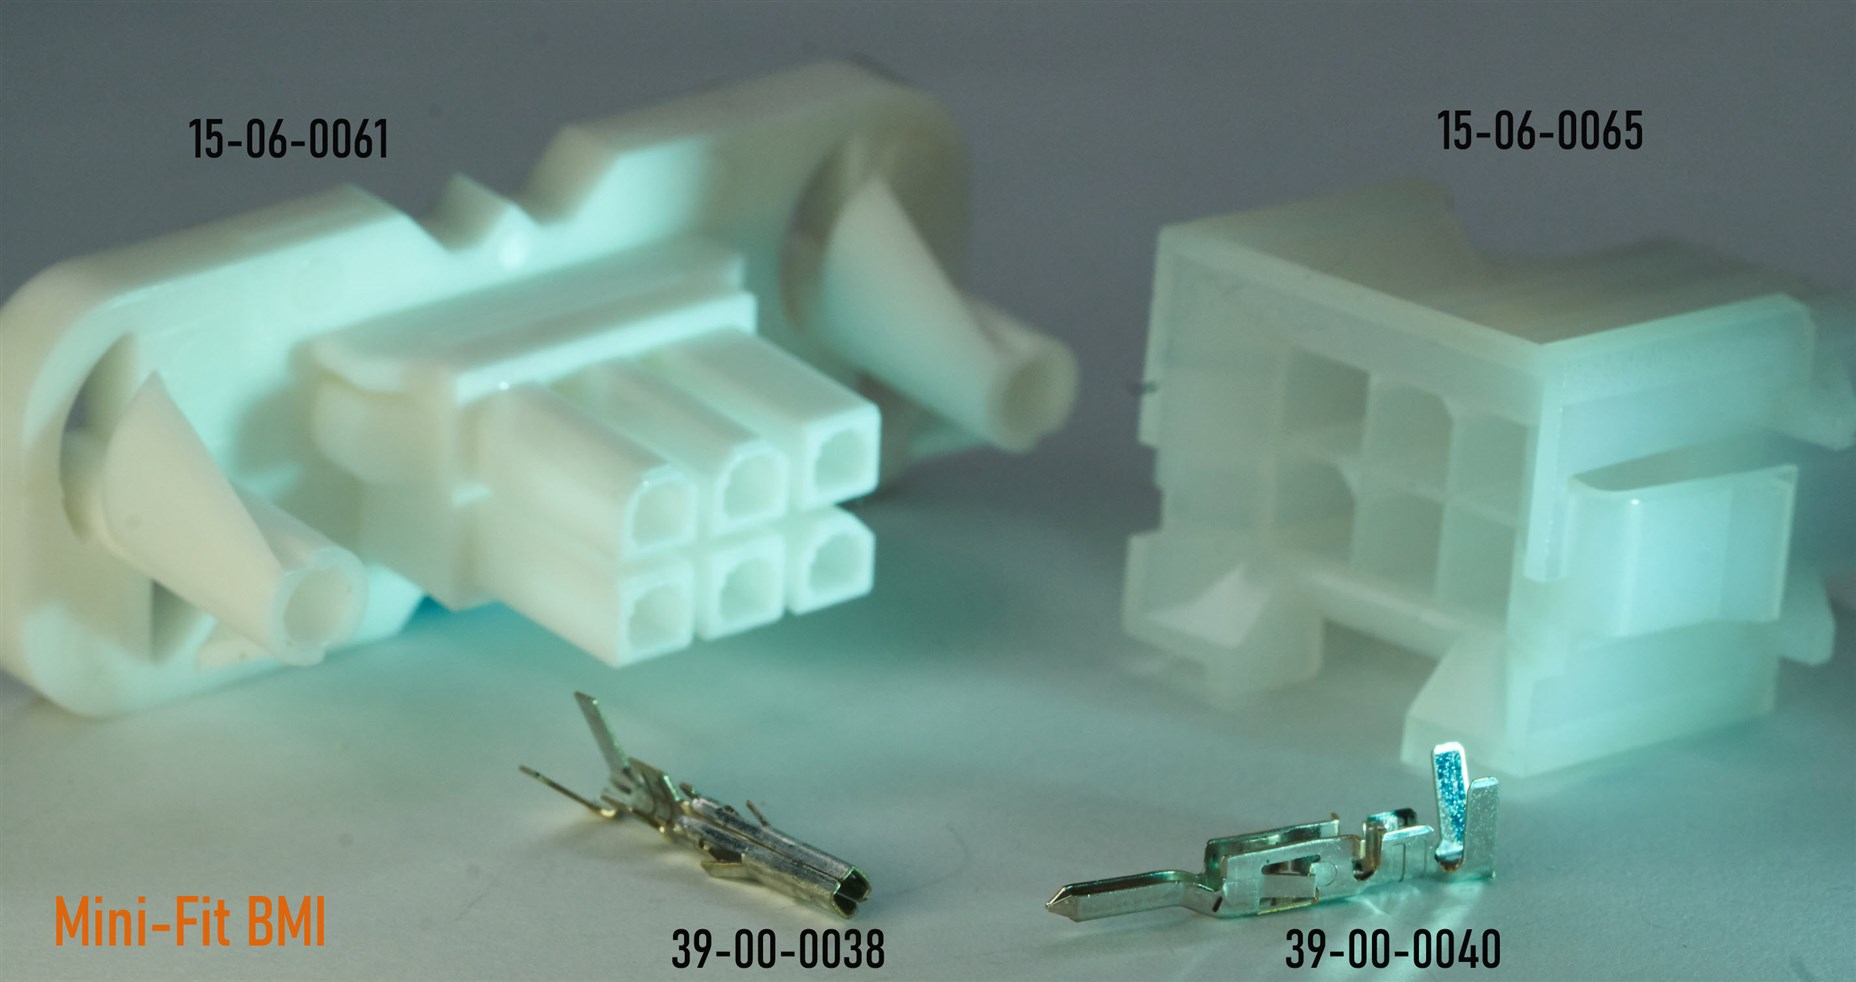
Connectors have a concept known as gatherability, and the BMI solution implements good gatherability with a mounting system that allows for one end to slightly move to self-align, as well as 45-degree portions to help begin the connection docking process with coarse gatherability before the fine gatherability from the rest of the connector occurs. The BMI capability here is not super-advanced (it cannot handle hot (i.e. powered) connections, but nevertheless it's still a leap in capability compared to other low-cost connector ranges.
Molex Crimp Tool
The Molex tool is designed to handle most of the crimp contacts (both sockets for receptacles, and pins for plugs) for the Mini-Fit Jr and compatible products, apart from the larger 16 AWG capable crimps which require a different tool.
The Molex tool generally looks well-made, and the ‘PremiumGrade’ body is designed for 50,000 crimp operations, compared to cheaper Molex ServiceGrade tools that are designed for 1,000 operations.
The tool is quite small, and testing with a force gauge shows it requires quite a lot of force (close to 175 Newtons) to operate. The amount of force is within specification, but it’s still a lot of force. The tool can be adjusted by pushing one of the metal arms and rotating a ‘Preload Force Adjust’ dial; I dropped the setting down by 1, but a pull force test should be carried out if the factory setting is changed.

The tool is easy to use but does require wires to be stripped to a high level of accuracy, between 3.0 and 3.3 mm, which a lot of wire strippers won’t easily achieve. The Knipex 12 12 06 works very well, however.
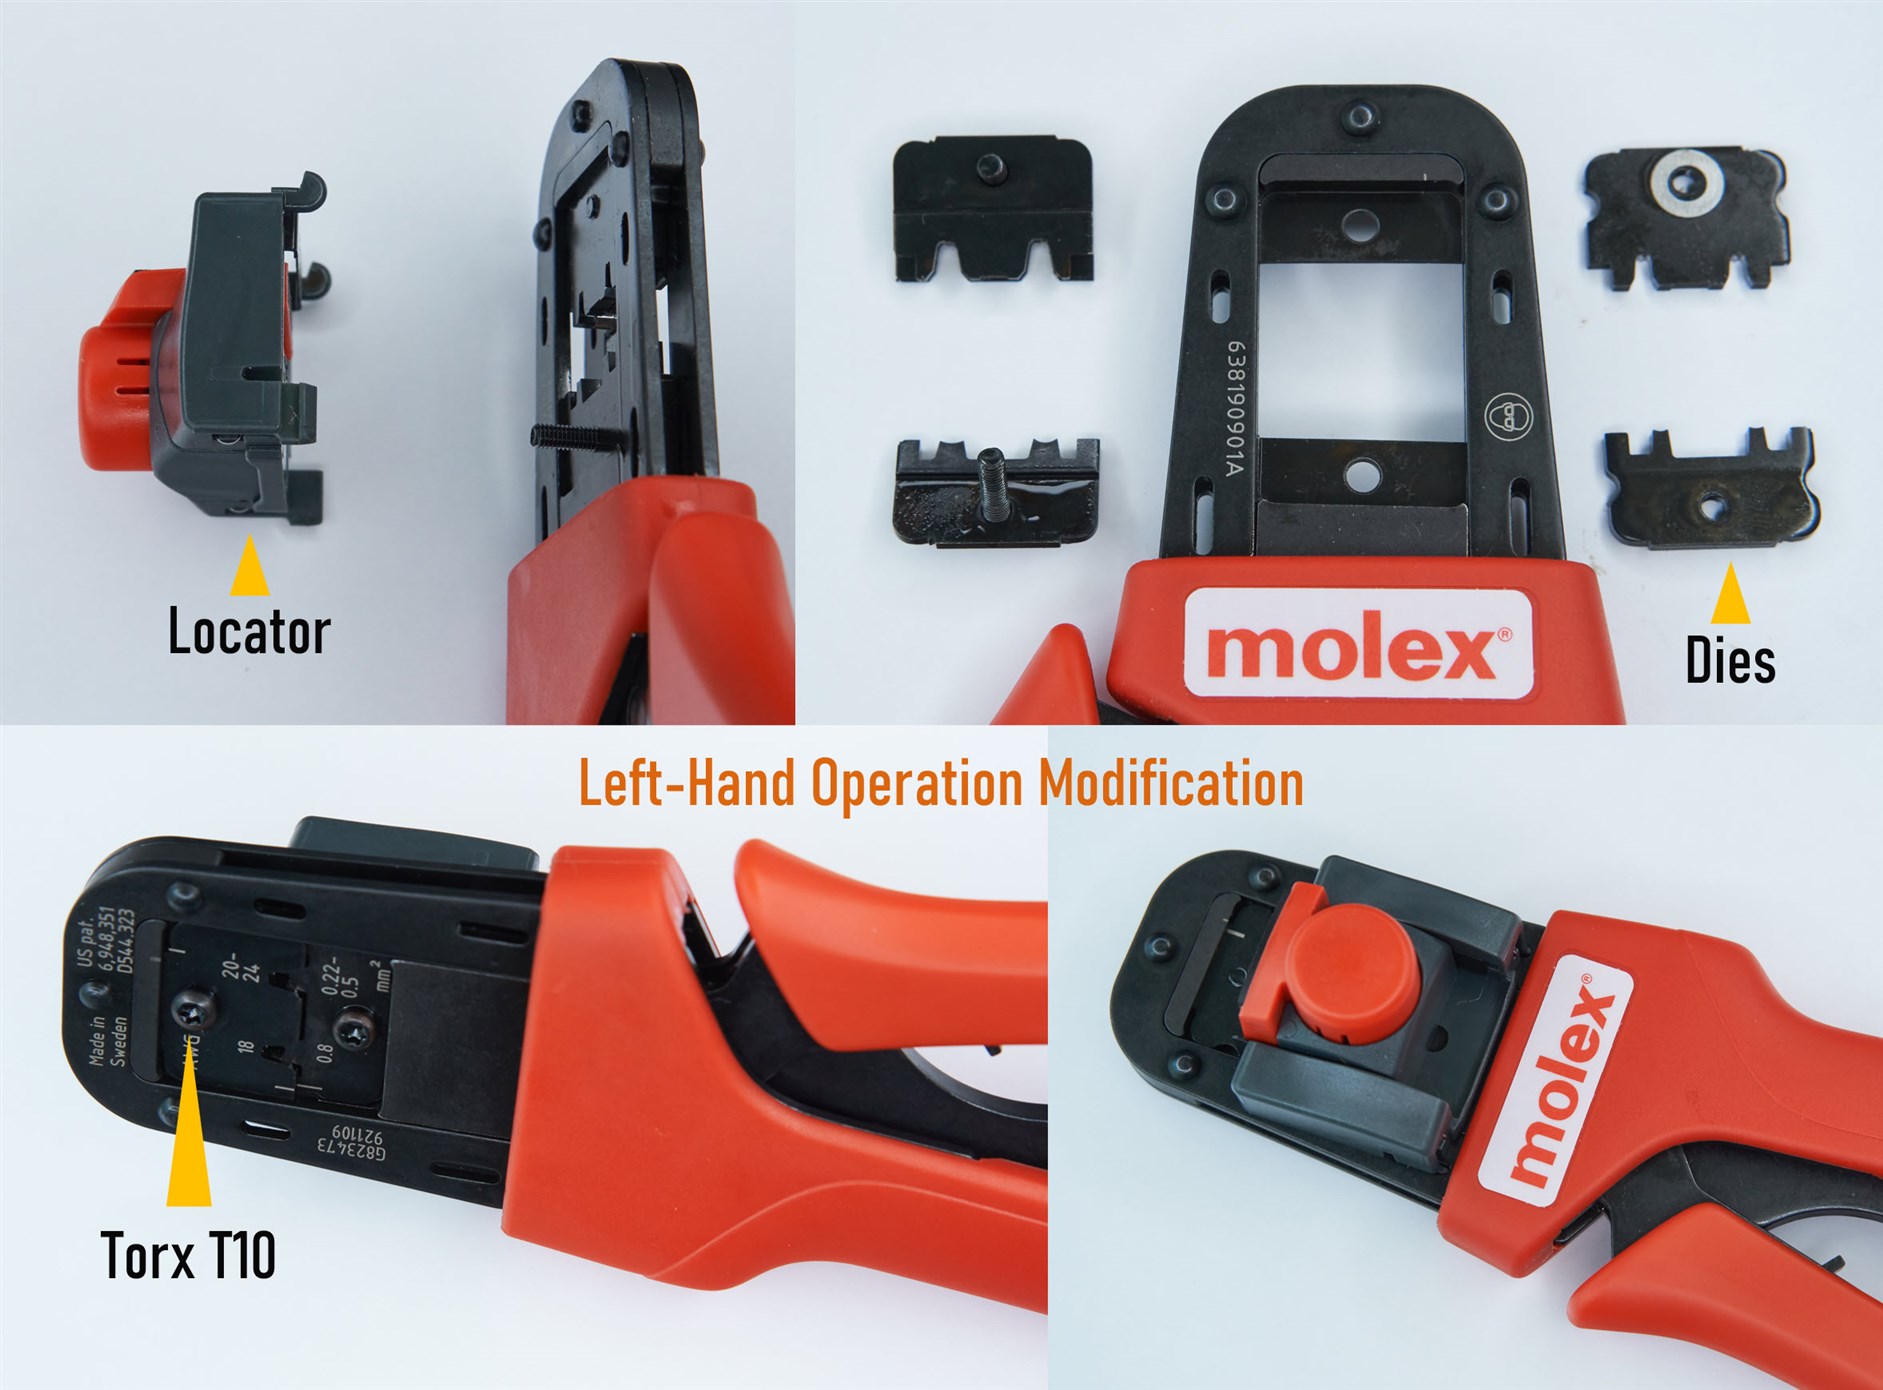
The Molex tool simplifies the positioning of the crimp within the dies and simplifies the positioning of the wire. The crimp is placed in a plastic dock that is brought forward using a plastic Locator Button on the other face of the tool. The locator mechanism is replaceable if it gets damaged or worn out.
The wire is positioned by simply pushing the wire in as far as it will go; there is a metal surface that the conductor will hit, and that controls the depth. I found this a bit unusual, because other connector ratchet tools often have a notch for passing the conductor through, and then the insulation hits the edge of the notch to control the depth. It’s easier to explain in video (see the video at the beginning of this review). The long story short is that fairly accurate wire stripping will be needed with Mini-Fit Jr and the Molex tool. It’s not a big deal, but it’s just something to be aware of because it’s an extra cost if you don’t already have a precision wire stripper.
The Molex tool is configurable for left-handed operation. I happen to be occasionally left-handed, and the benefit will be that the thinner of the two handles will no longer dig into the palm once the tool is correctly set. After left-hand modification, the Molex logo is on the locator button side of the tool, which actually looks aesthetically better.
What Happens with a Bad Crimp?
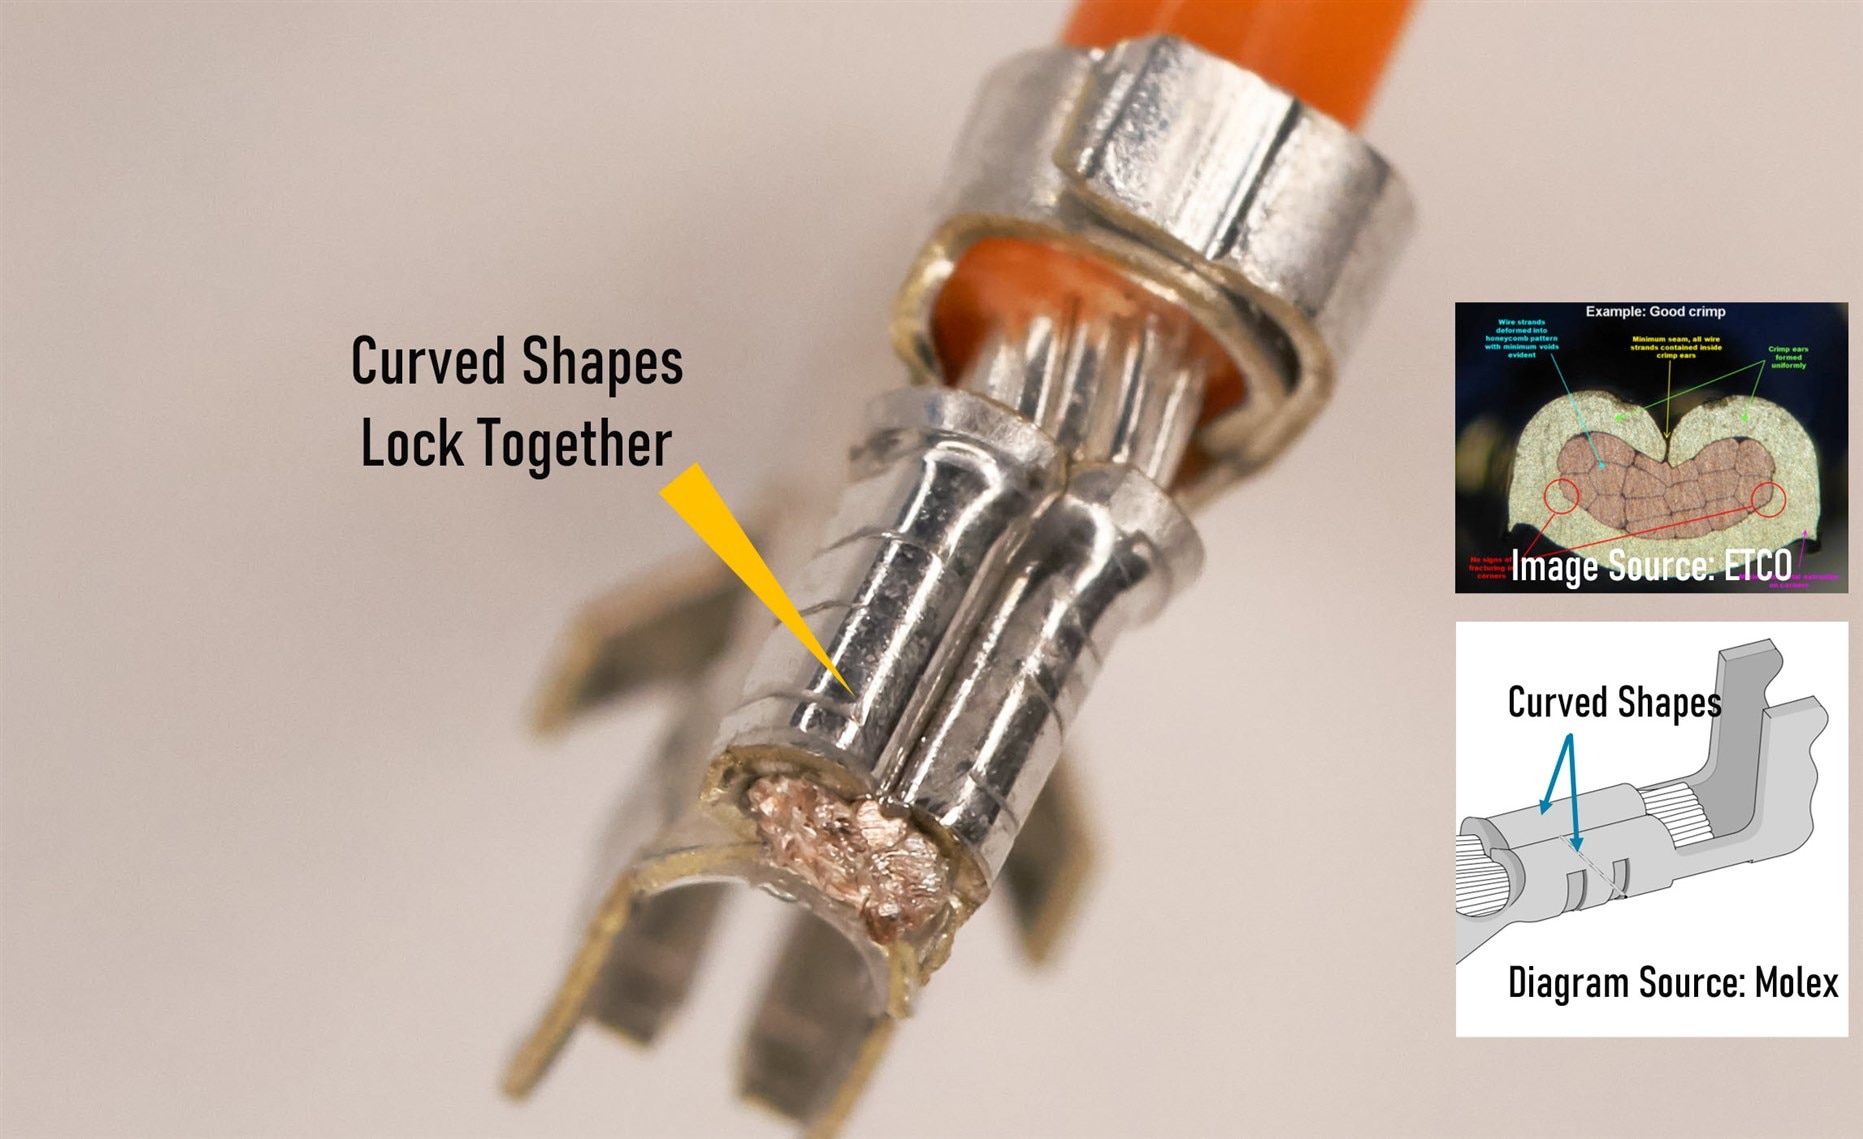
Molex suggests that periodically, crimps should be checked destructively, by pulling the crimped result. I'm unaware of a decent, simple methodology to non-destructively check crimps, although there are some basic checks that could be done for some assurance. One traditional check is to measure the crimped portion width and height and see if it is within the range that the crimp manufacturer specifies. It's only a partial tool check; the crimped result may still be unusable. The width and height are extremely important however since these parameters help define part of what the curved shape of the crimp is like. The shape is important because it serves the purpose of forming a kind of lock that requires a lot of force to loosen. This is why one cannot just fold over the tabs with flat pliers; the force to loosen the tabs is greatly reduced when those curves are not present and correct. Some studies suggest that there can be two orders of magnitude difference in resistance between a good crimp and some bad crimps, so a testbed that can measure (into the tens of micro-ohms) crimp connections could be useful in production scenarios, depending on the end-use for the crimp.
The photo below shows a typical crimped result with the Molex tool. I’ve bent back the crimp to show the conductor crimped portion more clearly.
There are all sorts of problems with bad crimps and I'm not going to attempt to cover them all (it's an ever-evolving subject with hundreds of theories of the underlying physics and there is still ongoing research, so there is plenty of literature to read), but according to a 2015 paper, it is likely that one of the most serious failure scenarios is that if the crimp is badly formed, then there is higher resistance in the area where the low-resistance crimp cold welds are formed, and as current passes and generates heat in that resistance region, the expansion and contraction will differ between the wire and the crimp (since they are made of different materials) and these cause the crimp to open up, increasing the resistance yet further. Other environmental factors may play a role to make this particular problem worse.
Generic Crimp Tools OK?
If you use an ultra-low-cost ‘generic crimp’ tool such as HT-225D, you’re only kidding yourself that the crimp may be totally sound. It will be fine for low-current hobby prototyping, but will not survive high current nor any automotive and many other real-world environments. The photo below shows what the crimp visually looks like; the obvious difference is that the insulation strain relief was damaged by the tool, however, the conductor crimp portion superficially looks OK, with a decent-looking curve shape. However, a pull test caused the entire conductor strands to slide out, at a fraction (one fifth) of the force compared to the Molex tool. With the Molex tool, the conductor remained in the crimp portion, and the wire broke outside the crimp area.

Motorized Crimping
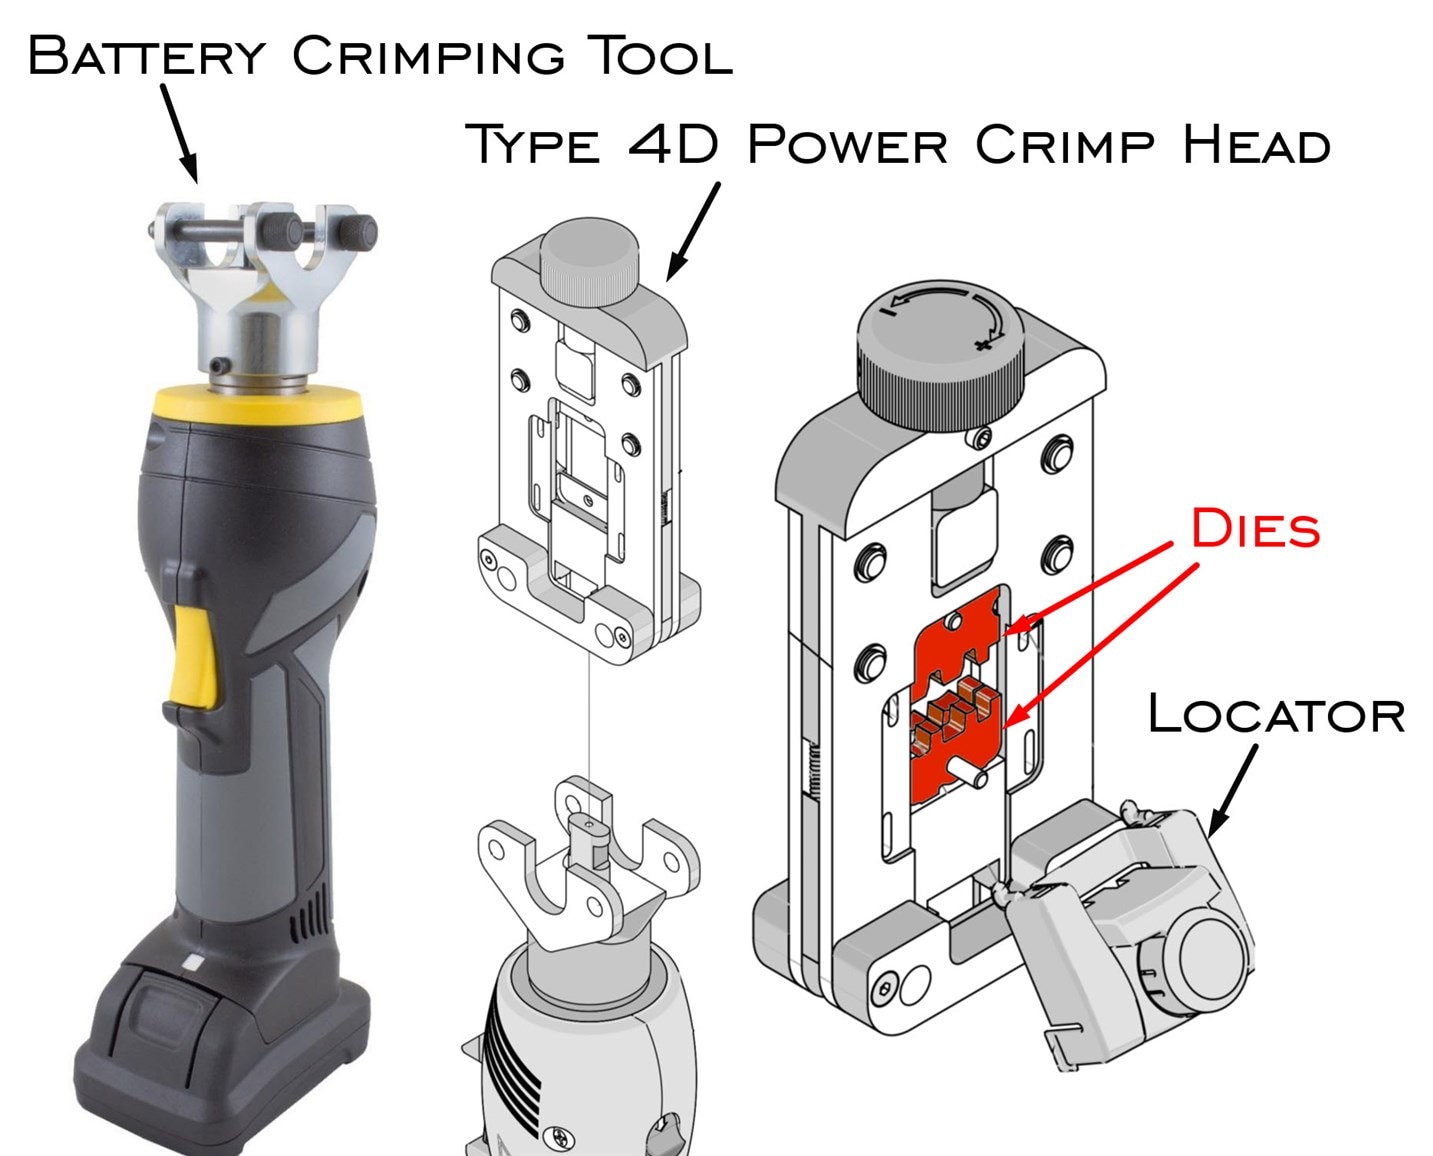
The dies and the plastic locator from the crimp tool can be removed and installed into a motorized crimping solution. In brief it requires the purchase of the Battery Crimping Tool and a Power Crimp Head, and then the dies and the plastic locator can be installed. The Battery Crimping Tool has a removable Li-Ion battery at the base, like DIY power tools.
Ergonomics
I wouldn't say the Molex tool is the most comfortable crimper that I own. It’s not bad, but it’s not the best in this respect. It requires more force to close than some other crimp tools, and even more force for the final squeeze that releases the crimp tool – about 175 Newtons about an inch from the end of the handles. I definitely wouldn't want to be using the tool all day, but it's not intended to be a production tool; perhaps just very light production. I think if I had to use the tool daily (even for very light production), I'd want the motorized option.
The tool is advertised to have ergonomic soft handles but the plastic is only slightly soft when not being pressed. The handles have a kind of soft plastic finish, but it's not a proper rubbery feel (that requires molding in two stages). It doesn’t yield at all. Some far cheaper tools (that won’t do as good a job crimping) have a separate very soft molding inserted into the plastic, and usually, that’s far more comfortable. The Molex tool will do an excellent job on the crimps, but I wish the Molex tool had such handles for maximum comfort. For such a stiff tool, I would have preferred the handles to feel rubbery, and be slightly longer to get more leverage.
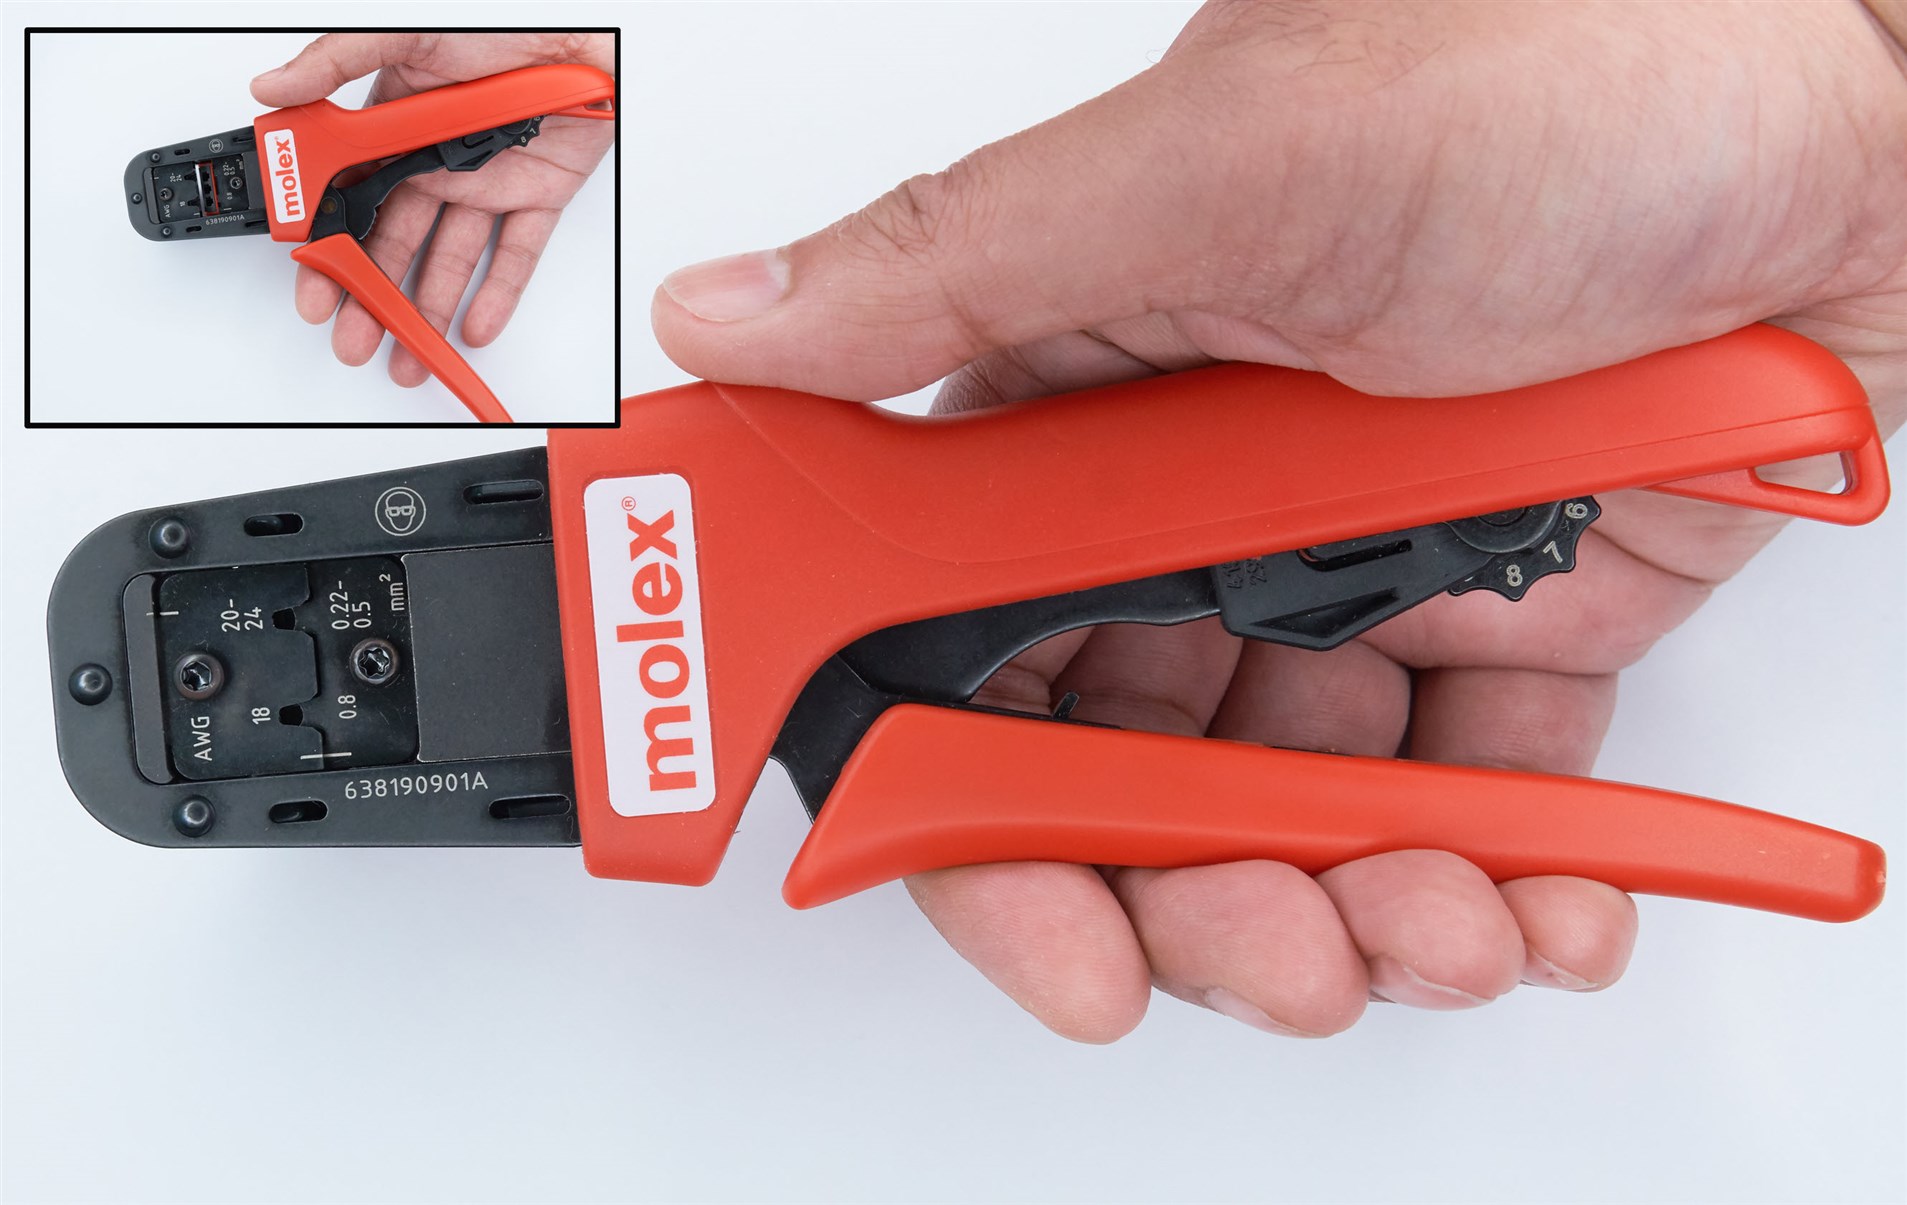
I liked that the tool can be user-modified for left-handed operation, by unscrewing and swapping the positioning of the crimp dies.
In summary, the tool would be just average for ergonomics, primarily because of the force required to use the tool, however, it’s very good that the tool can support left-handed users.
Pull Force Test
With any proper crimp tool used properly, it’s going to be impossible for the wire to slide out, or to break inside the conductor crimp portion of the metal terminal. The wire should break anywhere else! Since the tool dies are specifically designed for the Mini-Fit Jr terminals, and the tool is new from the factory, there’s little chance of a fault occurring, however, I did briefly try to do a simplified pull test. The pull test isn’t as specified by the manufacturer, but I think it’s good enough to explore the strength of a proper crimp.
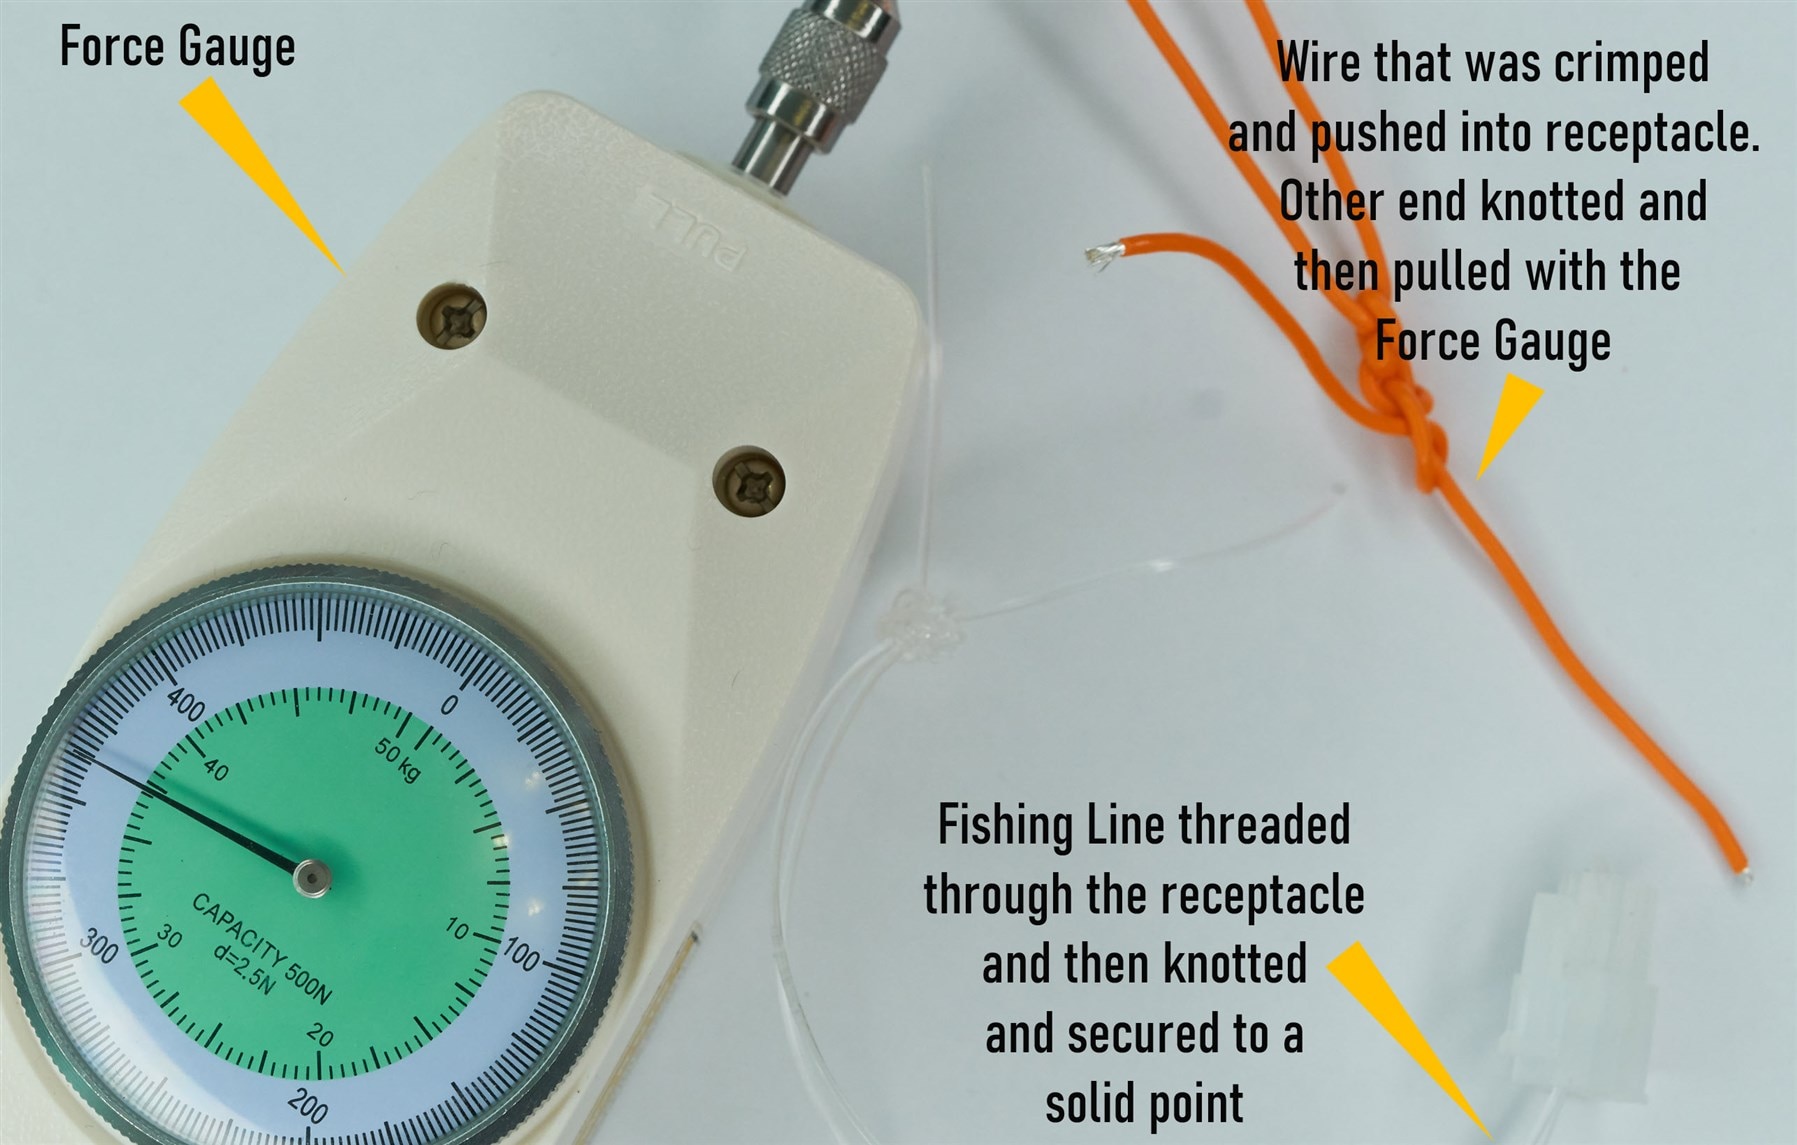
When the wire eventually broke (at about 360 Newtons; in other words, the weight of a person could be supported by just two or three crimps in a connector) the break was just beyond the crimped portion, and it was a great opportunity to see what the crimp looks like end-on, in the photo below; it looks textbook quality. This photo from the test provided me with a lot of confidence about the quality of the crimping from the Molex tool.

I repeated the test with a crimp done using a generic tool (HT-225D), and as mentioned earlier, the wire came out entirely, at a fifth of the force, at under 75 Newtons.
Creating Designs with Mini-Fit Jr
I was really happy with the crimping quality from the Molex tool, and the breadth of low-cost capabilities enabled by the Mini-Fit ecosystem. Spurred on by that, I explored what CAD footprints existed within KiCad. The footprints were not great, primarily the component origin was pin 1 rather than (say) the center of the connector, and the silkscreen didn’t make the pin numbering clear. There were no 3D models for them in KiCad either.
I created my own footprint library containing just the most popular (in my opinion) Mini-Fit Jr headers, and inserted the 3D models from the Molex website. The footprint library along with the 3D models is on GitHub for anyone who wants to make use of it or improve it further.

Summary
I really like Mini-Fit Jr, I think it offers a very wide range of functionality at an extremely low cost, so purchasing a Mini-Fit Jr crimp tool could be a really good investment. The crimp results appear to be flawless with the tool, which along with the pull test result and examination of the conductor crimp portion, should provide some confidence in using it for high current.
I also liked that the tool is easy to convert to left-handed operation, this made the tool more comfortable for me. I whinged a bit about ergonomics but it's partially subjective, perhaps others would not find it an issue depending on grip strength and hand size. I would have preferred to see softer, and perhaps longer handles, but it's still a fine tool and the 175 Newtons is not in an extremely different ballpark compared to (say) the JST tool which requires close to 150 Newtons force for similarish sized crimps, it's just enough difference to be noticeable.
The cost is quite reasonable at just over £200 mainly because the tool solves many different scenarios such as wire-to-wire, wire-to-board, and wire-to-panel so that the one tool can achieve a lot. Molex does have a cheaper (£100) tool with a 1000 cycle operation life, but that’s more for (say) the occasional on-site repairs.
For hobbyist non-critical use at low current, a £20 generic tool could be used, but as demonstrated earlier, it’s highly unlikely to come close to the result with the proper tool so it is of limited use. If you’re crimping for PCs, automotive, white goods, and so on, then the proper tool should be used, and the cost is pretty low.
As a result, based on how much use the tool can provide, I think this tool is very good value-for-money, and it performs competently.
Thanks for reading!
-

geralds
-
Cancel
-
Up
0
Down
-
-
Reply
-
More
-
Cancel
-

shabaz
in reply to geralds
-
Cancel
-
Up
0
Down
-
-
Reply
-
More
-
Cancel
-

geralds
in reply to shabaz
-
Cancel
-
Up
0
Down
-
-
Reply
-
More
-
Cancel
Comment-

geralds
in reply to shabaz
-
Cancel
-
Up
0
Down
-
-
Reply
-
More
-
Cancel
Children