RoadTest: Nordic Bluetooth LE Audio Development Kit nRF5340 DK
Author: skruglewicz
Creation date:
Evaluation Type: Development Boards & Tools
Did you receive all parts the manufacturer stated would be included in the package?: True
What other parts do you consider comparable to this product?: Other Nordic products that use nRF Connect SDK. nRF9160 Thingy-53.
What were the biggest problems encountered?: Getting myself familiar with the usage of the toolchains again and not being able to use the nRF-Connect extensions for VS Code, was a bit of a challenge. I was unable to follow the Audio example and get the Firmware programmed onto the boards, so I could test, Very frustrating.. I hope this will improve and bring in VSCode support...
Detailed Review:
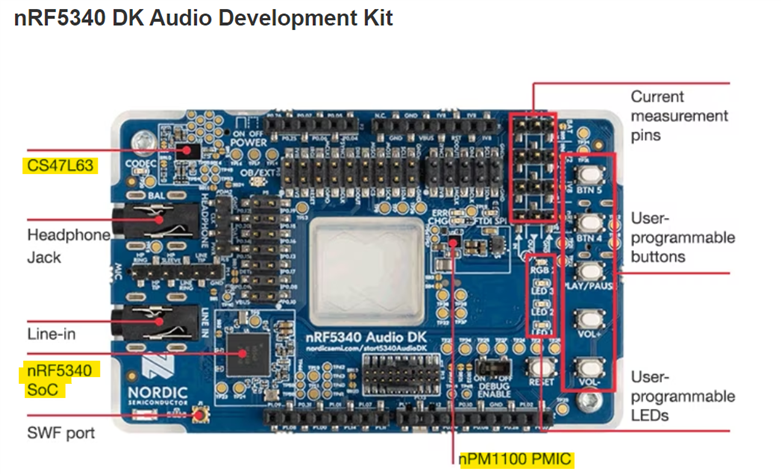
This is a review of the Nordic nRF5340 Audio DK (Development Kit). This Development Kit was supplied to me by the RoadTest sponsor Nordic Semiconductor. I was supplied with 2 DK's to experiment with. I'm a little late to the game, since another member was unable to do the review. So, I'll try my best to give this product a fair review. The Nordic Semiconductor nRF5340 Audio Development Kit (DK) is an impressive platform for Bluetooth LE Audio products. It is a comprehensive kit that contains everything needed to start development, including the nRF5340 SoC, nPM1100 PMIC, and Cirrus Logic’s CS47L63 Audio DSP. These are depicted in the following photo courtesy of figure 7 located on the element14 blog
I took the quiz that was included on this blog at Take the Bluetooth LE Audio Quiz.

This is an excellent resource that I used to get familiar with Bluetooth LE Audio
One of the most interesting features of this DK is its configurability. It can function as a USB dongle to send or receive audio data from a PC, a Business Headset, or a True Wireless Stereo (TWS) Earbud. The kit also supports all Auracast features.
The CS47L63 Audio DSP is optimized for direct connection to an external headphone load, making it perfect for earbuds with mono-only and direct speaker output. It also supports the new “Low Complexity Communications Codec” (LC3), which has superior audio quality compared to Bluetooth Classic’s “Low Complexity Subband Codec” (SBC).
The nRF5340 SoC combines a high-performance application processor with a fully programmable ultra-low-power network processor. This dual core architecture allows for optimal power efficiency. The 128 MHz Arm Cortex-M33 Application Processor has 1 MB flash and 512 KB of RAM, which is perfect for handling custom applications and audio codecs like LC3. The 64 MHz Arm Cortex-M33 Network Processor has 256 KB Flash and 64 KB RAM and is power optimized to run Nordic’s Bluetooth LE Audio stack.
The nPM1100 power management IC has a highly efficient configurable buck regulator and includes an integrated battery charger with a charge current up to 400mA. It is extremely small and ideal for size-constrained applications like True Wireless Earbuds.
The nRF Connect SDK is the software development kit for the nRF5340 SoC, and it has board support for the nRF5340 Audio DK. It supports the development of Bluetooth LE Audio, Bluetooth Low Energy, Thread, and other applications. The Zephyr RTOS, protocol stacks, samples, hardware drivers, and much more are integrated in the nRF Connect SDK. The kit also includes two 3.5 mm audio jacks for analog in and headphones out, five user-programmable buttons and LEDs, a battery, an SD-Card holder for extra storage if needed, a J4 connector for an NFC antenna, and connectors to access the analog/digital interfaces and GPIOs.
Overall, the Nordic Bluetooth LE Audio Development Kit nRF5340 DK is an excellent development platform that provides exceptional performance, power efficiency, and flexibility. It is highly recommended for developers who want to create Bluetooth LE Audio products with superior audio quality. It can be used to develop proof-of-concept firmware demonstrating the usage of the nRF5340 SoC, nPM1100 PMIC, and Cirrus Logic’s CS47L63 Audio DSP.
I usually do an unboxing with roadtest reviews. I chose not to for this review because, there are 3 items in each box, and the documentation explains much of the DK in detail
I am a musician (a Drummer) and have always wanted to experiment with Digital Signal Processing. I'm excited to get into this review. When my package arrived it contained 2 boxes. Each box contained a Kit, Battery and a Leaflet.. The leaflet has a link to the kit introduction page, which I read through. A quarter way down the page, there are navigation tabs that include the following links : Overview, Development Tools, Downloads, and Get Started.

Unless your familiar with Nordic documentation, this could be a little confusing for a start page where one wants to start using the board. Also, putting the "Geat Started” at the end of the tab bar, in my option seems to be misplaced. It should be at the beginning of the page, in my humble opinion.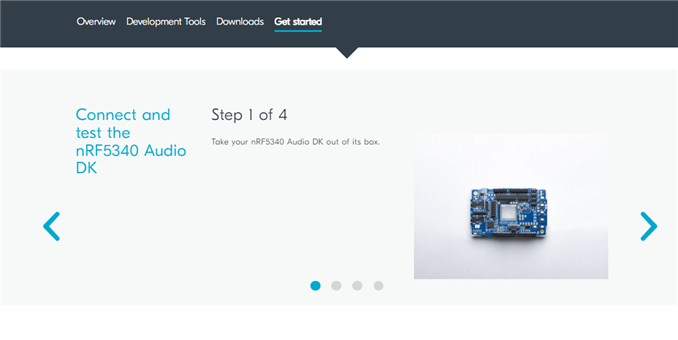
I read through all the tabs and on the "Get Started" tab, I followed the 4 step wizard titled "Connect and test the nRF5340 Audio DK" This is a simple Blinky program that comes .pre installed on the DK. It is used primarily , I believe, to test If the Board and Battery are working.
I observed a few discrepancies, on step 3 it is stated that "the Nordic logo should light up yellow now". It actually more green than yellow. and LED 3 is blinking and another LED to the Left is a solid green?
Second, on step 4, "unplug the usb-c cable and connect the included battery". I received 2 kits for the roadtest, and in my hast getting started, I never noticed the battery tucked away in the bottom of the box. Once I found them well into my review I connected them and they worked fine. The kit items come in a compact little box, so make sure you don't make the same mistake I did.
The rest of the "Get started" tab contains links to more Nordic documentation.

I have used the nRF Connect SDK before, so I skipped over this link. I have 2 Nordic products that I used the nRFConnect SDK on. The first for an Element14 roadtest on another Nordic product, the nRF9160. and a Hackster.io project for the Thingy53. I needed to refresh my memory on using the nRF SDK again. But I will not be focusing on the usage of the development toolchain in this review. The following section describe these 2 project, with links to the blogs pages ,if you have an interest.
Element 14 ROADTEST- This was a very interesting board. I enjoyed my time developing with the nRF SDK and the Toolchains along with using VS Code to develop code. The LTE implementation went flawless. the Product Performed to Expectations I was expecting to have connection issues . Overall the product was easier to get up and running then the AVNET Monarch LTE-M Development Kit.
Hackster.IO - I entered a challenge on hackster Smarter Sustainable World Challenge. In this challenge I was awarded A FREE Nordic Thingy-53 to experiment with. It was far different than the nRF8160. I did not have a much luck getting my project completed, but I did do 3 projects devoted to the Thingy-53.
Research & Experimentation with the Nordic Thingy:53 - Hackster.io
Thingy:53 – Home Energy Monitoring Station - Hackster.io
A Thread Border Router with Pi 4 and nRF9160 - Hackster.io
Now, lets get going with the audio.
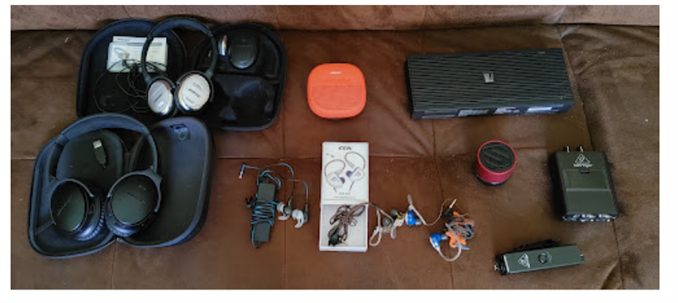
I have many audio devices as I've depicted here. Including
I used some of these in my experiments.
The following two links were helpful in experimenting with the audio.
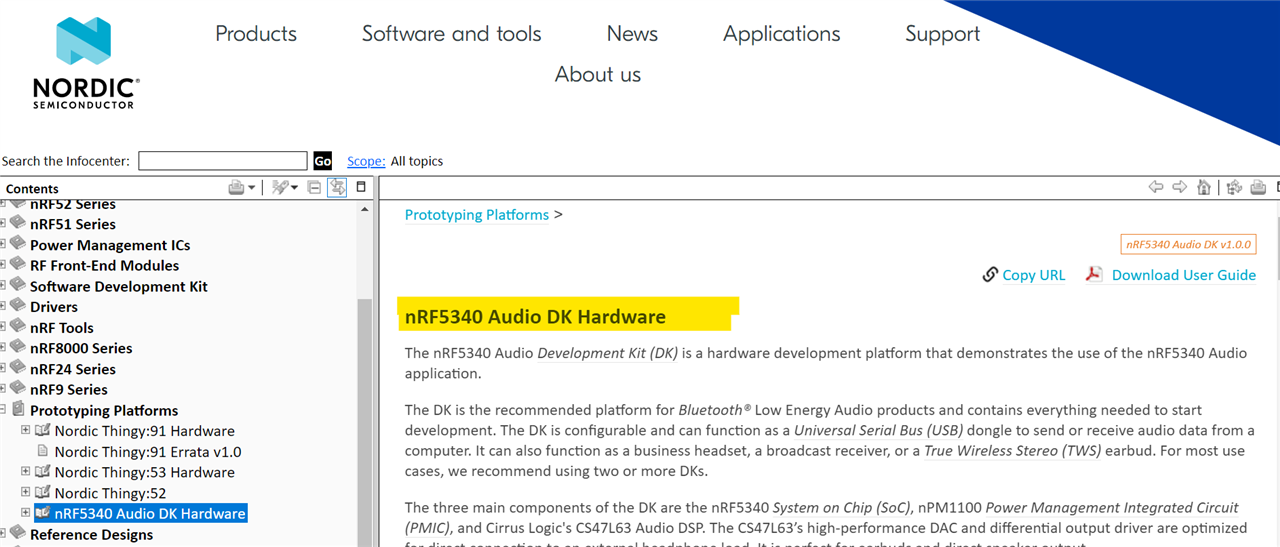
InfoCenter - nRF5340 Audio DK Hardware
This page located on Nordic's InfoCenter site, it contains hardware infomation on the board. It is helpful to describe Pin and peripherals of the Kit. I referred to it during my review, to learn more about the hardware used in the application document, to better understand the workings of the kit.
nRF Connect SDK- NRF5340 Audio.
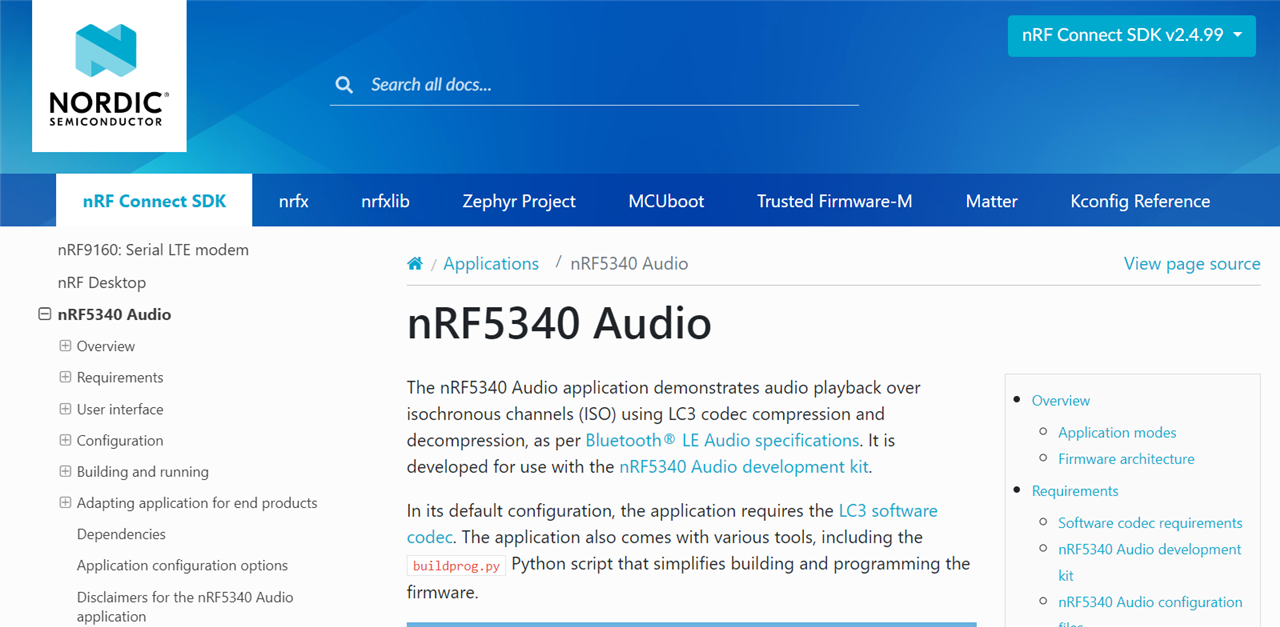
This page contains an application that offers a way to experiment with the kit. It is located on the Nordic nRFConnect SDK doc page. I spent most of my time on this document and describe my experience in the remainder of this review.
The NRF audio application is described in this NRF SDK documentation .The nRF5340 Audio application is a software developed for audio playback over isochronous channels (ISO) using LC3 codec compression and decompression, following the Bluetooth® LE Audio specifications. It is designed to work with the nRF5340 Audio development kit and includes various tools, such as the buildprog.py Python script for building and programming the firmware.
It should be noted that the application is undergoing a restructuring process, which involves moving drivers and modules to more suitable locations in the nRF Connect SDK or Zephyr, making it currently more complex to develop out-of-tree applications.
Again This document is very dense and concise. Be prepared to study it thoroughly before experimenting with the kit. It Contains several sections on the explanation of the audio application. The first section, overview is a very intensive overview of the application design and logic two boards will be able to do gateway and one side of the audio if you had three boards and you could have a gateway right side and left side.
My Nordic BLE board will not be able to be used as a gateway as I thought. It does not contain the audio chip that the kit board has unfortunately.
To build and program the firmware You will need to use the command line tool chain and the Python script builder. It is noted that the NRF connect for VS code is not supported for the example. not sure why? Again, it is noted that development toolchains are presently in a state of flux, so that might be the reason..
In this section, I will discuss the challenges encountered during the building process of the Nordic nRF5340 Audio DK Application example and propose potential improvements for the documentation. Specifically, we will address the difficulties faced when using Visual Studio Code (VSCode) and the issues with the provided build options, as highlighted by fellow Road testers.
A review by Gough Lui Nordic Semiconductor nRF5340 Bluetooth Low-Energy Audio Development Kit RoadTest Review
A review by Fred27 Nordic nRF5340 Audio Development Kit review
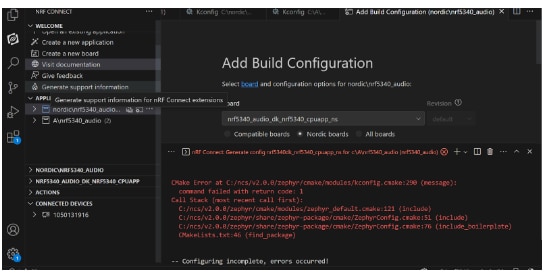
The documentation clearly states that VSCode is not supported for the nRF Connect Extensions, causing problems for users who are accustomed to working with this popular IDE. It is essential to highlight this limitation upfront to avoid wasted efforts and frustration among developers attempting to use VSCode. Clear instructions on alternative IDEs or workarounds would greatly assist users in finding compatible development environments.
For example the environment variables for the WEST toolchains are not installed as the following screenshot clearly shows.
The provided documentation offers two build options: using the command line or a Python script. However, both options seem to present challenges, as reported by other Road testers.
Both Gough and I encountered issues while following the command line instructions. Although Gough eventually succeeded after overcoming these challenges, it is evident that the process can be confusing and time-consuming. This indicates a need for enhanced clarity and detailed troubleshooting steps to assist users in resolving common issues.
Fred27's experience with the Python script approach also highlighted challenges. While the script eventually worked after resolving some issues with dependencies, the process of building the example should ideally be streamlined. Relying on manual dependency management and troubleshooting is not an optimal solution. Providing a more seamless and straightforward method for building with the Python script would greatly benefit users.
For example the following command line error running the script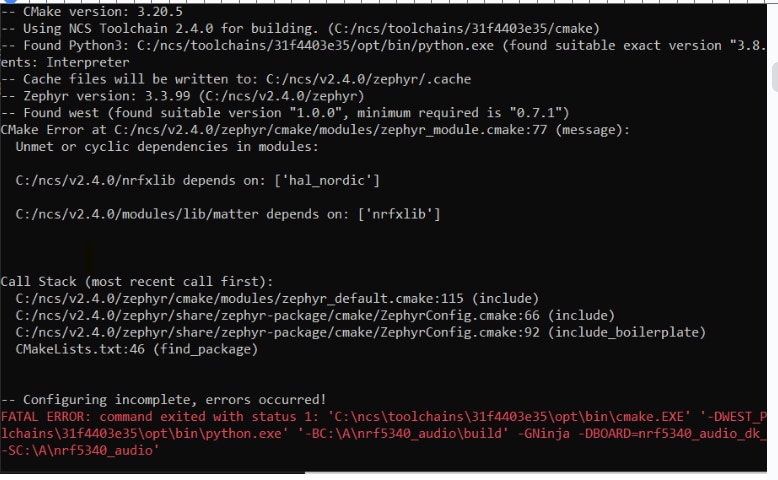
run from C:\A\s1
to build the script go to the directory cd C:/A/s1/tools/buildprog
documentation is here:
The idea is that you
Use the python script: buildprog.py on the tools directory under the copied audio directory
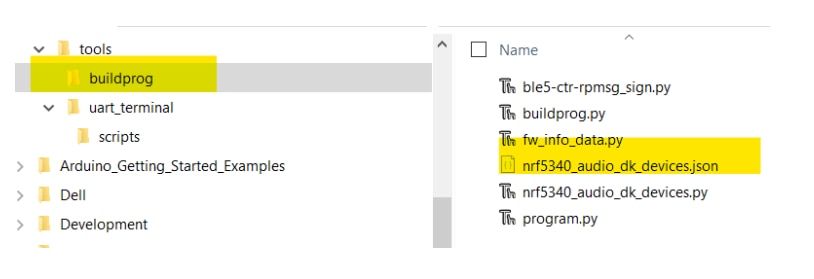
The script depends on the settings defined in the nrf5340_audio_dk_devices.json file. Before using the script, make sure to update this file with the following information for each development kit you want to use:

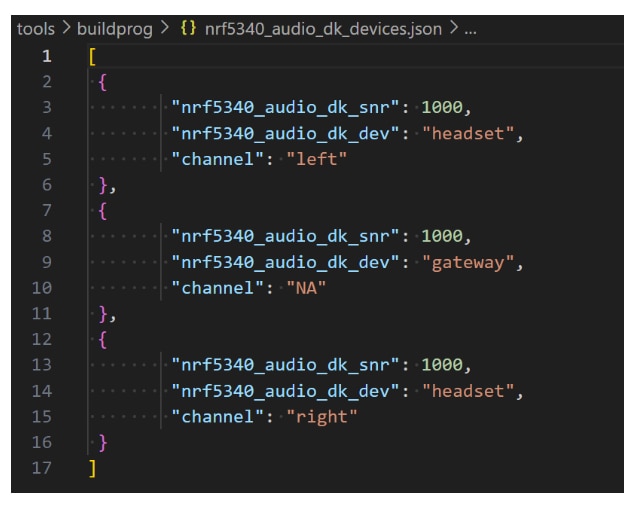
1050171701 = headset left (Orange USB)
1050131916 – gateway (BLACK USB)
NOTE: from here on I used VSCode to run the script and edit file.
Right click on the folder and select “open with code”
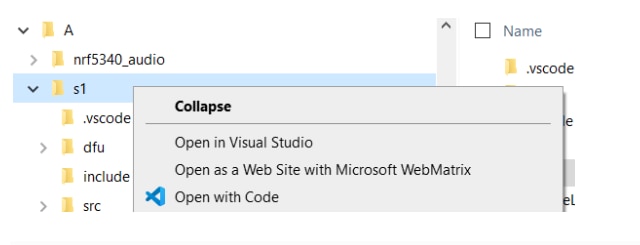
After editing the nrf5340_audio_dk_devices.json file, run buildprog.py to build the firmware for the development kits. The building command for running the script requires providing the following parameters, in line with nRF5340 Audio configuration files:
I ran example 2
python buildprog.py -c both -b debug -d both -m internal -M
Just as FRED27 stated there were problems with this build command
The following solution was suggested by a fellow element14 user uzer123 I also spent many hours with the "automated" install. About installing "colorama" etc, i don’t think this is the optimal solution because they are already installed, you just have to use environment variables in the terminal in order to find the correct python environment (maybe like this) or you can use the terminal created from Toolchain Manager.The PAGE instructs you to enter the command zephyr\zephyr-env.cmd
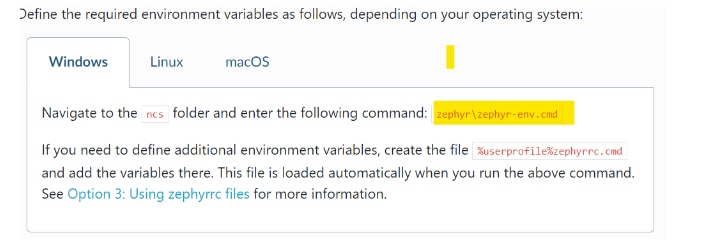
I decided to get out of VSCode and run the python script from the Tool Manager as described in the next section
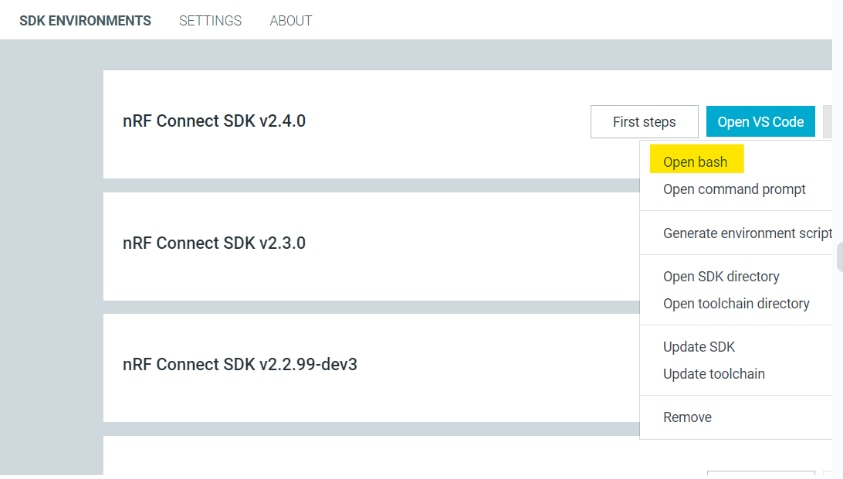
The Bash command is available from the Toolchain manager “SDK Environments” sdk version tab pull down menu. Getting there is a little confusing, so I included the following screenshot to illustrate selecting it. I’m using the version nRF Connect SDK v2.4.0.
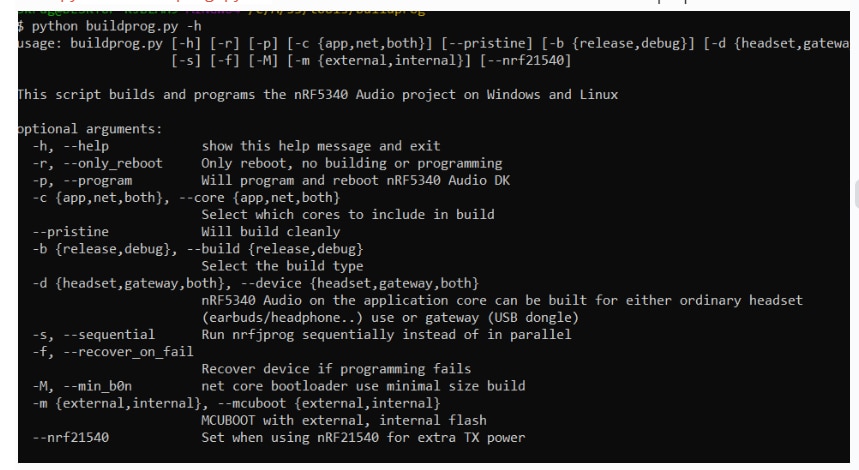
Getting help on the script arguments
Run python buildprog.py -h for information about all available script parameters.
The building command for running the script requires providing the following parameters, in line with nRF5340 Audio configuration files:
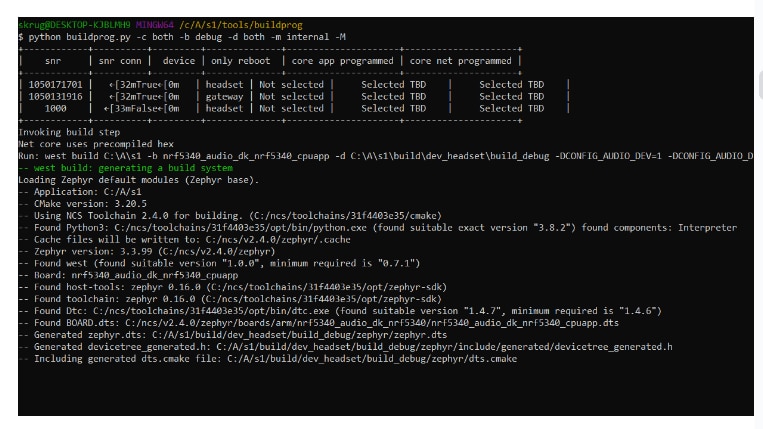
But I ran into a fatal error with building zephyr FLASH OVERFLOW
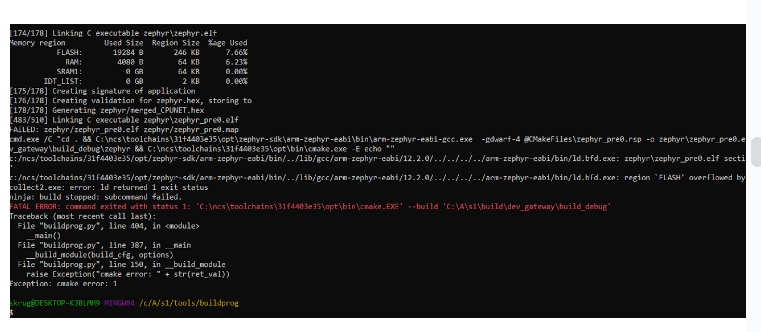
Is it a gateway board? NO , because I Switched the boards in the JSON file and still the same flash error.
Is it the SDK version? No, because I tried another version and still no build. Tried an older SDK /c/ncs/v2.1.0-rc2, with fresh software the following error occurred and did not get as far as the other code.
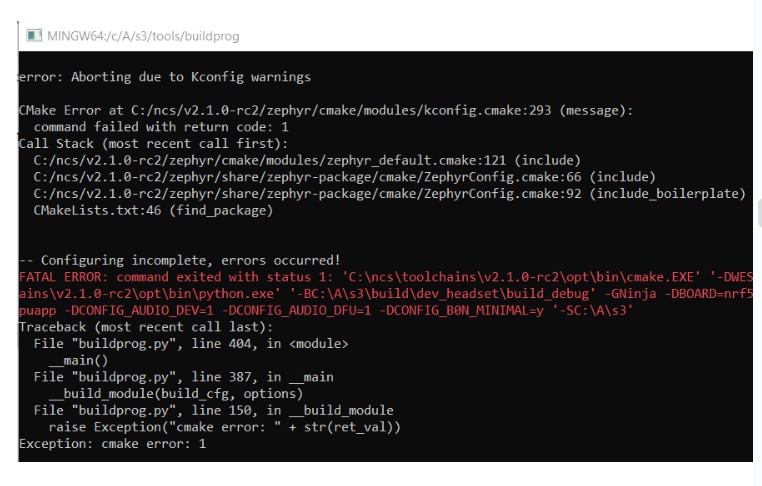
Now I tried to run the script with different arguments I used the external DFU type and release instead of debug as described here:
python buildprog.py -c both -b release -d both -m external
SUCCESS I WAS ABLE TO BUILD using the args -b release -m external for the python script
HERE IS THE END OF THE COMMAND to PROVE IT. I also saved the whole log into a WORD doc.
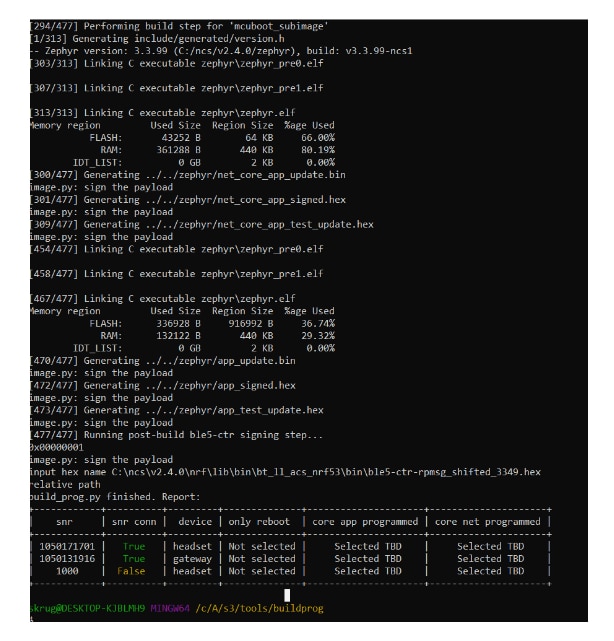
The development kits are programmed according to the serial numbers set in the JSON file. Make sure to connect the development kits to your PC using USB and turn them on using the POWER switch before you run the command.
The following parameters are available for programming:
The command for programming can look as follows:
python buildprog.py -c both -b debug -d both -p
Since I built the code in RELEASE MODE I will use the –b release argument instead of debug
python buildprog.py -c both -b release -d both –p
Received: buildprog.py: error: unrecognized arguments: –p WHY? I have the –p

Tried what FRED27 discovered SEE below with underscores for arg –recover_on_fail
python buildprog.py -c both -b release -d both -p –recover_on_fail
But did not build with –p on the end so I tried putting the –p at the beginning and dropped the –recover_on_fail
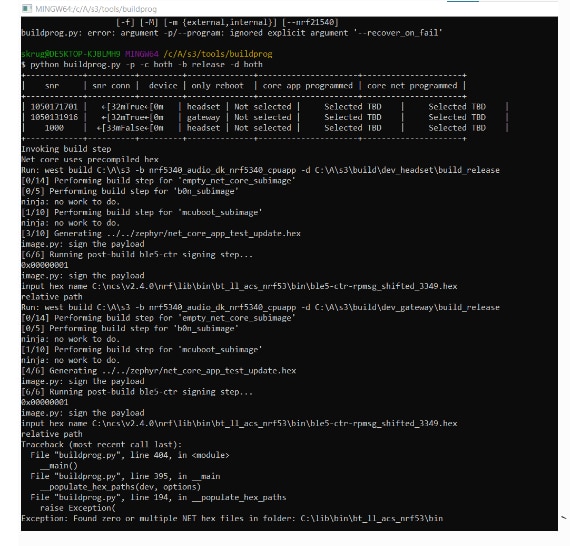
python buildprog.py -p -c both -b release -d both
Results: went a little farther but failed on
input hex name C:\ncs\v2.4.0\nrf\lib\bin\bt_ll_acs_nrf53\bin\ble5-ctr-rpmsg_shifted_3349.hex
relative path
Traceback (most recent call last):
File "buildprog.py", line 404, in <module>
__main()
File "buildprog.py", line 395, in __main
__populate_hex_paths(dev, options)
File "buildprog.py", line 194, in __populate_hex_paths
raise Exception(
Exception: Found zero or multiple NET hex files in folder: C:\lib\bin\bt_ll_acs_nrf53\bin
`
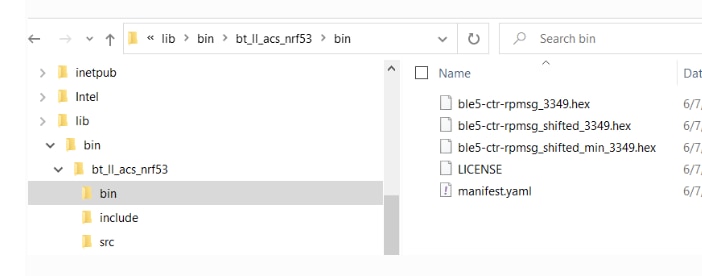
Is the hex file present? YES see the pic below?

image.py: sign the payload
input hex name C:\ncs\v2.4.0\nrf\lib\bin\bt_ll_acs_nrf53\bin\ble5-ctr-rpmsg_shifted_3349.hex relative path
But why then does the script log say the following location for the hex name? it exist?
And why does the exception give a directory that does not exist?
Exception: Found zero or multiple NET hex files in folder: C:\lib\bin\bt_ll_acs_nrf53\bin
So I created and copied the contents of C:\ncs\v2.4.0\nrf\lib\bin\bt_ll_acs_nrf53\bin to C:\lib\bin\bt_ll_acs_nrf53\bin as shown below
And voila it WORKED
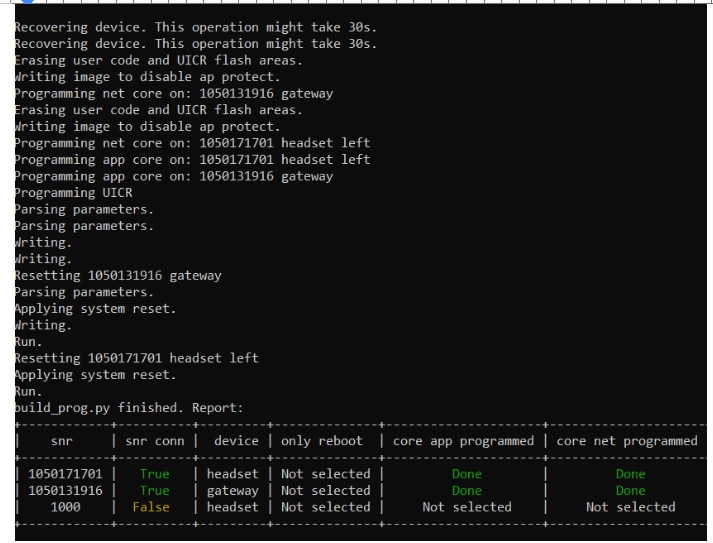
But I did get the error
ERROR: your device. Please use --recover to unlock the device. As seen below?
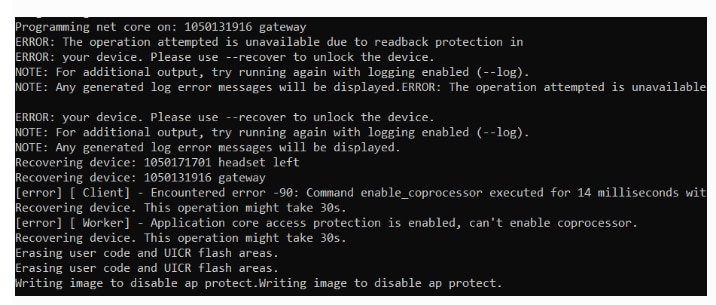
FRED27 experienced the following:
So now I’d successfully built the code, it needed to be flashed to the devices. I followed the instructions and used "python buildprog.py -c both -b debug -d both -p --recover-on-fail". This promptly failed with unrecognized option recover-on-fail. I tried reducing it to “-r” and my PC crashed. I tried leaving the option off and was told I needed the recover option. I tried –recover and something worked. Eventually I worked out that the option should have been --recover_on_fail (with underscores)
Another indication that the programming was unsuccessful was that the LEDS are not the same as Roadtester: Gough Lui? As described below
Once the firmware is correctly loaded on the boards, they will change from the yellow color (as shipped) to green (gateway), blue (headset-left) or magenta (headset-right).
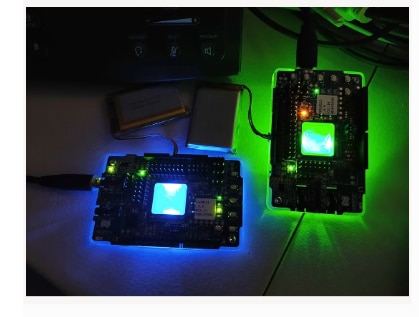
Try another round to get the proper results without error.
NO GOOD cannot program net core on both devices?
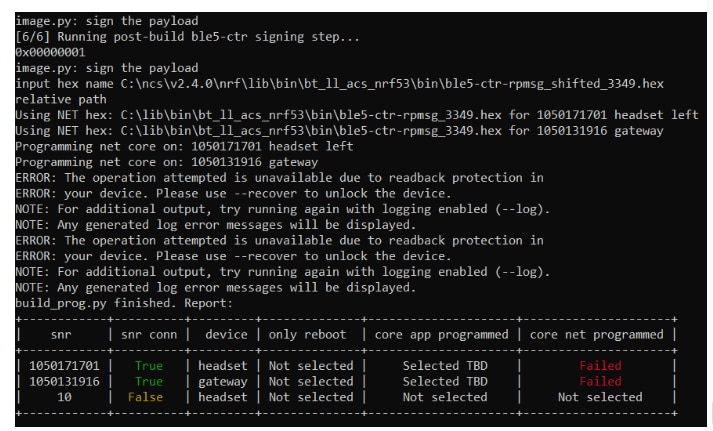
[6/6] Running post-build ble5-ctr signing step...
0x00000001
image.py: sign the payload
input hex name C:\ncs\v2.4.0\nrf\lib\bin\bt_ll_acs_nrf53\bin\ble5-ctr-rpmsg_shifted_3349.hex
relative path
Using NET hex: C:\lib\bin\bt_ll_acs_nrf53\bin\ble5-ctr-rpmsg_3349.hex for 1050171701 headset left
Using NET hex: C:\lib\bin\bt_ll_acs_nrf53\bin\ble5-ctr-rpmsg_3349.hex for 1050131916 gateway
Programming net core on: 1050171701 headset left
Programming net core on: 1050131916 gateway
ERROR: The operation attempted is unavailable due to readback protection in
ERROR: your device. Please use --recover to unlock the device.
NOTE: For additional output, try running again with logging enabled (--log).
NOTE: Any generated log error messages will be displayed.
ERROR: The operation attempted is unavailable due to readback protection in
ERROR: your device. Please use --recover to unlock the device.
NOTE: For additional output, try running again with logging enabled (--log).
NOTE: Any generated log error messages will be displayed.
build_prog.py finished.  Report:
+-----------------+------------+-----------+-------------------+-------------------------------+------------------------------+

|    snr              | snr conn |  device | only reboot  | core app programmed | core net programmed |

+-----------------+-------------+-----------+------------------+-------------------------------+------------------------------+

| 1050171701 |   True     | headset | Not selected |        Selected TBD          |        Failed                      |

| 1050131916 |   True     | gateway| Not selected |        Selected TBD          |        Failed                      |

|     10               |  False     | headset | Not selected |        Not selected          |        Not selected          |

+---------        ---+--------  --+-------    --+---      -----------+------            ---------------+---            ------------------+
After many trials and errors with both the BUILD and The Programmer arguments to the script, as mentioned above, I came up with the following to successfully Build & Program the two devices:


After building and programming the application, you can test it for the CIS mode. The following testing scenarios assume you are using USB as the audio source on the gateway. This is the default setting. After programming, RGB2 starts blinking green on every device to indicate the ongoing CPU activity on the network core. LED3 starts blinking green on every device to indicate the ongoing CPU activity on the application core.
After programming the above indicated LEDs are in question? They are not BLINKING or illuminating. And the board lights do not illuminate like describe by reviewer Gough.
I Posted a DEVZONE ticket. Ticket nRF5340 Audio DK with the audio application nrf5340_audio.. This ticket helped me figure out why the LEDs and the Board lights were not working on Audio Gateway and Headset. Ticket was SOLVED June 28 and the above link details what I went through to solve it
Basically here are the steps I took to Build and Program the Audio Example on both devices.
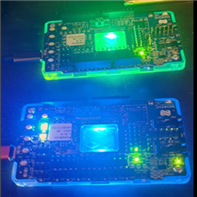
This worked great The LEDS are working on the boards and they change colors to indicate the Gateway GREEN and Headset BLUE as shown
.
The audio example page in the testing section indicates that after programming,
They are different for me however
The engineers at DevZone claim that this is a known issue and that it doesn’t affect anything.
I completed the following steps to test the unidirectional CIS mode for one gateway and a left headset.
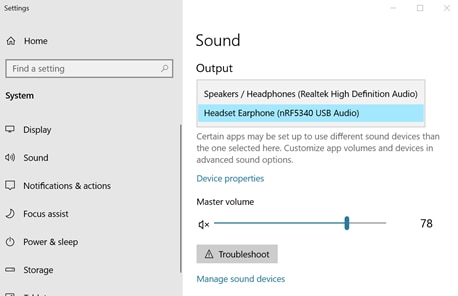
After the kits have paired for the first time, they are now bonded. This means the Long-Term Key (LTK) is stored on each side, and that the kits will only connect to each other unless the bonding information is cleared. To clear the bonding information, press and hold BTN 5 during boot.
When you finish testing, power off the nRF5340 Audio development kits by switching the power switch from On to Off.
You don't have permission to edit metadata of this video.
I was given, an insightful comment from Uzer123 offered a potential solution using environment variables in the terminal or utilizing the terminal created by the Toolchain Manager. Incorporating this valuable information into the documentation can save users from unnecessary troubleshooting.
The Documentation is sometimes giving invalid script information(like dashes instead of underscores, improper argument placement etc.) For this reason I’m lowering my ratings for documentation in this review.
The page should include the supported SDK versions to use. It should have a release date and an indication of updates to the documentation.
The building and programming sections need to be improved with solutions that work with the supported SDK version.
In conclusion, the building and programming process for the Nordic nRF5340 Audio DK example application presents challenges due to limitations with VSCode support and the complexities encountered in both the command line and Python script approaches. To improve the user experience, it is crucial to provide clear instructions, address limitations with supported IDEs, and streamline the build process, especially with the Python script option. Incorporating the discovered solutions and enhancing troubleshooting guidance will significantly reduce frustration and enable a smoother building experience for developers relying on the provided documentation.
I raised my my rankings due to the DEVZONE support I received with the build and programming issues of the Audio example page.
Nordic nRF5340 Audio DK reviews from other members, is another excellent resource and are very informative on the usage of the kit
Top Comments
Hi,
Good starting though. I have had the same issue some time ago regarding editing and saving the roadtest. But then I started using Libre office and then paste everything to the roadtest. That worked…
Even if it is draft form, the comments are interesting to read. Looking forward to what you learn. Let’s hear some drumming!