RoadTest: Sign Up to Roadtest the Cytron MAKER PI RP2040
Author: feiticeir0
Creation date:
Evaluation Type: Development Boards & Tools
Did you receive all parts the manufacturer stated would be included in the package?: True
What other parts do you consider comparable to this product?: Raspberry PI Pico
What were the biggest problems encountered?: None.
Detailed Review:
Hi all.
Here's my take on the Cytron Maker PI RP2040. I had to place it on YouTube because there's an issue with the Element14's site regarding uploading files bigger than 50MB.
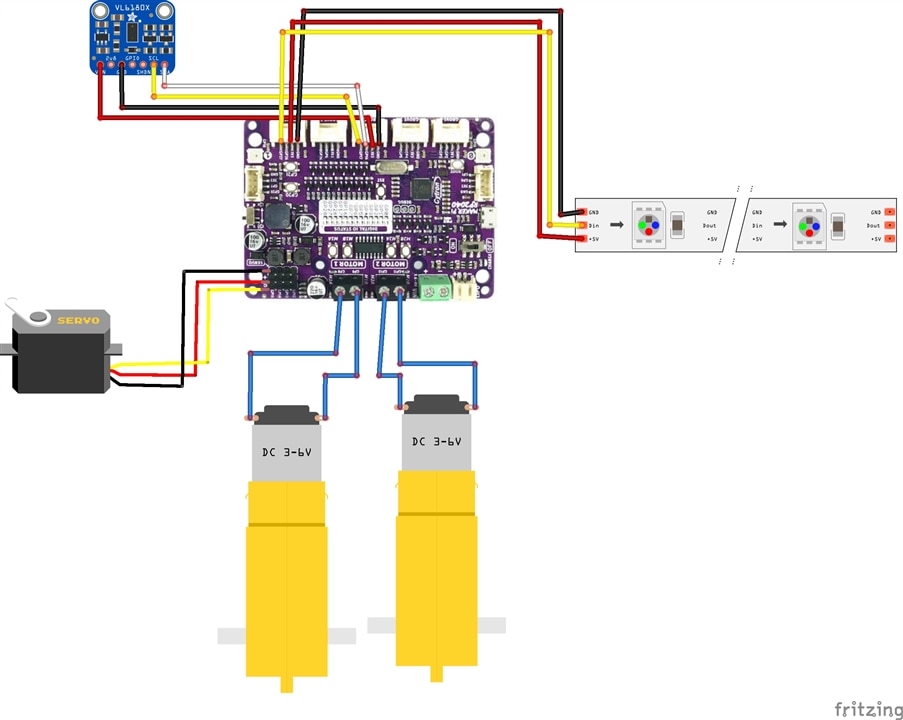
To demonstrate the board, I decided to create an "Autonomous" car. Using a Ultrasonic HC-SR04 sensor to measure the distance to objects, the car would detect objects in front of it and change direction. Using a servo, it will measure distance in the left and right and decide which way to turn and go.
Here's the schematics:
Because I'm having a lot of difficulty using the SR04 ultrasonic sensor. Sometimes it doesn't work - it's like it's not detecting the PINs or the sensor.
I get this error:
>>> %Run -c $EDITOR_CONTENTMPY: soft rebootTraceback (most recent call last): File "<stdin>", line 33, in <module> File "<stdin>", line 29, in ultrasoundNameError: local variable referenced before assignment>>>
I know it's not the sensor, because I've tried several...
Even with this library,hcsr04.py, that had worked well a few times, I had problems. So, I tried a new approach - I had a Time Of Flight sensor at home, I decide to give it a try.
I found this library - VL53L0X - that works with MicroPython. I had to discover the Raspberry PI PICO I2C PINs, because the Maker PI RP2040 doesn't specify - It's Grove 4 - GP16 and GP17.
So, I've change to a Time Of Flight Sensor.
Here's the code for the various examples and at the end the code for the final project.
Here's the code to test the buzzer.
Testing the buzzer
from machine import Pin, PWMfrom utime import sleepbuzzer = PWM(Pin(22))# frequency - higher the number, higher the pitch# from 10 and 12.000buzzer.freq(1000)#set volume - don't really know how high this can bebuzzer.duty_u16(10000)sleep(1)#stop buzzerbuzzer.duty_u16(0)
The tones.py file is straight from the arduino examples, but change to use a dictionary in Python.
In the code are the URLs for the examples
""" Playing a Song """# based on https://www.tomshardware.com/how-to/buzzer-music-raspberry-pi-pico# https://www.coderdojotc.org/micropython/sound/05-play-mario/from machine import Pin, PWMfrom utime import sleep#import notes form tones.pyfrom tones import tones#declare buzzerbuzzer = PWM(Pin(22))mario = ["E7", "E7", 0, "E7", 0, "C7", "E7", 0, "G7", 0, 0, 0, "G6", 0, 0, 0, "C7", 0, 0, "G6", 0, 0, "E6", 0, 0, "A6", 0, "B6", 0, "AS6", "A6", 0, "G6", "E7", 0, "G7", "A7", 0, "F7", "G7", 0, "E7", 0,"C7", "D7", "B6", 0, 0, "C7", 0, 0, "G6", 0, 0, "E6", 0, 0, "A6", 0, "B6", 0, "AS6", "A6", 0, "G6", "E7", 0, "G7", "A7", 0, "F7", "G7", 0, "E7", 0,"C7", "D7", "B6", 0, 0]def playtone(frequency): buzzer.duty_u16(10000) buzzer.freq(frequency)def bequiet(): buzzer.duty_u16(0)def playsong(mysong): for i in range(len(mysong)): if (mysong[i] == "P" or mysong[i] == 0): bequiet() else: playtone(tones[mysong[i]]) sleep(0.2) bequiet()playsong(mario)
In the first URL is the link to get the tones.py file.
Here's the code to testing the motors.
The class is already set for the Cytron Maker PI RP2040 pins
dcmotors.py class code
# This class defines the motors to gofrom machine import Pin, PWMclass DCMotor: def __init__(self): # left Motors definitions self.Motor_A1 = PWM(Pin(8, Pin.OUT)) self.Motor_A2 = PWM(Pin(9, Pin.OUT)) # right motors definitions self.Motor_B1 = PWM(Pin(10, Pin.OUT)) self.Motor_B2 = PWM(Pin(11, Pin.OUT)) #set frequency self.Motor_A1.freq(50) self.Motor_A2.freq(50) self.Motor_B1.freq(50) self.Motor_B2.freq(50) # forward def forward(self,speed = 30000): print (speed) # right motors self.Motor_A1.duty_u16(speed) self.Motor_A2.duty_u16(0) # left motors self.Motor_B1.duty_u16(speed) self.Motor_B2.duty_u16(0) # stop def stop(self): # right motors self.Motor_A1.duty_u16(0) self.Motor_A2.duty_u16(0) # left motors self.Motor_B1.duty_u16(0) self.Motor_B2.duty_u16(0) # backward def backward(self, speed = 30000): # right motors self.Motor_A1.duty_u16(0) self.Motor_A2.duty_u16(speed) # left motors self.Motor_B1.duty_u16(0) self.Motor_B2.duty_u16(speed) # turn Right def turnRight(self, speed = 35000): # right motors self.Motor_A1.duty_u16(speed) self.Motor_A2.duty_u16(0) # left motors self.Motor_B1.duty_u16(0) self.Motor_B2.duty_u16(speed) # turn Left def turnLeft(self, speed = 35000): # right motors self.Motor_A1.duty_u16(0) self.Motor_A2.duty_u16(speed) # left motors self.Motor_B1.duty_u16(speed) self.Motor_B2.duty_u16(0)
The actual code of testing
from machine import Pin, PWMfrom utime import sleepfrom time import sleepfrom dcmotor import DCMotormotors = DCMotor()# clockwise - A1 False | A2 True# counterclockwise - A1 True | A2 False# set duty cycle - speed 0 and 65535# Forwardmotors.forward (65000)sleep(4)#stopmotors.stop()# turn rightmotors.turnRight (45000)sleep(1.5)# Backwardmotors.backward (40000)sleep(2)#stopmotors.stop()sleep(1)# turn leftmotors.turnLeft (45000)sleep(1.5)# Forwardmotors.forward (65000)sleep(3)motors.stop()
The code to control an external LED strip is straight from the MicroPython documentation.
Here's the code changed for the Cytron
import machine, neopixelimport timenp = neopixel.NeoPixel(machine.Pin(26), 9)def demo(np): n = np.n # cycle for i in range(4 * n): for j in range(n): np[j] = (0, 0, 0) np[i % n] = (255, 255, 255) np.write() time.sleep_ms(25) # bounce for i in range(4 * n): for j in range(n): np[j] = (0, 0, 128) if (i // n) % 2 == 0: np[i % n] = (0, 0, 0) else: np[n - 1 - (i % n)] = (0, 0, 0) np.write() time.sleep_ms(60) # fade in/out for i in range(0, 4 * 256, 8): for j in range(n): if (i // 256) % 2 == 0: val = i & 0xff else: val = 255 - (i & 0xff) np[j] = (val, 0, 0) np.write() # clear for i in range(n): np[i] = (0, 0, 0) np.write()
The code for the Time Of Flight sensor example.
The library can be found here.
import timefrom machine import Pinfrom machine import I2Cimport VL53L0Xsda=machine.Pin(16) # lower right pinscl=machine.Pin(17) # one up from lower right pini2c=machine.I2C(0, sda=sda, scl=scl, freq=400000)# Create a VL53L0X objecttof = VL53L0X.VL53L0X(i2c)def calculate_distance(): tof.start() tof.read() distance = tof.read() tof.stop() return distancewhile True: """ tof.start() tof.read() print(tof.read()) tof.stop() """ print (calculate_distance()) time.sleep(0.1)
After all this, here's the code used to testing the board on the robot, by avoind obstacles using the Time Of Flight sensor
import machineimport timefrom machine import Pin, PWMfrom time import sleepfrom dcmotor import DCMotorimport VL53L0Xfrom lighting import Lightingsda=machine.Pin(16) # lower right pinscl=machine.Pin(17) # one up from lower right pini2c=machine.I2C(0, sda=sda, scl=scl, freq=400000)# Create a VL53L0X objecttof = VL53L0X.VL53L0X(i2c)# define the ledsleds = Lighting()# Define pin for servo motorservo_pin = Pin(15)servo = machine.PWM(servo_pin)servo.freq(50)# fine tune the duty cycle values to suit your servo motorMIN_DUTY = 2000MAX_DUTY = 5100# Motorsmotors = DCMotor()def calculateAngle(angle): return int(((MAX_DUTY - MIN_DUTY) / 180) * angle) + MIN_DUTY""" Calculate distance using the TOF sensor """""" Returns distance in mm """def calculate_distance(): tof.start() tof.read() distance = tof.read() tof.stop() return distance# Function to move robot based on distance measurementsdef move_robot(): distance = calculate_distance() print (distance) if distance > 90: # If no obstacle in front servo.duty_u16(calculateAngle(90)) # Set servo to center position # Move robot forward motors.forward() time.sleep(2) motors.stop() else: # If obstacle detected servo.duty_u16(calculateAngle(45)) # Set servo to left position time.sleep(0.5) distance_left = calculate_distance() servo.duty_u16(calculateAngle(135)) # Set servo to right position time.sleep(0.5) distance_right = calculate_distance() if distance_left > distance_right: # back a bit motors.backward() time.sleep(0.7) # Move robot left motors.turnLeft() time.sleep(1) else: # back a bit motors.backward() time.sleep(0.7) # Move robot right motors.turnRight() time.sleep(1)# First, set servo to 90 degreesservo.duty_u16(calculateAngle(90))# Main loopwhile True: move_robot() time.sleep(0.1)
All the files used are attached .
Here's the URLs for the libraries used:
https://www.tomshardware.com/how-to/buzzer-music-raspberry-pi-pico
https://www.coderdojotc.org/micropython/sound/05-play-mario/
VL53L0X is from github - several repositories have it, just search
Overall, I'm really impressed with the Cytron Maker Pi RP2040.
It's a powerful and versatile board that's packed with features and components, making it a great choice for anyone looking to build a robot or other project.
The automatic power selection and built-in LiPo/Li-Ion charger are especially convenient, and the preloaded CircuitPython makes it easy to get started with programming right out of the box. Whether you're a beginner or an experienced maker, the Cytron Maker Pi RP2040 is definitely worth considering for your next project.
Don't get me wrong, this board is really great. But I would love to see some exposed GPIO Pins so I don't have to use a grove connector . Like they have done with the servo PINs, place like 3 or 4 exposed ones to use.
WiFi. They should think about that in a future revision of the board. I
Music by FASSounds from Pixabay
Music by FASSounds from Pixabay
Music by Lofi_hour from Pixabay
Music by BrentinDavis from Pixabay
Music by BrentinDavis from Pixabay


