RoadTest: Sign Up to Roadtest the Cytron MAKER PI RP2040
Author: crisdeodates
Creation date:
Evaluation Type: Development Boards & Tools
Did you receive all parts the manufacturer stated would be included in the package?: True
What other parts do you consider comparable to this product?: Cytron Maker Pi PICO, Pimoroni Inventor 2040 W
What were the biggest problems encountered?: Unavailability of onboard WiFi/BLE for IoT projects, no dedicated GPIO breakout, unavailability of motor driver datasheet in English
Detailed Review:
First of all, I would like to thank rscasny, the roadtest program team, and element14 for giving me this awesome chance to roadtest this amazing product. If you are a robotics freak like me, I am sure you are gonna love the Maker Pi RP2040 kit from Cytron. E14 was kind enough to send me a piece for road testing. The kit (https://www.cytron.io/p-maker-pi-rp2040-simplifying-robotics-with-raspberry-pi-rp2040) is so awesome that you can just plug and play most of the components, code easily using CircuitPython / MicroPython (Python) and Arduino (C++), and get started with your robot already.
Let's have a look at the kit and its components:


So in the box, we have got the following components:
1x Maker Pi RP2040
4x Grove to Female Header Cable
1x Mini Screwdriver
1x Silicone Rubber Base (4 nos)
Now, let's have a look at the Maker Pi RP2040. Maker Pi 2040 (datasheet: https://www.farnell.com/datasheets/3685790.pdf) features a Raspberry Pi RP2040 (datasheet: https://datasheets.raspberrypi.com/rp2040/rp2040-datasheet.pdf, with the following features:

Picture courtesy: Cytron

Picture courtesy: Cytron
Upon unboxing and powering up the kit via USB, the first thing that we see is the execution of the demo code that is shipped with the kit, written in CircuitPython.
It has the following features:
You don't have permission to edit metadata of this video.
Let's check some links to get started.
Link to this roadtest: https://community.element14.com/products/roadtest/rt/roadtests/618/sign_up_to_roadtest_1#pifragment-4106=9&pifragment-4100=4
Maker Pi RP2040 review videos from youtube:
https://www.youtube.com/watch?v=TeFKcoZNV6I&ab_channel=CytronTechnologies
https://www.youtube.com/watch?v=MUz60BY0Co0&ab_channel=LearnEmbeddedSystems
https://www.youtube.com/watch?v=8CXirBVwVoU&ab_channel=CytronTechnologies
https://www.youtube.com/watch?v=RE3KMqO27Wk&ab_channel=ScottBeasley
Cytron Product page: https://www.cytron.io/p-maker-pi-rp2040-simplifying-robotics-with-raspberry-pi-rp2040
Cytron GitHub link: https://github.com/CytronTechnologies/MAKER-PI-RP2040/tree/main
Additional links:
Maker Pi RP2040 sample projects:
Here are some additional links to purchase the Maker Pi RP2040.
This can also vary according to your geographical area.
This board is similar in many ways to yet another kit from Cytron, called the Maker Pi PICO (https://www.cytron.io/p-maker-pi-pico), and is more focused on beginners for learning and prototyping.

Cytron Maker Pi PICO vs Cytron Maker Pi RP2040
Here is the comparison between the Maker Pi RP2040 and Maker Pi PICO.

Picture courtesy: Cytron
The Pimoroni Inventor 2040 W (https://shop.pimoroni.com/products/inventor-2040-w?variant=40053063155795) is a great board which is very similar in features to the Maker Pi RP2040.
It has a compact form factor, C++/ MicroPython support, dual motor driver (DRV8833), and WiFi connectivity.
Amazingly, it also got 6 GPIO breakouts, 2 x Qw/ST connectors, a speaker connection, 12 x addressable RGB LEDs/Neopixels, and battery connectors.
I would believe this is a very strong competitor to the Maker Pi RP2040 as it hosts many features that the latter lacks.

Picture courtesy: Tom's Hardware
Let's have a closer look at the board.

Picture courtesy: Cytron
Vin Terminal: Any power source within the 3.6 - 6V range can be connected.
LiPo Battery Connector: A Single Cell LiPo or a Li-Ion Battery can be connected and rechargeable via USB. The documentation mentions the following: “The battery is protected from overcharged and over-discharged. If the board cannot be turned on when the battery is connected, please charge the battery to activate the battery protection circuit.”
Power LED: It is turned ON when the board is powered up and the ON/OFF switch is in the ON position.
On/Off Switch: This can be used to turn the kit on or off. This is a handy feature for hobbyists.
Debug Port: This is connected to the debugging port on the RP2040 SoC.
Micro USB Port: This USB port can be used for uploading programs from a PC via CircuitPython, Arduino, etc. It also doubles up as a power source for the board.
Reset Button: This button can be pressed to reset the RP2040.
Boot Button: Press and hold this button while resetting the RP2040 will enter the bootloader mode. This can be used to load the MicroPython / CircuitPython or custom C/C++ firmware very easily via a mounted drive that is enabled in this mode.
Grove Ports: This can be used to connect to the extensive variety of Grove modules available. There are 7 Grove Ports and each port can be used for multiple functions.
| Grove Port | GPIO | PWM | SPI | I2C | UART | Analog |
| 1 | 0 | PWM0-A | SDI0 | SDA0 | TX0 | - |
| 1 | PWM0-B | CSn0 | SCL0 | RX0 | - | |
| 2 | 2 | PWM1-A | SCK0 | SDA1 | - | - |
| 3 | PWM1-B | SDO0 | SCL1 | - | - | |
| 3 | 4 | PWM2-A | SDI0 | SDA0 | TX1 | - |
| 5 | PWM2-B | CSn0 | SCL0 | RX1 | - | |
| 4 | 16 | PWM0-A | SDI0 | SDA0 | TX0 | - |
| 17 | PWM0-B | CSn0 | SCL0 | RX0 | - | |
| 5 | 6 | PWM3-A | SCK0 | SDA1 | - | - |
| 26 | PWM5-A | - | SDA1 | - | ADC0 | |
| 6 | 26 | PWM5-A | - | SDA1 | - | ADC0 |
| 27 | PWM5-B | - | SCL1 | - | ADC1 | |
| 7 | 7 | PWM3-B | SDO0 | SCL1 | - | - |
| 28 | PWM6-A | - | - | - | ADC2 |
RGB LEDs: They are WS2812 intelligent control LED lights and are user-programmable. The only drawback is that both of them are connected to GP18 and hence cannot be controlled individually.
Programmable Buttons: Both the programmable buttons connected to GP20 and GP21 are accessible from the user program.
Piezo Buzzer: It is connected to GP22 and can be used to play tone or melody.
Buzzer Mute Switch: This can be used to mute the piezo buzzer.
GPIO Status LEDs: These are connected to the Grove ports and can act as LED indicators. These will turn on when the corresponding GPIO state is high.
Motor Test Buttons: These are a very good addition to this kit. These buttons can be pressed to test the functionality of the motor driver. Also, these can simulate the motor control signals without the need for connecting actual motors. They are very helpful in testing. By default, motors will run at full speed.
Servo Ports: These are the connectors for 4 x RC servo motors. Their corresponding signals are connected to GP12, GP13, GP14, and GP15 respectively. For the servos, the V+ voltage is equal to the power source voltage.
Motor Status LEDs: They will automatically turn on when the motor is running. They are very useful for motor control simulation and testing.
DC Motor Terminals: They connect to the motor terminals. The motor voltage at full speed is equal to the power source voltage and the motor direction is dependent on the polarity of the signal at the terminals. M1A is connected to GP8, M2A is connected to GP10, M1B is connected to GP9, and M2B is connected to GP11. The maximum DC Motor Current (Per Channel) is 1A continuous and 1.5A peak. The DC Motor Driver's PWM Frequency is 20KHz.
|
Input A |
Input B |
Output A |
Output B |
Motor |
|
(GP8 / GP10) |
(GP9 / GP11) |
(M1A / M2A) |
(M1B / M2B) |
|
|
Low |
Low |
Low |
Low |
Brake |
|
High |
Low |
High |
Low |
Forward* |
|
Low |
High |
Low |
High |
Backward* |
|
High |
High |
Hi-Z (Open) |
Hi-Z (Open) |
Coast |
* Please note that the actual motor direction is depending on the motor connection. Swapping the connection (MxA & MxB) will reverse the direction of the motors.
INFO: The motor driver is the MX1515H driver, manufactured by Sinotech Mixic Electronics. It is a dual-channel DC motor driver.
Datasheet: https://datasheetspdf.com/pdf/909509/SinotechMixicElectronics/MX1515/1
Here I will walk you through the setup to program the Maker Pi RP2040 via CircuitPython and Arduino.
The board comes pre-configured with CircuitPython firmware and has a demo code.
CircuitPython is developed by Adafruit and they have a plethora of resources (https://learn.adafruit.com/welcome-to-circuitpython/installing-circuitpython) to manage and update the firmware.
In short, the steps are as follows:
Arduino IDE (https://www.arduino.cc/en/software) is required for this method of programming.
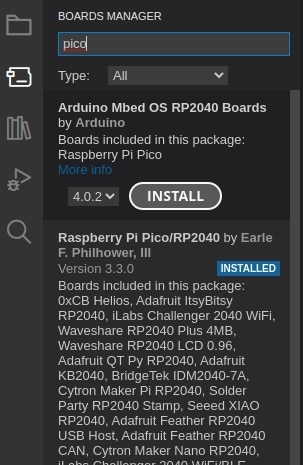
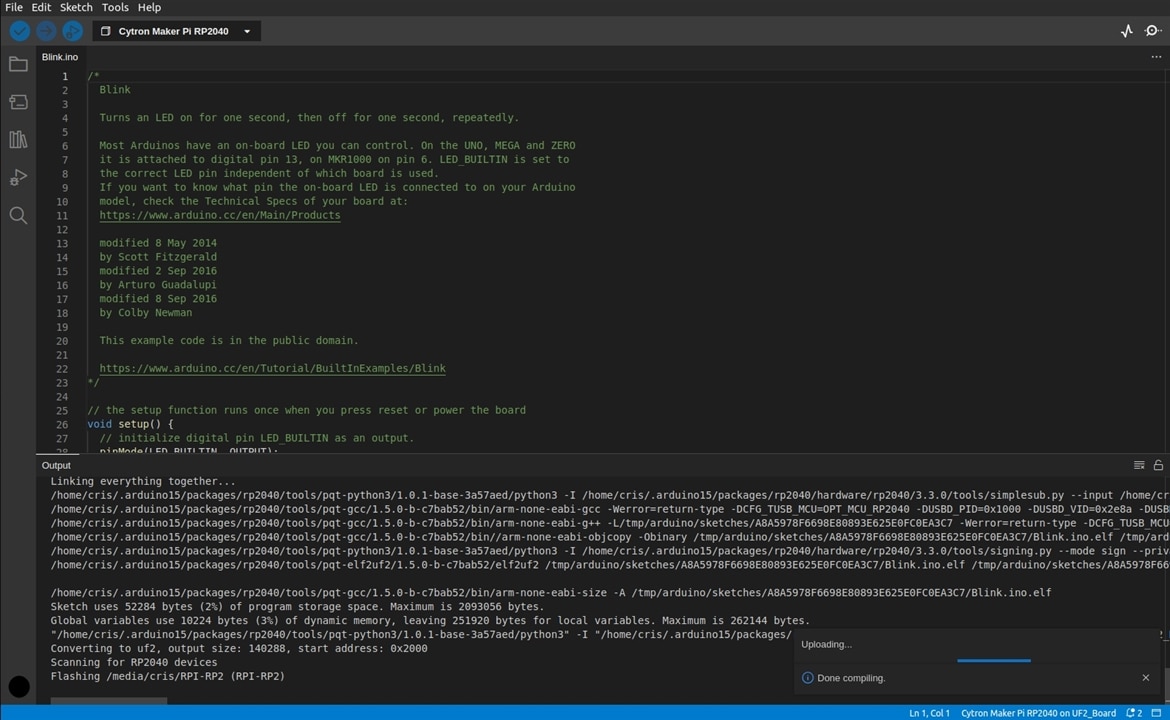
Since we don't have official Arduino support for the Maker Pi RP2040, we will follow the steps based on Arduino Pico a.k.a Raspberry Pi Pico Arduino core (https://github.com/earlephilhower/arduino-pico), which is a port of the RP2040 to the Arduino ecosystem.
The steps are as follows:


Here we will test the interfacing of Maker Pi RP2040 with various sensors and actuators. Due to my current setup and resource limitations, I am not able to do an extensive hardware test. However, I will be able to perform the same soon and will be updating the road test as it is completed.
The demo code shipped with the Maker Pi RP2040 is already capable of driving the servo back and forth between 0 and 180 degrees.
The video depicts the corresponding servo rotation when the buttons corresponding to GP20 and GP21 are pressed.
As mentioned prior, the Maker Pi RP2040 comes with an inbuilt piezo buzzer capable of producing melody tunes in different octaves.
Some sample tests that were performed are provided below.
Here I used CircuitPython and the simpleio python package to drive the piezo buzzer across various tones and octaves.
I also programmed the GPIO Status LEDs to act as a chaser circuit based on the strength of the tone. ENJOY
Here I again used CircuitPython and the simpleio python package to drive the piezo buzzer across various tones and octaves.
I also programmed the GPIO Status LEDs to act as a chaser circuit based on the strength of the tone. ENJOY
The Maker Pi RP2040 is capable of interfacing with the vast array of Grove sensors available.
Though I am yet to test these, they will be completely interfaced and will be updated soon.

The Maker Pi RP2040 was a very fun and interesting board to work with. The readily available out-of-the-box CircuitPython programming will allow anyone to directly jump into using and tinkering with the kit. This allows a robotics project to be realized with little to no effort. The availability of good documentation is also a plus as it allows in-depth programming and interfacing. The peripheral interfacings are also well set.
The major pros and cons of the kit are summarized below.
I would like to continue tinkering with the Maker Pi RP2040 and use it for some more interesting robotics projects. Although my current work setup doesn’t allow it to be completed immediately, it will be done in due time.
I would also like to set up the kit with micro-ROS (https://micro.ros.org/) and use it in the upcoming project.