RoadTest: Enroll to Review the Nordic nPM1300 Power Management IC Eval Kit
Author: Fred27
Creation date:
Evaluation Type: Development Boards & Tools
Did you receive all parts the manufacturer stated would be included in the package?: True
What other parts do you consider comparable to this product?: There are various PMICs available from most semiconductor manufacturers (e.g. TI, NXP, Microchip)
What were the biggest problems encountered?: Inability to profile a battery without the mysterious nPM Fuel Gauge board
Detailed Review:
Unboxing the nPM1300 EK was a simple affair, and as far as I'm concerned that's a good thing. The small cardboard box in the "usual" Nordic style contained nothing more than the Evaluation Kit board in an anti-static bag. There was no USB cable to add to the pile of random landfill USB cables. There wasn't even a little "getting started" card - just a link printed on the cardboard box. I like this minimal no-waste approach and think more manufacturers should aim for this. As there was nothing but the PCB inside, I don't even think an unboxing photo is really needed.
However, at the risk of contradicting myself, this kit is all about batteries and one thuing conspicuously missing was a suitable compatable battery. Luckily, I recently road tested the nRF5340 Audio DK and that - perhaps somewhat unnecessarily - came with a 3-pin 3.7V Lithium Ion battery including a NTC thermistor. This appeared to be an ideal compliment to the nPM1300. The only question is why one wasn't included in this battery-focused kit but was included with a Bluetooth Audio one. Anyway, more on this battery later...
First things first - time to look through the online getting started guide which prompts you to connect a USB cable for power, a battery (not supplied), and a second USB cable for communication. There is a little note about earlier kits not working with USB-C to USB-C cables and a quick check revealed that the supplied board was indeed a earlier version that requires USB-A to USB-C. I was grateful for the heads-up as I was indeed about to connect using USB-C on my PC. I initially found it surprising that Nordic would suppl an older version for a road test, but then again I suppose that it's better than a paying customer getting an older board. To be honest, the differences are minimal anyway. There was a fix for the USB-C issue for v1.0.0 and an update to the nPM1300 revision for v1.1.0.
The next steps are to install the toolchain. I've moaned a bit about this in the past but things do seem a bit smoother now. There is a lot to install though - first nRF Connect for Desktop, then nPM PowerUP. A bit later when using a host microcontroller board you'll also need the Tolchain Manager, the nRF Connect SDK and Visual Studio Code, There may be a lot, but it all installs fairly smoothly these days.
Once you have nPM PowerUP installed, you can experiment with the Evaluation Kit. The first thing I was prompted to do is to update the firmware on the nPM5340 that resides on the nPM1300 board.

This nRF5340 is in charge of the nPM1300 in much the same way as it could be in your own design. It manages the PMIC and then passes data back-and-forth to the nice nPM PowerUP GUI. Essentially, this means that anything nPM PowerUP can do, you can do in your own design. I think this is a nice way to demonstrate all the features you could include in your own product.
You're prompted to select the attached evaluation kit - just in case you have more than one - and then to select an "active battery model". I picked the closest which was the LP803488 at 1518.18mAh. A quick google showed this is a fairly standard battery with a nominal capacity of 1350mAh. I must admit that I was a bit surprised that the LP803450 with a nominal capacity of 1500mAh that came with the nRF5340 Audio DK isn't listed. The one I selected seemed close enough for now though. I wasn't after accurate fuel gauge readings - just to get used to the board.
 I enabled battery charging at a very low 32mA and as you can see I was presented with a state of charge and a time to full. The 15hrs shown is probably right, as obviously this was barely a trickle. Once I cranked it up to a more sensible 500mA the charge time was more reasonable. It's good to know that all this is under software control from whatever microcontroller you attach to the nPM1300.
I also tried removing the USB power connection. This simulated what would happen if your battery powered device was not plugged in to USB power. The second USB connection is only used for communication between the on-board microcontroller and the GUI. As expected, in this case all features related to charging are disabled. and this is status panel displayed on screen.
At this point I decided to see if it was possible to create a better profile for my battery. It was possible to change the active profile to select from one of the included profiles and this did indeed change certain parameters such as the percentage remaining, but not in a predictable way.
I tried clicking "Write Battery Model" and this seemed to do something, but it just got stuck in an endless state of "downloading chunk X of 0". I assume this would be where the mysterious nPM Fuel Gauge board would be profile the battery. This board is mentioned in the documentation a few times but is not available to purchase. Apparently it's available as a sample if you contact your local Nordic representative. I can see that perhaps this board doesn't need to be supplied with the nPM1300 EK, but maybe it would have made sense to provide it - even on loan - for this road test, especially as there isn't any documentation on it.


It seems that a detailed battery profile is out of scope for this road test, so I thought I'd at least modify an existing model to say that I have "one of those, but 1500mAh". That should be close enough for testing, even if it falls short of a full profile for a commercial product. However, this didn't seem possible either. I could add a new "project" in nPM PowerUP and could specify a capacity, but this seemed to be unusable without a full battery profile.
This leads us to a bit of an issue - even for basic use. Unless you happen to have exactly one of the batteries listed - and this doesn't include the one supplied with the nRF5340 Audio DK - then you're out of luck. You can't create any sort of profile without the separate and unobtainable nPM Fuel Gauge board. The ability to at least select a standard Li-Ion battery of a specified capacity would extend the use of this board greatly.
A major feature of the nPM1300 EK, is to help you create the code that you can then run on an external microcontroller. Naturally, Nordic's devices are well supported, although there woudl be noting stopping you doing some porting and using any microcontoller that an I2C interface and some GPIO - i.e. pretty much all of them. I briefl wondered whether it woudl be possible to create code that would run on the on-board nRF5340 rather than connecting a separate development kit. It's probably possible but would risk bricking your nPM1300 EK. Anyway. connecting this board to a nRF5340DK is well documented.
Perhaps it's a little too well documented! I got to teh section of the getting started guide that deals with connecting the nRF5340, but had a feeling that wasn't all of it. I eventually tracked down some better documentation that I'd seen when applying for this road test. This was in to Info Center. However, even this had some minor discrepencies between the text and the diagram. For instance, the diagram does not show the SHPHLD connection. There's even a third set fo documentation here.
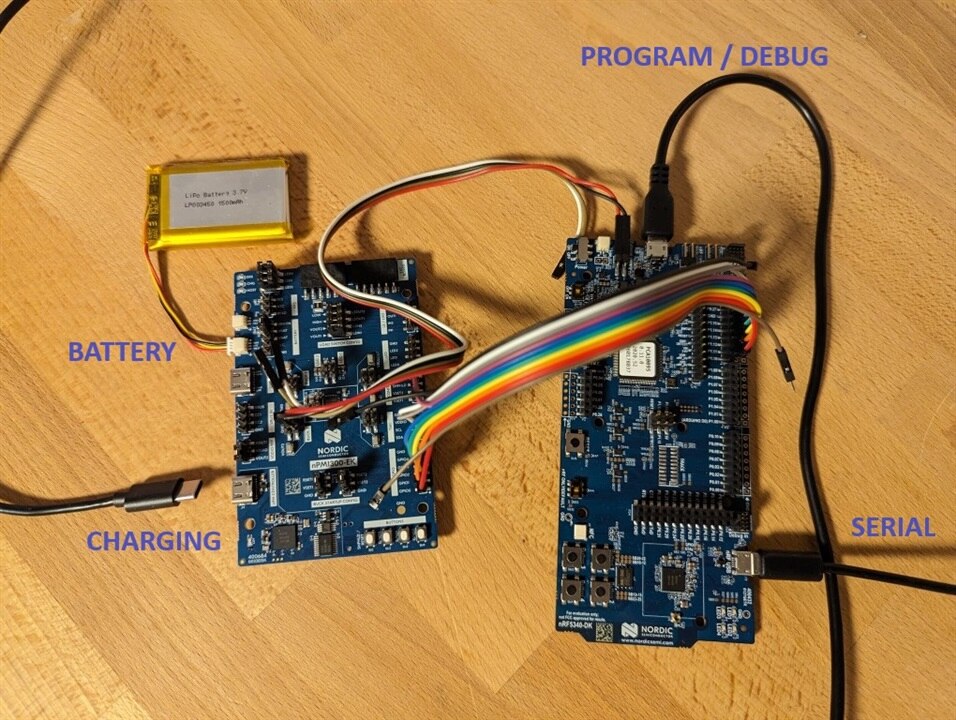
To be honest, they're all adequate, but it's confusing to find 3 sets of slightly different documentation. In the end I wired thing up as per the InfoCenter diagrams, including the GPIO and SHPHLD connections. Here's how it looked:
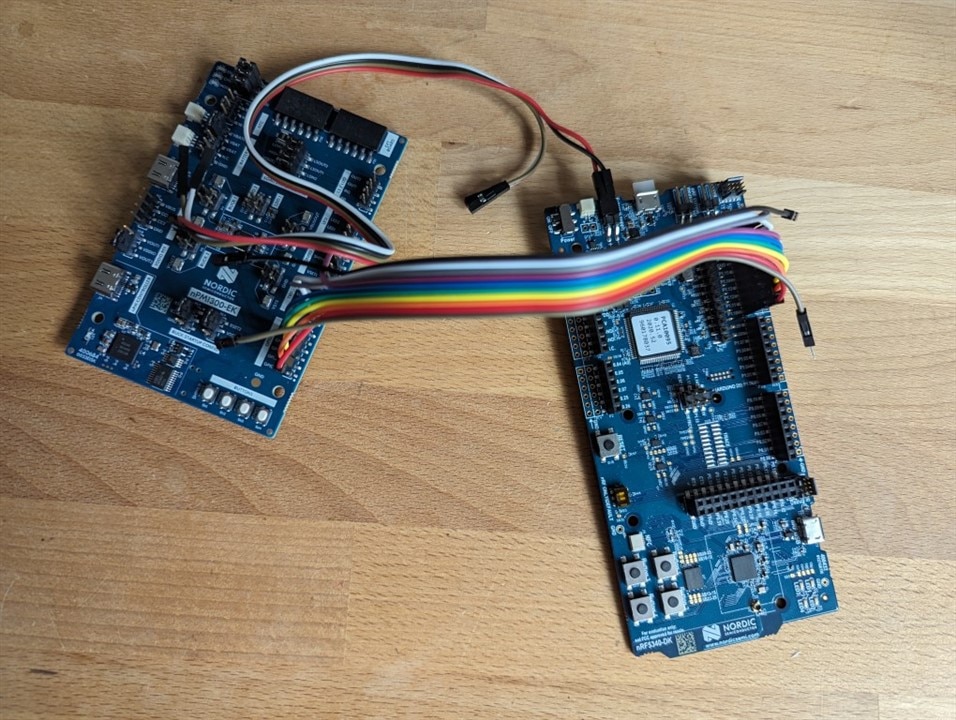
So, once the hardware was connected, it was time to look at the software, Once you have the toolchain up and running it is fairly easy to create a project from the nrf_fuel_guage example that comes with the latest SDK. This came with some default battery data already present so it compiled easily and I was ready to run it on the nRF5340DK. As the example project uses a serial port to report back on what's happening with the nPM1300, I needed to connect 2 micro USB cables - one for programming and debugging the microcontroller, and another as a USB serial port. With only a minor delay whilst I guessed which one of the serial ports was the right one, I was up and running. The sample application happily popped up "Charger device not ready" on the serial port and stops...
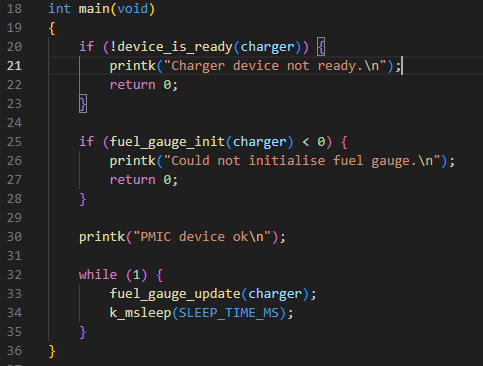 Of course, this is completely correct. I'm happily running the code on the nPM5340 but it is expecting that the nPM1300 to be providing power. There would be no point powering this from the nRF5340 DK as that would rather defeat the point of a Power Management IC! This is the main function of the sample application, so you can see that it does nothing unless it finds a happy nPM1300 to talk to.
I added a third USB cable - this time USB-C power only from a phone charger I had handy. Re-running the sample and I had some more meaningful output. The code runs in a loop and every second gives a report from the PMIC. This is what I saw:
V: 0.019, I: 0.000, T: -88.12, SoC: -5.00, TTE: nan, TTF: nan
V: 0.019, I: 0.000, T: -88.12, SoC: -5.00, TTE: nan, TTF: nan
V: 0.019, I: 0.000, T: -88.12, SoC: -5.00, TTE: nan, TTF: nan
...etc.
Well, that's certainly better than coming to a stop, but it didn't really seem right - a battery voltage of 0.019V, no current, a negative State of Charge and no idea when the battery would be full or empty....
The battery! Of course. After sorting out the mass of wires between the boards and the 3 USB cables I'd forgotten to connect the battery! The nPM1300 has been configured to supply the microcontroller with the required 3.3V whether it comes from the battery or USB and it is doing so. Power regulation is one part of its feature set and it's managing this just fine. However, the application is a fuel guage application and it correctly reporting that there's nothing going on.
Once I'd re-connected the same battery I'd been using earlier with nPM PowerUP the values made a lot more sense. The battery voltage was a mroe senible 3.994V, there was 128mA flowing into it, it has about 65% SoC and rising. That's lookng correct. However, as the capacity of the example battery is unlikely to match the one I'm using the Time To Full of about 40 minutes is probably incorrect.
V: 3.994, I: -0.128, T: 22.86, SoC: 65.60, TTE: nan, TTF: 2384
V: 3.994, I: -0.128, T: 22.76, SoC: 65.61, TTE: nan, TTF: 2385
V: 3.994, I: -0.128, T: 22.76, SoC: 65.63, TTE: nan, TTF: 2385
V: 3.994, I: -0.128, T: 22.76, SoC: 65.64, TTE: nan, TTF: 2385
V: 3.989, I: -0.128, T: 22.76, SoC: 65.65, TTE: nan, TTF: 2385
V: 3.989, I: -0.128, T: 22.76, SoC: 65.66, TTE: nan, TTF: 2385
V: 3.994, I: -0.128, T: 22.76, SoC: 65.68, TTE: nan, TTF: 2385
When I unplugged the USB-C supply being used to charge the battery, the display changed appropriately.
V: 3.955, I: 0.000, T: 22.55, SoC: 72.49, TTE: nan, TTF: nan
V: 3.955, I: 0.000, T: 22.55, SoC: 72.49, TTE: nan, TTF: nan
V: 3.945, I: 0.000, T: 22.45, SoC: 72.43, TTE: nan, TTF: nan
V: 3.945, I: 0.000, T: 22.55, SoC: 72.38, TTE: nan, TTF: nan
V: 3.945, I: 0.000, T: 22.55, SoC: 72.33, TTE: nan, TTF: nan
The battery voltage and state of charger is now dropping slightly. There seems to be a negligible current draw. I'm sure if there was a bit more current being pulled then the Time To Empty would show something.
Once this was up and running I decided to take a look around the sample project. Firstly, there is a file called config.overlay. Whilst there is a default one with the project, this can be replaced by one you export from nPM PowerUP. Inside is configuration for the regulators, load switches, GPIO and LEDs. Any configuration you define using nPM PowerUP can easily be copied into your project.
A second interesting looking file is battery_model.inc. Whilst I wasn't able to create my own battery model, I assume this is the final output. It contains some arrays of number - obscurely labelled param1 to param12 and also a few temperatures and a name for the battery. I discovered thatparam1 seemed to be 0 to 1 on 200 steps of 0.005 (i.e. 0.5%). param2 seemed to be from 2.99 to 4.199 which look like a reasonable range for a nominal 3.7V LiIon battery. This gave me some hope that perhaps the file could be easy enough to amend to create the "rough" battery profile I'd been hoping to generate earlier. However, as param 2 has only 122 values and there was nothing in the other parameters resembling a capacity in mAh, I decided that messing around with this wasn't sensible.
I also thought it might be useful to delve into the code behind nrf_fuel_gauge_process() function as this will be taking raw battery data (voltage, current, temperature, etc.) and using the battery_model.inc data to generate a State of Charge. However, this function is compiled into a static library so not accessible. I think it's safe to say that if you want any useful SoC data then you'll need the nPM fuel gauge board to profile your battery.
Update: I managed to find some more info on the Fuel Gauge software here. I seems that the pre-compiled algorithm can run on the usual set of Nordic devices, and perhaps if you ask nicely you'll be given something that will run on other microcontroller.
"The fuel gauge algorithm can run on Nordic host SoCs (nRF52, nRF53, nRF54, and nRF91 series) to ensure an accurate estimation of the battery state of charge by controlling and retrieving measurement information from nPM1300 through Two-wire Interface (TWI) communication. Other non-Nordic SoCs can also be used. Contact your local Nordic sales representative for more information."
I also managed to discover that the example battery model provided is for the LP302535 - listed as 273.95mAH in the Power UP application.
There also appears to be a second sample application available for the nPM1300 - one that demonstrates how to select power modes, including setting the device into its "ship mode" state. This is intended to use the lowest power possible whilst the attached microcontroller is off, but still allow the device to be switched on with a button press. Unfortunately, whilst the documentation for this is available here, it doesn't appear in any of the available SDKs that can be downloaded via the Toolchain Manager - latest v2.5.2 at time of wrting. I assume that it's present in a beta version of the SDK - listed as 2.5.99 - but I'm not sure how to install this and I'd rsther not break my installation as it was a bit convoluted to install.
I like the nPM1300. It seems like a flexible and powerful PMIC. The nPM1300 EK also seems like a great board for prototyping and evaluating the device, although to get the best out of it I would really recommend you pairi it with one of Nordic compatible microcontroller development kits such as the nRF5340DK ,nRF52840DK or (if cellular is your thing) the nRF9160DK.
There are only a couple of things that bothered me. Mainly, it's the fact that you can't really get any accurate information about the battery State of Charge or Time To Full/Empty unless you have the mysterious and unavailable nPM Fuel Guage board. I understand that if you were producing a commercial product and had a contact at Nordic it's probably not a big deal. However, if that's not the case then the fual guage features aren't really any use. I feel this could be easily mitigated by being able to generate a generic Li-Ion profile for a known capacity. It might not be perfect but I'm sure it would be useful enough.
The other thing that might improve the Evaluation Kit would be supplying a battery that matched a provided profile. It seems odd that a battery is supplied with the nRf5340 Audio DK where it's not essential but not with this kit.
These are both fairly minor points though. If you're after a PMIC for a battery powered device then the nPM1300 is a great choice. And if you want to evaluate the nPM1300 then this Evaluation Kit - matched with the excellent nPM Power UP software - does a great job of evaluating its features.


